Excel is a ubiquitous tool, used for everything from simple tabular-format databases to complex statistical analyses. In fact, it is so widely used that in some cases it makes perfect sense to be able to save your application’s data out to a workbook so users can easily work with it in Excel.
Carlos Aguilar Mares of Microsoft, formerly on the ASP.NET development team for .NET 2.0, has developed two tools that make it very simple to get your application’s data into Excel using its XML workbook format. ExcelXmlWriter is a freely available DLL with a rich API supporting many of Excel’s advanced features, such as pivot tables, sorting, and filtering. ExcelXmlWriter.Generator is a utility that will quickly generate the logic necessary to reverse-engineer an existing Excel file, with all its data and formatting intact. The Generator drastically cuts the time needed to build code for using complex workbooks.
Mares’s tools are completely standalone; you don’t need to have Excel or Office on the system hosting your application.
Tool | ExcelXmlWriter |
Version covered | 1.0.0.6 |
Home page | |
Power Tools page | |
Summary | Generate Excel files from any data source. Online code-generation tool greatly simplifies creation of classes. |
License type | Freeware, no specific license |
Online resources | |
Supported Frameworks | .NET 2.0 |

Download the tool from its home page. The distribution is a .zip file containing an assembly you’ll need to reference in your application. The ExcelXmlWriter.Generator application is a standalone app that you can drop in any convenient directory. Mares’s tools also include an API documentation help file, which you can download from his web site.
XML-based workbooks have been supported in Microsoft Excel since Office XP. ExcelXmlWriter capitalizes on this capability by exposing an API that handles writing out the XML structure based on Microsoft’s Office XML schema.
Tip
Office versions before XP won’t be able to use workbooks created by ExcelXmlWriter because they don’t support the XML file format.
The easiest way to get rolling with ExcelXmlWriter is to use the ExcelXmlWriter.Generator application to reverse-engineer an existing workbook. Start by making an Excel sheet with mocked-up data. Get all the formulas, sorting, and formatting set up as you’d like. Figure 4-23 shows an example spreadsheet based on data pulled from the omnipresent Northwind sample database via a three-table query.
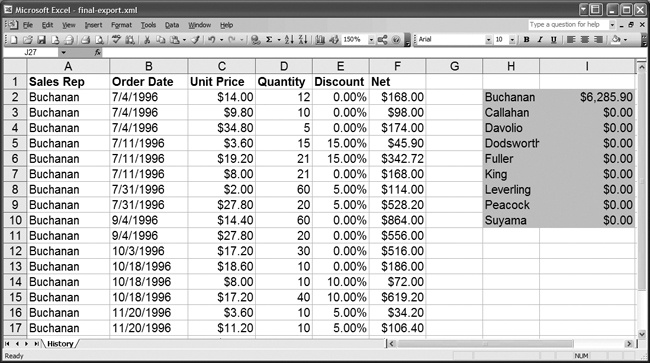
Columns A through E are values straight from various tables in the Northwind sample database. Column F is a formula that computes net sales and takes into account any discounts that may have been applied. Columns H and I are summary fields, with column I using a SUMIF function to gather up each sales rep’s total sales.
Tip
Just mock up a few rows of data; you’ll only need enough to get a feel for how the Generator builds code using ExcelXmlWriter’s API. Too many rows will slow down code generation and needlessly bloat the generated class.
ExcelXmlWriter will also support additional details in Excel files, such as fields listed under File → Properties and default printers if they are set.
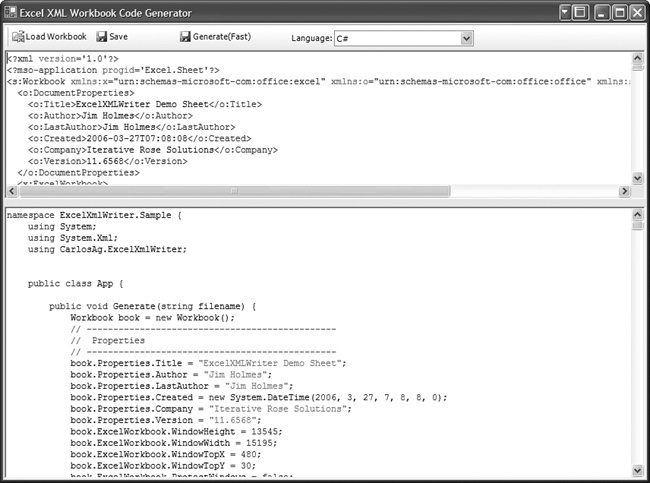
Save your mocked-up file as an XML workbook using File → Save As, making sure to select “XML Spreadsheet (*.xml)” as the type. Next, run the ExcelXmlWriter.Generator tool and use it to load the XML file you just created. Figure 4-24 shows the Generator after it’s finished loading the XML spreadsheet. The top pane shows the source XML and the bottom shows the generated code.
You can either save the content as a separate class file or copy it over to an existing file in your code editor. You can then use this file in your Windows Forms or Console application solution, or in a code-behind for an ASP.NET project.
The class created by the Generator is broken into three methods:
Generate( )A public method managing creation of the workbook
GenerateWorksheet1( )A private method building the content of the sheet
GenerateStyles( )A private method creating style elements for the sheet
Output from the Generator can be quite lengthy. The simple worksheet shown in Figure 4-23 resulted in 611 lines of code—and that’s without wiring in any data source!
Despite the code size, the generated code shows the flexibility of ExcelXmlWriter. For example, it’s a simple matter to set information one usually sees in Excel’s File → Properties menu. First, create a workbook:
Workbook book = new Workbook( );
Then use the Properties collection to set information such as the author’s name and company:
book.Properties.Author = "Jim Holmes";
book.Properties.Company = "Iterative Rose Solutions";
The basic flow of building an XML file continues in a sensible pattern. First set up the styling you’ll need for the finished product. The Generator’s reverse-engineering creates the style objects for you, but they’re rather obscurely named—a byproduct of automated code generation. To increase readability and ease maintenance hassles down the road, think about renaming styles such as s22 to something clearer in your code. For example, this snippet:
WorksheetStyle s22 = styles.Add("s22");
s22.Alignment.Vertical = StyleVerticalAlignment.Bottom;
s22.NumberFormat = "Short Date";
Would read much better transformed to something like:
WorksheetStyle dateStyle = styles.Add("dateStyle");
dateStyle.Alignment.Vertical = StyleVerticalAlignment.Bottom;
dateStyle.NumberFormat = "Short Date";
With styling set up, move on to creating the framework of a worksheet to put your data in. The following snippet creates a Worksheet and builds the sheet’s header row by adding WorksheetCell objects to a WorksheetRow. Each cell’s data type is specified as a string because the header row contains labels, not actual data:
Worksheet sheet = sheets.Add("History");

WorksheetRow headerRow = sheet.Table.Rows.Add( );
headerRow.Cells.Add("Sales Rep", DataType.String, "headerStyle");
headerRow.Cells.Add("Order Date", DataType.String, "headerStyle");
headerRow.Cells.Add("Unit Price", DataType.String, "headerStyle");
headerRow.Cells.Add("Quantity", DataType.String, "headerStyle");
headerRow.Cells.Add("Discount", DataType.String, "headerStyle");
headerRow.Cells.Add("Net", DataType.String, "headerStyle");
Next, create columns and apply the styles defined earlier. You can also set each column’s width:
WorksheetColumn salesRep = sheet.Table.Columns.Add( );
salesRep.Width = 70;
salesRep.StyleID = "defaultStyle";

WorksheetColumn date = sheet.Table.Columns.Add( );
date.Width = 66;
date.StyleID = "dateStyle";
WorksheetColumn objects also let you span formatting to adjacent columns, specify whether a column is hidden, or even hardwire the column’s position via the Index property. Continue adapting the Generator’s output to meet your own needs. You’ll also want to get rid of the data the Generator hardwired in. Delete WorksheetRow and cell statements that set up an entire row’s worth of data, such as the following:
WorksheetRow Row1 = sheet.Table.Rows.Add( );
WorksheetCell cell;
cell = Row1.Cells.Add( );
cell.Data.Type = DataType.String;
cell.Data.Text = "Buchanan";
cell = Row1.Cells.Add( );
cell.Data.Type = DataType.String;
cell.Data.Text = "7/4/1996";
cell = Row1.Cells.Add( );
cell.Data.Type = DataType.Number;
cell.Data.Text = "14";
cell = Row1.Cells.Add( );
cell.Data.Type = DataType.Number;
cell.Data.Text = "12";
cell = Row1.Cells.Add( );
cell.Data.Type = DataType.Number;
cell.Data.Text = "0";
cell = Row1.Cells.Add( );
cell.Data.Type = DataType.Number;
cell.Data.Text = "168";
cell.Formula = "=IF(RC[-1] > 0,RC[-3] * ((1 - RC[-1])) * RC[-2], RC[-3]*RC[-2])";
cell = Row1.Cells.Add( );
cell.StyleID = "s26";
cell.Data.Type = DataType.String;
cell.Data.Text = "Buchanan";
cell.Index = 8;
cell = Row1.Cells.Add( );
cell.StyleID = "s26";
cell.Data.Type = DataType.Number;
cell.Data.Text = "6285.9";
cell.Formula = "=SUMIF(C[-8],\"Buchanan\",C[-3])";
Once you’ve created and styled all of your columns, you can move on to wiring in a dynamic data source. Get some real data by loading up a DataTable from several Northwind tables:
public System.Data.DataTable GetAllEmployeesSalesHistory( )
{
    string sel = @"select employees.lastname, orders.orderdate, " +
            "[order details].unitprice, [order details].quantity, " +
            "[order details].discount from employees, orders, [order details]" +
            "where [order details].orderid = orders.orderid AND " +
            "employees.employeeid = orders.employeeid "+
            "order by employees.lastname";

    DataTable history = new DataTable( );
    string connString = "Persist Security Info=False;Integrated
            Security=SSPI;database=Northwind;server=(local);"
    SqlConnection conn = new SqlConnection(connString);
    try
    {
        SqlCommand cmd = new SqlCommand( );
        SqlDataAdapter adapter = new SqlDataAdapter(sel, conn);
        adapter.Fill(history);
    }
    catch (SqlException e)
    {
        System.Console.WriteLine("Error: " + e.Message);
    }

    return history;
}
Now you can add a method to load data from that DataTable into your new workbook:
/// <summary>
/// Loads data from the history DataSet into the workbook.
/// </summary>
/// <param name="book">The Excel workbook.</param>
/// <param name="data">The history data.</param>
private void LoadData(Workbook book, DataTable data)
{
    // reps is a private member ArrayList holding sales reps' last names
    reps = new ArrayList( );
    WorksheetRow sheetRow;
    WorksheetCell cell;

    foreach (DataRow tableRow in data.Rows)
    {
        // create a new row
        sheetRow = book.Worksheets["History"].Table.Rows.Add( );

        // last name
        cell = sheetRow.Cells.Add( );
        cell.Data.Type = DataType.String;
        cell.Data.Text = tableRow[0].ToString( );

        // add rep names if they're not in already
        if (! reps.Contains(tableRow[0]))
        {
            reps.Add(tableRow[0]);
        }

        // date of sale
        cell = sheetRow.Cells.Add( );
        // Note this is type *string*. Setting a *cell* to DateTime causes load
        // errors in Excel. The *column's* type is set as DateTime in the
        // spreadsheet itself, so everything works just fine.
        cell.Data.Type = DataType.String;
        DateTime date = Convert.ToDateTime(tableRow[1].ToString( ));
        cell.Data.Text = date.ToShortDateString( );

        // unit price
        cell = sheetRow.Cells.Add( );
        cell.Data.Type = DataType.Number;
        cell.Data.Text = tableRow[2].ToString( );

        // quantity
        cell = sheetRow.Cells.Add( );
        cell.Data.Type = DataType.Number;
        cell.Data.Text = tableRow[3].ToString( );

        // discount
        cell = sheetRow.Cells.Add( );
        cell.Data.Type = DataType.Number;
        cell.Data.Text = tableRow[4].ToString( );

        // Net sales -- calculated
        // Unit cost less any discount times quantity sold
        cell = sheetRow.Cells.Add( );
        //Note R1C1 cell reference type!
        cell.Formula =
                "=IF(RC[-1] > 0,RC[-3] * ((1 - RC[-1])) * RC[-2], RC[-3]*RC[-2])";
    }
}
Finally, you can deal with the Summary History section of the report, which sums net sales for each sales rep:
/// <summary>
/// Creates the history report section.
/// </summary>
/// <param name="sheets">The sheets in the Workbook.</param>
private void CreateHistoryReportSection(WorksheetCollection sheets)
{
    // reps is a private member ArrayList holding sales reps' last names
    reps.Sort( );

    WorksheetRow row;
    WorksheetCell cell;
    string repName;

    Worksheet history = sheets["History"];
    WorksheetColumn repCol = history.Table.Columns.Add( );
    repCol.Width = 80;
    repCol.Index = 8;

    WorksheetColumn figures = history.Table.Columns.Add( );
    figures.Width = 80;
    figures.Index = 9;

    row = history.Table.Rows[0];
    // blank cell to get alignment right
    row.Cells.Add( );
    row.Cells.Add("Sales Rep", DataType.String, "headerStyle");
    row.Cells.Add("Total Sales", DataType.String, "headerStyle");

    for (int i = 0; i < reps.Count; i++)
    {
        row = history.Table.Rows[i + 1]; // offset one row down
        repName = reps[i].ToString( );
        // add and style the rep's name
        row.Cells.Add( );
        cell = row.Cells.Add(repName);
        cell.StyleID = "reportStyle";
        // add a cell and include the summing formula
        cell = row.Cells.Add( );
        cell.Formula = "=SUMIF(C[-8],\"" + repName + "\",C[-3])";
        cell.StyleID = "reportStyle";
    }
}
You’re now ready to make use of this class in an application. Create the class and call the Generate( ) method, passing it a filename for the workbook. Running the application will leave you with an XML file ready to be loaded into Excel.
Get Windows Developer Power Tools now with the O’Reilly learning platform.
O’Reilly members experience books, live events, courses curated by job role, and more from O’Reilly and nearly 200 top publishers.

