To be completely blunt, the world of Windows 8 is tailored for touchscreens. You can do everything with a keyboard and a mouse, but Microsoft saved the choicest pleasures for tablets and touchscreens. For example, the Charms bar (right edge) and app switcher (left edge) are positioned where your thumbs are when you’re holding a tablet.

Figure 1-7. Top: This master diagram shows all the different ways you can swipe on a touchscreen, and all the different panels and options they produce. (The app switcher, closing apps, and splitting the screen are described in Chapter 3.) Bottom: This master diagram shows the equivalent gestures if you have a mouse.
The proof is the long list of gestures (Figure 1-7) that do things in Windows 8—special finger-on-glass movements that open important panels and do important things. There are keyboard-and-mouse equivalents, but finger on glass is almost always quicker and easier.
You’ll need to know these techniques whether you have a touchscreen or not, because the panels and options they open are essential to using your computer.
Tip
Every laptop that came with Windows 8 also has a multitouch trackpad. All the gestures described in this book for touchscreens (pinch, swipe, and so on)—you can also perform on the trackpad itself. (Some older models have multitouch trackpads, too.)
The Charms bar (Figure 1-8) is new in Windows 8. It’s a vertical panel that pops out of the right side of the screen, no matter what you’re doing on the computer or what program is open.
Here’s how to open the Charms bar:
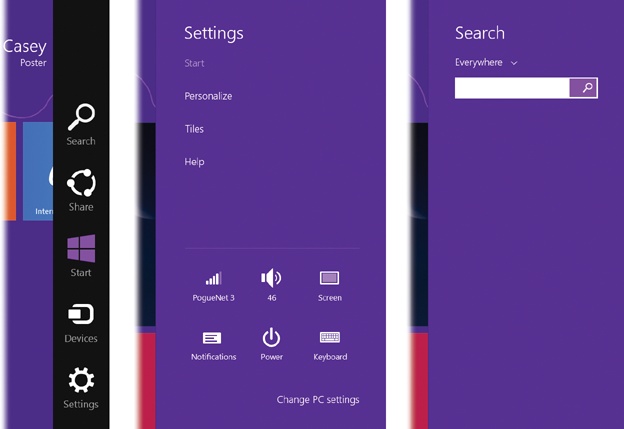
Figure 1-8. The Charms bar (left) is named after the jingly silver doodads that dangle from a charm bracelet. In this case, however, they’re more than decorative. They give you direct access to some of the most important functions in Windows. For example, the Settings button opens the Settings panel (middle); the Search button opens, of course, the Search panel (right).
In each case, the Charms bar gracefully slides in from the right edge of the screen. As you can see in Figure 1-8, the five icons here provide direct access to some of the most important functions of your computer.
Tip
Whenever the Charms bar opens on the right side of the screen, you simultaneously get a pop-up panel at the lower-left side of the screen that shows today’s date, the current time, and your battery and WiFi status.
Here are the icons on the Charms bar:
Search. Tap this icon to begin a search of your computer—for anything: programs, documents, settings, email, calendar appointments, and so on. (Figure 1-8, right, shows the panel.) You can read all about searching in Chapter 3.
Share. Tap this icon to send whatever is selected off to your adoring fans—by email or social network, for example.
The choices you see here vary by program. For example, if you’re on a Web page, you might get options like Mail, People (for posting on Facebook or Twitter), or Reading List (the “save for later” feature in Windows 8.1). If you’re looking at a photo, the options might include Mail or OneDrive (Microsoft’s free online “hard drive”). You can send a location from the Maps app, a news item from the Finance app, or even a contact from the People app.
In each case, you’re now offered a new screen where you can tell Windows more about what you want to do. You can address the outgoing email message, or edit the Facebook post, or choose the name of the person you want to receive your shared item, and so on.
You’ll read more about the options here in the appropriate sections of this book.
Tip
In PC Settings (Accounts), you can turn off individual Share options. For example, if you don’t use the OneDrive, you can turn OneDrive off here so that the option never appears in the Share panel.
Devices. This icon offers options that pertain to whatever is connected to your computer: TileWorld-compatible printers, projectors, phones, wireless TVs, and so on. For example, this is where you specify how you want a second monitor or an external projector to behave—as an extension of your built-in screen or as a mirror of it.
And if there aren’t any other gadgets connected to your computer, you won’t see any options at all here.
Settings. Settings, here, means “options for the TileWorld app you’re using at the moment.” You’ll find them on the panel that opens when you tap or click Settings (Figure 1-8, middle).
Note
App settings show up here only in TileWorld apps—not in Windows desktop programs. If you open the Settings panel when a Windows desktop program is open, then the top half always lists the same Control Panel shortcuts: Desktop, Control Panel, Personalization, PC Info, and Help.
Below the app settings, you’ll find a set of six handy settings icons for your entire computer: network, sound, screen brightness, notifications, power, and keyboard.
As you’ll eventually discover, Windows 8 has three control panels—different places where you can change settings. (Depending on the kind of computer you have, you might not see them all.) This set of six is only one of those control panels.
Below these, you’ll see a link called “Change PC settings” that takes you to a second window full of preferences settings. Finally, there’s also the traditional Windows Control Panel at the desktop.
Chapter 5 describes all three of the control panels and their settings in exhausting detail.
To hide the Charms bar without tapping any of its buttons, repeat whatever swipe, click, or keystroke you used to make it appear.
Suppose you’ve been using BeeKeeper Pro, and now you want to duck back into the last app you used, ProteinFolder Plus.
In the Windows of old, of course, you could press Alt+Tab to jump back and forth between the programs. That still works in Windows 8, but now there are other ways to do the same thing:
Touchscreen: Swipe in from the left edge. With each swipe, you “turn the page” backward to the next older TileWorld app.
Mouse: Point to the upper-left corner of the screen; when the other program’s icon appears, click. (This technique flips back and forth between two apps only.)
Keyboard: Press and release
 +Tab. (This technique flips back and forth
between two apps only.)
+Tab. (This technique flips back and forth
between two apps only.)
Note
The desktop, and all of its own programs, are represented as one app. In other words, if you had three programs open, their windows all appear simultaneously when you flip to the desktop.
The old Alt+Tab keystroke still works, too, but it brings up a different app switcher—the old one. Chapter 3 for more on switching apps.
In the Windows of days gone by, you could click something with the right mouse button to open a shortcut menu. That’s a brief menu of options, appearing right at your cursor tip, that applies to whatever you just clicked.
That idea is available in TileWorld, too—but the “shortcut menu” is a horizontal options strip called the App bar. It contains a few important options for whatever TileWorld program you’re using at the moment. In some apps, it pops in from the top of the screen; in some, from the bottom; in a few, both top and bottom.
Note
The App bar doesn’t appear when you’re using traditional Windows desktop programs—just for TileWorld apps.
To see the App bar:
Tip
At the Start screen, the App bar has a few other twists. To see the options for a single tile, hold your finger down on it for a moment, or right-click it. The resulting buttons apply to that tile: “Unpin from Start” (gets the tile off the screen), Uninstall, Resize (offers a choice of four tile sizes), and “Turn live tile off” (stops displaying real-time info from online).
Get Windows 8.1: The Missing Manual now with the O’Reilly learning platform.
O’Reilly members experience books, live events, courses curated by job role, and more from O’Reilly and nearly 200 top publishers.

