Windows 2000 displays a boot menu that lets you choose which operating system to boot on a multi-boot system or to boot the repair console if installed. Depending on your preferences, you might want to change which option boots by default and how long the menu is displayed before the default option is booted. You can change these options from the Windows 2000 GUI or modify the source of the options, boot.ini, within Windows 2000 or from a console prompt.
Tip
If you choose to modify the boot menu by editing boot.ini, make a backup of the file first in case you have problems editing the file. Also, keep in mind that you can modify the labels for each boot option by modifying boot.ini. For example, you might change “Windows 2000 Professional” to just “Windows 2000.” Or you might change “MS-DOS” to “Windows 98.”
The [boot loader] section of boot.ini includes a setting named “default” that specifies the option that boots by default if you don’t select any other options from the menu. Usually the main reason to change this setting is if your system contains Windows 9x and you want to switch from Windows 2000 to Windows 9x as the default boot option (or vice versa). Making the switch is as easy as modifying the value of the default setting. The easiest way to do that in Windows 2000 is through the System property sheet:
Right-click My Computer and choose Properties, or select My Computer and press Alt+Enter.
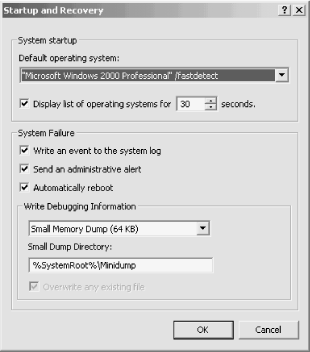
Click the Advanced tab, then click Startup and Recovery (see Figure 1-4).
From the Default Operating System drop-down list, select the OS that you want to boot by default. Click OK to save the changes and close the dialog.
You also can change the value of the default setting manually, which is useful for changing the value from Windows 9x:
Open My Computer and locate boot.ini in the root folder of the boot drive. If you’re running Windows 2000, choose Tools → Folder Options, then click View and deselect the option Hide Protected Operating System Files so that you can view boot.ini.
Change the properties of boot.ini to remove the read-only attribute. In the GUI, right-click the file and choose Properties to access the attribute. From a command line, use the following two commands to remove the read-only attribute (removes read-only and restores hidden and system attributes):
attrib -s -h -r boot.iniattrib +s +h boot.iniOpen the boot.ini file with Edit, Notepad, or another text editor. Change the value of the default setting in the [boot loader] section to the OS you want to boot by default. Look in the [operating systems] section and note the value to the left of the = sign for the desired boot option. This is the value to use for “default.” To configure Windows 98 as the default, for example, you would use the value default=c:\. Use copy and paste to make sure you get the entry right.
Save the file, and if desired, restore the read-only attribute (not required, but a good idea).
The boot menu remains on the screen for 30 seconds if you don’t select a menu option. Windows 2000 boots the default operating system after the timeout period expires. Changing the timeout period is a simple matter of changing the timeout value in boot.ini. Follow these steps to change the value through the Windows 2000 GUI:
Right-click My Computer, choose Properties, click the Advanced tab, then click Startup and Recovery.
Change the value using the option “Display list of operating systems for n seconds.”
Click OK to save the change.
You also can modify the value manually, which is useful when the system is booted to Windows 9x or a DOS prompt. See Section 1.8.1 to learn how to edit boot.ini. Change the value of the “timeout” setting in the [boot loader] section to the number of seconds the menu should be displayed.
Get Windows 2000 Quick Fixes now with the O’Reilly learning platform.
O’Reilly members experience books, live events, courses curated by job role, and more from O’Reilly and nearly 200 top publishers.

