Restoring and Copying Courses
Once you’ve created a backup, you can use it to restore your course if there is catastrophic data loss on the server. Alternatively, you can use it to create a copy of your course without student data to create a new course or section.
To restore or load a new shell:
If the backup zip file is not in the files area for your course, upload the archive file from your desktop. See Chapter 3 for details on uploading files.
Find the backup file in the files area, as shown in Figure 13-5. If you didn’t upload the file manually, it will be located in the backup folder of the course you backed up.
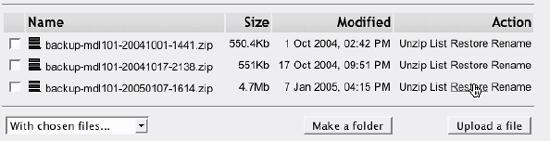
Figure 13-5. Backup file
Click the Restore option next to the file you want to back up.
Click Yes under “Do you want to continue?”.
The next screen will detail everything in the backup you have selected. Click Continue.
On the next screen, shown in Figure 13-6, first select whether you want to delete the data in the target course before you copy the backup or simply add the data in the backup to the target.

Figure 13-6. Restore a course
On the same page, select whether you want to restore each tool and whether you want to add user data.
Tip
Most people have two main reasons for restoring course data from a backup: restoring lost data and copying a course shell. If you are trying to ...
Get Using Moodle now with the O’Reilly learning platform.
O’Reilly members experience books, live events, courses curated by job role, and more from O’Reilly and nearly 200 top publishers.

