Chapter 4. Setting Up the Basics of Your Website
In this chapter, we’re going to set up the basic structure that we planned in Chapter 2. The very first step is to install Joomla. See Appendix A to accomplish this if you need to and then come back here to dive in.
For setting up Joomla Pet Center, we will start from a blank site with no sample content loaded. You may have chosen to install the sample content during the Joomla installation, and you can follow along using that (for information about sample data, see Appendix A). If you did not, then have your own planning sketches available so that you can set up your website structure while we do so for Joomla Pet Center.
The order of creating content for your website is as follows:
- Create categories
- Create articles
- Create menu items
Content Categories
One of Joomla’s strengths is its simplicity, and that’s reflected in how it manages contenet, using categories and articles. It really is as simple as thinking of categories as being like buckets, and articles as like rocks. You can’t have the same rock in multiple buckets, but you can have many rocks and buckets.
The Category Manager displays the categories of your site. These are the “buckets” for your articles. If your site is small, you may only need one or two categories. You’ll organize your articles within them. But most sites will have a number of categories (e.g., About, Products, Services, Blog) to give more control and flexibility over how your articles are displayed. The Category Manager enables you to copy, edit, create, and delete categories. Before you can create articles, you’ll need to first create a category.
Creating Categories
You must create at least one category before you create any articles. For example, in Joomla Pet Center, we will be creating the categories we came up with in Planning Categories.
Joomla Pet Center Categories:
- Blog
- How to
- About
- Testimonials
- Legal
Blog and “How to” nested Categories:
- Dogs
- Cats
- Reptiles
- Birds
Hands-On Exercise: Create Your Categories
- Log in to the backend of your website.
- Click on Content and hover over Category Manager, then click on Add New Category. This opens the Category Manager: Add A New Articles Category (Figure 4-1) screen.
- Enter a title for the category. We will start with the category Blog.
- Leave the alias blank, and Joomla will fill it in for you.
- Optionally, you may also enter a description of the category in the text box. This information will show up on category pages when the appropriate menu item parameter is enabled. See Category Blog Layout further along in this chapter for more information about this parameter.
- Another option is to associate an image that displays with the category. Simply click on the Images button at the bottom of the text editor to add an image to the category.
- In the details panel on the right, select a parent category if the category you are creating is nested. In our case, it is not.
- Leave the Tags field for now. We will be setting this up in Chapter 8 when we set up our Blog.
- Leave the Category as Published.
- Choose an access level—either Guest, Public, Registered, Special, or a custom access level if you have created any. Most often this will be set to Public. If set to Registered, registered users or higher will have access. Special means only administrators will have access. Custom ACLs will have different access permissions. (See Access Control Lists (ACLs).)
- For other Publishing Options, Options, Metadata Options, and Category Permissions, click the tabs next to the Category Details tab and fill them in as desired.
- Click Save & Close to return to the Category Manager or Save & New to create an additional category or nested category.

We have added all the categories and nested categories for Joomla Pet Center. When complete, our Category Manager will look like Figure 4-2. Yours should look similar.
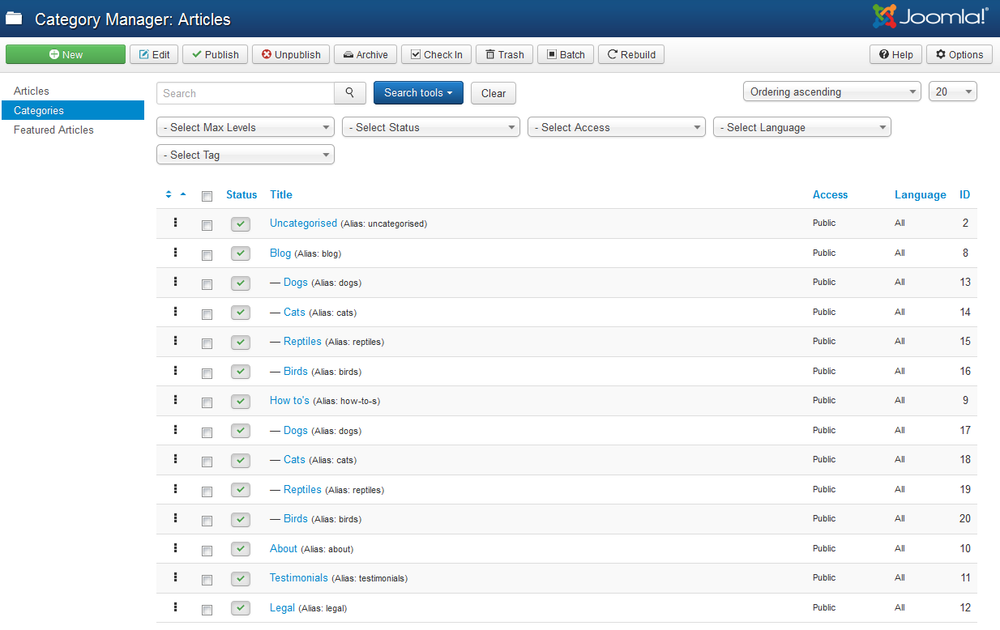
If you installed Joomla with the sample data, you can use the existing categories and change the title, alias, and other settings to utilize what was installed with your site. Or you can follow the instructions above to create new categories and then unpublish or trash the sample data categories.
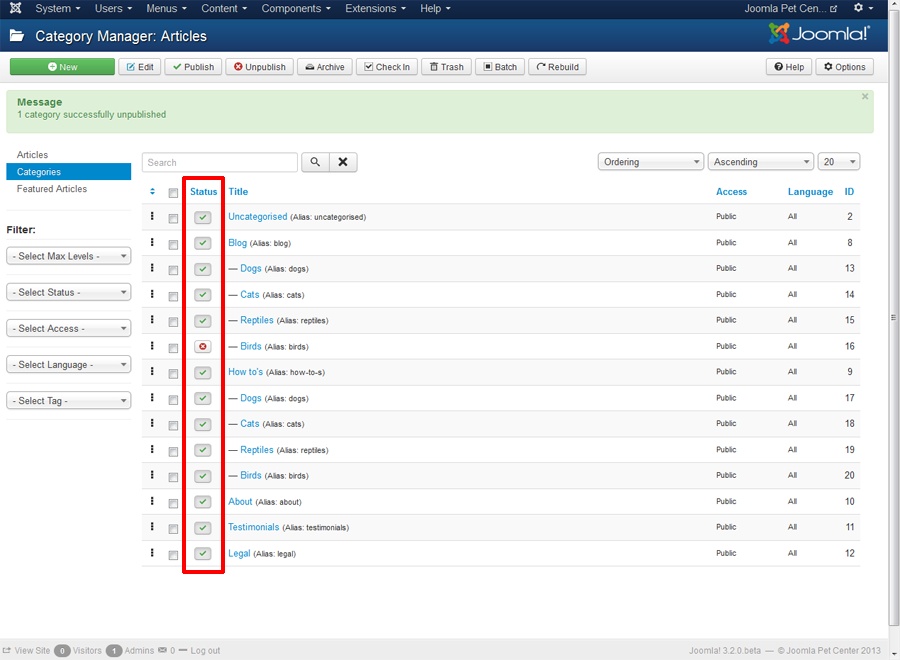
Publishing and Unpublishing Categories
In the Category Manager, you also have control over the published state of each category or nested category. To publish or unpublish a category, click the icon in the Status column, as shown in Figure 4-3. You can also unpublish a category in the Category Editor.
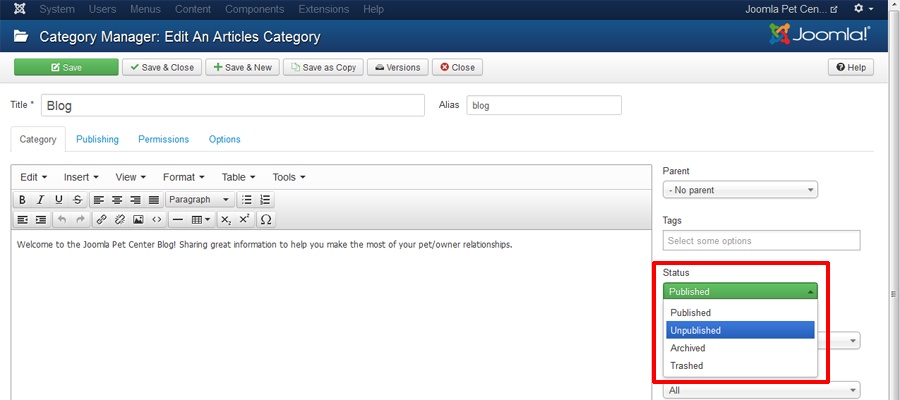
- Go to the Category Manager and click the category name to open it in the Category Editor. You can also click the checkbox by the category name and select the Edit button in the toolbar.
- On the Details panel on the right, click the drop-down menu for Status and set its status from Published to Unpublished, as shown in Figure 4-4.
- Click Save & Close.
Copying Categories
There are times when you may want to duplicate a category. To copy a category:
- Go to the Category Manager and open the category you want to duplicate.
- Click the Save as Copy button in the toolbar.
This will open a copy of that category, which you can now give a new title and alias. You can simply erase what is in the alias field after copying and Joomla will assign a new alias upon saving the new category.
Note
The Alias field is used to manage how a page’s URL is constructed. Each category must have an original alias (each article and menu item must have original aliases as well). If in doubt, empty the alias field and Joomla will fill it in for you. For more on how to work with the alias field, see SEF URLs.
- Make any other changes to the items in the Details panel on the right or in the additional tab items next to Category Details as appropriate.
- Click Save & Close.
You may copy multiple categories (or articles) at a time using the Batch function. Simply check the categories you want to copy (or move) and click the Batch button in the top toolbar. Select where you want to copy them to and make sure the Copy option is selected. Then click Process. Batch functionality is available in multiple instances of your Joomla website.
Uncategorized Category
You may have noticed the option of using the Uncategorized category when creating new articles. Uncategorized articles are limited in how they can be displayed on your website, so we don’t recommend keeping finished articles in this category.
If you do use the Uncategorized category, it should be limited. The only articles that might be appropriate to have in the uncategorized category are:
- The home page
- Custom 404 page
- Thank you page for form submission
- Draft articles submitted by site authors
Aside from those, your articles should be placed into applicable categories you create. This reduces heartache down the road when you want content to display a certain way, and the articles need to be moved into categories which then breaks links and is just a pain overall.
Now that our categories are all set up, we can create articles.
Creating Articles
You can create and manage articles in the Article Manager.
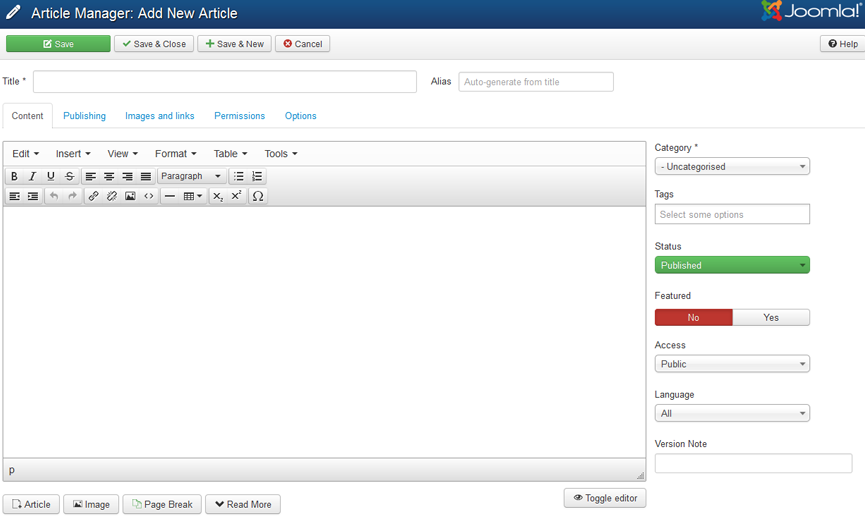
Creating a new article is as simple as clicking the Add New Article link on the left sidebar of the Control Panel. You can also create a new article by clicking on Content, hovering over Article Manager, and clicking Add New Article. If you are already in the Article Manager, simply click the New button in the toolbar. All of these methods open up the Article Editor screen (Figure 4-5) where you can add text, images, and other content. When you click Save, your article is saved and kept open for editing. If you are done editing, click Save & Close, and you’ll be taken back to the Article Manager. Clicking Save & New saves the article you are working on and opens a new article to be added to the system.
In setting up the basics of our website, we will first create all of our articles at once without adding content to them. We will add content in Chapter 5.
Hands-On Exercise: Create Your Articles
We will use the spreadsheet we created when planning our website to create our articles. You will use the planning sketch of your website and create yours.
Joomla Pet Center will have the following articles, which we decided in Planning Articles:
- Helen
- Diana
- Mark
- Testimonial 1
- Testimonial 2
- Testimonial 3
- Blog 1
- Blog 2
- Blog 3
- How to 1
- How to 2
- How to 3
- Privacy Policy
- Terms & Conditions
- Home
Follow these steps:
- Click on Add New Article in the Control Panel.
- Enter an article title in the Title field. We’ll start with Helen.
- Leave the Alias field blank and Joomla will fill it in for you.
- Select Category from the drop-down menu. In our case, the category is About.
- For the time being, we are going to leave everything else as is and click Save & New to create the rest of our articles.
The Featured button is what tells Joomla to display any Featured articles on a page that is set up to be a Featured Article menu item type; this is most typically the home page. Even though “home” is the most popular use of Featured articles, it is not the only way they can be used. Featured articles are associated with the Featured menu item type, which is installed by default by Joomla as the Home menu item in the Main Menu.
None of our articles will be Featured articles except our home page, which we will mark as Featured and leave in the Uncategorized category. This will be denoted by a yellow star in the Status column of the Article Manager.
When we are done adding articles for Joomla Pet Center, the Article Manager will look like Figure 4-6.
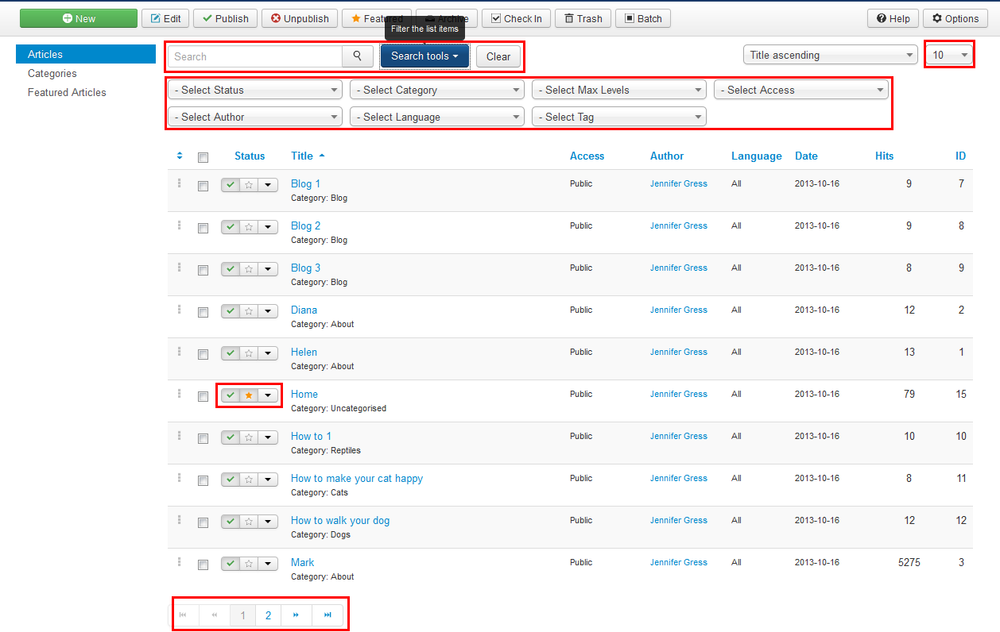
You can see in the Article Manager that we have a list of articles. At the bottom of the list, you can navigate to a second page of articles. You can select the number of articles to show in the list in the top right corner. There is a red box around it.
There are a number of tools, including filters, that can save you time when looking for your articles to edit them in the future. You can type a portion of the title into the search box at the top of the Article Manager. You can select Search Options at the top of the Article Manager, which will toggle the display of several filters that you can set when looking for articles in a certain Category, Status, Access Level, and more. You can also click on a column heading to sort by a heading. Clicking twice will reverse the results. For example, clicking on the Title column heading once will sort alphabetically with the letter A first. Clicking the Title heading again will sort reverse-alphabetically with the letter Z first.
Note
Once you set your filters, the system remembers that they are set, visits other pages, and returns. In order to display your entire list of articles again (unfiltered), you need to clear the filters by choosing Select from the drop-down menu.
Article Publishing and Unpublishing
New articles are set to Published by default—meaning they are visible to your site users. Unpublishing an article removes it from view. Publishing and unpublishing articles is straightforward, but there are a number of ways to do it and customize the process. The first (and most common) way is by clicking the publish/unpublish icon in the Article Manager.
Find the icon in the Status column. A green checkmark means the article is already published on your site. A red circle with a white x in the center means the article is unpublished and not viewable on your website. The star icon denotes that the article is both published and Featured.
The second way to toggle the published state is in the Article Editor where you edit the article. Go to the Article Manager and click the name of the article you want to edit. Find the Status drop-down under the Details column at the far right of the screen. Select either Published, Unpublished, Archived, or Trashed from the drop-down menu, as seen in Figure 4-7.
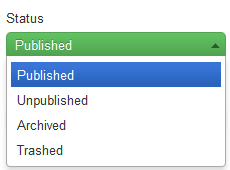
Click the Save button or Save & Close button to save your changes.
Now that we have added our categories and articles, if you were to check the frontend of our website, you would see that there is no difference in how the site looks. Now that we have our categories and articles created, we get to move to the fun part of having them display on the frontend of the website by creating menu items.
Creating Menu Items
Menu items are the primary tools for navigating to and controlling the display of content in Joomla. Joomla Pet Center has a lot of menu items that will depend on an extension to display content stored in the extension itself. Since we are only setting up the basics of our site structure right now, we will create placeholders for menu items that will utilize extensions.
We will focus on the most popular menu item types for Joomla Pet Center: the Category Blog, Single Article, and our placeholders that utilize the Text Separator menu item type.
For now, we are working with the Main Menu, which was installed with Joomla.
Let’s start by taking yet another look at our sketch, spreadsheet, or file of the menu that we created in Chapter 2 so we can create our menu items.
Text Separator Menu Item type
Aside from Home, our first five menu items are extensions. Because we haven’t yet installed and configured these extensions, we will create placeholders for them using what’s known as the Text Separator menu item type.
The Text Separator menu item type is also often used as a main tab, or Parent menu item with submenu or child-menu items. This forces a visitor to choose from the drop-down because the Text Separator isn’t clickable.
Hands-On Exercise: Create Text Separator Menu Items
Click on Menus from the backend Control Panel, hover over Main Menu, and click on Add New Menu Item, as seen in Figure 4-8.
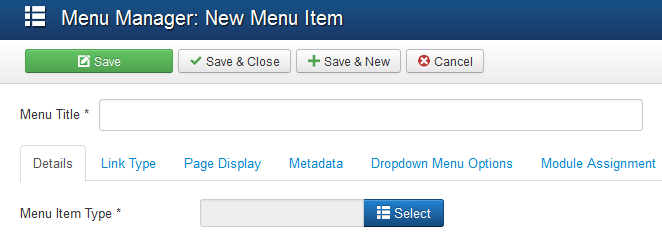
- In the Menu Manager: New Menu Item screen, enter the menu title.
- The alias will autogenerate when you save the menu item. See more about using an alias in SEF URL Settings and SEO Basics.
Click the blue Select button to the right of the Menu Item Type field to select the type of menu item, as seen in Figure 4-9.
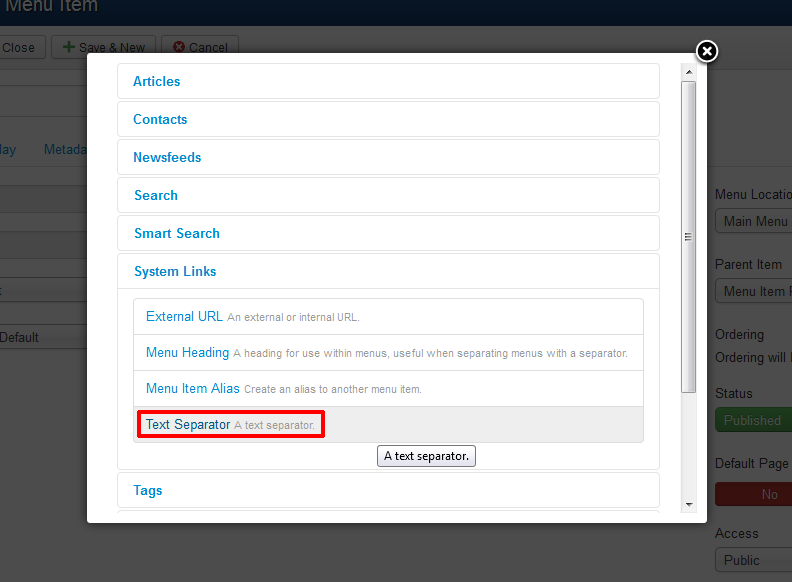
Click on System Links and then on the Text Separator menu item type, as seen in Figure 4-10.
- Click Save & New from the top toolbar and repeat for the next menu items that have the Text Separator menu item type. When you get to the last one, click Save & Close.

You may not have the same menu items next to each other as we do. Feel free to create your menu items in the order your menu calls for and with whatever types are required. Items can be ordered after they are entered.
We are going to continue and add our Text Separator menu item types for events, gallery, community, and forum. Forms and Contact will also be extensions, so we will create Text Separator menu items for those when we get to the About portion of the menu items.
Creating Single Article Menu Item Types
The Privacy Policy and Terms & Conditions for Joomla Pet Center are both simple Single Article menu item types. Single Article menu item types are by far the most commonly used menu item type. We just happen to be using a lot of extensions and Category Blog layouts (which you’ll see in the following hands-on exercise) in Joomla Pet Center. Chances are good that you will have more Single Article menu item types than we do.
Let us create a couple of Single Article menu items.
Hands-On Exercise: Single Article Menu Item Types
Open a new Menu Manager: New Menu Item. Then just follow along.
- Enter the title of your menu item. Ours will be Privacy Policy.
- Leave the Alias field blank, as Joomla will fill it in for you.
- Click the Select button for the Menu Item Type.
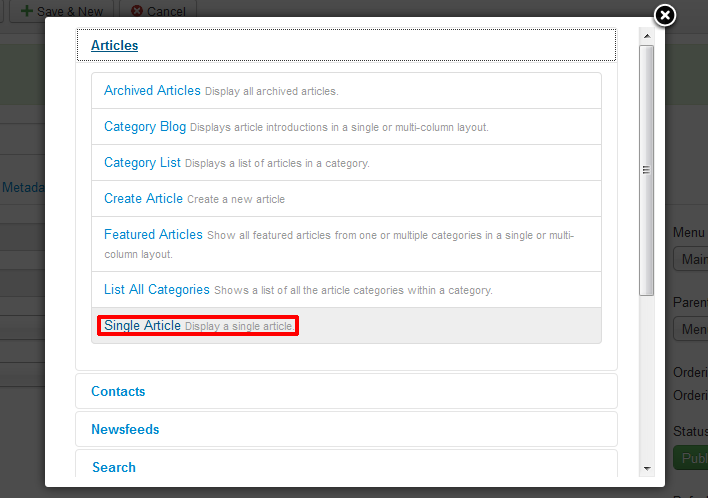
- Click Articles and then click the Single Article menu item type. (Figure 4-11.)
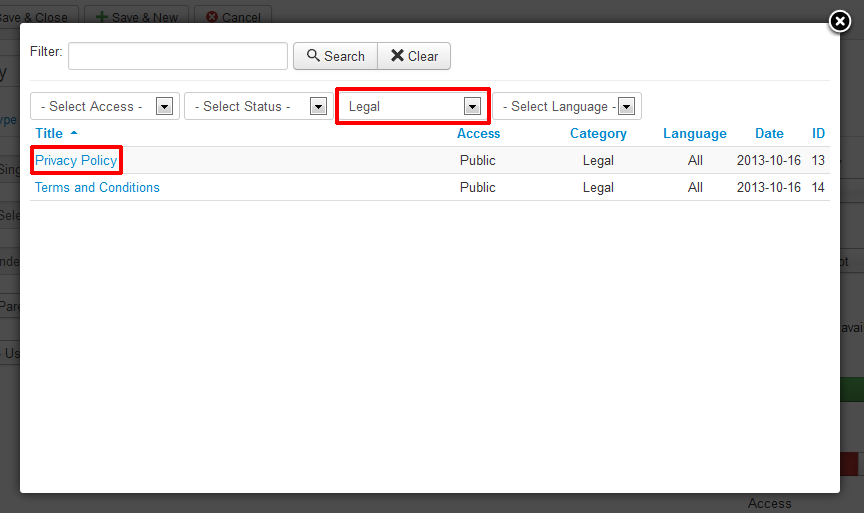
- Click the Select button next to the Select Article field.
- A list of articles will appear in a pop-up window. You can filter by Access, Status, Category, or Language. You may also type a portion of the title of the article into the Filter field at the top and press Enter. Articles matching your search will appear in the box. Click on the desired article. See Figure 4-12 to see articles in the Legal category.
- Leave the Link field alone unless you really know what you are doing. It will be automatically populated for most menu item types.
- Leave the Target Window as Parent.
Leave the Template Style as Use Default unless you are using a different template for specific pages.
- Leave the Menu Location as Main Menu.
- Click the Parent Item drop-down menu and select About as the Parent Item. This means that the Privacy Policy menu item will be a drop-down menu item under the About tab in the main menu.
- Leave the Status as published.
- Leave the Default Page set to No. Only one menu item will be Yes on your website. That menu item will be the main page that your domain directs to. Typically, this is the home page.
- Leave the Access set to Public unless it is intended for registered users or content to display to a specific access level.
- Click Save & New to save and move on to creating a new menu item or Save & Close if complete.
It is possible to change menu item types. If you create a Single Article menu item type and then decide you want to make it Category Blog, you may do so simply by clicking the Select button next to Menu Item Type and selecting a new menu item type. Keep in mind that the system will then erase the settings you had created for the original menu item type. So if you decide to go back to Single Article, you will have to input your original settings again. You may want to take a screen capture of your original settings so they are easy to access in case you want to revert back.
You may want to use the Save as Copy button to test a new menu item type before changing menu item types. Just remember that whichever you choose, you may need to change the alias and title so that the original title and alias are properly reflected in the new menu item type that may be a copy.
We left most of the settings alone while creating the basic structure of this site. The reason for this is because when we add our chosen template, the look and feel will change. After we install and configure the template we are going to use, we will be better able to decide how we want things to display. Adding content to the articles may also change what we want to display and how. Just getting the basics in place helps us. Then we will go back and fine-tune.
Category Blog Layout
Blog, About, and Testimonials are our next menu item types and they are all going to be Category Blog menu item types. We will configure each one differently so that you can see the flexibility of this type.
We are going to skip some aspects of the menu item settings. We could write an entire book just on menu items if we were to go through every field. Hovering over any field will provide you with a tooltip describing what that field does.
Note
Global settings for some parameters of the Category Blog layout can be found in the Global Article Options, which we cover in Joomla Pet Center Article Options Hierarchy.
Hands-On Exercise: Category Blog
We’ll start with our Category Blog menu item for our Blog. Start by having a Menu Manager: New Menu Item up on your screen.
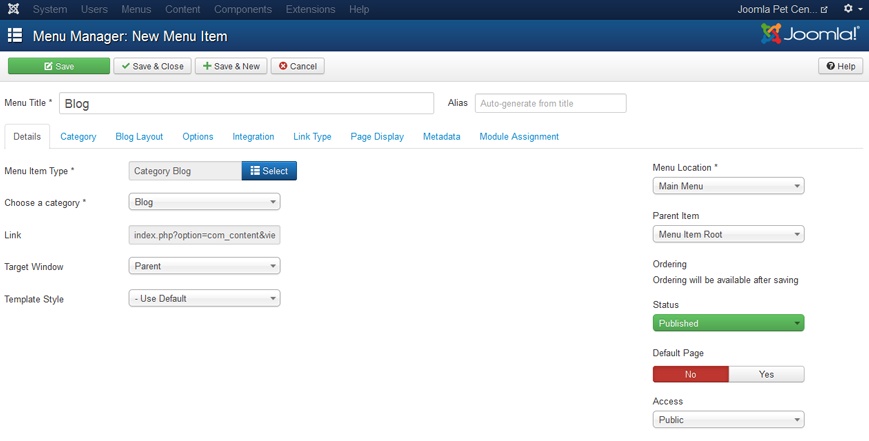
- Enter the title; in our case, the title is Blog.
- Leave the Alias field blank. For more information on how to work with the alias field, see SEF URLs.
- Click the Select button for the Menu Item Type.
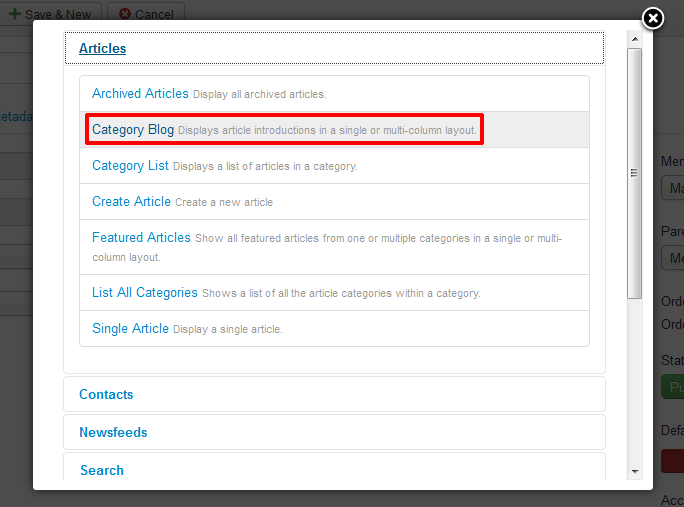
Click Articles and then click the Category Blog menu item type. (Figure 4-13.)
- Choose the appropriate category from the “Choose a category” field. We will choose Blog, which will include all our nested categories within the Blog category.
Leave the Link field alone unless you really know what you are doing. It will be automatically populated for you for most menu item types. It just states what the internal link will be to that menu item minus the
Itemidparameter.Leave the Target Window as Parent for most cases.
Note
As a guideline, if you are linking to a page on the same website, you should open it in the Parent window (which refers to the browser window or tab you are currently viewing). If you are linking to a different website, you should almost always open that page in a new window so you don’t take the user away from your website.
- Leave the Template Style as Use Default unless you are using a different template for specific pages.
- Leave the Menu Location as Main Menu.
- Leave the Parent Item as Menu Item Root. This means that it will be a parent menu item having a main “tab” or “button” in the main menu. If it were a drop-down item (a child item), then clicking the drop-down of the Parent Item would give you the opportunity to select which parent item to have the new item drop down under.
- Leave the Status as Published.
- Leave the Default Page set to No. Only one menu will have a Default Page state of Yes on your website. That menu item will be the main page that your domain directs to. Typically, this is the home page.
- Leave the Access as Public unless it is intended for registered users or is meant to be displayed to a specific access level. Figure 4-14 shows the Details tab.
- Click on the Blog Layout tab.
Enter the following and see Figure 4-15 to see the Blog Layout fields of this tab.
-
1in the # Leading Articles field -
4in the # Intro Articles field -
2in the # Columns field -
10in the # Links field
-
- For now, leave the rest of the fields set to Use Global. We will go over what this means in Chapter 5.
Click Save & New to create another menu item or Save & Close if you are done creating menu items.
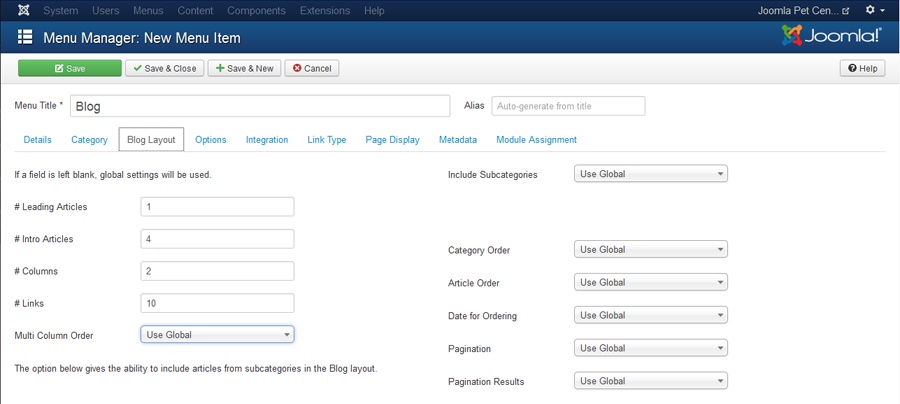
What we have done in this menu item is tell the Blog menu item to show one Leading Article in its entirety. We want four articles to show only their intros, and then folks can pursue the ones they’re interested in by clicking on the title or the “Read more” button. At the bottom of the main Blog page, there will be a list of up to 10 links to additional articles in the Blog category or any of its nested categories.
The About Category Blog menu item will be created the same way as the Blog menu item, except we’ll choose About as the category and in the Blog Layout tab we will select the following:
-
# Leading Articles =
3 -
# Intro Articles =
0 -
# Columns =
1 -
# Links =
0
This will cause the articles for Helen, Diana, and Mark to appear one after another in their entirety on the About page of the website.
We’ll do it again with the Testimonials Category Blog menu item by choosing the Testimonials category and clicking the Parent Item drop-down and selecting the About category. In the fields on the Blog Layout tab, we will choose the following:
-
# Leading Articles =
0 -
# Intro Articles =
100 -
# Columns =
3 -
# Links =
0
This will create a display that appears to be three columns of testimonials. We want them all to show, so we set the number of Intro Articles relatively high and display zero links.
Category List Menu Item Type
We will set up the “How to” menu item differently, as “cat people” typically do not want to see “How to” articles about dogs. This is a change from the original spreadsheet we created. A Category List menu item type will be ideal for this area of the site so that people can easily find the “How to” article that means the most to them.
We’ve created the menu item similarly to the Category Blog, except that we selected Category List from Articles for the menu item type.
We left it entirely default for now. Once the template is installed, we will be able to fine-tune it and get it looking the way we want it to look, displaying the correct information.
Mastering Backups
We have added a lot of information to our site now. Before we install our template, we want to make a backup of our website and the database.
Note
It is highly recommended that you run a backup of your site before you install or uninstall any extension, do an update, or after you do any work on your site. Otherwise, if an unlikely problem were to occur, you would need to either start over or restore an earlier backup and have to do your work over again. Back up!
The easiest way to run a backup of your site and database is with a brilliant extension called Akeeba Backup. Jenn (and thousands of others) are extremely impressed with the developer of Akeeba Backup as a result of his witty sense of humor, excellent documentation, stellar products, and brilliant mind.
Thanks to the new Install from Web feature in Joomla 3.x, we can install Akeeba Backup from the Extension Manager.
- Click on Extensions in the top menu and then on Extension Manager.
- You will see a blue bar across the top of the screen with a button directing you to add the install from Web tab.
- Click that button and wait while the system installs the appropriate plugin to add the Install from Web tab. You will now see a list of categories and a number of pretty, colorful icons for different popular extensions from the Joomla Extensions Directory (JED). Since Akeeba Backup is one of the most popular Joomla extensions available, it will be listed in one of these boxes. Scroll down until you find it.
- Click on the Akeeba Backup Core box. Core implies that it is the noncommercial (free) version of Akeeba Backup.
- You will now see the rating, software version, the type of extension (component, module, plugin) and buttons for download, directory listing, and developer website.
Click the Download button and you will be taken to the appropriate page of the Akeeba Backup website to download the Akeeba Backup package.
Warning
Just because you see an extension in the Install from Web tab, don’t feel complacent about its safety. You still need to do research on extensions and only install those you need on your website. If you install an extension you do not need, uninstall it immediately (after taking a backup). Extensions need to be maintained and updated; scripts not being updated are one of the top reasons that sites get hacked. See Chapter 14 and Appendix C for more information on extensions.
- Once you download the latest stable version of Akeeba Backup and save it to your computer, go back to your Extension Manager.
- Click on the Upload Package File tab.
- Click the Browse button and navigate to where you saved the Akeeba Backup package and double-click on it.
- Click the Upload & Install button.
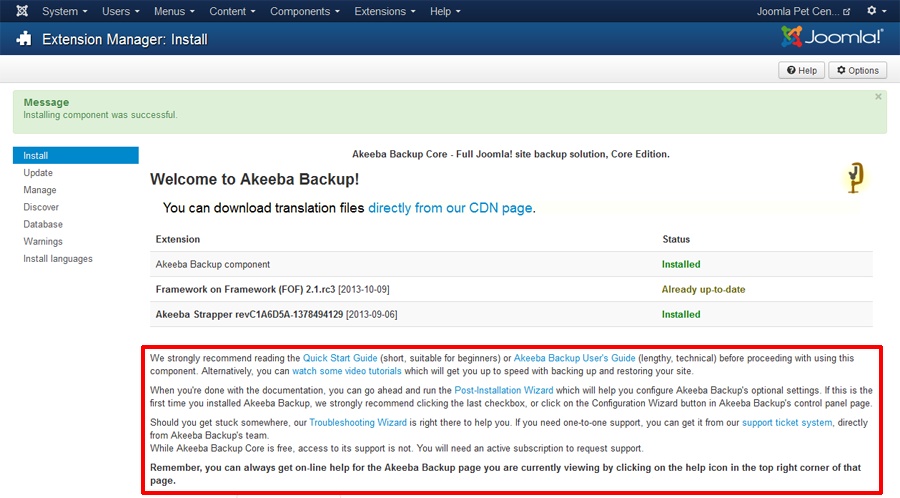
When complete, you will see the “Installing component was successful” message. See Figure 4-16. It is highly recommended that you spend some time watching videos and reading the documentation for Akeeba Backup, and learning how to restore backups. The documentation is so thorough that it isn’t necessary to cover it here. The author/developer has done better than we ever could.
- Click on Components and then on Akeeba Backup.
- Because this is our first time accessing Akeeba Backup, it wants to run us through the configuration wizard and make sure we know a few important things. Leave the two boxes checked to run the configuration wizard and update all profiles to ANGIE. Then, read all three boxes under Mandatory Information and be sure you understand them. This is very important!
- When complete, click “Apply these preferences.”
- Akeeba Backup will perform a bunch of scans and do its magic to configure itself on your server. Do not browse away from the page while it’s processing.
-
You will see a Finished message, and from here you can click the Backup Now button. On this screen, you can simply click the Backup Now button, or you can enter a note in the Backup comment field. In our case we will type
before template install. This comment appears in the Manage Backups tab of the extension and can be helpful. - Click Backup Now and the site will back up. Do not navigate away from this page until it is complete.
- When complete, use an FTP client such as FileZilla and copy the backup file off the server and onto your local device, an external drive, or DVD. The default location of the backup file is public_html(httpdocs)/administrator/components/com_akeeba/backup. Your default backup location may (and should) be elsewhere, yet that is the default location.
- After you have downloaded your backup file, make sure you delete it from your server. If someone gets their hands on your backup, they can find ways to hack your site. Don’t keep backups on your server!
A backup is useless unless you test that it restores. Thus, it is recommended to create a subdomain or subdirectory on your server and test restoration of your backup. Full documentation can be found at Akeeba Backup.
Note
The Pro version of Akeeba Backup provides many more features, including automated backup and storage in an external location like Amazon S3. This is highly recommended. As humans, we have great intentions of keeping our site regularly backed, up and then guess what? It doesn’t happen. The Pro version is worth every penny.
Now that you have your backup, you can safely install the template.
Template Parameters
We’ve decided on the Afterburner2 template by RocketTheme. The first step is to download the package from RocketTheme’s website. We are downloading the Afterburner2 Template bundled with Gantry. You may be using a different template company or a custom template. Once you have the package (typically a .zip file), follow these steps to install your template:
- Log in to your Backend Administrator Control Panel.
- Click on Extensions and then on Extension Manager.
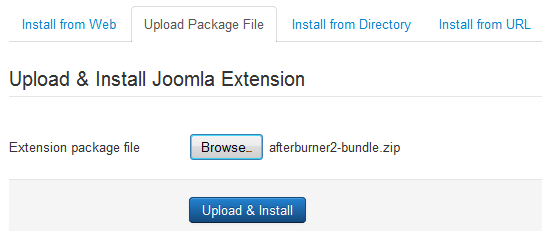
- Click the Browse button, navigate to where you saved the template installation package, and select it. This will fill in the filename to replace the “No file selected” text.
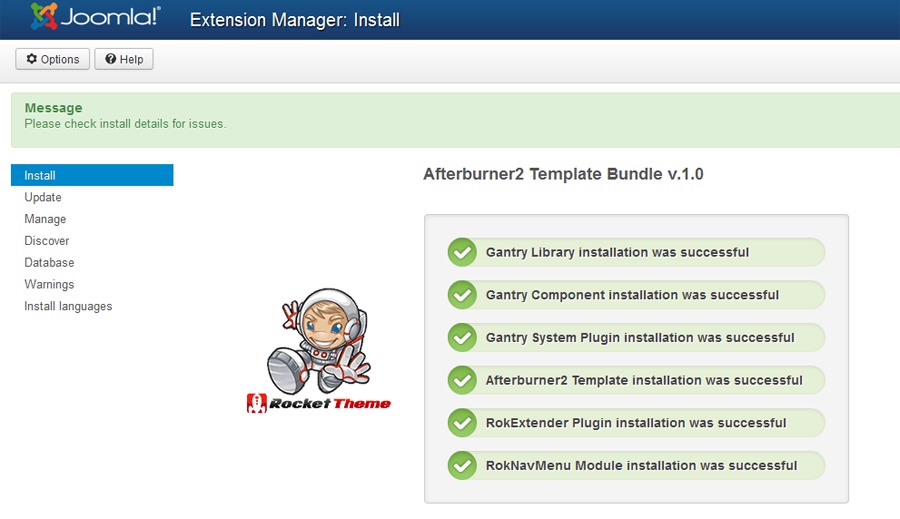
- Click the Upload & Install button (Figure 4-17) and wait for the success (or failure) message (Figure 4-18).
With our template installed, we will now set it to be the default template and set up the parameters for it.
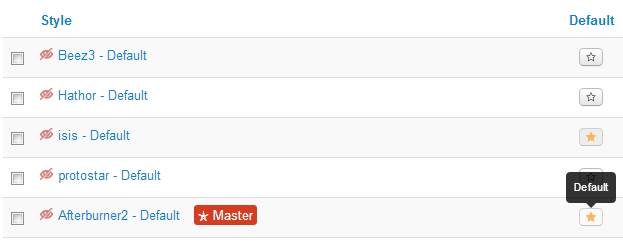
- Click on Extensions and then click on Template Manager.
- Click the button with the star to the right of the Style called Afterburner2 - Default. This action makes the Afterburner2 template the default template for our website (See Figure 4-19).
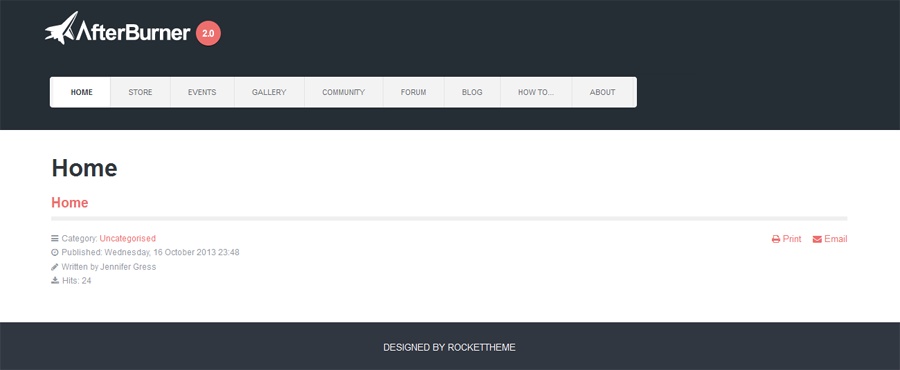
At this point, we can go to the frontend of our website and see the structure we have planned and built thus far. See Figure 4-20.
There are several things we want to change and customize in the template for Joomla Pet Center. We want to change the logo, the “Designed by RocketTheme” in the footer, and the color from the pink accent color to a lovely green.
We make these changes in the parameters of the template. From the Template Manager, click on the Style Afterburner2 - Default to access the configuration of the template. The Overview tab appears. See Figure 4-21.
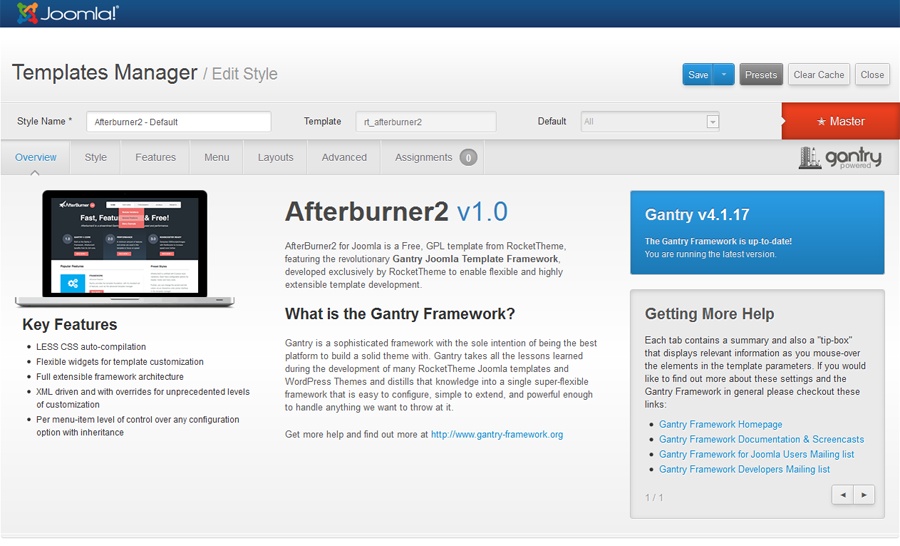
The overview tab gives you just that: an overview of the template and the Gantry Framework that the template runs on top of. There are links to get more help and a notification as to whether the installed version of Gantry needs to be updated or if it is up-to-date. For more on third-party extension updates, see Updating Third-Party Extensions.
There are other tabs for the Afterburner2 configuration. They are:
- Style
- Features
- Menu
- Layouts
- Advanced
- Assignments
Each template company has a different way of making changes to template parameters. We will be going through each of our tabs and making changes that give us the look and configuration we are looking for on Joomla Pet Center. You will want to do the same thing with your template. The template company should have documentation and tutorials to assist you in making the template “your own.”
The Style Tab
The Style tab starts with the ever-important logo. Currently, the template is pulling the Afterburner2 logo, and we want it to pull our logo instead. To do this, we need to upload our logo image to the site in the Media Manager. We will be covering media in detail in Media Manager, but for now, we want to see our logo on the site.
- Click Close in the Template Manager/Edit Style screen (unless you have made changes, in which case click Save & Close).
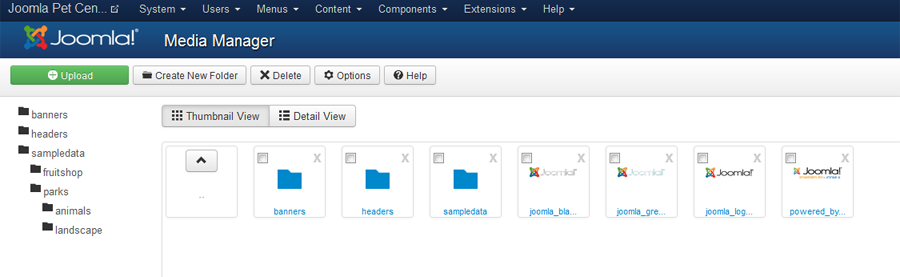
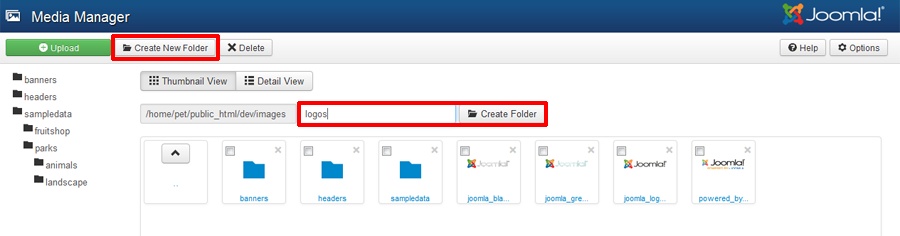
Click on Content and then on Media Manager. By default, you will see a screen like Figure 4-22.
Create a new folder by clicking the Create New Folder button in the top toolbar as seen in Figure 4-23. Name it logos.
- Click on the new logos folder you just created.
- Click the green Upload button in the top toolbar.
- Navigate to where your logo file is located and select it.
- Click the Start Upload button.
Now we’ll go back to our template parameters by clicking Extensions and again on Template Manager. Select the Afterburner2 template and then click the Style tab.
We will be making a number of changes to this tab to address the logo and the accent color.
To change out the logo:
- Leave the Show setting as On.
- Leave the Position at top-a.
- Click the Type drop-down and select Custom. This creates a new line where you can select your logo that was just uploaded to the Media Manager.
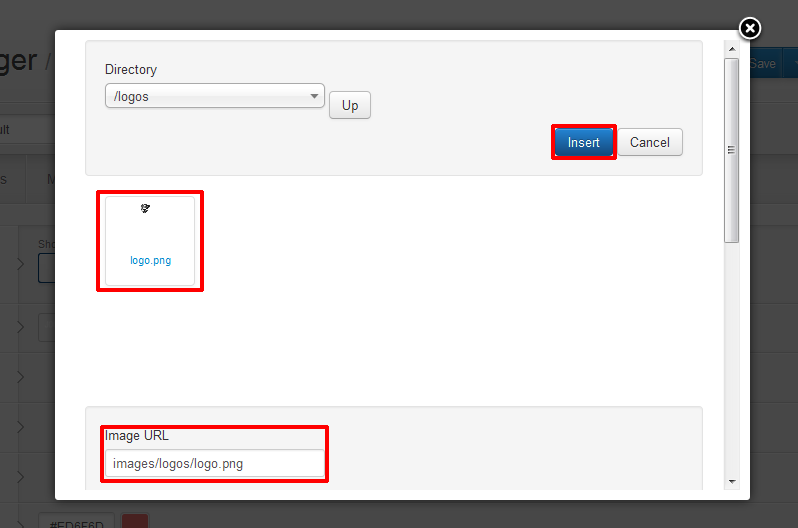
- Click the Select button, which opens a new window in a popup box with the folders and files in your Media Manager.
- Scroll down to your folder called logos and click on it.
- Click on the logo file you just uploaded which will force the Image URL to appear below in the Image URL field.
- Click the blue Insert button. See Figure 4-24.
Note
Some templates will require you to create a Custom HTML module to display your logo. If this is the case, simply create a new Custom HTML module as described in Hands-On Exercise: Create Custom HTML Placeholder Modules and insert an image as described in Hands-On Exercise: Adding Folders and Uploading Images from the Editor. To hyperlink the image of your logo, follow the directions in Hands-On Exercise: Hyperlinking an Image.
Now we’ll address the rest of the parameters on the Style tab:
- Header Style
- Leave as Dark. You may want to change it to light if your logo has dark text that wouldn’t otherwise show up on a dark background. The light header style will create a different look that you might prefer.
- Menu Style
- Leave as Light. You may want to change it to dark or grey. This is all a matter of preference.
- Footer Style
- Leave as Dark. Same as above on personal preference. Image background colors may dictate how you want this to appear.
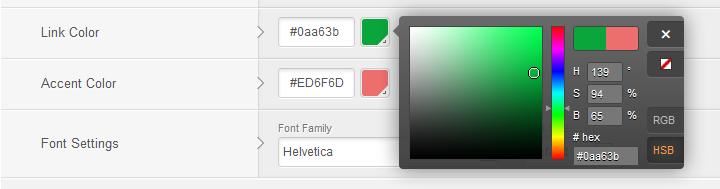
- Link & Accent Color
- Click the color swatch to the right of the hexadecimal code field to use the color picker provided. You can also directly enter a hex code into the field. See Figure 4-25 as an example.
Note
Most browsers have add-on tools that give you the ability to grab hex codes from web-based sites or images. These can be great tools to find the exact color of a hue in your logo or other resource. ColorZilla is an example of one of these tools for Firefox.
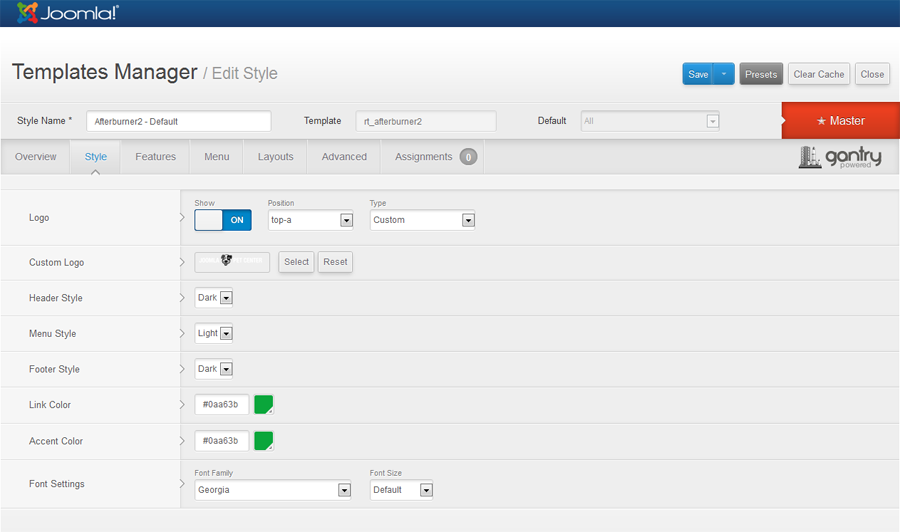
Figure 4-26 shows how the Style tab looks after our changes.
Now let us take a look at the frontend with our new settings in Figure 4-27.
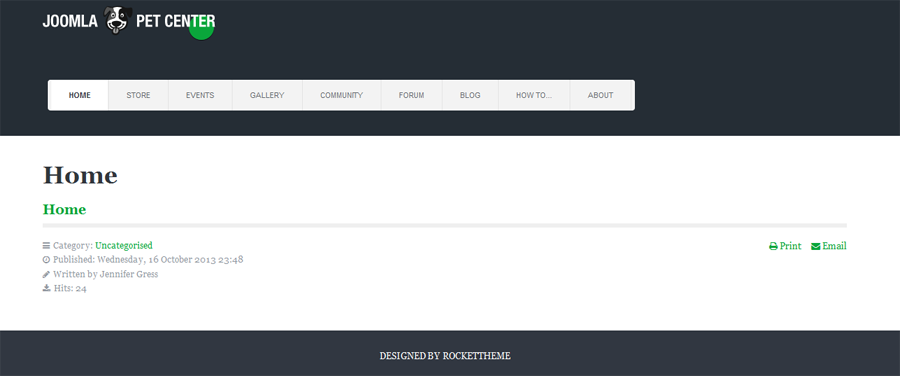
The logo looks good, but as you can see, there’s a dot under it; the CSS in the template is creating this. We don’t want that there, so we’ll need to find the CSS code that makes it appear and alter it.
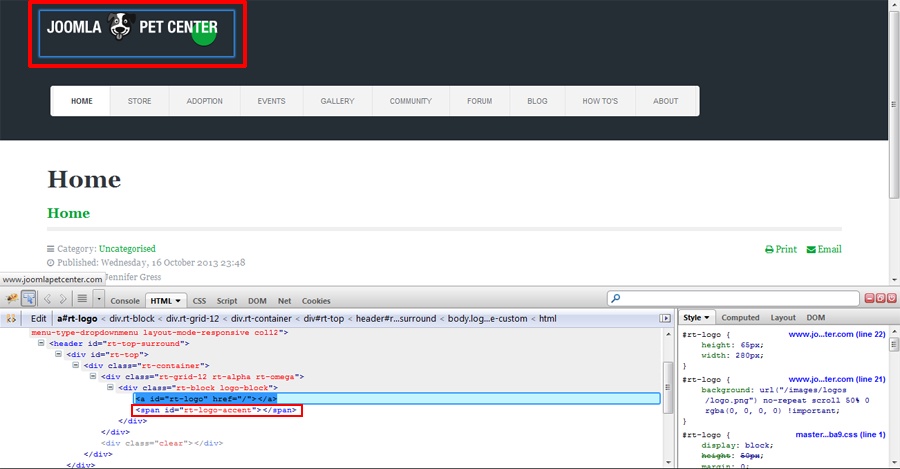
Using a Firefox add-on tool called Firebug, we’ll inspect the element to find the applicable code. Chrome has a similar Inspect Element function that you can access by right-clicking on a browser window and choosing Inspect Element.
Firebug creates a panel under the website that shows the code and CSS of the website. When we inspect the element over the logo area, we can see the code that creates the style of the logo—including that circle, which is called <span id="rt-logo-accent"> </span> in Figure 4-28. That is what we need to see, so we’ll click on that span line.
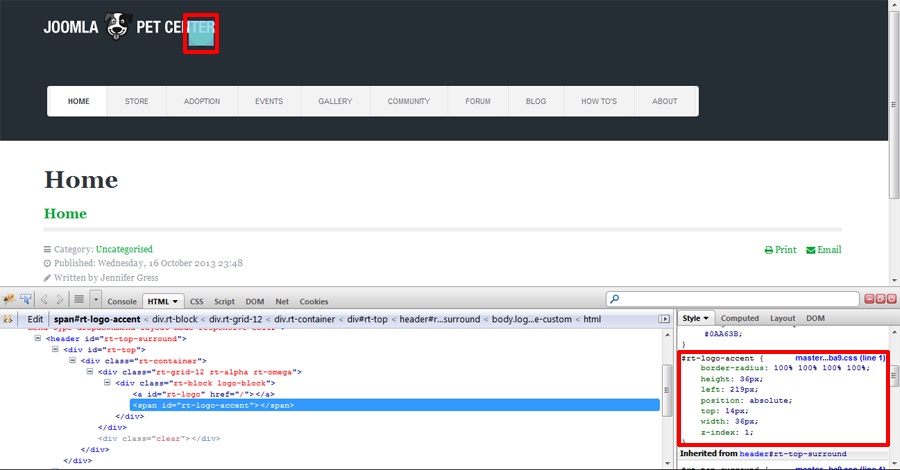
In Figure 4-29, we can see the CSS code on the right. If we change the height to 0, the dot disappears, and that’s what we want. Another way to state this is display: none;. We will copy the code from Firebug and create a template override file to make this change permanent.
Template CSS Overrides
Many template companies have specific files that changes to the template CSS can be placed into. The benefits to this are many:
- One place to make changes
- Won’t be affected by template updates
- Often, CSS changes desired for other extensions can be added to the template overrides which then wouldn’t be affected by extension updates
- We won’t forget that we changed the individual files—because we didn’t
To create an override file for RocketTheme templates, we will follow these steps:
- Click on Extensions and then on Template Manager.
- Click on Templates in the left sidebar.
- Scroll down and select the Afterburner2 Details and Files.
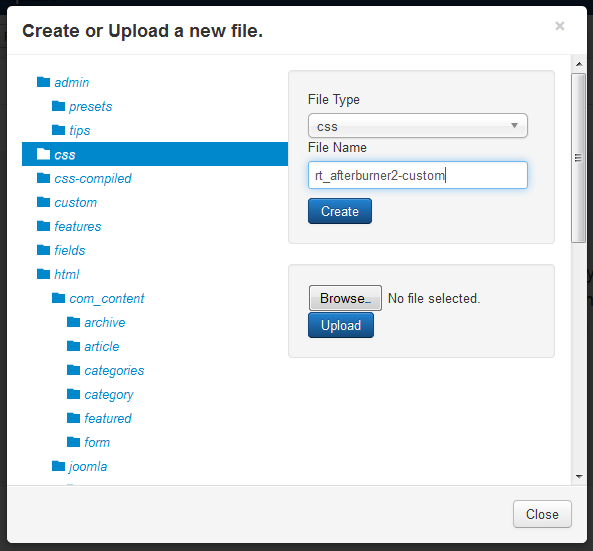
- Create a new .css file by clicking New File from the top toolbar.
- Select the css folder.
- Select the File Type css from the drop-down.
- Name the file rt_afterburner2-custom.css.
Click the blue Create button. See Figure 4-30.
Navigate to the file on the right sidebar and place the following code into the file.
#rt-logo-accent{display:none;}- Click Save & Close and refresh the frontend.
- Using FTP, copy this new file onto your local device so you have it as a backup in case it is needed in the future.
With the code in our overrides file in place, the green dot is gone.
We could have gone into the logo.php file and erased the line for rt-logo-accent except that, in that case, any template update would put the green dot back. Using the CSS override file, we avoid future problems.
Templates that operate on top of a framework will almost always have some kind of override file system. Look for documentation from your template company or search in their forums.
Remember that if you want to change something in your template, chances are good that someone else has wanted to as well. Search for what you want to do and you will likely find the answer.
Features Tab
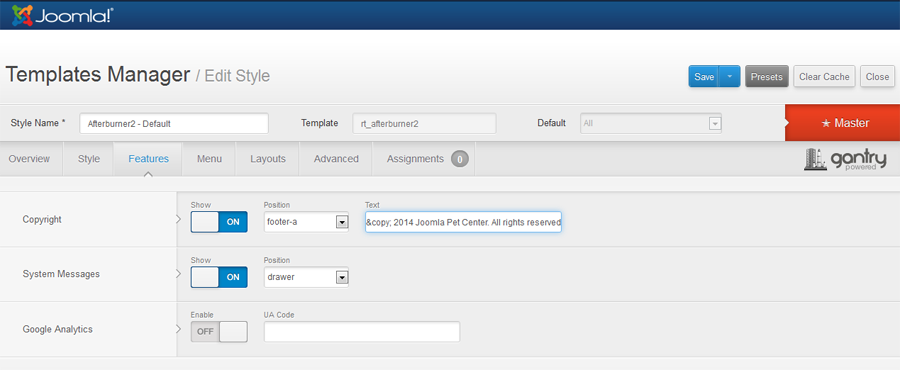
The Features tab is where we can change the copyright, change the module position, turn off the System Messages, and add our Google Analytics tracking code.
We are going to leave everything as default on the Features tab except Designed by RocketTheme, which we will change to “© 2014 Joomla Pet Center. All rights reserved.” This field takes HTML, so if we wanted a blank line under the copyright, we could add it with a break. Perhaps something like:
© 2014 Joomla Pet Center. All rights reserved.<br />Built by Jenn & Ron
This would appear as:
© 2014 Joomla Pet Center
Built by Jenn & Ron
When we save the new settings, the completed Features tab looks like Figure 4-31.
The frontend of the site reflects our new copyright in Figure 4-32.

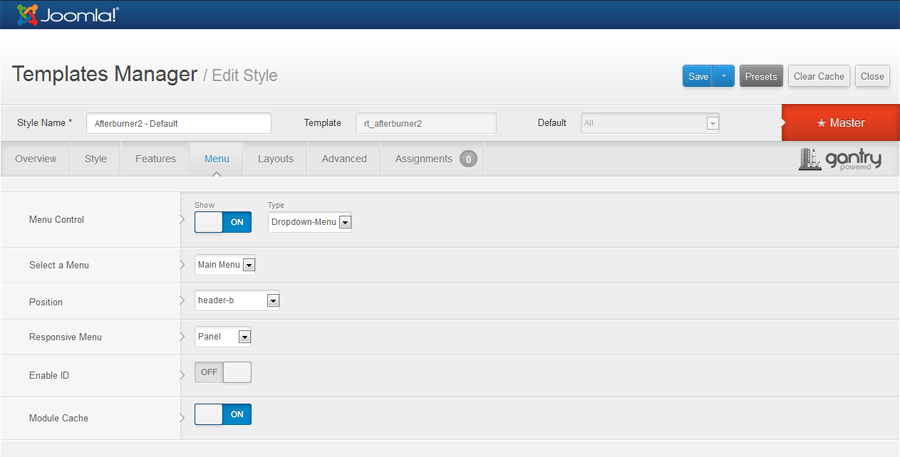
Menu Tab
In the Menu tab, you can control the menu type and what menu is being used. We are leaving them all as default, as seen in Figure 4-33.
You can select Split Menus in the Menu tab by choosing it from the drop-down. A split menu eliminates the drop-down for child menu items (submenu items) and instead only shows the parent menu item in the main menu bar. When the parent menu item is clicked, a secondary menu appears in the module position chosen in the Menu tab of the Afterburner2 template parameters.
Layouts Tab
There is extraordinary flexibility with the Gantry Framework, which quickly becomes apparent in the Layouts tab. See Figure 4-34.
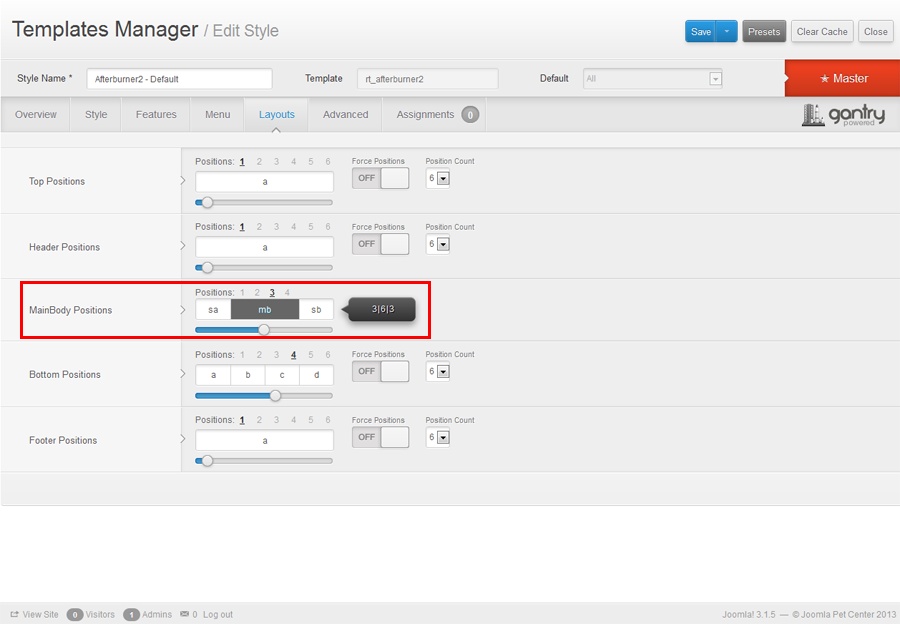
Most templates for Joomla operate with a 12-grid system. Modules and the main content area can be set to span a specific number of columns of the 12 available grids. This creates a lot of flexibility in your layout display.
We’ve left everything at the default values except the MainBody Positions. We know that we are going to have sidebars. In order to accommodate this, we needed to change the configuration.
- Click the number of Positions. We selected 3 so that we could have a sidebar a (sa), a mainbody section (mb), and a sidebar b (sb). If a sidebar is not in use, it will collapse. This gives us a lot of flexibility.
- Click, hold, and slide the slider below the positions to determine the ratio of space for each position. This can be changed as the design takes shape.
- Click Save.
Advanced and Assignments Tabs
We are going to leave both the Advanced and Assignments tabs at their default settings. You are welcome to change them. Feel free to read more of the RocketTheme documentation.
Assignments come into play if you want a different look and feel to appear on different pages. This is a powerful feature that is beyond the scope of this book, yet very cool. You can create different variations of this template and have them appear on different menu items by using Assignments.
At this point, the basics of your template are configured and your site should look pretty good. We will get to further customizing of content in Chapter 5.
Creating Modules
Modules provide a sort of window into your content by displaying it in small, customizable blocks or boxes. Modules are usually positioned in the left and right columns of a web page, but they can be just about anywhere you want. Joomla comes with a number of default module types that show you the most recent news items, a login form, breadcrumbs, or an advertising banner. Third-party extensions provide options do a whole lot more.
At this point, you should have a few menu items created (see Creating Menu Items if you jumped ahead) as a prerequisite for getting your modules to appear.
Module names and their positions are determined by their location in your template. If you’re using the default Protostar template and you installed the sample data, you already have a few modules in various positions set up on the frontend of your website.
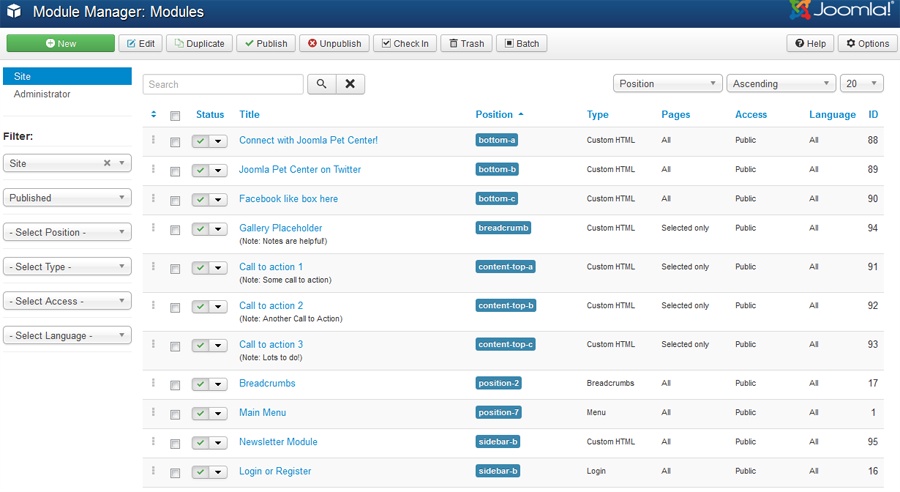
The Module Manager provides an overview of your modules, their positions in your template, type of module, and status (see Figure 4-35).
In the Module Manager, you can reorder modules when you have more than one module in the same position by dragging and dropping into the desired order. See Ordering Modules for more detail.

As your site grows, you’ll end up with a lot of module positions, and finding them can be tough. Have you ever looked at a module and wondered which position it was in? Here’s how to find out.
To enable the preview of module positions (which is disabled by default):
- From the backend, click on Extensions and then on Template Manager.
- Click on the Options button at the top of the screen.
- Click Enabled for Preview Module Positions.
- Click Save & Close.
- Click the eyeball icon at the left of the template title to view the preview of the module positions available for that template.
On the frontend, add the tp parameter with a value of 1 on the end of the website URL. An example of that would be: http://www.<yourwebsite>.com/index.php?tp=1
That’s it. Now you can see the module types and positions from the frontend of your site.
Placeholder Custom HTML Module
We know that we will have modules on our site based on our layout, which we saw in Figure 2-6. Because we don’t have our extensions installed yet and we haven’t yet learned how to create content and manage images (this will be discussed in Chapter 5), we are going to create a few placeholder modules so that the layout of Joomla Pet Center can take shape.
The module positions for the Afterburner2 template can be found on RocketTheme’s demo website. Once we select the Afterburner2 template, we can navigate to the module positions page of the demo to see which are built into the template for us. In our case, these module positions are available on the RocketTheme demo website under the “Features” tab.
Afterburner2 is a free template. Free templates often have less functionality than paid ones, which is the case with Afterburner2. Afterburner2 doesn’t have as many module positions as RocketTheme’s Club templates. We are going to make it work, as there are still many module positions to choose from.
The Top module positions are going to be utilized by our logo and our RSS module. The menu bar occupies the Header positions so we are unable to use it for additional modules.
Note
More than one module can be used in the same module position, as they can stack or be side-by-side. We are not choosing to do so because of aesthetics. You will need to try different positions in order to achieve the layout you want.
Our gallery will occupy the Breadcrumbs module position. This is not normally a position we would use for a gallery, but since we are low on positions, and breadcrumbs are not necessary on the home page, we will use it. See Adding an Image Gallery for instructions on how to create a gallery.
We will place our three calls to action in the module positions Content Top and use content-top-a, content-top-b, and content-top-c.
We will use the Sidebar position sidebar-b for our newsletter (see Getting the Word Out with a Newsletter) and other modules.
The Bottom positions will house our social media modules. See Chapter 12.
We will create placeholders for each of these modules.
Hands-On Exercise: Create Custom HTML Placeholder Modules
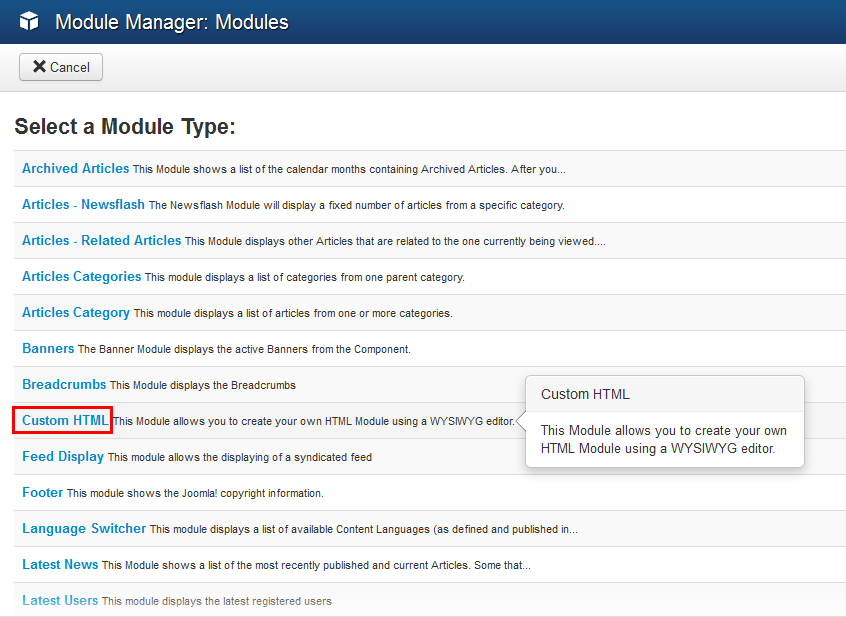
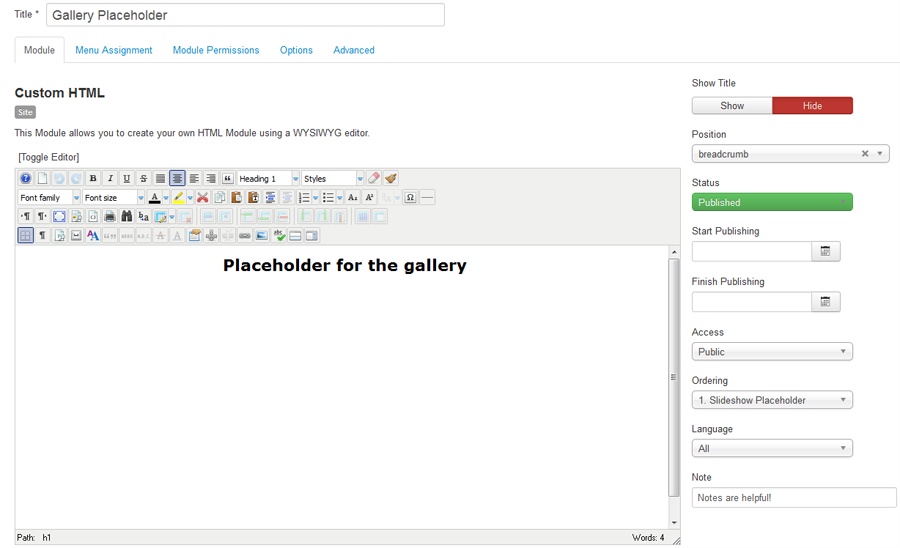
Creating placeholder modules is generally the same process no matter the type or position. Because we only need to place a little text in a module as a placeholder, a Custom HTML module is the perfect type of module for this purpose. A Custom HTML module is also good for pasting a bit of HTML code on your site outside of the main content area. This module allows to you paste any text, image, or HTML you want and have it show up in a module position. To create a Custom HTML module:
- Click on Extensions and then on Module Manager.
- Click the New button in the top toolbar.
- Choose the type of module you want to create; in our case, we will choose Custom HTML (see Figure 4-36).
In the Module tab:
-
Enter
Galleryas the module title (show or hide the title on the right sidebar) and choose a position from the drop-down. We will create a placeholder for the gallery in the Breadcrumbs position. -
Change Status to
Unpublishedif you don’t want it to appear at this time. (You can also trash the module with the Status drop-down). - If you want your module to turn on or off automatically, set the Start Publishing and Finish Publishing date and time.
- Choose the Access level if different from public.
- Select your Language if different languages are being utilized on the site.
- Add a Note, which will appear in the Module Manager list if desired.
See Figure 4-37 for how our placeholder looks with the Module tab filled out.
Note
If your desired module position isn’t in the position drop-down, you can create one on the fly by typing the name.
You can also type the name of a module position to save time scrolling through the drop-down, as it shows the positions for all loaded templates in the Template Manager. You may also want to uninstall unused templates from the Template Manager so that module positions are faster to select from the list.
Adding a note in the Notes field for a module will help clarify what a module is if the title is obscure. Notes are a great way to make your life easier in the future. You could add a note like “home page advertisement” or “contact page sidebar.” Use whatever makes it easier to find the module, because the titles don’t always make sense when editing or aren’t shown on the frontend.
In the Menu Assignment tab:
In order for your modules to appear on your website, they must be associated with one or more menu items. Since menu items essentially point to pages on your site, you’re deciding which modules will show up on which pages. To assign a module:
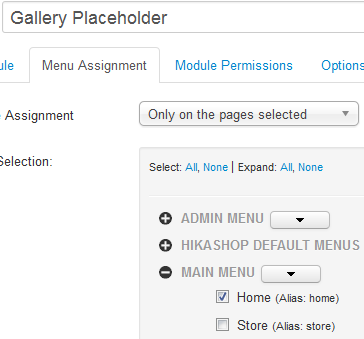
- In the Menu Assignment tab (Figure 4-38), leave the Module Assignment set to “On all pages” to have the module show up on all pages. Select “No pages” to have the module be hidden. Choose “Only on the pages selected” to choose specific pages for the module to appear on. Or choose “On all pages except those selected” to have the module publish on all pages except the ones checked.
- We will only be showing the slideshow on the home page. We will select the option “Only on the pages selected,” which brings up a list of all menu items on the site.
- Uncheck all boxes except the Home menu item by deselecting all other menu items or clicking the link None at the top and then only ticking the Home box. Check out Figure 4-39 for how this looks.
- Click Save to save the module and stay on the screen. Click Save & Close to save and go back to the Module Manager list.

Note
If you were to use the “Only on the pages selected” Module Menu Assignment, then as you add articles to the menu, you would also have to go into each module and select the menu item in the Module Menu Assignment for each module you want to appear on your new page. It’s a real time saver and a real confusion saver if someone other than you is adding pages but doesn’t have the permissions to edit modules.
The great thing about “On all pages except those selected” is that as you add pages to your menu, modules will automatically publish on them with this option selected, except on the pages that are checked.
Within the Menu Assignment tab, you can save time by using the Select: All, Select: None, Expand: All, Expand: None either at the top of the Menu Selection or the drop-down arrow button next to the menu name and checking the Select or Deselect checkboxes to check or clear all menu items in that menu with a click.
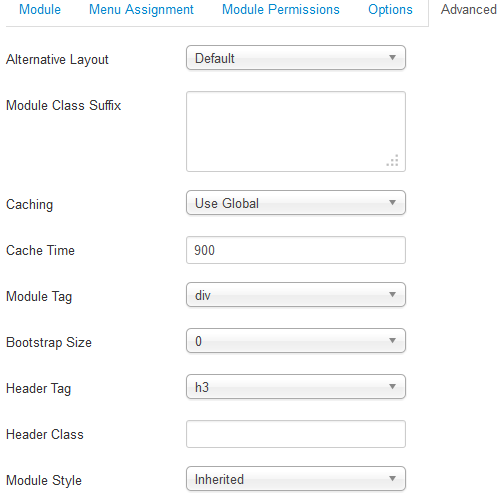
In the Advanced tab:
Enter a Module Class Suffix in the Advanced Options tab if you want to apply specific CSS styles to this module. Module Class Suffixes are appended to the normal module CSS class. If you have an off-the-shelf template like we do, the template designer may have included alternative color schemes, borders, and styling for modules that are activated by adding one of the available Module Class Suffixes in the template demo. If you are using a custom template, to check with your template designer about the suffixes available to you.
-
Afterburner2 has a number of module suffixes with the main style suffix as
box1. For the purpose of the slideshow placeholder, we will not use a suffix. - Click Save to save the module and stay on the Edit Module screen. Click Save & Close to save and go back to the Module Manager list.
Hovering over any of the titles in the Advanced tab will tell you what each field is for. Module Class Suffix is the most frequently used field in the Advanced tab.
See Figure 4-40 as an example.
Depending on which type of module you created, you’ll have a few module-specific options available. Go ahead and play around with the options, choosing the ones that best fit your needs, and see how they affect the frontend of your site.
Ordering Modules
Ordering modules in the same module position is a breeze in Joomla 3. From the Module Manager, use the position filter to display the position you want to order. Click the up/down arrows at the top of the first column on the left to activate the ordering function. Then simply drag and drop the modules in the order desired.
Duplicating Modules
Since we are creating a number of placeholder modules, we are going to simply duplicate our modules and change the following items on each so that they appear on our frontend.
- Title
- Module Position
- Show Title
- Text in the description
- Notes field
- Menu Assignment
- Add a Module Class Suffix if applicable
Duplicating modules is also very helpful if you have modules with a lot of customizations and you need more than one of these modules. You can save a lot of time by duplicating it rather than starting from scratch. To copy a module:
- From the Module Manager, click the checkbox next to the module name you want to duplicate.
- Choose Duplicate from the top toolbar. See Figure 4-41.
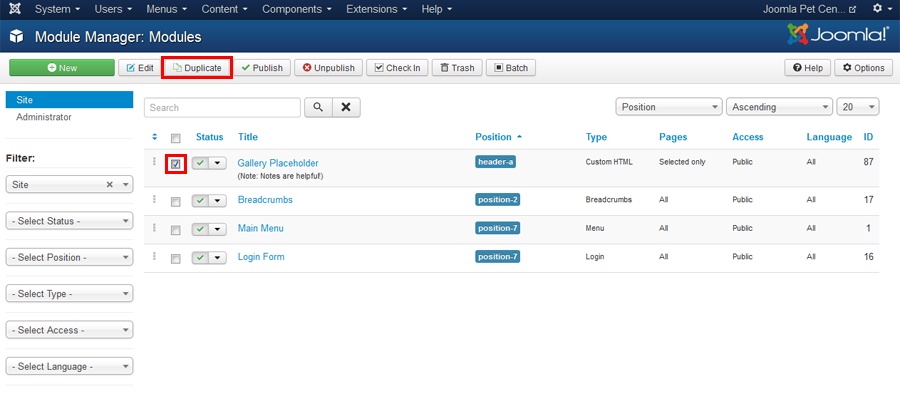
Your new copy will be saved with the same title and “(2)” added (e.g., a new copy of Gallery Placeholder will be named Gallery Placeholder (2)). Your new module will be unpublished by default.
You can then go into the module and change the title and other specifics to make it appear on the proper pages and publish it to the frontend according to our list as previously stated in this section.
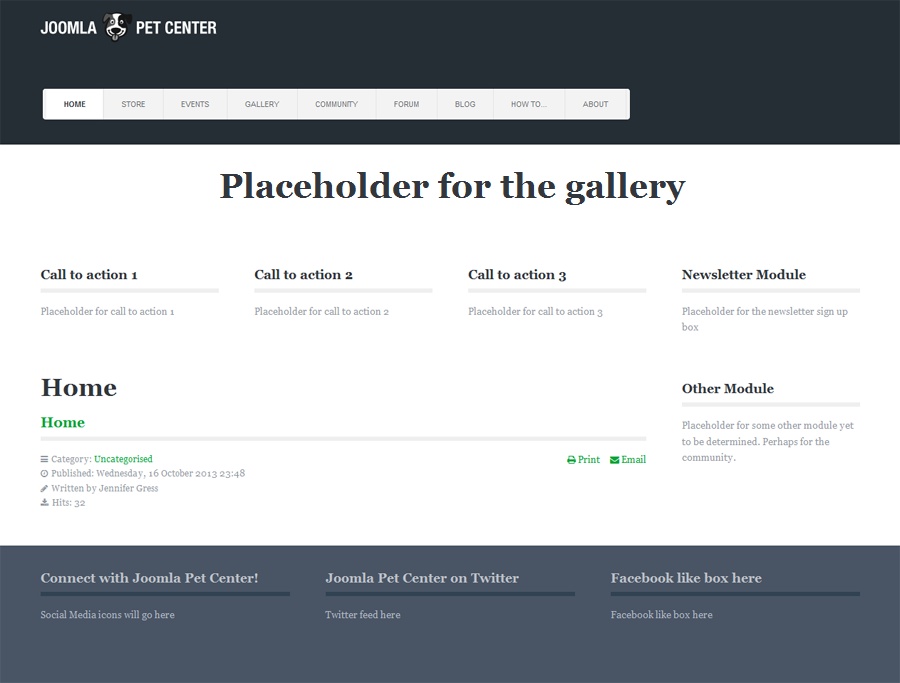
We have created the rest of our placeholder modules (See Figure 4-42). One of the top reasons to create placeholders is so that as we create content, we have a proper idea of layout in the design. If you think you might have a sidebar, adding a placeholder for it is a wise move. It may determine the optimum or maximum width for images that you place in articles.
Deleting Modules
Ultimately, we will be deleting some of our placeholder modules. Here are the step-by-step instructions on how to delete modules.
If you make a mistake or create a module you no longer need, you can simply delete it. To delete a module:
- Click on Extensions and then on Module Manager and click the checkbox next to the module name you want to delete.
- Choose Trash from the top toolbar.
Note
You can still access trashed modules by choosing Trashed in the Status filter drop-down. You can restore or permanently delete modules from the Trashed module list.
Frontend Layout After Building the Structure
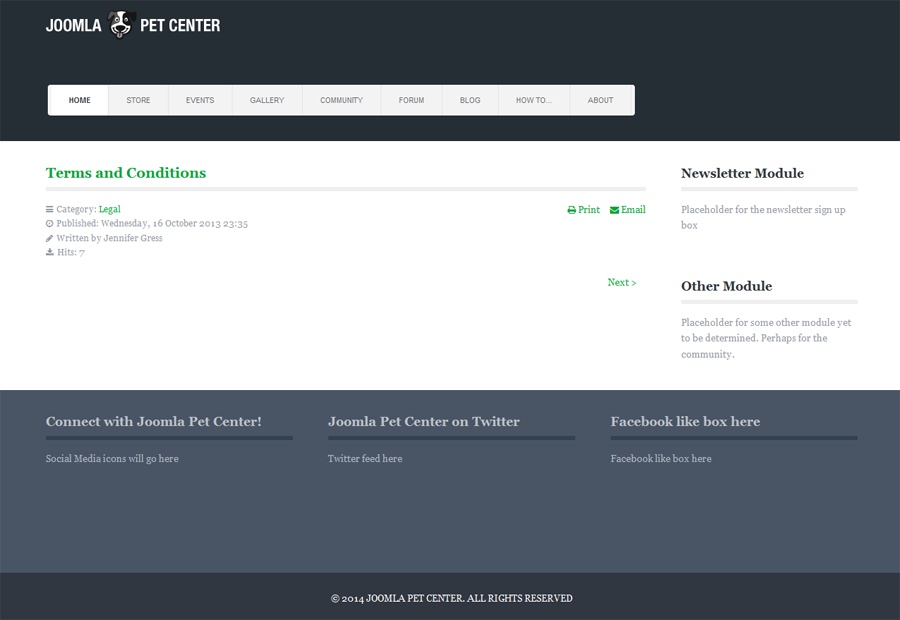
See Figures 4-43 and 4-44 for how our site looks after the work we did in this chapter.
Now that you have gotten this far, it is time to run a backup. See Mastering Backups and remember to do backups regularly, not to keep backups on your server, and that a backup is only good if you are sure it can be restored.
Next we will rock on and work with the content and fine-tune the site further.
Get Using Joomla!, 2nd Edition now with the O’Reilly learning platform.
O’Reilly members experience books, live events, courses curated by job role, and more from O’Reilly and nearly 200 top publishers.

