Chapter 1. Getting Online
The Internet, as you may have heard, is a parallel universe. It’s a travel agency, bank teller, music store, video player, radio station, and newspaper wire service, not to mention a bulletin board, chat room, post office, and global chess tournament. Or at least the Internet can be all that stuff if you can connect to it. That can be the tricky part.
The basic components you need for Internet fun include:
Internet service. Lots of stuff on the Internet’s free, but getting to the Internet usually isn’t. In fact, you have to sign up for an account with somebody—your cable TV company, phone company, or an outfit like America Online—to get your computer connected.
Equipment. Your computer may already have what it takes to get you online: a modem (if you want to get online via phone lines), an Ethernet jack (to connect by network wire), or a wireless card (to connect wire lessly). Details in a moment.
Internet software. If you’re going to send email and browse the World Wide Web, you need special programs to do so. Luckily, your computer came with these programs already on the hard drive.
This chapter explains each of these elements in more detail.
This chapter also describes each of the three primary methods people use to get their computers connected to the Internet these days, in this order:
Broadband connections. These are high-speed, extremely satisfying connections that are growing in popularity—but they’re fairly expensive.
Dial-up connections. Your computer can also connect to the Internet by dialing out over ordinary phone lines. It’s slow, but cheap.
Wireless connections. Pure heaven. Might even be free, if you’re in the right place.
Broadband Connections (Fast)
A broadband connection delivers songs, videos, and digital photos to your computer in minutes instead of hours. We’re talking at least 20 times faster than a dial-up modem. Complex Web pages that take almost a minute to appear in your browser with a standard modem will pop up almost immediately with a cable modem or DSL.
And that’s not the only reason about half of all Internetters have signed up for broadband service. Here are some of the other perks:
No dialing. These connection methods hook you up to the Internet permanently, full time, so that you don’t waste time connecting or disconnecting—ever. You’re always online. There’s no 40-second wait while your modem screeches and dials.
No weekends lost to setup. You can set up the equipment yourself to save a few bucks. But most people take the easy road: they allow a representative from the phone company or cable company to come to their home or office to install the modem and configure the Mac or PC to use it.
Possible savings. Cable modems and DSL services cost $30 to $40 a month. If you, a dial-up customer, have been paying for two phone lines just so you can talk and be online at the same time, you’ll actually save money with broadband because you can cancel the second phone line.
Broadband connections usually come in the form of a cable modem or DSL box (digital subscriber line). (In some remote areas, you can also get broadband satellite service. But this method is slow, expensive, and rare in residential areas.)
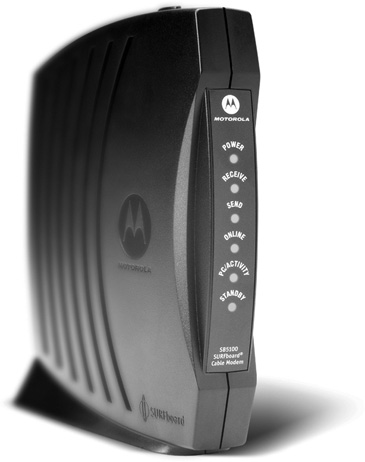
As the name suggests, a cable modem (Figure 1-1) uses your cable-TV company’s network of wires to pipe data into your house, right alongside Comedy Central and HBO. DSL, on the other hand, uses your existing telephone lines to carry its signal. You usually sign up for DSL service through your phone company.
Broadband connections generally require a computer with an Ethernet jack.It looks like a telephone jack, but slightly fatter. This jack’s an indication that your computer contains a network card, used for creating a wired connection to a home network, office network, cable modem, or DSL box. Most computers sold since about 2001 have such a jack.
Tip
Your computer may even have both a modem jack (described later in this chapter) and an Ethernet jack. The two jacks look very similar and accept the same sort of plastic plug on the end of the connecting cord, but the network jack is slightly wider. Using a flashlight, magnifying glass, and small child—if necessary—look for tiny identifying icons on each jack; a tiny telephone handset icon denotes the modem jack.
If your computer doesn’t have a network card, you can add one, as an internal card that you install inside; a metal, credit card-size card that fits into a laptop card slot; or an external box that dangles from the computer’s USB connector.
The Broadband Setup
If you’ve ordered cable-modem or DSL service, a technician may come to your house to do all the necessary wiring and configuration for you. All you have to do is be home to let the technician in.
In some cases, however—especially if you already have cable TV or phone service—you may be offered a self-installation kit. As thanks for doing the cable person’s job, a tasty discount is usually part of this arrangement.
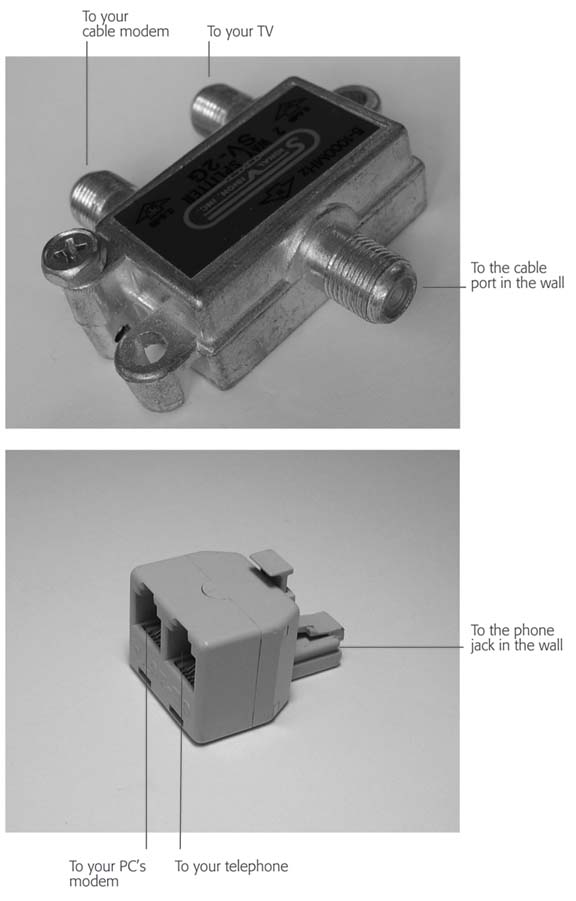
If you opt for the self-installation route, your kit probably contains the modem itself, a software CD, an Ethernet or USB cable to connect to your computer, a splitter box (Figure 1-2, top) to divide your incoming cable line into two, and paperwork containing account names, numbers, and passwords.
Note
If you’ve opted for a DSL box, your kit may also include several plastic DSL filters. You’re supposed to attach them to all your active phone lines except the one the computer’s using. (DSL works by maximizing the amount of data that your regular old copper phone wires can carry, but doing so makes the line noisier than a teenage girls’ slumber party. The filters you attach to your telephone, fax machine, or other working phone lines screen out the data noise and let you use the phone to order pizza, even as you’re downloading a big video file from the Web.)
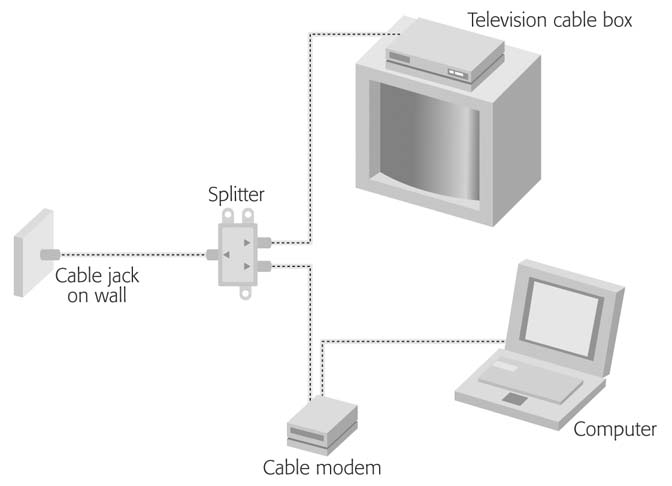
The company’s setup instructions will probably direct you to unscrew the round coaxial cable that runs from the wall to the back of the cable box and attach the splitter. Then you use the additional cable provided to connect one side of the splitter to the cable box, and the other side to the back of the cable modem. Use the Ethernet or USB cable to connect the cable modem to the computer’s network (Ethernet) or USB port. Figure 1-3 maps the typical setup.
Tip
You can plug the cable modem straight into the computer. That’s all you need if you only have one computer. But if there’s more than one computer in the house, consider buying an inexpensive box called a router. If you plug the cable modem (and all computers) into that, they can all share the broadband connection for a single price. See Section 1.1.1.2 for more on sharing strategies if you’ve got multiple computers.
After everything’s all plugged in, the wrapup steps differ slightly depending on whether you’re using Windows or a Macintosh.
Wrapping up the Windows setup
Dig the CD out of the box, put it in your computer, and run the setup program on it. You’ll be asked to plug in the account information from the cable or DSL company: your new account name, password, and so on. Your provider should also supply the settings and information you need to set up your new email address; see Section 14.1.4.4 for instructions on how to configure an email account.
CDs that come with broadband kits are designed to take your hand and walk you through the setup process. If you’ve got a fistful of account settings, user names, and passwords from your provider—and no fear of your computer’s control panels—you can also manually plug in your new connection settings. Choose Start → Control Panel → Network Connections and then choose “Create a new connection.” Click “Connect to the Internet” and then click Next.
On the next screen, click the button for “Set up my connection manually.” Click Next again.
The next box presents you with two choices for a broadband connection: one that requires a user name and password and one that’s always on. In most cases these days, you use the “always on” option, but check the papers from your ISP.
If your connection is always on, click Next to finish up. If your ISP requires a name and password to use your connection (some DSL providers do), the next few screens walk you through typing in the user name and password.
Wrapping up the Mac OS X setup
Once the cable modem or DSL box is connected to your Mac’s Ethernet jack, you should be able to get online immediately; no software installation is generally necessary.
The beauty of cable modems and DSL service is that they offer a geeky but wonderful feature called DHCP, which means, “I’ll configure all the network settings for you.” Open your Web browser and enjoy.
Sharing a Broadband Connection
You’re paying good money each month for that speedy broadband connection. If you have more than one computer around the house in need of Internet access, you can share your DSL or cable connection with the other, less fortunate machines. You do this by setting up a home network.
A home network is like your own personal Internet: All the computers in your house can share files, use the same printer, and divide up the high-speed Internet connection so everyone in the house can surf on their own Macs or PCs.
To create a basic home network, you need to buy an inexpensive, compact metal or plastic box called a router. It offers one jack for your broadband modem and several others for network cables from all your computers. Once you plug in the modem and network cables between the router and each computer, the router divides your modem’s pipeline among the connected computers so they can all be online at once.
Note
You can also opt for a wireless router, which lets you share the broadband computer with all the wireless computers in your house. See Section 1.2.
Powerline networking, where your house’s existing electrical system is converted into a discreet home network, is another way to get your computers connected without having to string the house with Ethernet cables.
For an in-depth look at setting up your own home network, check out Home Networking: The Missing Manual, which shows you how to make a wired, wireless, or mixed network out of PCs, Macs, or Macs and PCs.
Dial-Up Connections (Slow)
The least expensive way to get online is to use a narrowband or dial-up connection, in which your computer’s modem calls your Internet provider’s modem over the telephone line. You actually connect a piece of phone wire between your computer and the wall jack.
Sending Internet information over a phone wire is slow (for the geeks scoring at home, the top theoretical speed is about 53 kilobits per second). In today’s Internet world of video, audio, and animated, glittering Web pages, this type of connection can be excruciatingly time consuming. You may lapse into a catatonic state waiting for a video clip to play in your Web browser.
On the bright side, a dial-up connection is inexpensive, doesn’t require a lot of special hardware, and works just about anywhere you can find a phone. If you’re just using the connection for email messages and light Web browsing, it’s often perfectly fine.
Two kinds of dial-up services await you:
Online services. Services like America Online, Earthlink, PeoplePC, and Microsoft’s MSN are handy if you travel a lot because these national services offer local dial-up numbers just about everywhere in the country. (That is, your laptop can make a local, inexpensive call from your hotel room or friend’s house.)
These services are often easier to set up than standard Internet service providers (described next) because the starter CD walks you through the setup process.
To go online, open the related program (the AOL program, for example) from your Start menu. Type in your password and click the Sign On button that appears on the Welcome screen. If you use the Mac OS X edition of AOL’s software, open the program by choosing Applications → AOL. Type in your password and click the Sign On button.
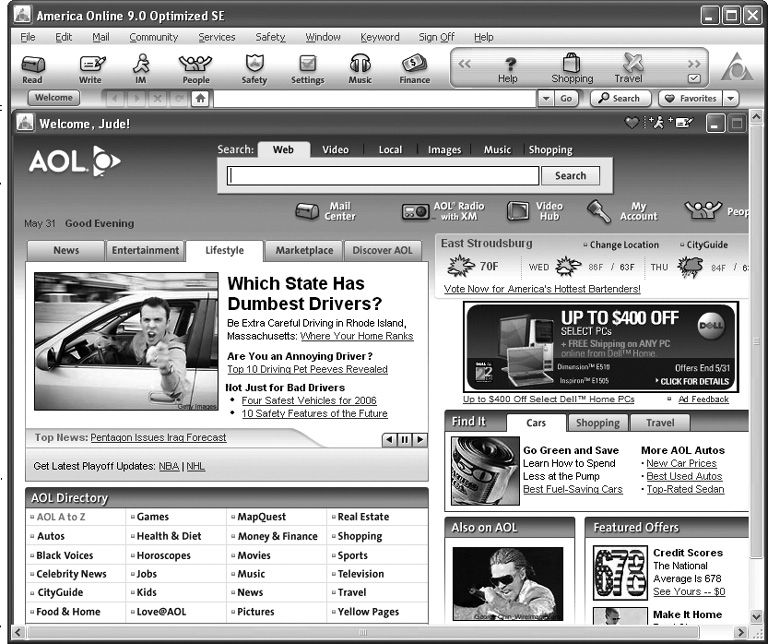
After a minute or so, during which your computer’s modem connects with AOL’s, you see AOL’s dashboard of menus and graphics (Figure 1-5), with icons to click for checking mail or browsing the Web. Some services (AOL and MSN, for example) even offer specialized Web pages and other goodies just for subscribers; others provide free anti-virus and security software to their members.
Figure 1-5. When you log on to AOL, you land on its Welcome screen. On this page, you can quickly see the top news stories of the day, the current weather conditions, and a link to the latest sports scores. This onscreen dashboard also gives you icons to click your way into other corners of the service—like your AOL mailbox or the company’s online music and video offerings. As you can see, your eyeballs also get pelted with a few advertisements here and there for good measure.Note
Along with its traditional dial-up plans, America Online now offers broadband service for Windows. Even if you sign up for and install the dial-up software, you can always upgrade to the broadband plan online at http://discover.aol.com/aolhighspeed.adp or by calling 800-392-5180.
Standard Internet Service Providers (ISPs). If you just want to get on the Net and aren’t afraid of rolling up your sleeves and setting up your computer’s communications software yourself, a traditional Internet service provider (ISP) company can get you online for a few bucks less than most online services. You don’t have to install some space-hogging proprietary program, either; you can use any email program or Web browser you like.
The following pages apply primarily to people who’ve signed up for this kind of standard ISP service.
Meet the Modem
Modem is short for modulator-demodulator, a bit of circuitry that sends and receives information over telephone lines. Almost every computer made in the last 10 years has a modem built right inside. (If you see what looks like a standard phone jack on the back or side panel of your computer, that’s it.)
If your computer has a built-in modem jack, all you have to do is connect it to a phone jack in the wall (or, if you’re in a hotel room, to the Data jack that usually appears on the side of the hotel room’s phone). Use a standard phone cord, just like the one that connects your phone to the wall jack.
In the unlikely event that your computer doesn’t have a modem, you may have to buy an external one that connects to your computer’s USB jack. In that case, install the software that came with it as a first step; the modem won’t work without it. You may have to plug the modem into a power outlet, too.
Note
Almost every computer sold in the last 10 years has a built-in modem. Weirdly, the exception is the very latest Apple laptops, which lack one. Apple evidently believes that all of its enlightened customers stay exclusively at hotels that offer wireless Internet service. If you want to connect one of these MacBook or MacBook Pro laptops to the Internet through a dial-up connection, you’ll have to buy Apple’s $50 external USB modem. Fortunately, there’s no software setup or power cord involved.
Finding an ISP
You can find Internet service providers in the phonebook, computer-magazine ads, and, of course, online. Here are some key factors to consider when shopping for an ISP:
What do other people think of the service? Ask friends what they use and how they like it. If you can get onto the Internet somehow (from a friend’s computer or at the library, for example), read the reviews at www.broadbandreports.com or www.theispguide.com. (And see Section 2.1.2 if you’ve never used a Web address before and don’t know what the previous sentence means.)
How much is it really going to cost per month? Some companies offer special deals for the first few months of service—but then the real rate kicks in. (Hint: It’s never lower than the teaser rate.) Furthermore, some require you to buy your own modem and other equipment. Find out all the costs ahead of time to prevent unpleasant surprises later.
Can you get to your email from anywhere? Are there local phone numbers you can use all over the country?
How’s the company’s technical support? If you’re up in the middle of the night trying to get your Internet connection to work, having a company with 24/7 tech help can be a real comfort.
Once you’ve narrowed down a service provider, make sure it’s compatible with your computer hardware and software. The truth is, virtually every broadband and dial-up service should work identically with Macintosh and Windows. Not all ISPs are equipped to answer questions about both kinds of computers, though, so if you’re a Mac fan, ask before you sign up.
Setting Up a Dial-Up Connection (Windows)
Windows XP lets you set up the software side of your Internet connection before you’ve actually picked an ISP. In fact, it even offers to help you find an ISP. Of course, its offerings include only Microsoft services or partners—but hey, what did you expect?
If your Internet service provider supplied a setup CD, pop it into your computer’s drive and click your way through the setup screens until you arrive on the Internet. Be prepared to whip out your credit card and punch in some numbers as part of the process. The company will keep your card on file and you’ll see a charge pop up on your credit card bill once a month.
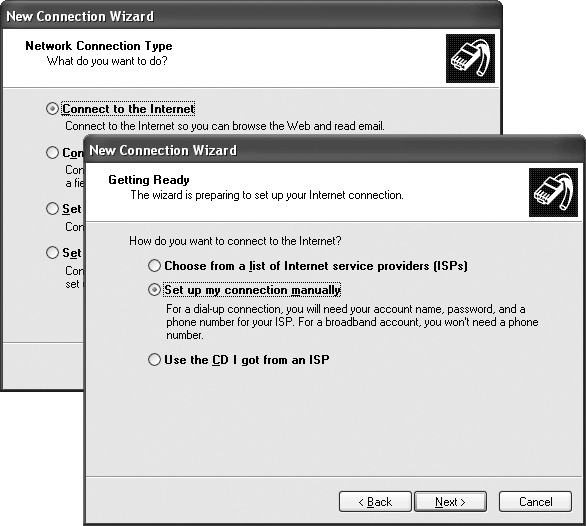
The New Connection Wizard
If you didn’t get a setup CD from your ISP, you can use the Windows XP New Connection Wizard (Figure 1-6).
Note
This section describes setting up an Internet connection with Windows XP. If you’re still using an older version of Windows, choose Start → Programs → Accessories → Communications → Internet Connection Wizard, or Start → Programs → Online Services to find the wizards to lead you to the online Wonderland.
It may sound like a magical dating guru for lonely single people, but the Windows XP New Connection Wizard is designed to get you on the Internet by asking you a series of questions about your computer and software. (As for actual dating sites, see Chapter 17.)
To open this wizard, choose Start → All Programs → Accessories → Communications → New Connection Wizard. Make sure that your computer is plugged into a phone jack.
Click Next, “Connect to the Internet”, Next, “Set up my Internet connection manually”, and Next. Then click “Connect using a dial-up modem”, and then Next.
On the following several screens, you’ll be asked to type in a few pieces of information that only your ISP can provide: the local phone number that connects your PC to the Internet, your user name, and your password. (You can call your ISP for this information, or consult the literature delivered by postal mail when you signed up for a dial-up account.)
You’ll also be offered these three important checkboxes:
Use this account name and password when anyone connects to the Internet from this computer. This option refers to the Windows XP user accounts feature, in which various people who share the same computer keep their worlds of information and settings separate by signing in each time they use the machine. It’s asking you, “Is this the Internet account you want this PC to use no matter who’s logged in?”
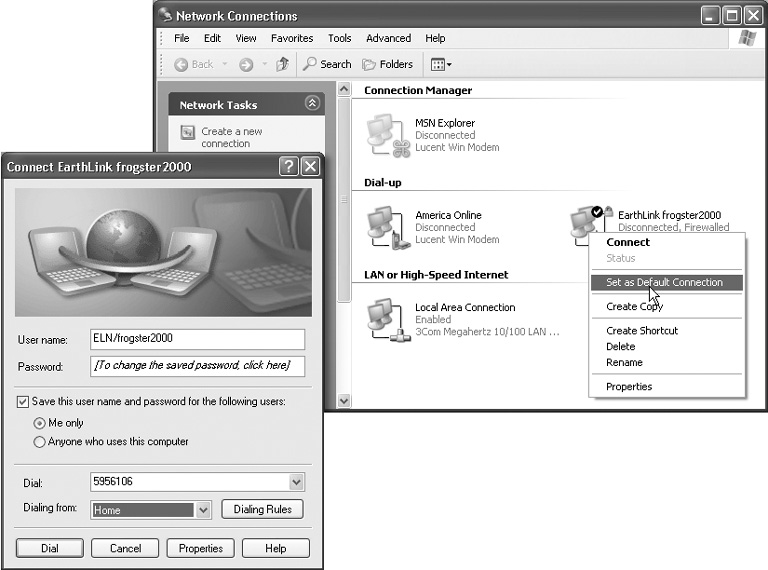
Make this the default Internet connection. Some people have more than one way to access the Internet. Maybe you connect your laptop to a cable modem when you’re at home but dial out using the modem when you’re on the road. Turn on this checkbox if the account you’re setting up is the one you want to use most often.
Tip
You can always change your mind. In the Network Connections window (Figure 1-7), right-click a connection icon and choose “Set as Default Connection” from the shortcut menu. On the other hand, if you’re a laptop-toting traveler, you might want to specify a different connection in each city you visit. In that case, right-click the default icon (shown by the checkmark at right in Figure 1-7) and choose “Cancel as Default Connection” from the shortcut menu. This way, your laptop will never dial automatically, using some hopelessly irrelevant access number for the city you’re in.
Turn on Internet connection firewall for this connection. Windows XP offers a certain degree of protection from incoming hacker attacks in the form of a personal firewall (see Section 21.6.1). Turn this off only if you’ve equipped your PC with other firewall software (or if you have a router, as described in Section 1.1.1.2).
When it’s all over, you’ll find that you’ve given birth to a connection icon, as shown at right in Figure 1-7. Once you’ve correctly typed in all the necessary information, you should be ready to surf.
Tip
If you carry a laptop from city to city—each of which requires a different local Internet number—you might want to create more than one connection icon by plugging in a different local access number each time. (Alternatively, just create one connection icon—and then, in the Network Connections window, right-click it and choose Create Copy.) Another helpful hint: Name each of these connections after the appropriate location (“EarthLink Cleveland,” “EarthLink Stamford,” and so on), so you’ll remember which one to use for which city.
Wading through all these dialog boxes sets up almost everything—but not your email account. Skip over to Chapter 14 for the details on that. If you want to check out the Web right away, though, you only have to flip to the next chapter.
Actually going online
When your PC dials, it opens up a connection to the Internet; this may take a minute or so as your modem dials the right phone number, issues its high-pitched squeals of welcome, and so on. But aside from tying up the phone line, your PC doesn’t actually do anything until you launch an Internet program, such as an email program or a Web browser. By itself, making your PC dial the Internet’s no more useful than dialing a phone number and then not saying anything.
Therefore, using the Internet is generally a two-step procedure: First, open the connection; second, open a program.
People who bill by the hour may prefer to initiate the connection manually—for example, by double-clicking the connection’s icon in the Network Connections window (Figure 1-7, right). The Connect To dialog box appears, as shown at left in that figure. Just press Enter, or click Dial, to go online.
Fortunately, Windows offers an automated method that saves you several steps: You can make the dialing/connecting process begin automatically whenever you launch an Internet program. That way, you’re saved the trouble of fussing with the connection icon every time you want to go online.
To turn on this feature, just open your Web browser and try to Web surf. When the PC discovers that it’s not, in fact, online, it will display a Dial-up Connection dialog box. Turn on the “Connect automatically” checkbox, and then click Connect.
From now on, whenever you use a program that requires an Internet connection, your PC dials automatically. (For example, specifying a Web address in a window’s Address bar, clicking the Send and Receive button in your email program, clicking a link in the Windows Help system, and so on.)
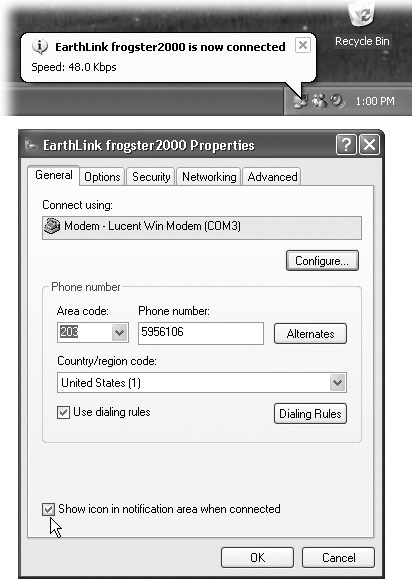
The Notification Area icon
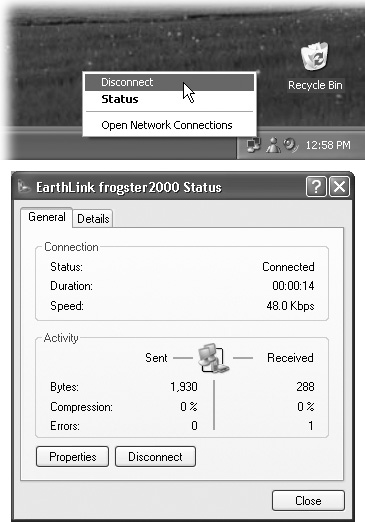
While you’re connected to your ISP, Windows XP puts an icon in the notification area (Figure 1-8, top), reminding you that you’re online. You can watch the icon light up as data zooms back and forth across the connection. And if you point to it without clicking, you’ll see a yellow tooltip showing your speed and how much data has been transmitted. (If this little taskbar icon isn’t visible, take a moment to turn it back on, as directed in Figure 1-8. You’ll find it to be an important administrative center for going online and offline.)
Disconnecting
The trouble with a standard dial-up Internet connection is that, unless you intervene, it will never hang up. It will continue to tie up your phone line until the other family members hunt it down, hours later, furious and brandishing wire cutters.
Therefore, it’s worth taking a moment to configure your system so that it won’t stay online forever.
When you’re finished using the Internet, end the phone call by performing one of the following steps:
Right-click the little connection icon on your taskbar. Choose Disconnect from the shortcut menu (Figure 1-9, top).
Double-click the little connection icon on the taskbar. Click the Disconnect button in the Status dialog box that appears (Figure 1-9, bottom), or press Alt+D.
Right-click the connection icon in your Network Connections window. Choose Disconnect from the shortcut menu.
You can also set up your PC to hang up the phone automatically several minutes after your last activity online.
To find the necessary controls, right-click your connection icon (Section 1.2.3.2); from the shortcut menu, choose Properties. In the resulting dialog box, click the Options tab. Near the middle of the box, you’ll see a drop-down list called “Idle time before hanging up.” You can set it to 1 minute, 10 minutes, 2 hours, or whatever.
Setting Up a Dial-Up Connection (Macintosh)
If your Mac uses AOL, EarthLink, or another online service, you’ve probably already enjoyed the step-by-step setup software that prepares your Mac for its online adventures. Happy surfing!
If you have a traditional ISP, though, you must plug a series of settings into the Network pane of System Preferences. You’ll need to get this information directly from your ISP by consulting either its Web page, the little instruction sheets that came with your account, or a help desk agent on the phone.
The PPP tab
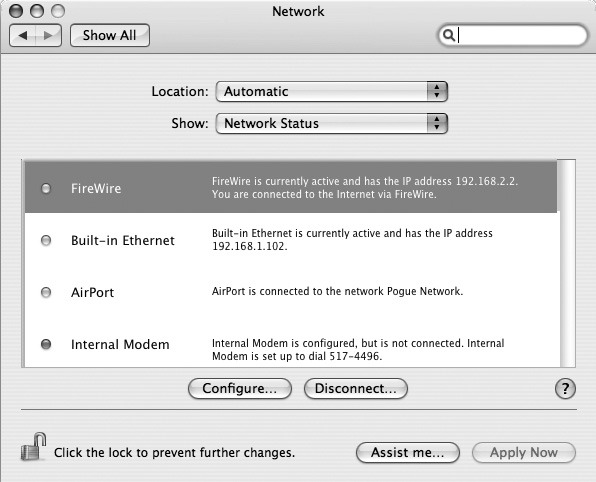
Start by opening ![]() → System Preferences and clicking the Network icon. You’re shown the view pictured in Figure 1-10: a Network Status screen that summarizes the various ways your Mac can connect to the Internet or an office network, and how each connection is doing.
→ System Preferences and clicking the Network icon. You’re shown the view pictured in Figure 1-10: a Network Status screen that summarizes the various ways your Mac can connect to the Internet or an office network, and how each connection is doing.
From the Show pop-up menu, choose Internal Modem. (Or just double-click the Internal Modem “row” of the status screen.) You should see the PPP tab, where you fill in the blanks like this:
Service Provider. Type in the name of your ISP (EarthLink, for example).
Account Name. This is your account name, as assigned by the ISP. If you’re BillG@earthlink.net, for example, type BillG here.
Password. Specify your ISP account password here. Turn on “Save password” if you’d rather not retype it every time you connect.
Telephone Number. This is the local access number that your modem’s supposed to dial to connect to your ISP.
Tip
If you need your Mac to dial a 9 or an 8 for an outside line (as you would from within a hotel), or *70 to turn off call waiting, add it to the beginning of the phone number followed by a comma. The comma means “pause for two seconds.” You can also put the comma to good use when typing in the dialing sequence for a calling card number.
Alternate Number. This blank lets you type in a number to dial if the first one’s busy.
PPP Options. Click this button to bring up a special Options dialog box. Here, for example, you can specify how long the Mac waits before hanging up the phone line after your last online activity, and how many times the Mac should redial if the ISP’s phone number is busy.
Tip
In the Session Options, one checkbox you’ll almost certainly want to turn on is “Connect automatically when needed.” It makes your Mac dial the Internet automatically whenever you check your email or open your Web browser. (Otherwise, you’d have to establish the Internet call manually, using the Internet Connect program described in Section 1.2.4.2. Only then could you check your email or open your Web browser.)
Going online
If you’ve turned on “Connect automatically when needed,” your Mac dials and connects to the Internet automatically whenever an Internet-related program tries to connect (a Web browser or email program, for example).
If you didn’t turn on that option, you can make your Mac dial the Internet in one of two ways:
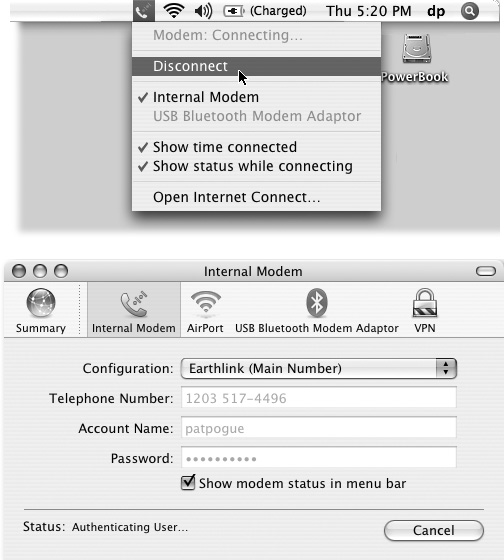
Using Internet Connect. This little program is in your Applications folder. The main item of interest here is the Connect button, which makes the Mac dial the Internet. Once Internet Connect indicates you’re online, open your Web browser, email program, or other Internet software and get surfing.
If you’re smart, however, you’ll turn on the “Show modem status on menu bar” checkbox. It adds a tiny telephone icon—the Modem Status menu-let—to the upper-right corner of your screen, which lets you completely bypass Internet Connect the next time you want to go online (Figure 1-11).
Using the menu-bar icon. Just click the Modem Status menulet and choose Connect from the pop-up menu. Your Mac dials without even blocking your desktop picture with a window.
Disconnecting
The Mac automatically drops the phone line 15 minutes after your last activity online (or whatever interval you specified in the PPP Options dialog box).
Of course, if other people in your household are screaming for you to get off the line so that they can make a call, you can also disconnect manually. Either choose Disconnect from the Modem Status menulet (Figure 1-11) or click Disconnect in the Internet Connect window (Figure 1-10).
Wireless Connections (Awesome)
For years, getting onto the Internet meant plugging into it—that is, literally connecting a wire to your computer that, if you could crawl inside and follow it through all the walls, ceilings, pipes, and relay stations of the world, would eventually lead you to the Internet.
Nowadays, however, an increasing number of people get online without connecting any wires at all. Wireless hot spots, also known as WiFi or AirPort networks, are invisible pools of Internet signal, 300 feet across, that let wireless-equipped computers get onto the Internet at high speed. Travelers with wireless-ready laptops connect to the Internet via these wireless hot spots in airports, coffee shops, hotel lobbies, and just about anywhere else they have work to do or time to kill.
Usually, you have to pay a fee to use one of these public hot spots. But if you live in an apartment building or other tightly spaced housing, an even better option may await you. You may be able to hop onto the Internet using someone else’s wireless signal. Sometimes the signal bleeds into your home without the owner’s knowledge, in which case—you very lucky person—you may be able to get online free, at least until the owner catches on. More often, though, someone in the building makes his signal available deliberately, collecting, say, $5 a month from each person who shares it.
If you’re such a lucky neighbor, then it’s not true that you need an ISP to get onto the Internet. Your neighbor has an ISP account, which he’s sharing with you. In that case, you’re getting online not via an ISP, but through a VSN—a Very Shrewd Neighbor.
WiFi at Home
But WiFi networks are also very useful at home. If your cable modem or DSL box is in an inconvenient area of the house, and you don’t feel like snaking 50 feet of ugly network cable from the den to the bedroom, setting up a wireless network to share your broadband connection is just the ticket.
Setting up a wireless hot spot in your home is easy, at least compared with other networking tasks. Remember how you’d ordinarily connect your cable modem or DSL box directly to your computer? For a wireless network, you connect it instead to a $40 box called a wireless router, which then beams the network signal over radio waves to the entire house (or at least to the nearest 150 feet of it, even through walls). Any computer with wireless networking circuitry can join this type of network; in fact, they can all surf simultaneously.
Note
Most laptops sold these days have a built-in wireless card inside, but you can easily add one to an older laptop. Wireless network adapters are also available in different forms for desktop computers as well. Home Networking: The Missing Manual covers creating and configuring a wireless network in detail.
How to Join a Hot Spot
When you first turn on your wireless laptop in the vicinity of a wireless network—whether at home or in some public place—Windows XP and Mac OS X usually bring it to your attention. A dialog box asks if you want to join it. (Figure 1-12 shows this situation in Windows.)
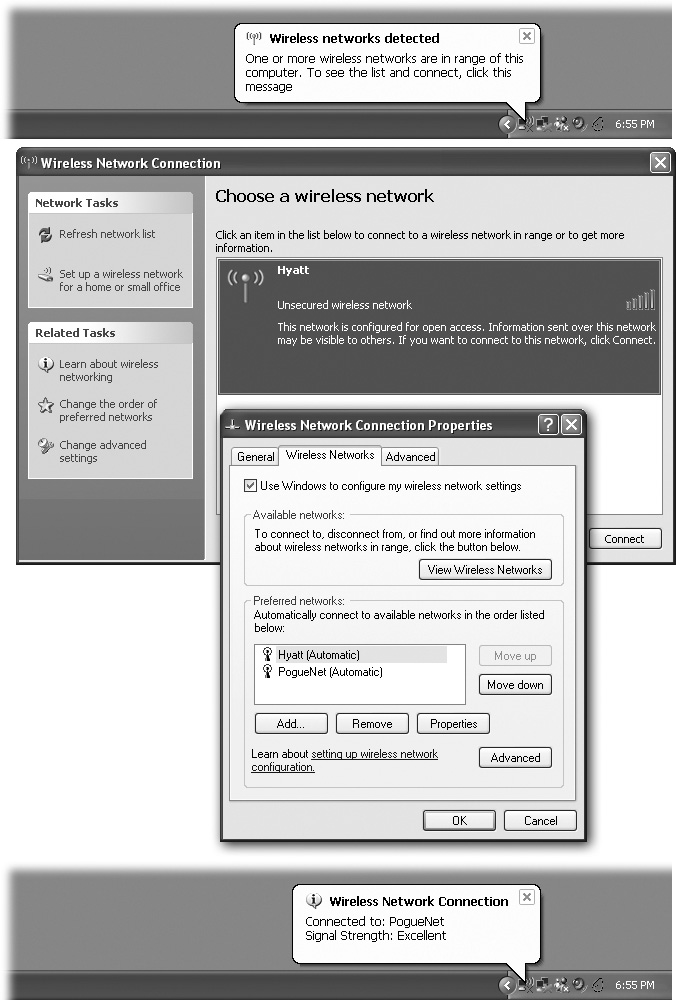
If the hot spot is free and unprotected by a password, just click OK or Connect; you’re online. Check your email, browse the Web, and do other Internet-based tasks.
If the hot spot, like those in airports and hotels, requires payment up front, clicking OK or Connect doesn’t actually get you onto the real Internet. Instead, you’re now supposed to open your Web browser, where you’ll find a demand for your credit card number. Prices vary, but $8 for 24 hours worth of access isn’t unusual. You can’t proceed to the wider Web or check your email until you first plug in a credit card number and sign up for a plan (that is, you pay for 15 minutes, an hour, or a day of service).
Note
Public networks are not private places. It’s theoretically possible for a hacker seated nearby, using special packet sniffing software, to intercept text that you’re sending by email or writing in a chat room. (Transactions on Web pages, however, are safe as long as you see a tiny padlock icon in the corner of the Web browser window.) Chapter 21 has plenty of information on how to keep yourself safe online at home and in the hotspot.
Software
The last piece of the Getting Online puzzle is the software. But here’s the good news: Your computer probably has the essentials already installed: an email program, Web browser, and text-chat program, for example. And once you have those, getting anything else you need is a snap.
If you have a PC, check your Start menu for Outlook Express and Internet Explorer, the free email and Web programs Microsoft has included with every copy of Windows it’s made in the past 10 years. If you’re a Macintosh sort of person, open Mac OS X’s Applications folder to see your free Apple Mail and Safari browser programs there waiting for you.
The rest of this book covers each software type in detail. But for your appetite-whetting pleasure, here’s a summary of the key, free Internet software pieces and what kinds of happiness they’ll bring you.
Web Browsers
A Web browser program is your window to the World Wide Web: the Inter-net’s vast collection of documents, pictures, videos, games, music, and other elements of the human experience. A browser lets you do just what it says: browse from page to page by pointing and clicking with your mouse.
As mentioned in the previous section, your computer has a Web browser already installed on it. Chapter 2 explains the alternatives, and it also explains how to use this browser thing to get around the Web.
Email Programs
An email program is like a cross between a word processor and an electronic postal worker. It lets you exchange typed messages with people around the world.
It also lets you store, sort, and save all the messages other people have sent to you. This means you can keep track of ongoing correspondences, file away electronic receipts of items you’ve purchased online, or collect all of the annoying junk mail that finds its way to your digital mailbox—and it will—and erase it all at once.
As you now know, your computer has a basic email program on it already. Chapter 14 describes how to use it—and why you might want to consider alternative programs, including Web-based mail programs that let you check your messages from any computer in the world.
Instant Messaging Programs
Humorist Dave Barry once described the Internet as “CB radio, but with more typing”—and using an instant messaging program certainly makes you feel that way. Instead of sending off an email message and waiting for your pal to reply, an instant messaging (IM) program, also called a chat program, lets you conduct real-time, typed conversations with the person on the other end. You get instant feedback (“Where should we go to dinner tonight?”), and you save money on long-distance phone calls.
Many instant messaging programs also let you transfer files directly to the other person, make free audio and video calls, and chat with several people at once (helpful for party planning or remote family meetings).
You may already have an IM program on your computer, too. Windows XP comes with Windows Messenger, and Mac OS X comes with iChat. Chapter 15 has details on how to use them.
Security Software
You’ve probably heard the stories in the paper about people getting ripped off on the Internet, getting infected by viruses, or having their computers taken over by evildoers. This sort of thing can happen. But you can take precautions so that the bad side of the Internet doesn’t infringe upon all the good you can do with it.
Another piece of software you may want to consider—alas, one that probably did not come free on your computer—is an Internet security suite that protects you and your computer from Internet evils like viruses, worms, hackers, crackers, phishers, pharmers, and identity thieves. (For more, see Chapter 21.)
Viruses and spyware are generally Windows-only treats. Some of the online scams, though, are equally dangerous to Mac fans. Chapter 21 explains what all of these sinister-sounding creatures are, and how to keep yourself safe with software.
Advanced Connection Tricks (Windows)
Because so many people consider the Internet such an important PC feature, Windows XP lets you fine-tune its dialing, modem, and Internet settings to within an inch of their lives. You should consider this section optional—or power-user—reading.
To adjust the settings for your modem’s dialing patterns, choose Start → Control Panel. Click the “Show Classic view” link, and then double-click “Phone and Modem Options”. The resulting dialog box (Figure 1-13, left) consists of three major tabs (Dialing Rules, Modems, and Advanced), each serving important functions.
Dialing Rules Tab
The Dialing Rules tab (Figure 1-13, left) is made for travelers. As you move from place to place, you may wind up in locations that have very different dialing requirements. The area code may change, not to mention the requirement to dial 9 for an outside line, the availability of touch-tone dialing, and so on.
To set up the dialing rules for your current location, click its name and then click the Edit button. The New Location box appears (Figure 1-13, right), bristling with enough controls to make your modem sing, dance, and stand on its head.
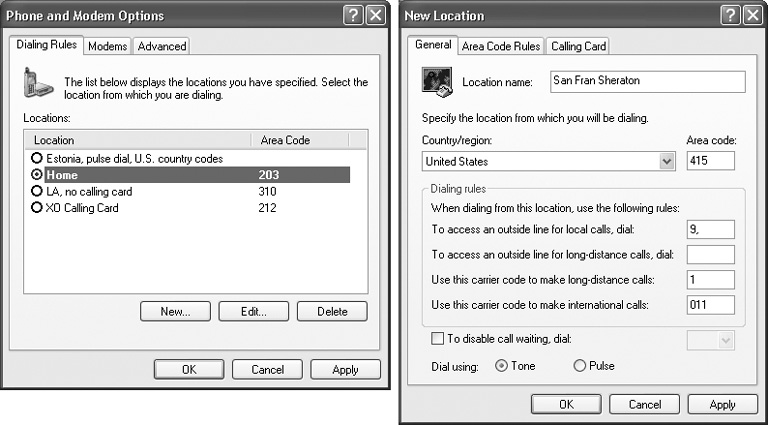
General tab
Here are the guidelines for filling out this dialog box:
Location name, Country/region, Area code. These boxes inform Windows where you’re presently located. When your modem dials another city or country, Windows XP will know when to dial a 1 (and a country or area code, when necessary) before dialing.
To access an outside line for local/long-distance calls. In many offices and hotels, you must dial a number (usually 8 or 9) to get an outside line. If you enter numbers into these text boxes, Windows will dial them before the regularly scheduled Internet number.
Use this carrier code to make long-distance/international calls. These options specify the codes that you have to dial, even before the area code, when dialing internationally. For example, in the United States, the long distance carrier code is 1. For international calls, the carrier code consists of the digits you dial before the country code—to make international calls from the United States, for example, the carrier code is 011.
To disable call waiting. If you have call waiting, that little beep that announces an incoming call can scramble your Internet connection. Fortunately, Windows XP is delighted to automatically disable call waiting whenever you use the modem. Turn on this checkbox; from the drop-down list to its right, choose from the list of the common call waiting disabling key sequences (*70, 70#, and 1170). (If you don’t know which sequence works for your local phone company, check the front of your phone book.)
When the modem disconnects from the Internet after your online session, call waiting automatically returns to the phone line.
Tone or pulse dialing. Specify whether your telephone service is touch-tone (push-button) or pulse (as on old-fashioned rotary-dial phones).
Area Code Rules tab
It used to be easy to dial the telephone in America. For local calls, you dialed a seven-digit number. Calls to other area codes started with 1 and then the area code.
Not anymore. Many metropolitan areas now utilize 10-digit dialing—an insidious system that requires you to dial the full area code even for your next-door neighbor. Worse, some cities have several different area codes—not all of which require a 1-plus-area-code dialing pattern. To confuse things further, in some cases, you dial only the area code plus the seven-digit number.
To clue your modem in to the vagaries of your own area’s area code practices, click the Area Code Rules tab. From there, set up the dialing sequences for certain locations by clicking the New button to open the New Area Code Rule dialog box. The resulting options let you specify the area code and three-digit prefixes. Click OK to return to the New Location dialog box.
Calling Card tab
If you, the shrewd traveler, feel that there’s a better use for your money than paying most of it to your hotel’s $3-per-minute long-distance scheme, this dialog box is for you. It lets you train your modem to bill its calls to a calling card (Figure 1-14).
Note
Creating a calling card profile doesn’t mean you must use it every time you use your modem. In fact, you can choose whether or not to use the calling card each time you dial out.
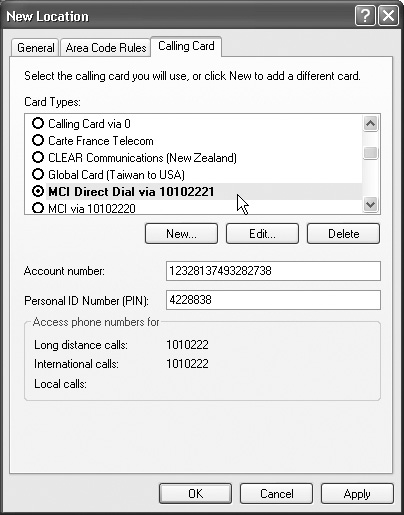
If your calling card isn’t listed, you can create a setup for it yourself, which Windows then adds to the list. Armed with the instructions from your calling card company, click the New button. In the resulting dialog box, specify the card name, account number, PIN, and so on.
By clicking the Long Distance tab in the New Calling Card dialog box, you can specify the steps needed to use the card for long distance. For instance, you may need to dial a number and then wait for a tone that confirms that the number has been accepted. In this dialog box, you can specify the number of seconds you want Windows to wait. (You can set up the same kinds of rules for international and local calls by clicking the appropriate tabs.)
Once you’ve set up a calling card, it becomes part of one of these dialing rules. Now when you want to go online, you’ll be able to bill your modem calls to your calling card on a case-by-case basis.
To do so, start by double-clicking your connection icon (Figure 1-7). When the dialog box appears, use the “Dialing from” drop-down list to choose the name of the dialing-rule setup that contains your calling card configuration. Now click Dial to start your call.
Modems Tab
All the preceding discussion concerns only the first of the three tabs in the “Phone and Modem Options” program. The second tab, called Modems, is simply a list of the modems currently connected to your PC. (Most people not in Oprah’s tax bracket, of course, see only one modem listed here.)
Double-clicking the name of your modem opens its Properties dialog box, which bursts with technical parameters for your modem. In general, you’ll need to visit these dialog boxes only when troubleshooting, following the instructions of some telecommunications geek from your modem company. Two of them, however, are more generally useful:
Change the speaker volume. The modern modem may have revolutionized computer communications, but the squealing sounds it makes could wake the dead—or, worse, the spouse. To turn the speaker off, so that you no longer hear the shrieks every time you dial, click the Modem tab, and then drag the Speaker volume slider to Off.
Wait for dial tone before dialing. This checkbox is normally turned on. If you travel abroad with your laptop, however, you may experience trouble connecting if the foreign country’s dial tone doesn’t sound the same as it does back home. Turning off this checkbox often solves the problem.
Advanced Connection Tricks (Mac OS X)
The Mac has its own assortment of Internet connection stunts, especially for the laptop crowd.
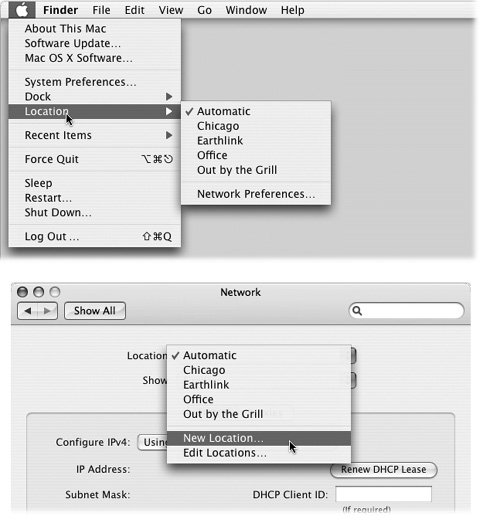
Switching Locations
If you travel with a laptop, you know the drill. You’re constantly opening up System Preferences → Network so that you can switch between Internet settings: Ethernet at the office, dial-up at home. Or maybe you simply visit the branch office from time to time, and you’re getting tired of having to change the local access number for your ISP each time you leave home (and return home again).
The simple solution is the ![]() → Location submenu. As Figure 1-15 illustrates, all you have to do is tell it where you are. Mac OS X handles the details of switching to the correct Internet connection and phone number.
→ Location submenu. As Figure 1-15 illustrates, all you have to do is tell it where you are. Mac OS X handles the details of switching to the correct Internet connection and phone number.
Creating a New Location
To create a location, which is nothing more than a set of memorized settings, open System Preferences, click Network, and choose New Location from the Location pop-up menu. You’ll be asked to provide a name for your new location, such as Chicago Office or Dining Room Floor.
When you click OK, you return to the Network panel, which is now blank. Take this opportunity to set up the kind of Internet connection you use at the corresponding location, just as described on the first pages of this chapter. If you travel regularly, in fact, you can use Location Manager to build a long list of locations, each of which “knows” the local phone number for your Internet access company (because you’ve entered it on the PPP tab).
A key part of making a new location is putting the various Internet connection types (Ethernet, AirPort, Modem, Bluetooth) into the correct order. Your connections will be slightly quicker if you give the modem priority in your Hotel setup, the AirPort connection priority in your Starbucks setup, and so on.
In fact, if you use nothing but a cable modem when you’re at home, you may want to create a location in which only the Ethernet connection is active. Conversely, if your laptop uses nothing but its dial-up modem when on the road, your location could include nothing but the modem connection. You’ll save a few seconds each time you try to go online because your Mac won’t bother hunting for an Internet connection that doesn’t exist (see the upcoming section “Multihoming”).
Making the Switch
Once you’ve set up your various locations, you can switch
among them using either the Location pop-up menu (in System Preferences → Network) or the ![]() → Location submenu, as shown in Figure 1-15. As soon as you do so, your Mac is automatically set to dial the new phone number or to connect using the different method.
→ Location submenu, as shown in Figure 1-15. As soon as you do so, your Mac is automatically set to dial the new phone number or to connect using the different method.
Tip
If you have a laptop, create a connection called Offline. From the Show pop-up menu, choose Network Port Configurations; turn off all the connection methods you see in the list. When you’re finished, you’ve got yourself a setting that will never attempt to go online. This setup will save you the occasional interruption of a program that tries to dial but takes three minutes to discover you’re on Flight 800 to Miami and have no phone line available.
Multihoming
Speaking of different ways to get online, Mac OS X offers one of the coolest features known to Internet-loving humanity: multihoming. That’s the ability to maintain multiple simultaneous network connections open—Ethernet, Air-Port, dial-up, even FireWire. If one of your programs needs Internet access and the first method isn’t hooked up, the Mac switches to the next available connection—automatically.
This feature’s ideal for laptops. When you open your Web browser, your laptop might first check to see if it’s at the office, plugged into a cable modem via the Ethernet—the fastest possible connection. If not, it automatically looks for an AirPort network. Finally, if it draws a blank there, the laptop reluctantly dials the modem. It may not be the fastest Internet connection, but it’s all you’ve got at the moment.
In short, for each location you create, you can specify which network connections the Mac should look for, and in which order. You can even turn off some connections entirely. For example, if you have a desktop Mac that’s always connected to a cable modem, you may never want your Mac to dial using its built-in modem. In that case, you could turn off the modem entirely.
Here’s how to go about using this multihoming feature:
Open System Preferences. Click the Network icon.
The Network Status screen (Figure 1-10) brings home the point of multihoming: you can have more than one network connection operating at once.
Make sure the appropriate location is selected in the Location pop-up menu.
From the Show pop-up menu, choose Network Port Configurations.
Now you see the display shown in Figure 1-16. It lists all the different ways your Mac knows how to get online, or onto an office network.
Drag the items up and down in the list into priority order.
If you have a wired broadband connection, for example, you might want to drag Built-in Ethernet to the top of the list, since that’s almost always the fastest way to get online.
At this point, you can also turn off any connections you don’t want your Mac to use when it’s in this location—the internal modem, for example.
Click Apply Now.
Your Mac will now be able to switch connections even in real time, during a single Internet session. If lightning takes out your cable modem in the middle of your Web surfing, your Mac will seamlessly switch to your dial-up modem, for example, to keep your session alive.

Get The Internet: The Missing Manual now with the O’Reilly learning platform.
O’Reilly members experience books, live events, courses curated by job role, and more from O’Reilly and nearly 200 top publishers.

