Taking Screenshots
Linux users love to share screenshots of their desktops and applications—perhaps because Linux is so highly customizable and it is interesting to see how someone has personalized their desktop. (You'll learn all about customizing KDE in Chapter 8.) In order to share your screenshots, you first need to learn how to make them. To this end, Move includes the program KSnapshot, which can take screenshots of specific windows, the entire screen, or a selected portion of the screen.
To launch KSnapshot, click K Menu → View, modify and create graphics → Create a screenshot. Figure 7-10 shows you the only window in the program. Taking a screenshot is a fairly simple process. Select the type of screenshot you want to create from the "Capture mode" drop-down list.
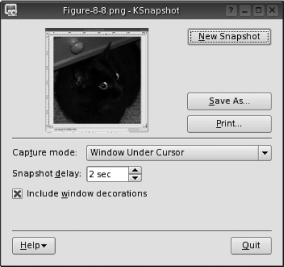
Figure 7-10. The screenshot program KSnapshot
Select a time in the "Snapshot delay" field, which determines how long KSnapshot will wait before it actually takes the screenshot. Setting a delay of a few seconds gives you enough time to open a program window or expand a menu you want to be in the screenshot.
Click the New Snapshot button to take the screenshot. The KSnapshot program disappears until the screenshot is taken, to ensure that it does not appear in the final image. If you selected the Fullscreen capture mode, you just have to wait for the screenshot to be taken. If you chose Window Under Cursor, you need ...
Get Test Driving Linux now with the O’Reilly learning platform.
O’Reilly members experience books, live events, courses curated by job role, and more from O’Reilly and nearly 200 top publishers.

