Once Apple gave us Full Screen mode, the next step—new in El Capitan—was obvious: split Full Screen mode. In this arrangement, two windows fill the screen, edge to edge and top to bottom. Just as in Full Screen mode, the menu bar, Dock, and all other cluttery extras are hidden to maximize screen space; the only difference is that two apps are now sharing that big monitor canvas.
This combination works very well when you want to keep a continuously updating app visible—Twitter, Mail, or FaceTime, for example—while continuing to do work in a second app. It’s also handy when you’re referring to one app (a recipe in your web browser) and making notes in another (an ingredients list in Notes).
Once again, though, Split Screen doesn’t work in all apps—only the ones that work in Full Screen mode, as described above.
There are two ways to get in and out of Split Screen mode, but this one is quickest:
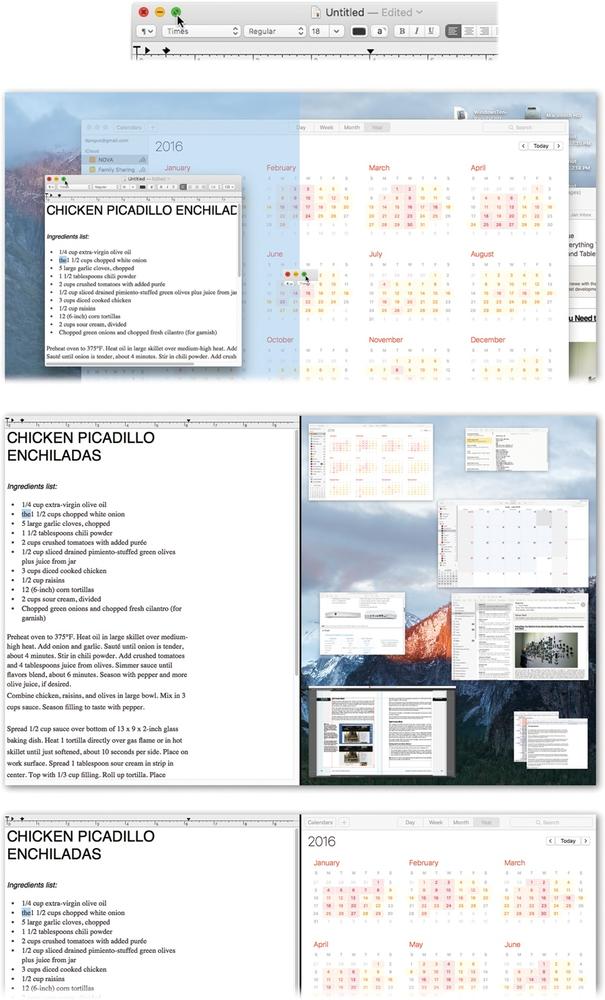
Click-and-hold the green
 button at the top left corner of Window No. 1. (See Figure 4-10, top.)
The weirdest thing now happens: Whichever half of your monitor contains this window (usually the left side) becomes shaded blue (Figure 4-10, second from top). That’s El Capitan’s way of telling you: “When you release your mouse or trackpad, this window will snap to fill only this half of the screen.”
Tip
At this point, you could, if you liked, drag the window to the opposite side of the screen—still holding down the mouse or trackpad—to make it fill that half.
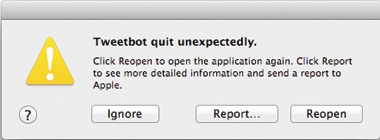
FREQUENTLY ASKED QUESTION: Report to Apple
What the—I was working along in Safari, and all of a sudden it just vanished! Poof! And all I got was this lousy dialog box about “reporting to Apple.” What’s going on?
Apple is trying to assimilate you.
Or, more accurately, it’s trying to enlist your help in ferreting out all the little glitches that make modern computing so much fun. If you’re willing to click the Report button and type a few comments (“I was running Word, minding my own business, and when I clicked the Print button, the whole thing just crashed”), then Apple will add your report to the thousands flowing in from everyone else.
The idea is that when its programmers get a moment, they’ll study these reports, track down the patterns (“Hmm, we’ve received 50,000 reports about that Print button in Word”), and then chase down the software company responsible—and, presumably, get a fix under way.
The report you submit is full of technical info that helps the programmers figure out what was happening at the time of the crash, but no personal information goes along for the ride. So if you feel like doing some good for your fellow Mac fans, by all means submit the report (via the Internet) whenever you’re offered the chance.
Release the mouse or trackpad.
And sure enough: Window No. 1 now fills exactly half the screen (Figure 4-10, third from top). Meanwhile, all other open windows shrink down into miniature cards. That’s El Capitan’s way of telling you: “Please choose Window #2, the one you’d like to fill the rest of the screen.”
Figure 4-10. Here’s the complete tutorial for turning on the new Split Screen mode in OS X El Capitan. Top: Hold down the green
button in the first app. Second from top: That half of your screen gets a blue tint. Third from top: Release the mouse; that window now fills half of your entire screen. Meanwhile, all other open windows appear in miniature so that you can choose the one you want to fill the other half of your screen. (There may even be a little pile of additional window cards at the bottom corner. These are apps whose software companies have been too lazy to make them compatible with the Full Screen/Split Screen feature.) Bottom: And voilà: Two apps, perfectly splitting your screen’s full height and width. Feel free to drag the divider line sideways to adjust the proportions.Click the miniature window you want to fill the remaining half of the screen.
Now you’ve got two windows sharing your screen space 50-50 (Figure 4-10, bottom). If you like, you can now grab the divider line and drag it, thereby adjusting the proportion of the screen occupied by each app.
The second method makes sense only after you’ve read about Mission Control and Spaces, starting next. Bookmark this spot, go read that, and then return here.
Back so soon? OK, great!
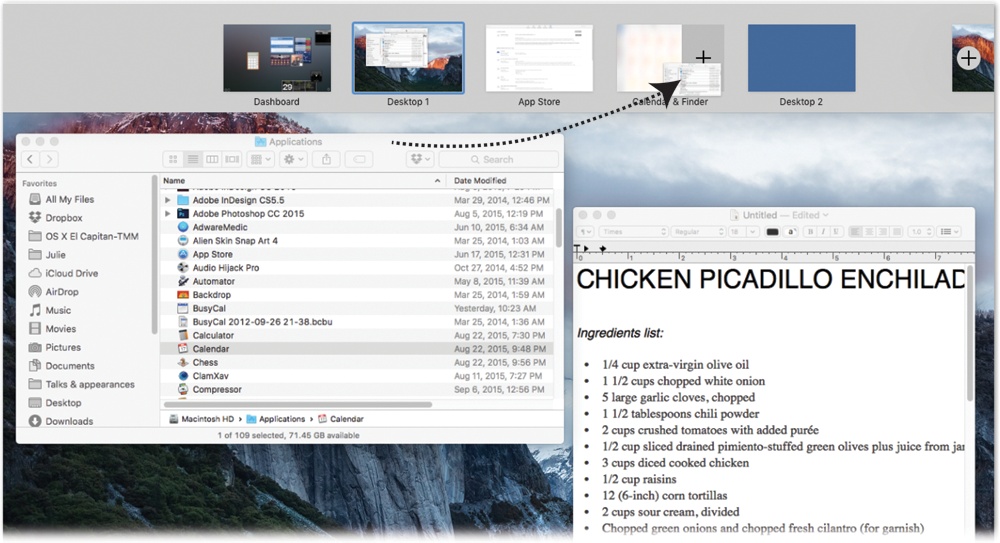
Now that you know what the Spaces bar is, here’s the tip: You can drag a second window onto an existing full-screen app’s thumbnail in the Spaces bar; see Figure 4-11 for details.
Just as there are two ways to enter Split Screen mode, there are also two ways to exit it.
The title-bar method. Move your cursor to the top edge of either window and pause; its title bar appears. Now click the green
 button.
That window becomes a normal floating window. (The other window remains in Full Screen mode, on its own desktop; you can switch to it as described on Creating a Desktop.)
Mission Control method. Enter Mission Control, as described next. (For example, press the
 key on your keyboard.) Move your cursor to the top of the screen to make the Spaces bar expand. Point to the desktop icon that contains the split screen; click the
  in the top left.
In this case, both windows exit Full Screen and become floating windows again.
Get Switching to the Mac: The Missing Manual, El Capitan Edition now with the O’Reilly learning platform.
O’Reilly members experience books, live events, courses curated by job role, and more from O’Reilly and nearly 200 top publishers.

