The beauty of life in the Era of Switchers is that most of the big-boy programs are available in nearly identical versions for both the Mac and Windows. Word, Excel, and PowerPoint; Photoshop, Illustrator, and InDesign; FileMaker Pro; Dreamweaver; and many other programs are available for both Mac and Windows. Sometimes you have to buy the Mac version separately; sometimes itâs on the same CD.
The best part: The documents you create with the Mac versions are generally identical in format to the ones created in Windows. A Microsoft Word document, for example, requires no conversion when transferred from a Mac to a PC or vice versa. It is what it isâa .doc or .docx file.
Same thing with Excel spreadsheets (.xls), PowerPoint slideshows (.ppt), Photoshop documents (.psd), and on and on. You may occasionally encounter a tiny formatting differenceâa line thickness change, a movie file that requires a plug-inâbut most documents open flawlessly when moved between Macs and PCs. (Chapter 7 offers more detail on finding Mac versions of your favorite PC programs.)
But even if switching to the Mac OS X versions of your programs is relatively easy, learning how Mac OS X programs in general operate may require some study. As this chapter will make clear, the relationship between programs and their documents differs in several substantial ways from the way things work in Windows.
Many of the techniques for launching (opening) a program work just as they do in Windows. For example:
Click a programâs icon on the Dock, the Sidebar, or the Finder toolbar.
Use Spotlight. Hit â-space bar, type the first letters of the programâs name, and then press Return.
Double-click an applicationâs icon in the Finder.
Highlight an application icon and then press â-O (short for FileâOpen) or â-â.
Use the submenus of the
 menuâs Recent ItemsâApplications command.
Open a document icon in any of these ways, or drag a document onto the icon of a program that can open it (whether in the Dock, the Finder toolbar, the Sidebar, or in a folder window).
When you launch a program, the Mac reads its computer code, which lies on your hard driveâs surface, and feeds it quickly into RAM (memory). During this brief interval, the icon of the opening program jumps up and down eagerly in your Dock.
What happens next depends on the program youâre using. Most present you with a new, blank, untitled document. Some, like iDVD, automatically open the last file you worked on. Some, like FileMaker and PowerPoint, ask if you want to open an existing document or create a new one.
And a few oddball programs donât open any window at all when first launched.
In each case, however, the very first menu after the ![]() appears with bold lettering and identifies the program youâre using. It might say iTunes, or Microsoft Word, or Stickies.
appears with bold lettering and identifies the program youâre using. It might say iTunes, or Microsoft Word, or Stickies.
This Application menu (Figure 4-1) offers a number of commands pertaining to the entire program and its windows, including About, Quit, and Hide.
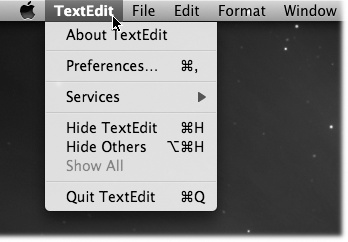
In Macintosh lingo, you donât âexitâ a program when youâre finished with it, you âquitâ it. And the command to do so isnât in the File menuâitâs at the bottom of the Application menu.
But Mac OS X offers two much more fun ways to quit a program:
Right-click a programâs Dock icon and then choose Quit from the pop-up menu.
When youâve pressed â-Tab to summon the âheads-up displayâ of open programs, type the letter Q without releasing the â key. The highlighted program quits without further ado.
Mac OS X is a rock-solid operating system, but that doesnât mean programs never screw up. Individual programs are as likely as ever to freezeâor, rather, to hang (to lock up and display the âspinning beach ball of deathâ cursor). In such cases, you have no choice but to force-quit the programâor, in Windows lingo, to terminate it or âend its task.â
Doing so doesnât destabilize your Mac; you donât have to restart it. In fact, you can usually reopen the very same program and get on with your life.
You can force-quit a stuck program in any of several ways:
Click-and-hold on the programâs Dock icon. That triggers the Exposé function, of course, but it also offers a Quit button just above your cursor. Press the Option key to make the button say Force Quit (Figure 4-2 left). Click it.
Control-click (right-click) its Dock icon. Once the shortcut menu appears, press Option so that the Quit command now says Force Quit (Figure 4-2 bottom). Bingoâthat program is outta here.
Figure 4-2. Top: Thanks to the Option key, you can force quit a program from the Dockâeither by click-and-holding (left) or Control-clicking (right). Bottom: When you press Option-â-Esc or choose Force Quit from the
menu, a tidy box listing all open programs appears. Just click the one you want to abort, click Force Quit, and click Force Quit again in the confirmation box. (Using more technical tools like the Unix kill command, there are other ways to jettison programs. But these are often the most convenient.)Press Option-â-Esc, the traditional Mac force-quit keystroke, or choose
âForce Quit. Either way, proceed as shown in Figure 4-2.
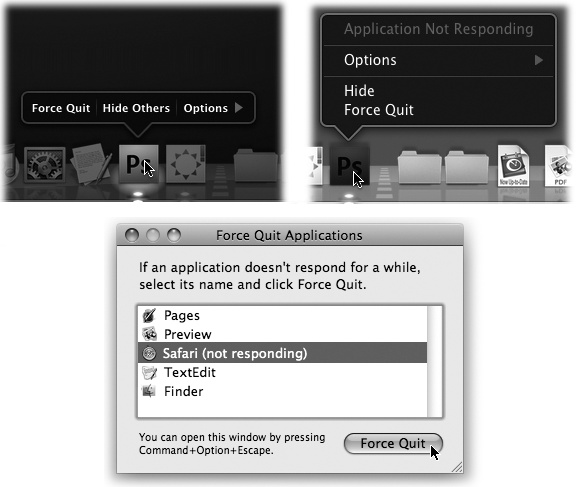
Again, force-quitting is not bad for your Mac. The only downside to force-quitting a program is that you lose any unsaved changes to your open documents, along with any preference settings you may have changed while the program was open.
Just as in Windows, thereâs a handy keystroke for switching from one open program to another; itâs the â-Tab keystroke (see Figure 4-3).
You can use this feature in three different ways, which are well worth learning:
If you keep the â key pressed, each press of the Tab key highlights the Dock icon of another program, in left-to-right Dock order. Release both keys when you reach the one you want. Mac OS X brings the corresponding program to the front. (To move backward through the open programs, press Shift-â-Tab.)
If you leave the â key pressed, you can choose a program by clicking its icon with your mouse.
A single press of â-Tab takes you to the program you used most recently, and another, separate â-Tab bounces back to the program you started in.
Figure 4-3. Apple calls this row of open program icons a âheads-up display,â named after the projected data screens on a Navy jet windshield that lets pilots avoid having to look down at their instruments.
Imagine youâre doing a lot of switching between two programsâyour Web browser and your email program, for example. If you have five other programs open, you donât waste your time â-Tabbing your way through all open programs just to âget backâ to your Web browser.

Managing all the open windows in all the open programs used to be like herding cats. Off you would go, burrowing through the microscopic pop-up menus of your Dock, trying to find the window you want.
Exposé represents the first fresh look at this problem in decades. The concept is delicious: With the one mouse click or keystroke, Mac OS X shrinks all windows in all programs to a size that fits on the screen (Figure 4-4), like index cards on a bulletin board. You click the one you want, and youâre there. Itâs fast, efficient, animated, and a lot of fun.
Now, this is going to get very mind-blowing very fast, so read slowly and keep your shoulders relaxed.
There are actually three different Exposé modes. One shows you miniatures of all windows in all programs; one shows you miniatures of all the windows in just one program; and one hides all windows in all programs so you can see the desktop.
Each of these three modes, moreover, can be triggered using different combinations of the mouse and keyboard. The following pages will cover all of them, but youâre not expected to learn all that. Just find the one trigger that seems most convenient, and stick with it.
The first and most famous Exposé method is shown in Figure 4-4. Every window in every program is arrayed before you, nothing covered up, nothing hidden. Itâs a great way to get your bearings in a hurry.
Here are the best ways to get this effect:
Current keyboards: Press F3 (
 ). On recent Apple laptop and desktop keyboardsâaluminum with very flat, thin keys poking upâthe F3 key is dedicated to Exposé. Itâs even painted with a special Exposé logo (). Tap that key to get the all-apps Exposé effect.
Figure 4-4. Top: Quick! Whereâs System Preferences in all this mess? Bottom: With a tap of the F3 key, you can spot that window, shrunken but not overlapped. Each thumbnail window offers a label to help you identify it. These arenât static snapshots of the windows at the moment you Exposé'd them. Theyâre live, still-updating windows, as youâll discover if one of them contains a playing QuickTime movie or a Web page thatâs still loading. If youâre not pointing to a window, tapping F3 again turns off Exposé without changing anything; if youâre pointing to a window, tapping F3 again brings it forward.
Plastic keyboards: Press F9. On older keyboards, the white or black plastic ones, press F9 instead.
Laptops: Swipe downward with four fingers. Sounds contrived, itâs true. But giving your trackpad a four-finger swipe is a quick and easy way to trigger all-apps Exposé. (Then you can get back to what you were doing by swiping upward with four fingers.)
Note
Older Mac laptops donât have multitouch trackpads and therefore donât offer this four-finger option. To find out if yours is eligibleâand to make sure the four-finger swiping feature is turned onâopen System PreferencesâTrackpad. Confirm that thereâs a list of gestures at the left side of the panel, as shown on On, Off, and Sleep.
As you can read later in this section, you can also trigger all-apps Exposé by pressing special buttons on your mouse, or by flinging the cursor into a specified corner of the screen. But start with baby steps.
Troubleshooting Moment: A Tedious Side Note about the Aluminum Apple Keyboards
In previous Mac versions, you could trigger the three Exposé modes described on these pages with three simple keystrokes: F9, F10, and F11.
Then the new-style aluminum keyboards and laptops came along. On these, Apple devoted the F3 key to Exposé functionsâand reassigned the F9, F10, and F11 keys to speaker-volume control!
You can make them operate Exposé as in the days of yoreâby adding the Fn key. That is: Fn-F9 for all-apps Exposé, Fn-F10 for one-app Exposé, and Fn-F11 for desktop Exposé. (Details on the Fn key appear on What the Special Mac Keys Do.)
So hereâs the point: On modern Macs, you have a choice of two Exposé keystroke suites: the F3 key (by itself, with Control, and with â)âor the Fn key plus F9, F10, and F11.
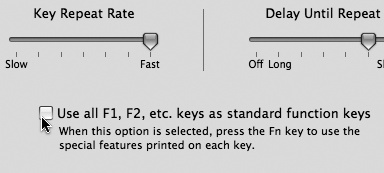
Actually, itâs even more complicated than that. If you find yourself using Exposé more than you use the volume keys, you can get rid of the requirement to press Fn. Open System PreferencesâKeyboard. Here youâll find a checkbox that reverses this logic. Itâs called âUse all F1, F2, etc. keys as standard function keys.â
If that checkbox is on, then you can use F9, F10, and F11 to trigger Exposé. Now you need the Fn key only when you want those keys to adjust the volume.
To exit Exposé, click one of the miniaturized windows, or repeat any of the Exposé triggers.
Note
If youâve minimized a programâs windows, they now show up in Exposé, tooâas miniatures below a fine horizontal line. You can see the effect in Figure 4-4.
A second Exposé function is designed to present miniatures of all windows only in the program youâre usingâgreat when youâre Web browsing or word processing. All the programâs windows spread out, and shrink if necessary, so you can click the one you want (Figure 4-5 top).
Figure 4-5. Top: When you trigger one-app Exposé, you get a clear shot at any window in the current program (Safari, in this example). In the meantime, the rest of your screen attractively dims, as though someone has just shined a floodlight onto the windows of the program in question. Itâs a stunning effect. Bottom: Trigger desktop Exposé when you need to duck back to the desktop for a quick administrative chore. Hereâs your chance to find a file, throw something away, eject a disk, or whatever, without having to disturb your application windows. In either case, tap the same function key again to turn off Exposé. Or click one of the window edges, which you can see peeking out from all four edges of the screen.
Hereâs how Apple intends most people to trigger this option:
Current keyboards: Press Control-F3. Thatâs the keystroke on current laptops and desktops, the ones with aluminum keyboards.
Tip
As noted in the box on All-Apps Exposé, you can also press Fn-F10, or with some tweaking, F10 alone. Or you can change the keystroke altogether as described on Changing a Menu Keyboard Shortcut.
Plastic keyboards: Press F10.
Use Dock Exposé. That is, click any programâs Dock icon and hold the button down for half a second.
This feature has one chief advantage over the keystroke method: You can Exposé-ize any programâs windows, not just the one youâre using at the moment.
The third flavor of Exposé is surprisingly handy. It sends all windows in all programs cowering to the edges of your screen, revealing the desktop beneath in all its uncluttered splendor (Figure 4-5 bottom).
Hereâs the keystroke scheme:
Current keyboards: Press â-F3. Thatâs the trigger for aluminum keyboards and laptops.
Note
Once again, you can also press Fn-F11, or (if you set it up) F11 by itself. See the box on All-Apps Exposé.
Plastic keyboards: Press F11.
The windows fly off to the edges of the screen, where they remainâforever, or until you tap the keystroke again, click a visible window edge, double-click an icon, or take some other window-selection step.
This is a spectacular opportunity to save headache and hassle in situations like these:
Youâre writing an email message, and you want to attach a file. Tap the desktop Exposé keystroke, root around in the Finder until you locate the file you want. Begin to drag it, and then, without releasing the mouse button, tap the desktop Exposé keystroke again to bring back your email window. (Or drag the attachment directly onto your email programâs icon on the Dock and pause until its window thumbnails appear.)
Move your cursor, with the file in mid-drag, directly over the outgoing message window; release the cursor to create the attachment. Youâve just added an attachment from the desktop in one smooth motion.
You want to open a different document. For many people, having access to the entire Finder beats the pants off having to use the Open dialog box. Double-clicking the icon you want automatically opens it and turns off Exposé.
Youâre on the Web, and you want to see if some file has finished downloading. Trigger desktop Exposé to survey the situation on your desktop.
If the layer of open programs is the atmosphere, the Finder is the earth belowâand the ability to teleport you back and forth is a huge timesaver.
Tip
You can switch among the three Exposé modes (all-apps, one-app, or desktop), even after youâve triggered one. For example, if you click-and-hold a Dock icon to shrink only that programâs windows, you can then press â-F3 to see the desktop, and then press F3 to shrink all programsâ windows.
Just having your world oâ windows spread out like index cards is magic enough. But these windows are live. You can work with them. Let us count the ways:
Tab through Exposé'd apps. Once youâve started one-app Exposé, and a programâs windows are arrayed before you, tap the Tab key to switch to the next running program. All its windows spring to the fore. Tab, Tab, Tab through all your open programs. (Shift-Tab, as usual, cycles through the programs in the opposite direction.)
Enter Exposé from the heads-up display. The New, Improved âAlt-Tabâ describes the heads-up displayâthe Mac OS X application switcher, the row of âthese are your open programsâ iconsâwhich appears when you press â-Tab.
The cool thing is that once youâve got that heads-up display open, you can press â, or â to enter Exposé for whatever programâs icon is highlighted! From there, release the keys and hit Tab to cycle through your open apps.
Hold down instead of two presses. Most of the time, youâll probably use Exposé in two steps. Youâll tap the keystroke once to get the windows out of the way, and tap it again to bring them back (if, indeed, you havenât clicked a window to bring them back).
In some cases, though, you may find it easier to hold down the relevant key. For example, hold down â-F3 to see if a file is finished copying to the desktop, then release the keys to bring back all of the windows. (Actually, you can let go of the â key as soon as youâve entered Exposé.) For quick window-clearing situations, that method saves you the step of having to press the key a second time to turn off Exposé.
Use the spring-loaded Dock. This trick is great when you want to drop a file from one program into a particular window belonging to another.
The most common example: You want to add an attachment to an outgoing email message. In the Finder, locate the fileâs icon. Drag it directly onto your email programâs Dock iconâand pause with your finger still on the button. After a half second, Exposé happens, showing all your email programâs open windows. Now continue your drag onto the miniaturized window of the outgoing message so itâs highlighted, tap the space bar to open it, and release. Presto! The file is attached.
This trick also works great when you want to drop a photo into a newsletter, for example, or a text clipping into a word processing document.
Sort the windows. Thatâs right: you can sort the windows as they appear on the screen. Press â-1 to sort the window names alphabetically, or â-2 to sort them according to the programs they belong to.
The trouble with miniaturized windows is that, well, theyâre miniaturized. The more windows youâve Exposé'd, the smaller they are, and the harder it is to see whatâs in them.
Fortunately, your old friend Quick Look (Quick Look) is standing by to help.
Once youâve got shrunken windows on the screen (using all-apps Exposé or one-app Exposé), tap your arrow keys to highlight a window (or point with your mouse without clicking). Youâll see a bright-blue border move from window to window.
At any point, you can press the space bar to make that one window return to life size. You havenât really activated itâyou canât edit itâbut at least you can see it at full size.
And hereâs the very cool part. Once youâve triggered Quick Look like this, you can press the arrow keys to zap other mini windows back to full size, without having to exit Quick Look. Or, again, point to other windows without clicking. Each zooms in to 100 percent size. (All of this is much easier to do than to imagine.)
You can keep examining your windows at full size until you spot the one youâre after; now tap Return (or click the mouse in the window) to exit Quick Look and Exposé. Youâve just opened that window, and youâre ready to roll.
Exposé is wonderful and all, but the standard keys for triggering its three functions may leave something to be desired. For one thing, they might already be âtakenâ by other functions in your programs (like Microsoft Word) or even by your computer. For another thing, those keys are at the top of the keyboard where your typing fingers arenât used to going, and you may have to hunt to make sure youâre pressing the right one.
Fortunately, you can reassign the Exposé functions to a huge range of other keys, with or without modifiers like Shift, Control, and Option. To view your options, choose ![]() âSystem Preferences and then click the Exposé & Spaces icon (Figure 4-6).
âSystem Preferences and then click the Exposé & Spaces icon (Figure 4-6).
Here, youâll discover that you can trigger Exposéâs functions in any of three ways:
The four pop-up menus (Figure 4-6) represent the four corners of your screen. Using these menus, you can assign an Exposé trigger to each corner; for example, if you choose Desktop from the first pop-up menu, when your pointer hits the upper-left corner of the screen, youâll hide all windows and expose the desktop. (To make the windows come back, click any visible edge of a window, highlight a window thumbnail and press Return, or twitch the cursor back into the same corner.)

Figure 4-6. You can trigger Exposé in any of three ways: by twitching your cursor into a certain corner of the screen (top), pressing a key (lower left), or clicking the extra buttons on a multibutton mouse (lower right), including Appleâs Mighty Mouse or Magic Mouse. Of course, thereâs nothing to stop you from setting up all three ways, so you can press in some situations and twitch or click in others.
Depending on the size of your screen, this option can feel awkward at first. But if youâve run out of keystrokes that arenât assigned to other functions, be glad that Apple offers you this alternative.
Also in the Exposé preferences, youâll find three pop-up menusââAll windows,â âApplication windows,â and âShow Desktopââthat correspond to the three functions of Exposé as described above. (The fourth pop-up menu, Dashboard, is described at the end of this chapter.) You canât assign any old keystroke to Exposé, but you have far more options than the puny F9, F10, and F11 keys (or the variations on F3).
Within each pop-up menu, for example, youâll discover that all your F-keysâF1, F2, F3, and so onâare available as triggers. If, while the pop-up menu is open, you press one or more of your modifier keys (Shift, Option, Control, or â), all these F-key choices change to reflect the key youâre pressing; now the pop-up menu says Shift-F1, Shift-F2, Shift-F3, and so on. Thatâs how you can make Shift- F1 trigger the hide-all-windows function, for example.
These pop-up menus also contain choices like Left Shift, which refers to the Shift key on the left side of your keyboard. That is, instead of pressing F9 to make all your windows shrink, you could simply tap the Shift key.
Note
This is only an example. Repeat: This is only an example. Actually using the Shift key to shrink all your windows is a terrible, terrible idea, as youâll quickly discover the next time you try to type a capital letter. This feature is intended exclusively for hunt-and-peck typists who never use the Shift key on one side.
If you have a laptop, youâll also find out that you can tap the Fn key alone for Exposéâand this time, itâs a great choice, because Fn otherwise has very little direction in life.)
If your mouse has more than one button, you see a second column of pop-up menus in System Preferences. Each pop-up menu offers choices like Right Mouse Button, Middle Mouse Button, and so on. Use these pop-up menus to assign the three Exposé modes (or Dashboard) to the various clickers on your mouse: right-click to hide all windows, left-side click to reveal the desktop, and so on.
Note, by the way, that on a laptop, for example, the wording isnât âright mouse buttonââitâs âsecondary mouse button.â Which means âright-click.â Which means that on a laptop, you can set it up so that a âright-clickâ trackpad gesture triggers Exposé. See That One-Button Mouse for all the different ways you can trigger a right-click.
Exposé is pretty darned cool. But Mac OS X offers another radical step forward in window management that you may even come to prefer. Itâs called Spaces.
This feature gives you two, four, six, eight, or even 16 full-size monitors. Ordinarily, of course, attaching so many screens to a single computer would be a massively expensive proposition, not to mention the number it would do on your living space and personal relationships.
But the bonus monitors that Spaces gives you are virtual. They exist only in the Macâs little head. You can look at only one at a time; you switch using a keystroke, a menu, or the mouse. Instead of shuffling through your windows using Exposé, you can now leave them all spread out over a much larger virtual desktop.
Just because the Spaces screens are simulated doesnât mean theyâre not useful, though. You can dedicate each one to a different program or kind of program. Screen 1 might contain your email and chat windows, arranged just the way you like them. Screen 2 can hold Photoshop, with an open document and the palettes carefully arrayed. On Screen 3: your Web browser in full-screen mode.
You can also have the same program running on multiple screensâbut different documents or projects open on each one.
Now, virtual screens arenât a new ideaâthis sort of software has been available for the Mac and Windows for years. But itâs never before been a standard feature of an operating system.
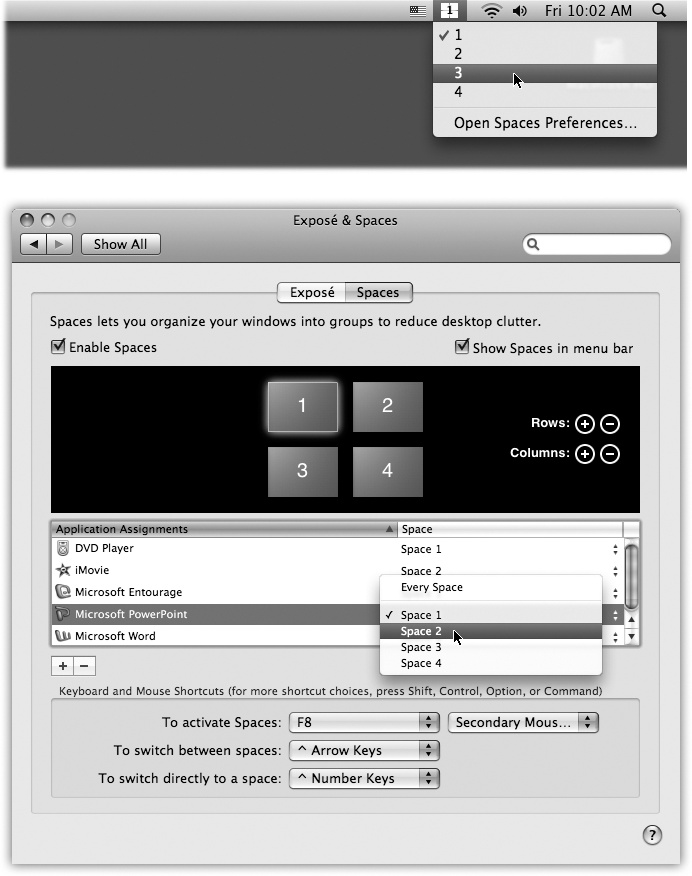
To âinstallâ your new monitors, start by choosing ![]() âSystem Preferences. Click the Exposé & Spaces icon, then click the Spaces tab. You see something like Figure 4-7.
âSystem Preferences. Click the Exposé & Spaces icon, then click the Spaces tab. You see something like Figure 4-7.
The setup ritual goes like this:
Turn Spaces on. The âEnable Spacesâ checkbox is the master on/off switch.
Add the menulet. Turn on âShow Spaces in menu barâ to make a menu of your virtual screens appear in the menu bar. It not only lets you switch screens, but the numeral on it also reminds you which screen youâre on.
Add rows or columns. Click the + and - buttons to add rows or columns of virtual monitors. Thereâs a difference between rows and columns, by the way. Not only will you eventually learn to sense where your various window setups live, but you can also move from one screen to another by bumping the mouse against the corresponding edge of your current screenâand youâll need to know which edge.
Set up program auto-screen assignments. Spaces starts to become truly useful only when you make it part of your routine. Youâll eventually memorize where everything is: Web stuff, top left. Email, top right. Photoshop, lower left. Finder with Applications folder open, lower right.
For that reason, you can use the controls in the center of the System Preferences pane to specify onto which screen certain programs automatically go when they open. Click the + button to view your Applications folder. Double-click a programâs icon to make it appear in the list. Now use the pop-up menu in the Space column to indicate which space you want this program to live on, as shown in Figure 4-7.
Tip
You can also choose All Spaces, meaning that this programâs windows are available on every virtual screen. Thatâs handy if itâs something you use constantly, like a stock ticker or your phone-book program.
Figure 4-7. Use the controls at the top to specify how many virtual screens you wantâhow many rows, how many columns, up to 16 in all. Use the middle section to specify where you want particular programs to appear (that is, on which screen) when they open. Use the bottom controls to set up how you want to move from one screen to another.
To make a program stop opening into a certain screen, click its name, and then click the - button.
Set up keyboard or mouse triggers. Once youâve got your majestic array of Cineplex Displays assembled, you need a way to move among them.
Spaces comes set up with the Control key as the âIâm switching screensâ key. For example, press Control-â, to move up one screen, Control-â to move one screen to the right, and so on. Or, if you have tons of screens, you can jump to one by number (as indicated in the map shown in Figure 4-7): Control-1, Control-4, Control-9, or whatever.
Youâre welcome to change these keyboard assignments, however, especially if youâre already using the Control key for other functions. Use the two bottom pop-up menus.
For example, suppose you want to switch screens by pressing the Option key rather than Control. In that case, youâd open the âTo switch between Spacesâ pop-up menu, press Option, and choose "
 Arrow Keys.â (In these pop-up menus, means the Option key, â is the Command key, and ^ means Control.)
Tip
The pop-up menu at the bottom of the window, âTo activate Spaces,â lets you choose a keystroke that opens up the master map of all your screens. (See Figure 4-9.)
Once youâve got Spaces set up and turned on, the fun begins. Start by moving to the virtual screen you want. Here are some ways to do that:
Choose a virtual screenâs number from the Spaces menulet, shown in Figure 4-7.
Press Control-arrow key, or whatever keystroke you set up as described above. Or hold down Control and keep tapping the arrow key to scroll through all your screens.
Press Control-number key to jump to a screen without having to scroll.
Use the heads-up switcher (The New, Improved âAlt-Tabâ), or the Dock, to select a program; Spaces switches to the proper screen automatically.
When you make a switch, you see a flash of animation as one screen flies away and another appears. You also see the display shown in Figure 4-8 to help you orient yourself among your magnificent array of virtual monitors.
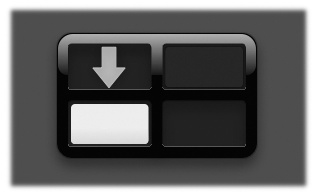
Figure 4-8. This display appears momentarily when you switch screens. The arrow shows you the screens youâre moving to and from. You can even move diagonally. While pressing Control, press two arrow keys on your keyboard at once (like â and â).
Now that youâre âonâ the screen you want, open programs and arrange windows onto it as usual.
The Fn-F8 key opens up a gigantic miniature (if there is such a thing) of your entire Spaces universe (Figure 4-9).
Clicking the Spaces icon in the Dock brings up the same display.
Note
As usual, you may run into trouble with this key if youâre using Appleâs aluminum, superflat keyboard. See the box on All-Apps Exposé.
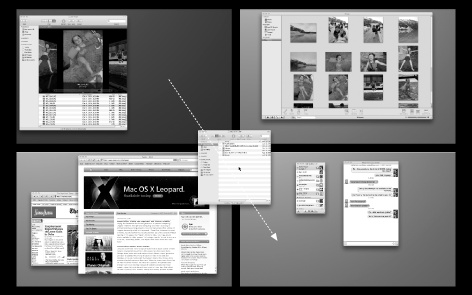
Figure 4-9. Press F8, or click Spaces in your Dock, to open this live master view of all the windows on all the screens. (The windows update in real timeâif youâre in a chat or playing a movie, for example.) You can actually drag individual windows from one of these âwindow panesâ (actually virtual screens) to another. In fact, you can even use the Exposé keystrokes to make all the windows on all the screens visible at once, for ease in moving them around the screens.
Get oriented. You could have sworn you opened your favorite Web siteâwhere the heck is it? Pressing Fn-F8 gives you an instant readout of where all your windows are sitting at the moment.
Switch screens. Click any âpaneâ of the big-picture view to jump to the screen.
Reorder the screens. Using any blank background spot as a handle, you can drag the actual panes of the big-picture view around to rearrange them. If you decide that your email screen should really be at top left, drag it there.
Move windows around. Hereâs the real power of the big-picture view. As shown in Figure 4-9, you can actually drag windows from one screen to another. You can use any part of the window as a handle, not just the title bar.
Hit an Exposé keystroke. You can actually use the F9 and F10 Exposé keystrokes while youâre in the Fn-F8 big-picture view.
Yes, this gets kind of meta, but itâs useful when youâre trying to arrange your windows and programs among your screens. Once youâre in the big-picture view, for example, you can hit F9 to see all windows on all screens scurry apart, so that nothing is covered up. Then start dragging windows onto different screens as necessary.
One way to move a particular window to a different screen is to drag it in big-picture view, as shown in Figure 4-9.
But there are two other ways that donât require entering the Fn-F8 big-picture view:
Drag a window (using its title bar as a handle) all the way to the edge of the screen. Stay there with the mouse button still down. After about a second, youâll see the adjacent screen slide into view; youâve just moved the window.
Click anywhere inside a window, and keep the mouse button down. Now press your screen-switching keystroke (Control-â, for example, or Control-3). Youâve just moved the window to the designated screen.
To be sure, these are power-user techniques that may not come naturally. But the Fn-F8 big-picture view is always waiting should you become befuddled.
Tip
What if you want to drag something from one screen (like a photo in iPhoto) into a window thatâs on a different screen (like an outgoing email message)?
Two ways; take your pick. First, you can start dragging whatever it isâand then, in mid-drag, press F8 to open the big-picture view, and complete the drag directly onto the other Space (and even into the relevant window in that Space).
Another approach: Start dragging. With the mouse still down, press â-Tab to open the application switcher. Continue the drag onto the icon of the receiving program, and still keep the mouse button down. Mac OS X switches to the appropriate virtual screen automatically.
When it comes to getting windows out of your way, nothing can touch Exposé and Spaces for speed and entertainment value. Once youâve mastered those features, the traditional rituals of hiding windows will seem charmingly quaint. âWhen I was your age,â long-time Mac people will tell their grandchildren, âwe used to have to hold down the Option key to hide windows!â
But you know the drill at software companies: They addeth, but they never taketh away. All the old techniques are still around.
For the purposes of this discussion, when a program is hidden, all its windows, tool palettes, and button bars disappear. You can bring them back only by bringing the program to the front again (by clicking its Dock icon again, for example).
If your aim is to hide only the program youâre currently using, Mac OS X offers a whole raft of approaches to the same problem. Many of them involve the Option key, as listed here:
Option-click any visible portion of the desktop. The program you were in vanishes, along with all its windows.
Option-click any other programâs icon on the Dock. You open that program (or bring all its windows to the front) and hide all the windows of the one you were using.
Option-click any visible portion of another programâs windows. Once again, you switch programs, hiding the one you were using at the time.
From the Application menu, choose Hide iPhoto (or whatever the program is). The Application menu is the boldfaced menu that bears the programâs name.
Gem In The Rough: Using the Dock or Sidebar for Drag-and-Drop
The Mac is smart about the relationship between documents and applications. If you double-click a TextEdit document icon, for example, TextEdit opens automatically and shows you the document.
But itâs occasionally useful to open a document using a program other than the one that created it. Perhaps, as is often the case with downloaded Internet graphics, you donât have the program that created it, or you donât know which one was used. This technique is also useful when opening a Read Me file into your word processor, such as Word, instead of the usual TextEdit program.
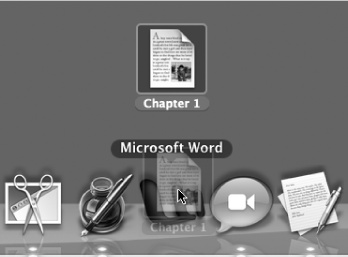
In such cases, the Dock is handy: Just drag the mystery document onto one of the Dockâs tiles, as shown here. Doing so forces the program to open the documentâif it can. (Dragging onto a programâs icon in the Sidebar or even the Finder toolbar works just as well.)
Incidentally, in general, only the Dock icons of programs that can, in fact, open the file youâre dragging onto them become highlighted. The others just shrug indifferently or even scoot aside, thinking maybe youâre trying to drag the file into the Dock.
Pressing Option-â as you drag forces Dock icons to be more tolerant. Now all of them âlight upâ as your document touches them, indicating that theyâll try to open your file. Even so, a âcould not be openedâ error message may result. As they say in Cupertino, sometimes what a can really needs is a can opener.
When youâve highlighted a Dock icon by pressing â-Tab to rotate through the running programs, press the letter H key. The program hides itself instantly. Leave the â key down the whole time, and after pressing the H, press Tab again to move on to the next program. If you release the keys while âstoppedâ on the program instead, youâll bring it forward rather than hiding it.
Press â-H. This may be the easiest and most useful trick of all (although it doesnât work in every program). Doing so hides the program youâre in; you then âfall downâ into the next running program.
To unhide a program and its windows, click its Dock icon again, choose the Show All command in the Application menu, or press â-Tab to summon the heads-up application display.
In Mac OS X, thereâs more to managing your window clutter than simply hiding entire programs. You can also hide or show individual windows of a single program. In fact, Apple must believe that hiding a window will become one of your favorite activities, because it offers at least four ways to do so:
Choose WindowâMinimize Window, if your program offers such a command, or press â-M.
Click the Minimize button on the windowâs title bar, as shown in Figure 4-10.
Double-click the windowâs title bar.
In any case, the affected window shrinks down until it becomes a new icon in the right side of the Dock. Click that icon to bring the window back.
Every operating system needs a mechanism to associate documents with the applications that created them. When you double-click a Microsoft Word document icon, for example, itâs clear that you want Microsoft Word to launch and open the document.
So how does Mac OS X know how to find a documentâs mommy?
It actually has two different mechanisms.
Filename extensions. A filename extension is a suffix following a period in the fileâs name, as in Letter to Mom.doc. (Itâs usually three letters long, but doesnât have to be.) These play a role in determining which documents open into which programs.
Thatâs how Windows identifies its documents, too. If you double-click something called memo.doc, it opens in Microsoft Word. If you double-click memo.wri, it opens in Microsoft Write, and so on.
Note
Mac OS X comes set to hide most filename extensions, on the premise that they make the operating system look more technical and threatening. If youâd like to see them, however, choose FinderâPreferences, click the Advanced button, and then turn on âShow all file extensions.â Now examine a few of your documents; youâll see that their names now display the previously hidden suffixes.
Figure 4-10. When you click the center button on a window title bar, double-click the title bar, or press â-M, you minimize that window, getting it out of your way and off your screen. Minimizing on the Mac is a lot like minimizing in Windows; the minimized window is now represented by an icon on your Dock, which you can click to reopen the window.
You can hide or show these suffixes on an icon-at-a-time basis, too (or a clump-at-a-time basis). Just highlight the icon or icons you want to affect, and then choose FileâGet Info. In the resulting Info window, proceed as shown in Figure 4-11.
Your preferences. If youâve used the âAlways Open withâ command to specify which program opens your document (described next), thatâs the one that opens; this preference overrides the filename extension system. Snow Leopard memorizes that new pairing in an internal Unix database. (If youâre a Unix geek, you can actually open and inspect that database.)
Itâs possible to live a long and happy life without knowing anything about these suffixes and relationships. Indeed, the vast majority of Mac fans may never even encounter them. But if youâre prepared for a little bit of technical bushwhacking, you may discover that understanding document-program relationships can be useful in troubleshooting, keeping your files private, and appreciating how Mac OS X works.
Filename extensions donât know which parent program should open a particular document. Suppose youâve downloaded a graphic called Sunset.jpg. Well, almost any program these days can open a JPEG graphicâPhotoshop, Word, Preview, Safari, and so on. How does Mac OS X know which of these programs to open when you double-click the file?
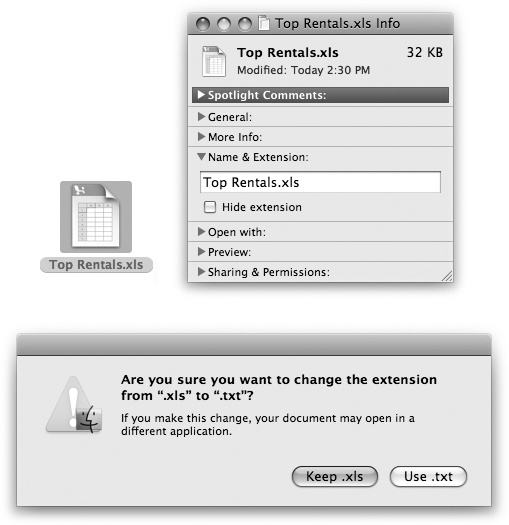
Figure 4-11. Top: In the Info window, open the Name & Extension pane. Now you can see what Mac OS X really thinks your file is called. Turn âHide extensionâ on if youâd rather not see the file name suffix in the Finder. Bottom: If you try to add a suffix of your own, Mac OS X objects, in effect saying, âHeyâIâve already got a filename extension for this, even if you canât see it. Are you sure you know what youâre doing?â (And you can turn off this warning, if you like. Choose FinderâPreferencesâAdvanced pane. Turn off âShow warning before changing an extension.â)
Fortunately, you can decide. You can reassign a document (or all documents of its kind) to a specific program. Hereâs the rundown.
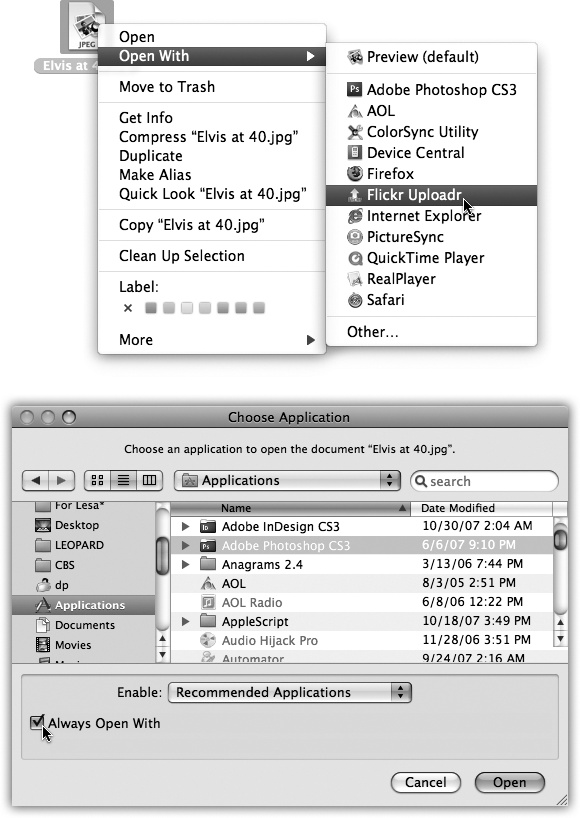
Double-clicking a graphics file generally opens it in Preview, the graphics viewer included with Mac OS X. Most of the time, thatâs a perfectly good arrangement. But Preview has only limited editing powers. What if you decide to edit a graphics file more substantially? Youâd want it to open, just this once, into a different programâPhotoshop Elements, for example.
To do so, you must access the Open With command. You can find it in two places:
Highlight the icon, and then choose FileâOpen With.
Right-click the fileâs icon. Or, in a Finder window, highlight the icon and then open the
 menu. In the shortcut menu, choose Open With.
Study the submenu for a moment (Figure 4-12, top). The program whose name says â(default)â indicates which program usually opens this kind of document.
Figure 4-12. Top: The shortcut menu offers a list of programs capable of opening an icon. If you were to press the Option key right now, the words Open With would suddenly change to say Always Open With. Bottom: If you choose Other, youâre prompted to choose a different program. Turn on Always Open With if youâll always want this document to open in the new parent program. Otherwise, this is a one-time reassignment.
From this pop-up menu, choose the name of the program youâd rather open this particular file, right now, just this once.
After opening a TIFF file in, say, Photoshop Elements for editing, you havenât really made any changes in the fabric of your Mac universe. The next time you double-click that file, it opens once again in Preview.
If you wish this particular file would always open in Photoshop Elements, the steps are slightly different. In fact, there are three different ways:
In the Choose an Application dialog box (the one that appears when you double-click a document whose âparentâ program isnât clear), turn on âAlways Open Withâ (shown at bottom in Figure 4-12).
Start out with one of the previously described techniques (FileâOpen With, or Control-click/right-click the fileâs icon and choose Open With)âbut after you see the menu, press the Option key, too. Before your very eyes, the Open With command changes to say Always Open With.
Highlight the icon, and then choose FileâGet Info. Open the âOpen withâ panel. Choose a new âparentâ programâs name from the pop-up menu. Youâll see that the word â(default)â changes position, now tacking itself onto the name of the program youâve chosen.
So much for reassigning one document (or a group of documents) at a time. What if youâre writing, say, a book about Mac OS X, and youâve been taking a lot of screenshots? Mac OS X saves each captured screen illustration as a graphics file in something called PNG format. Thatâs all fine, except that every time you double-click one of these, it opens into Preview, where you canât paint out unwanted details.
You could reassign all these files, one at a time, to a different program, but your grandchildren would have grandchildren by the time you finish. In this case, you want to tell Mac OS X, âFor heavenâs sake, make all PNG files open in Photoshop from now on!â
To make it happen, start by highlighting any PNG file. Choose FileâGet Info. (The shortcut menus wonât help you in this case.) Open the âOpen withâ panel.
From its pop-up menu, choose the program you want to open this kind of document from now on. (If the one you prefer isnât listed, use the Other option, which opens the Choose an Application dialog box so you can navigate to the one you want. Find and double-click the program.)
This time, follow up by clicking Change All beneath the pop-up menu. (This button is dimmed until youâve actually selected a different program from the pop-up menu.) Mac OS X asks you to confirm by clicking Continue or pressing Return.
From now on, double-clicking any similar kind of document opens it in the newly selected program.
In Windows, of course, you can operate every menu in every program from the keyboardâand every control in every dialog boxâthanks to the power of the Alt key.
Mac OS X offers full keyboard control, too. You can operate every control in every dialog box from the keyboard, including pop-up menus and checkboxes. And you can even redefine many of the keyboard shortcuts in Mac OS X and even your programs. In short, if you were a keyboard power-user in Windows, youâll feel right at home in Mac OS X.
Here are some of the ways you can control your Mac mouselessly. In the following descriptions, youâll encounter the factory settings for the keystrokes that do the magicâbut as youâll see in a moment, you can change these key combos to anything you like. (The System PreferencesâKeyboardâKeyboard Shortcuts tab contains the on/off switches for these features.)
Note
On modern-day, aluminum keyboards, the keystrokes described below may not work unless you also press the Fn key simultaneously.
If that seems just a tad clumsy, you can eliminate the Fn-key requirement either by using the âUse all F1, F2, etc. keys as standard function keysâ option described on The Complicated Story of the Function Keysâor by choosing a different keystroke altogether (Changing a Menu Keyboard Shortcut).
When you press Control-F2, the ![]() menu is highlighted. At this point, you can âwalkâ to another menu by pressing the â or â keys (or Tab and Shift-Tab). When you reach the menu you want, open it by pressing â, space, Return, or Enter.
menu is highlighted. At this point, you can âwalkâ to another menu by pressing the â or â keys (or Tab and Shift-Tab). When you reach the menu you want, open it by pressing â, space, Return, or Enter.
Walk down the commands in the menu by pressing â, or â, or jump directly to a command in the menu by typing the first couple of letters of its name. Finally, âclickâ a menu command by pressing Enter, Return, or the space bar.
You can also close the menu without making a selection by pressing Esc or â-period.
Once youâve pressed Control-F3, you can highlight any icon on the Dock by pressing the appropriate arrow keys (or, once again, Tab and Shift-Tab).
Then, once youâve highlighted a Dock icon, you âclick itâ by pressing Return or the space bar. Again, if you change your mind, press Esc or â-period.
Every time you press Control-F4, you bring the next window forward, eventually cycling through every window in every open program. Add the Shift key to cycle through them in the opposite order.
You may remember that Mac OS X offers a different keystroke for cycling through the different windows in your current program (itâs â-~, the tilde symbol at the upper left of your keyboard). Control-F4, on the other hand, tours all windows in all programs. Both keystrokes are useful in different situations.
This one is on the unpredictable side, but it more or less works in most programs that display a Mac OS Xâstyle toolbar: the Finder, System Preferences, and so on.
When you press Control-F5, you highlight the first button on that toolbar. Move the âfocusâ by pressing the arrow keys or Tab and Shift-Tab. Then tap Return or the space bar to âclickâ the highlighted button.
In a few programs that feature floating tool palettes, you can highlight the frontmost palette by pressing Control-F6. At this point, use the arrow keys to highlight the various buttons on the palette. You can see the effect when, for example, youâre editing text in TextEdit and youâve also opened the Font palette. Pressing Control-F6 highlights the Font palette, taking the âfocusâ off your document.
You can even operate menuletsâthose menu-bar status indicators for your speaker volume, wireless networks, and so onâfrom the keyboard.
This time, the trick is to hit Control-F8. That highlights the leftmost Apple menulet. Now you can use your â and â arrow keys to move around the menu bar; when youâve highlighted the one you want, press Return or the space bar to âclickâ that menu and open it.
You can also navigate and manipulate any dialog box from the keyboard.
See the dialog box shown in Figure 4-13 If you turn on âAll controlsâ at the bottom, then pressing the Tab key highlights the next control of any type, whatever it may beâradio button, pop-up menu, and so on. Press the space bar to âclickâ a button or open a pop-up menu. Once a menu is open, use the arrow keys (or type letter keys) to highlight commands on it, and the space bar to âclickâ your choice.
Suppose you love iPhoto (and who doesnât?) but one thing drives you crazy: The Revert to Original command, which discards all the changes youâve ever made since taking the photo, has no keyboard equivalent. You must trek up to the menu bar every time you need that command.
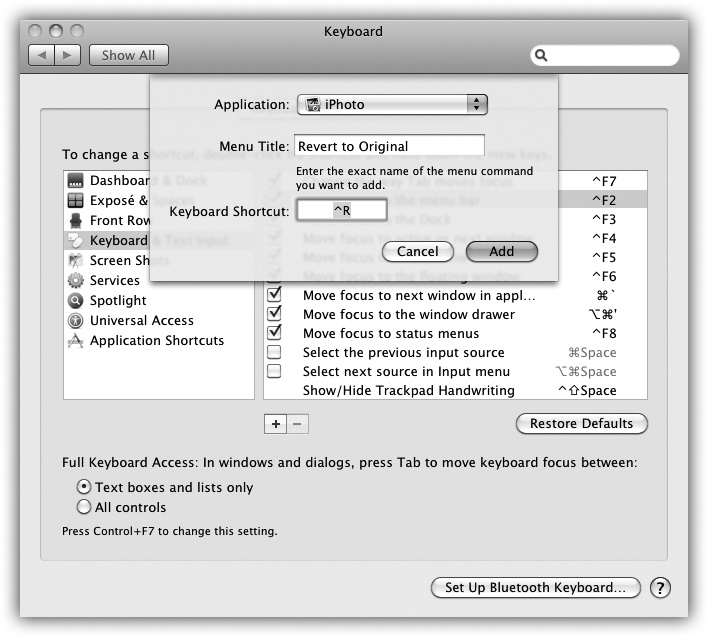
Figure 4-13. If you choose All Applications from the top pop-up menu, you can change the keyboard combo for a certain command wherever it appears. You could, for example, change the keystroke for Page Setup in every program at once. (Beware the tiny yellow triangles; they let you know if a chosen keystroke conflicts with another Mac OS X keystroke.)
This is why Mac OS X lets you add keyboard shortcuts to menu commands that lack themâor change the command in programs whose key assignments break with tradition. (It works in any program that uses the standard Mac OS X menu software, which rules out Microsoft Word and the other Office programs.) Hereâs the routine:
Choose
âSystem PreferencesâKeyboard. Click the Keyboard Shortcuts tab.Youâre shown a list of all of Mac OS Xâs built-in keyboard assignments.
Click the + button just beneath the list.
The dialog box shown in Figure 4-13 appears.
Indicate which program needs behavior modification.
In this example, youâd choose iPhoto from the Application pop-up menu. (If the programâs name doesnât appear in the pop-up menu, choose Other; navigate to, and double-click, the program you want.)
Carefully type in the name of the menu command whose keyboard shortcut you want to change or add.
Type it exactly as it appears in the menu, complete with capitalization and the little ellipsis (â¦) that may follow it. (You make the ellipsis character by pressing Option-semicolon.)
Click in the Keyboard Shortcut box. Press the new or revised key combo you want.
For example, press Control-R for iPhotoâs Revert to Original command. Youâll see the Macâs notation of your keystroke appear in the Keyboard Shortcut boxâunless, of course, the combo you selected is already in use within that program. In that case, you hear only an error sound that means âTry again.â
Click Add.
The dialog box closes. By scrolling down in your Keyboard Shortcuts list, youâll see that the keystroke you selected has now been written down for posterity under the appropriate programâs flippy triangle. (To get rid of it, click its name and then click the - button beneath the list.)
The next time you open the program you edited, youâll see that the new keystroke is in place.
Tip
To delete or change one of your custom menu shortcuts, open System PreferencesâKeyboardâKeyboard Shortcuts. Click Application Shortcuts in the list at left. Click the command youâd like to edit. Press Delete to get rid of it; or, to try a different key combo, click where the existing keyboard shortcut appears, and then press a new one.
As youâve no doubt become painfully aware, there are hundreds of keyboard combinations for the various Mac OS X functions and settings. Thatâs good, because keyboard shortcuts are efficient and quicker than using the mouse. But thatâs also bad, because thereâs no way youâll be able to remember all of themâand some of most useful shortcuts are ridiculous, multikey affairs that youâll never remember at all.
Snow Leopard comes with a keyboard-shortcut center, shown in Figure 4-14. Here, you can look over all of the common Mac OS X hidden keyboard functionsâfor Exposé, Spotlight, Spaces, the Dashboard, the Dock, and many othersâand change them.
Hereâs how it goes:
Choose
âSystem Preferences. Click Keyboard. Click the Keyboard Shortcuts tab.You arrive at the dialog box shown in Figure 4-14.
In the left-side list, click the category or function you want.
Your choices include Dashboard & Dock, Exposé & Spaces, Front Row, Keyboard & Text Input, and so on. When you click a category name, you see the available keyboard shortcuts.
Tip
You donât have to be content with changing one of these keyboard shortcuts. You can also turn it off by clicking the corresponding checkbox. Thatâs great if one of Appleâs predefined keystrokesâfor a function you donât even useâis interfering with one in a program you like.
Figure 4-14. The keyboard shortcut center in Snow Leopard lets you redefine the keystrokes that trigger many basic Mac OS X features, menu commands in your programs, and software youâve built yourself using Automator (Address Book).
Click the command you want to change. Then click the current keyboard combination.
Suppose, for example, that you wished that the All-Apps Exposé keystroke were something easier to remember, like Control-A. So in step 2, youâd click Exposé & Spaces. In this step, youâd click âAll windows,â as shown in Figure 4-14. Then youâd click where it currently says F9.
Press a new key combination.
In this example, youâd press Control-A.
Be careful, though. Mac OS X keystrokes take precedence over all others. So if you choose a keystroke like â-P for something, well, by golly, youâll no longer be able to use â-P to print anything in any of your programs. Think before you assign. Run a couple of tests afterward.

When you choose FileâSave, youâre asked where you want the new document stored on your hard drive. The resulting dialog box is crystal-clearâmore than ever, itâs a miniature Finder. All the skills youâve picked up working at the desktop come into play here.
To give it a try, launch any Mac OS X program that has a Save or Export commandâTextEdit, for example. Type a couple of words, and then choose FileâSave. The Save sheet appears (Figure 4-15).
Tip
In Mac OS X, a quick glance at the Close button in the upper-left corner of a document window tells you whether itâs been saved. When a small dot appears in the red button, it means youâve made changes to the document that you havenât saved yet. (Time to press â-S!). The dot disappears as soon as you save your work.
In the days of operating systems gone by, the Save dialog box appeared dead center on the screen, where it commandeered your entire operation. Moreover, because it seemed stuck to your screen rather than to a particular document, you couldnât actually tell which document you were savingâa real problem when you quit out of a program that had three unsaved documents open.
In most Mac OS X programs, thereâs no mystery regarding which document youâre saving, because a little Save dialog box called a sheet slides directly out of the documentâs title bar. Now thereâs no mistaking which document youâre saving.
Better still, this little Save box is a sticky note attached to the document. It stays there, neatly attached and waiting, even if you switch to another program, another document, the desktop, or wherever. When you finally return to the document, the Save sheet is still there, waiting for you to type a file name and save the document.
Of course, you, O savvy reader, have probably never saved a document into some deeply nested folder by accident, never to see it again. But millions of novices (and even a few experts) have fallen into this trap.
When the Save sheet appears, however, a pop-up menu shows you precisely where Mac OS X proposes putting your newly created document: usually in the Documents folder of your own Home folder. For many people, this is an excellent suggestion. If you keep everything in your Documents folder, it will be extremely easy to find, and youâll be able to back up your work just by dragging that single folder to a backup disk. As shown at top in Figure 4-15, the Where pop-up menu gives you direct access to some other places you might want to save a newly created file. (The keystrokes for the most important folders work here, tooâShift-â-H for your Home folder, for example.)
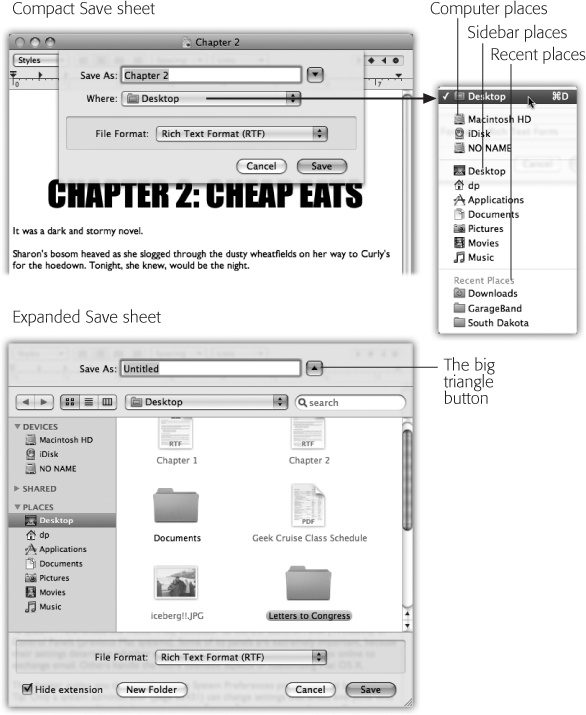
Figure 4-15. Top: The Save dialog box, or sheet, often appears in its compact form. Right (inset): If you open the Where pop-up menu, youâll find that Mac OS X lists all the places it thinks you might want to save your new document: on the hard drive or iDisk, in a folder youâve put into your Sidebar (Zoom Button), or into a folder youâve recently opened. Bottom: If you want to choose a different folder or create a new folder, click the â¼ button shown above to expand the dialog box. Here, you see the equivalent of the Finderâwith a choice of icon, list, or column view. Even the Sidebar is here, complete with access to other disks on the network. Supertip: Even in the Save or Open dialog box, you can highlight an icon (or several) and then press â-I. You switch back to the Finder, where the Get Info box is waiting with the date, size, and other details about the selected icons.
In any case, when you save a file, the options in the Where pop-up menu have you covered 90 percent of the time. Most people work with a limited set of folders for active documents.
But when you want to save a new document into a new folder, or when you want to navigate to a folder that isnât listed in the Where pop-up menu, all is not lost. Click the â¼ button identified in Figure 4-15. The Save sheet expands miraculously into a very familiar sight: a miniature version of the Finder.
Thereâs your Sidebar, complete with access to the other computers on your network. Thereâs the Back button. Thereâs your toggle switch between views; in Snow Leopard, you can even switch to icon view here, in addition to the traditional list and column views.
Tip
In column view, your first instinct should be to widen this window, making more columns available. Do so by carefully dragging the lower-right corner of the dialog box. Mac OS X remembers the size you like for this Save sheet independently in each program.
Most of the familiar Finder-navigation shortcuts work here, too. For example, press the right and left arrow keys to navigate the columns, or the up and down arrow keys to highlight the disk and folder names within a column. Once youâve highlighted a column, you can also type to select the first letters of disk or folder names.
Highlight the name of the folder in which you want to save your newly created document. Alternatively, you can click the New Folder button to create a new folder inside whatever folder is highlighted in the column view. (The usual New Folder keystroke works here, too: Shift-â-N.) Youâll be asked to type the new name for the folder. After youâve done so, click Create (or press Return). The new folder appears in the rightmost pane of the column view. You can now proceed with saving your new document into it, if you like.
The next time you save a new document, the Save sheet reappears in whatever condition you left it. That is, if you used column view the last time, itâs still in column view. At any time, you can collapse it into simplified view, shown at top in Figure 4-15, by clicking the â´ button to the right of the Where pop-up menu.
Tip
The Save box always displays whatever places youâve put in your Sidebar. (In compact view, the Where pop-up menu lists them; in expanded view, you see the Sidebar itself.)
The bottom line: If, on some project, you find yourself wanting to save new documents into the same deeply buried folder all the time, press F11 to duck back to the Finder, and add it to your Sidebar. From now on, youâll have quick access to it from the Save dialog box.
The Search bar at the top of the Open and Save dialog box is a clone of the Finderâs Search bar (Chapter 3). Press â-F to make your insertion point jump there. Type a few letters of the name of the file or folder youâre looking for, and up it pops, regardless of its actual hard-disk location.
Your savings: five minutes of burrowing through folders to find it, and several pages of reading about how to navigate the Save and Open boxes.
The Save dialog box in many programs offers a pop-up menu of file formats below the Save As box. Use this menu when preparing a document for use by somebody elseâsomebody whose computer doesnât have the same software. For example, if youâve used a graphics program to prepare a photograph for use on the Web, this menu is where you specify JPEG format (the standard Web format for photos).
The dialog box that appears when you choose FileâOpen is almost identical to the expanded Save File sheet. Because you encounter it only when youâre opening an existing file, this dialog box lacks the Save button, file name field, and so on.
Note
Furthermore, the Open dialog box shows you only icons for disks, folders, and documents that you can actually open at this moment. For example, when youâre using GarageBand, picture files show up dimmed.
But it does have a new Sidebar category called Media, which gives you direct access to all your photos, music, and movies. The premise is that Apple figures you might want to import these items into a document youâre working on.
Most of the other Save File dialog box controls, however, are equally useful here. That handy Spotlight search bar is still there, only a â-F away. Once again, you can begin your navigation by seeing whatâs on the desktop (press â-D) or in your Home folder (press Shift-â-H). Once again, you can find a folder or disk by beginning your quest with the Sidebar, and then navigate using either list or column view. And once again, you can drag a folder, disk, or file icon off your desktop directly into the dialog box to specify where you want to look. (If you drag a file icon, youâre shown the folder that contains it.)
When youâve finally located the file you want to open, do so by double-clicking it or highlighting it (which you can do from the keyboard), and then pressing Return, Enter, or â-O.
In general, most people donât encounter the Open File dialog box nearly as often as the Save File dialog box. Thatâs because the Mac offers many more convenient ways to open a fileâdouble-clicking its icon in the Finder, choosing its name from the ![]() âRecent Items command, and so onâbut only a single way to save a new file.
âRecent Items command, and so onâbut only a single way to save a new file.
By the end of 2006, Apple had abandoned the PowerPC processors (made by IBM and Motorola) that had been in Macs since the beginning. It switched its entire Macintosh product line over to Intelâs Core Duo processors (the successor to the Pentium).
Yes, that Intel. The company that Mac partisans had derided for years as part of the Dark Side. The company that Steve Jobs routinely belittled in his demonstrations of PowerPC chips. The company whose marketing mascot Apple lit on fire in a 1996 attack ad on TV.
Why the change? Appleâs computers can only be as fast as the chips inside them, and the chips that IBM had in the works just werenât keeping up with the industry. As one editorial put it, âAppleâs doing a U-turn out of a dead-end road.â
And sure enough, Intel-based Macs start up and run much faster than the old Macs, thanks to the endless march of speed improvements in the chip-making world. And thanks to that Intel chip, todayâs Macs can even run Microsoft Windows and all of the thousands of Windows programs. (Chapter 8 has details.)
At the time, though, there was a small glitch: Existing Mac software didnât run on Intel chips.
Apple would have to ask the worldâs software companies to rewrite their programs yet again, after already having dragged them through the Mac OS 9-to-Mac OS X transition only a few years earlier.
Fortunately, the transition wasnât as gruesome as you might expect. First, Apple had already secretly recompiled (reworked) Mac OS X itself to run on Intel chips.
Furthermore, Apple wrote an invisible translation program, code-named Rosetta, which permits the existing library of Mac OS X programsâPhotoshop, Word, and so onâto run, unmodified, on Intel Macs.
Note
When you install Snow Leopard, as described in Appendix A, you have the option to install Rosetta, so youâll have it just in case you want to run a pre-Intel program. (All software thatâs still on the market has long since been updated to the so-called Universal versionsâthat is, Intel-compatible. But plenty of older programs, long since abandoned, or whose software companies have gone under, are still around.)
But if itâs too late to install Rosetta along with Snow Leopard, or if you bought a new Mac with Snow Leopard already installed, donât worry. When the day comes that you try to run a pre-Intel program, Snow Leopard offers to grab Rosetta for you. It says: âTo open BeeKeeper Pro, you need to install Rosetta. Would you like to install it now?â When you click Install, Snow Leopard downloads it for you automatically.
They do not, however, run especially fast on Intel Macs. In fact, many of them run slower than they did on pre-Intel Macs.
To make their programs perform at full speed on Intel-based Macs, programmers have to update their wares. All the big software companies promised to make their programs into universal binariesâprograms that run equally well on PowerPC- and Intel-based Macs with a double-click on the very same Finder icon.
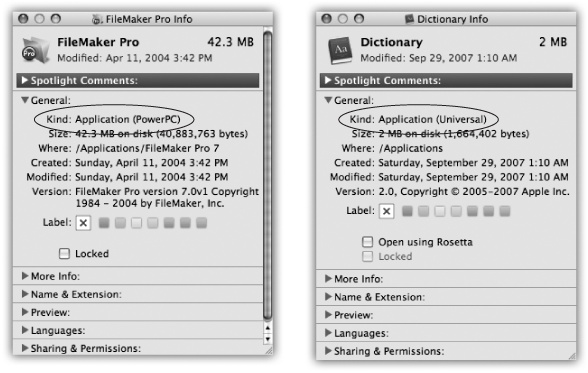
Figure 4-16. Hereâs a quick way to tell if a program is an old one that will run slowly on an Intel Mac (instead of a Universal or Intel one that wonât require the Rosetta software translation). Highlight its icon and choose FileâGet Info. Near the top, you see either âApplication: PowerPCâ (old and slow), âApplication: Intelâ (runs only on Intel Macs), or âApplication: Universalâ (runs fast on both Intel and PowerPC machines).
It took two years for all the big-name programs to fall in line, but they finally did. Photoshop, Microsoft Office, Final Cut Pro, QuarkXPress, FileMaker, Firefoxâ¦one by one, the worldâs most popular Mac programs were reworked into Universal versions. (Thereâs even a list of themâover 7,000 so farâat www.apple.com/universal/.)
You have only two indications that youâre using a program originally designed for PowerPC-based Macs: First, youâll see a notation in the programâs Get Info window (see Figure 4-16). Second, youâll probably discover that the program isnât as fast as it used to be.
If all this talk about architectures and chips makes your brain hurt, you can at least take comfort in one fact: No matter which kind of Mac youâve got Snow Leopard installed on, every feature, tip, and trick youâve learned from this book will work exactly the same.
In general, new programs arrive on your Mac via one of two avenues: on a CD or DVD, or via an Internet download. The CD method is slightly simpler; see Performing the Installation later in this section.
For help installing downloaded programs, on the other hand, read on.
Programs you download from the Internet generally arrive in a specially encoded, compressed form. (And unless youâve changed the settings, they arrive in the Downloads folder stack on your Dock.)
The downloaded fileâs name usually has one of these filename extensions:
.sit indicates a StuffIt file, the standard Macintosh file-compression format of years gone by.
.zip is the standard Windows compression file format. And because Snow Leopard has a built-in Compress command right in the File menu (and doesnât come with StuffIt Expander), .zip is the new standard Macintosh compression format. It certainly makes life easier for people who have to exchange files with the Windows crowd.
.tar is short for tape archive, an ancient Unix utility that combines (but doesnât compress) several files into a single icon, for simplicity in sending.
.gz is short for gzip, a standard Unix compression format.
.tar.gz or .tgz represents one compressed archive containing several files.
.dmg is a disk image, described below.
Fortunately, if you use Safari (Chapter 12) as your Web browser, you donât have to worry about all this, because it automatically unzips and unstuffs them.
If you use some other browser, StuffIt Expander can turn all of them back into usable form when you download a file. (StuffIt Expander doesnât come with Mac OS X, but you can download it for free from, for example, this bookâs âMissing CDâ page at www.missingmanuals.com.)
Once youâve unzipped a downloaded program, it often takes the form of a disk image file, whose name ends with the letters .dmg (second from top in Figure 4-17). Some files arrive as disk images straight from the Web, too, without having been compressed first.
Disk images are extremely common in Mac OS X. All you have to do is double-click the .dmg icon. After a moment, it magically turns into a disk icon on your desktop, which you can work with just as though itâs a real disk (third from top in Figure 4-17). For example:
Double-click it to open it. The software you downloaded is inside.
Remove it from your desktop by dragging it to the Trash (whose icon turns into a big silver Eject key as you drag), highlighting it and pressing â-E (the shortcut for FileâEject), clicking its
 button in the Sidebar, or right-clicking it, and then choosing Eject from the shortcut menu. (Youâve still got the original .dmg file you downloaded, so youâre not really saying goodbye to the disk image forever.)
When youâve finished unzipping or unstuffing a downloaded file, you may have several icons on your desktop or in the Downloads folder. Some are useful; some youâre free to trash:
The original compressed file. Itâs safe to throw away the .sit, .tar, .gz, or .tgz file you originally downloaded (after itâs decompressed, of course).
The .dmg file. Once youâve turned it into an actual disk-drive icon, installed the software from it, and âejectedâ the disk-drive icon, you can delete the .dmg file. Keep it only if you think you might need to reinstall the software someday.
The disk image itself. This final icon, the one that contains the actual software or its installer (third from top in Figure 4-17), doesnât exist as a file on your hard drive. Itâs a phantom drive, held in memory, that will go away by itself when you log out. So after installing its software, feel free to drag it to the Trash (or highlight it and press â-E to âejectâ it).
Working with .tar, .gz, and .dmg files are all skills unique to downloading Mac OS X programs from the Internet. Installing software from a CD or DVD is much more straightforward.
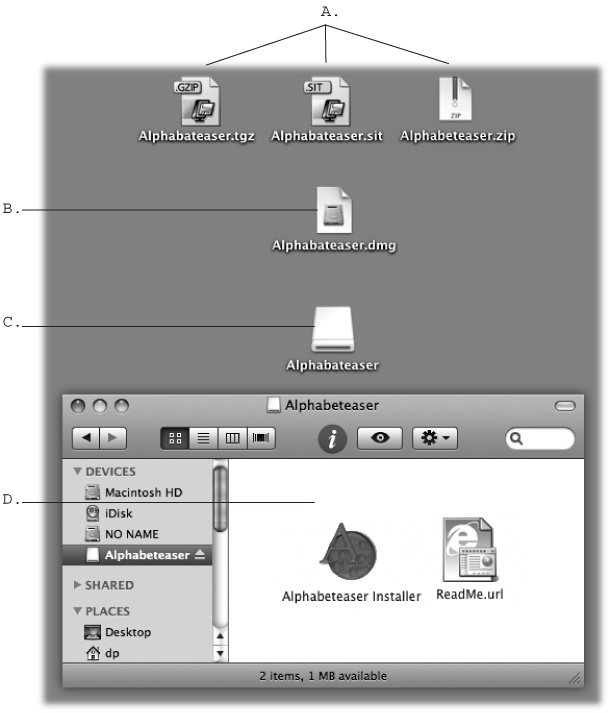
Figure 4-17. Downloading a program may strew your desktop or Downloads folder with icons. A: These are the original downloaded files. Delete them after theyâre decompressed. B: The compressed file turns into this .dmg file. Double-click it to âmountâ the disk image (if it didnât appear automatically). C: And now, the disk image itself. Double-click it to open the software installer window. Eject it after the installation is complete. D: Hereâs the actual software installer window. Drag the softwareâs icon to your Applications folder, or double-click the installer, if you see one here. After the installation is complete, you can delete all of this stuff (except maybe the .dmg file, if you think you might want to install the software again later).
In either case, once youâve got a disk icon on your desktop (either a pseudo-disk from a disk image or a CD or DVD youâve inserted), youâre ready to install the software. You can install many Mac OS X programs just by dragging their icons or folders to your hard drive (usually the Applications folder). Others offer a traditional installer program that requires you to double-click, read and accept a license agreement, and so on.
In both cases, where you decide to install the new program is suddenly a big issue. You have two alternatives:
In the Applications folder. Most programs, of course, sit in your Applications folder. Most of the time, this is where youâll want to install new programs. Putting them in the Applications folder makes them available to anyone who uses the Mac.
Note
You canât put anything in your Applications folder unless you have an Administrator account, as described on Creating an Account.
Up To Speed: A Little Bit About 64 Bits
Itâs one of the most-advertised features of Snow Leopard: The thing is now almost completely 64-bit.
Right. 64-what?
If you want your eyes to glaze over, you can read the details on 64-bit computing in Wikipedia. But the normal-personâs version goes like this:
For decades, the roadways for memory and information passed through Macs or Windows PCs were 32 âlanesâ wideâthey could manage 32 chunks of data at once. It seemed like plenty at the time. But as programs and even documents grew enormous, and computers came with the capacity to have more and more memory installed, engineers began to dream of 64-lane circuitry.
In the short term, the most visible effect of having a 64-bit computer is that you can install a lot more memory. Todayâs top-of-the-line Mac Pro, for example, is limited to 32 GB of RAM. That once seemed like a lot, but donât say that to todayâs video editors, game designers, and number-crunchy engineers.
A 64-bit computer, though, can have just a tad bit more: 16 million gigs, to be precise. (Thatâs 16 exabytes, in case you were wondering. And thatâs a theoretical number; no modern personal computer even has that many RAM slots.)
Eventually, there may be other benefits to a 64-bit Mac. Programs can be rewritten to run faster. Security can be better, too. Unfortunately, getting there requires rewriting huge chunks of the operating systemâand all your programs. Almost all of Snow Leopard is 64-bit software. You may have some older, non-Apple programs that arenât, but fortunately, they still run without a problem. Thatâs because the kernel of Snow Leopard, the underlying heart of it, still runs in 32-bit mode (yes, even on 64-bit processors), to accommodate all those older programs.
Even so, Snow Leopard runs 64-bit programs seamlessly. On certain Macs, you can make Snow Leopard boot into pure 64-bit mode by holding down the 6 and 4 keys as the computer is starting up. Itâs not a great idea, though, because all your 32-bit applications will crash.
Ordinarily, you never have to worry about any of this stuff. Every kind of program runs in the right mode automatically. Here and there, though, youâll bump your head on this 32-bit/64-bit difference. Youâll try to open somethingâan old PICT graphic you want to see in Preview, for example, or an add-on System Preferences pane from another companyâand youâll see a message telling you to deliberately command your modern, 64-bit app (Preview or System Preferences) to run in the older, 32-bit mode.
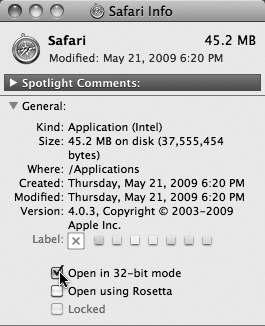
To do that, highlight the programâs icon. Press â-I (Get Info). Turn on âOpen in 32-bit mode.â Now youâll be able to run that older software.
Over time, these messages will become less frequent, as more of the worldâs Mac software is released in 64-bit versions. But in the meantime, youâll be ready.
In your Home folder. Suppose you share your Mac with other people, as described in Chapter 13. If thatâs your situation, you may occasionally want to install a program privately, reserving it for your own use only. In that case, just install or drag it into your Home folder, or a folder inside it. When other people log onto the machine, they wonât even know youâve installed that new program, since it doesnât show up in the Applications folder.
If you donât have an Administrator account, in fact, this is your only option for installing new programs.
In Mac OS X, thereâs generally no Uninstall program, and no Add/Remove Programs window. To uninstall a program, you just drag it (or its folder) from the Applications folder (or wherever it is) to the Trash.
Some programs also leave harmless scraps of themselves behind; to check for them, look for preference files or folders bearing the dearly departed programâs name in your Library folders (especially in Application Support) and your HomeâLibraryâPreferences folder.
The essence of using most operating systems is running programs, which often produce documents.
In Mac OS X, however, thereâs a third category: a set of weird, hybrid entities that Apple calls widgets. They appear, all at once, floating in front of your other windows, when you press the F4 (![]() ) key. Welcome to the Dashboard (Figure 4-18).
) key. Welcome to the Dashboard (Figure 4-18).
Note
The keystroke is F4 if you have a current Apple keyboardâthe thin aluminum one on a laptop or desktop Mac. In fact, you can see a tiny Dashboard logo ![]() painted right on the key.
painted right on the key.
On older, plastic keyboards, the keystroke is usually F12. Or, on laptops where F12 is the ![]() key, you have to hold down the Fn key (lower-left corner).
key, you have to hold down the Fn key (lower-left corner).
In either case, you can change the Dashboard keystroke to whatever you like, as described below.
What are these weird, hybrid entities, anyway? Theyâre not really programs. What they most resemble, actually, is little Web pages. Theyâre meant to display information, much of it from the Internet, and theyâre written using Web programming languages like HTML and JavaScript.
Mastering the basics of Dashboard wonât take you long at all:
To move a widget, drag it around the screen. (Click anywhere but on a button, menu, or text box.)
To close a widget, press the Option key as you move the mouse across the widgetâs face. Youâll see the
 button appear at the widgetâs top-left corner; click it.
Tip
If the Widget bar is open (as described below), every widget displays its
close button. You donât need the Option key.Figure 4-18. When you summon the Dashboard, you get a fleet of floating miniprograms that convey or convert all kinds of useful information. They appear and disappear all at once, on a tinted translucent sheet that floats in front of all your other windows. You get rid of Dashboard either by pressing the same key again (F12 or whatever) or by clicking anywhere on the screen except on a widget.
To open a closed widget, click the
 button at the bottom of the screen. Now the entire screen image slides upward by about an inch to make room for the Widget bar: a âperforated metalâ tray containing the full array of widgets, even the ones that arenât currently on the screen (Figure 4-19). Open one by clicking its icon.
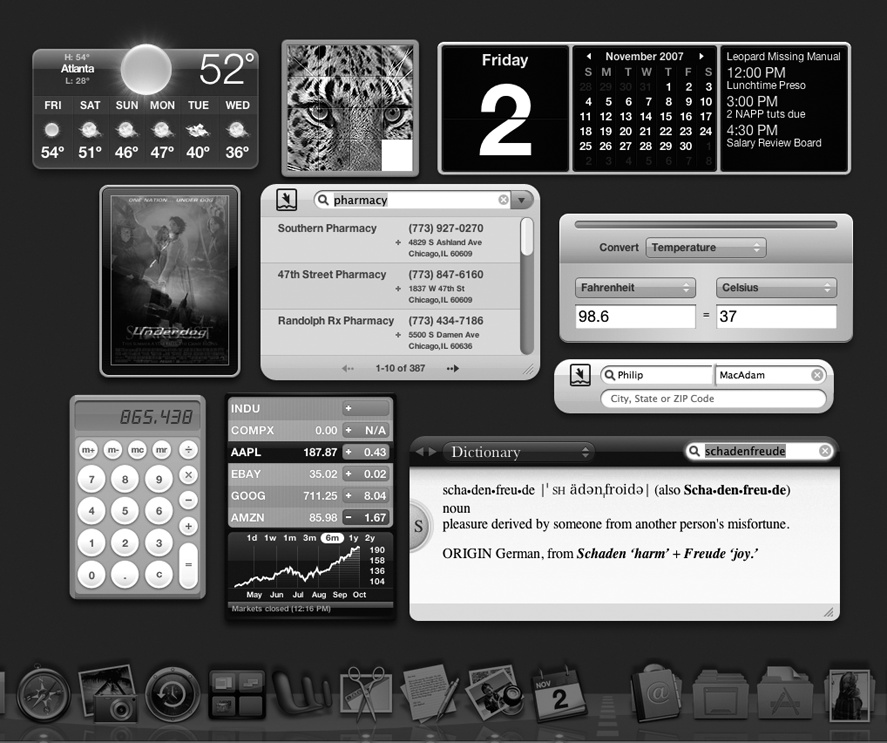
On Macs with newish graphics cards, a new widget appears by splashing down into the center of your screen, sending realistic pond ripples across the liquidy glass of your screen. These widgets really know how to make an appearance, donât they?
To hide one of Appleâs widgets, or to delete one youâve installed yourself, use the Widget widget described in Figure 4-20.
To rearrange your widgets as they appear in the Widget bar, open your hard driveâLibraryâWidgets folder. Here youâll find the icons for the standard Apple Dashboard widgets. To rearrange them, you have to rename them; they appear on the Widget bar in alphabetical order. (You can also remove a widget for good by deleting it from this folder, if you must.)
Tip
The Dashboard icon also appears in your Dock, just in case you forget the F4 keystroke. On the other hand, if you prefer the keystroke, you can remove the icon from your Dock to make room for more important stuff. Control-click (or right-click) the icon and, from the shortcut menu, choose Remove from Dock.
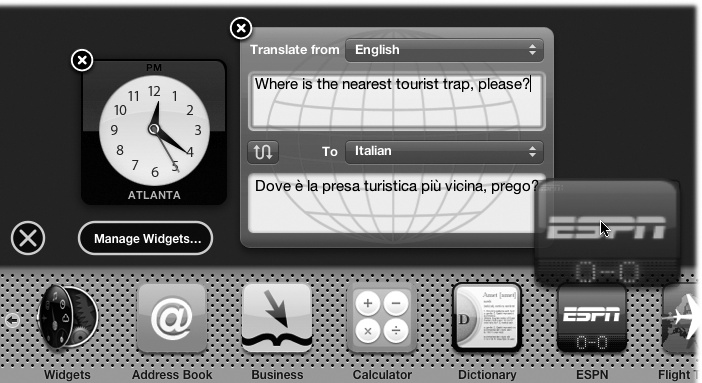
Figure 4-19. Youâll probably have to scroll the Widget bar to see all the widgets, by clicking the arrows at either end. When youâre finished opening new widgets, close the Widget bar by clicking its ![]() button at the left side of your screen.
button at the left side of your screen.
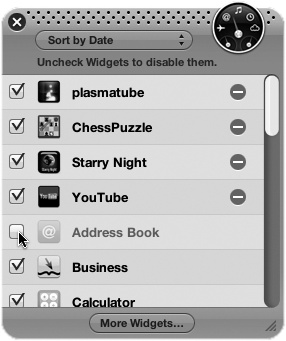
Figure 4-20. The Widget widget (whose icon appears at lower left in Figure 4-19) opens up this list of widgets. Turn off a checkmark to hide a widget, or click â to completely uninstall any widget you installed yourself. The ones whose boxes arenât checked are the ones that no longer appear on the Widget bar.
Dashboard is crawling with cool tips and tricks. Here are a few of the biggies:
If you just click an icon on the Widget bar, the widget appears right in the middle of your screen. But if you drag the widgetâs icon off the bar, you can deposit it anywhere you like.
Thereâs a great keystroke that opens and closes the Widget bar: â-= (equals sign). (This keystroke may be different on non-U.S. keyboard layouts.)
To refresh a certain widgetâfor example, to update its information from the Internetâclick it and press â-R. The widget instantly twist-scrambles itself into a sort of ice-cream swirl (youâve got to see it to believe it) and then untwists to reveal the new data.
You can open more than one copy of the same widget. Just click its icon more than once in the Widget bar. You wind up with multiple copies of it on your screen: three World Clocks, two Stock Trackers, or whatever. Thatâs a useful trick when, for example, you want to track the time or weather in more than one city, or when you maintain two different stock portfolios.
If you keep the Shift key pressed when you summon Dashboard, the widgets fly onto the screen in gorgeous, translucent, 3-D slow motion. Arenât you just glad to be alive?
To change the Dashboard keystroke to something other than F4 or F12, choose ![]() âSystem Preferences, and then click KeyboardâKeyboard Shortcuts.
âSystem Preferences, and then click KeyboardâKeyboard Shortcuts.
Tip
For faster service, Control-click (right-click) the Dashboard icon on the Dock. Choose Dashboard Preferences from the shortcut menu.
Here, youâll discover that you can choose almost any other keyboard combination to summon and dismiss the Dashboard, or even choose a screen corner that, when your mouse lands there, acts as the Dashboard trigger. This works exactly as described on Screen corners.
The best part of the Dashboard is that itâs expandable. Thousands of new widgets, written by other people, are available on the Web: games, chat and email notifiers, gas-price reporters, calculators and translators, news and sports updaters, finance and health trackers, and on and on.
To see Appleâs current list of goodies, use one of these tactics:
The short way. Right-click the Dashboard icon in the Dock. From the shortcut menu, choose More Widgets.
The long way. Click the Manage Widgets button that appears whenever the Widget bar is exposed; when the Widgets widget opens, click More Widgets.
Either way, you go to the Apple Dashboard downloads page. (Alternatively, check a Mac-downloads Web site like www.versiontracker.com for an even more complete selection.)
When you download a widget, Mac OS X is smart enough to install it automatically. First, though, it offers you a trial run, as shown in Figure 4-21.
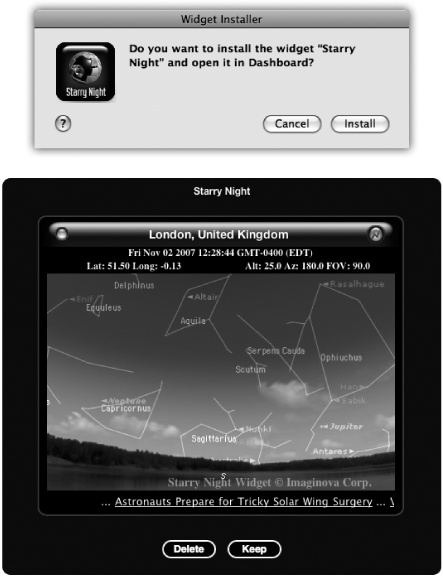
Figure 4-21. Widgets could, in theory, harbor viruses, so Mac OS X is extremely cautious in downloading them. Top: When you try to download a widget, the Mac asks if youâre sure. Bottom: After you download a widget and confirm your intention, you meet this test-drive mode for newly downloaded widgets. Itâs a way to play with new widgets before you actually commit to adding them to your system. Play with the widget, and then click Keep to install it (or Delete, if you think itâs evil).
If you click Keep, Mac OS X copies it into your HomeâLibraryâWidgets folder. Only you will see that Dashboard widget, because itâs been copied into the Widgets folder of your account. Anyone else who has an account on this Mac wonât see it.
Unless, of course, you copy or move that widget into the LibraryâWidgets folder (that is, begin with the Library folder in your main hard drive window). The contents of that Widgets folder are available to all account holders.
You donât have to be satisfied with Appleâs 20 widgets or the several thousand that other people have written. You can make a Dashboard widget of your ownâin about three clicks.
What if your interest isnât skiing, stocks, or sports? What if itâs The New York Times front page? Or the bestselling childrenâs books on Amazon? Or the most-viewed video on YouTube? Or some cool Flash game you wish you could summon with the touch of a key?
Thatâs the beauty of Web clips, a joint venture of Dashboard and the Safari Web browser. They let you turn any section of any Web page into a Dashboard widget that updates itself every time you open it. Itâs like having a real-time keyhole peek at all your favorite Web sites at once.
Hereâs how you go about creating a do-it-yourself widget:
Open Safari.
Safari is the Macâs Web browser. Itâs in your Applications folder.
Go to the Web page that contains the information you want to snip. Choose FileâOpen in Dashboard.
The screen goes dark, with only a small window of white. As you move your cursor around the page, the small white rectangle conveniently snaps to fit the various rectangular sections of the page.
Figure 4-22. Drag the little round handles to make the white box just big enough to surround the part of the page you want to enshrine. Or drag inside the box to move the whole thing.
As shown in Figure 4-22, your job is to make a frame around the part of the page that usually shows the information you want. If the Web site ever redesigns its pages, itâll wreck your widgetâbut what the heck. It takes only 5 seconds to make it again.
Adjust the corner or side handles to enclose the piece of page you want. When youâre finished, click Add, or press Return.
Now Dashboard opens automatically. At this point, you can dress up your widget, adding a little polish to this raw clipping youâve ripped out of a Web page. Click the
 button that appears when you move your mouse to the lower-right corner. The widget flips around to reveal some framing controls; see Figure 4-23.
Figure 4-23. Top: Here, you can click one of the frame styles to give your widget a better-looking border. If the widget plays sound, it keeps playing sound when you close the Dashboard unless you turn on âPlay audio in Dashboard only.â Click Edit to return to the front of the widget, where you can adjust its position on the underlying Web page. Bottom: Hereâs where it gets weird: You can reposition your widgetâs contents as though theyâre a window on the Web page thatâs visible behind it. Drag the widget contents in any direction within the frame, or resize the frame using the lower-right resize handle. Click Done.
You can make as many Web-clip widgets as you want.
But hereâs a big screaming caution: If you close one of these homemade widgets, itâs gone forever (or at least until you recreate it). Theyâre never represented as icons on the Widget bar, as ordinary widgets are.
Ah, wellâeasy come, easy go, right?
Something strange has been quietly taking place at Apple: Typing has been getting a lot of attention.
It starts with Mac OS Xâs system-wide spelling checker. You donât have to maintain a separate spelling checker for each program you use. Now thereâs just one, and it works in most Apple programs: TextEdit, Stickies, iChat, Mail, iCal, Safari, Pages, iPhoto, iMovie, and so on. Add a word to the dictionary in one program, and itâs available to all the others. Thereâs a grammar checker, too.
Snow Leopard also features text substitution, where you type addr and the system types out âIrwina P. McGillicuddy, 1293 Eastport Lane, Harborvilletown, MA, 02552.â (The same system auto-corrects common typos like teh instead of the.) Thereâs also a case-flipping feature that can change selected text to ALL CAPS, all lowercase, or First Letter Capped. Both of these new features are available in most Apple programs and in any other programs that tap into Mac OS Xâs built-in text processing circuitry (although not, alas, Microsoft programs).
Mac OS X can give you live, interactive spelling and grammar checking, just as in Microsoft Word and other word processors. That is, misspelled words or badly written sentences or fragments get flagged (with a dashed red underline for spelling problems and a green one for grammar problems) the moment you type them. Hereâs the crash course:
Check the spelling of one word: Highlight the word. Choose EditâSpelling and GrammarâShow Spelling and Grammar. The spell-check dialog box opens, with the proposed corrections visible.
Check spelling as you type. Choose EditâSpelling and GrammarâCheck Spelling While Typing. (If Check Grammar With Spelling is turned on in the same submenu, youâll get a grammar check, too.)
Now, as you type, youâll see those red and green underlines on words the Mac thinks represent spelling or grammar mistakes. To fix one, Control-click (right-click) the underlined word, and proceed as shown in Figure 4-24.
Check spelling after the document is finished. Choose EditâSpelling and GrammarâShow Spelling and Grammar (or press â-:). The Spelling dialog box appears. The first error it spots appears in the top box, with the proposed corrections in the bottom one.
Figure 4-24. Youâre never more than a Control-click (or right-click) away from more accurate spelling. Once you Control-click a questionable word, the suggestions of Appleâs built-in dictionary appear right in the shortcut menu, along with the Learn and Ignore commands.
If you like one of Appleâs proposals, click it and then click Change. If the word was correct already (for example, the guyâs last name really is Teh), then click Find Next (âLeave the word as I typed itâ), Ignore (âItâs OK everywhere in this documentâ), or Learn (âNever flag this word againâ).
Handily enough, you can also click Define to look up a highlighted word (one of the spelling suggestions, for example) in the Macâs built-in Dictionary app. Also handily enough, the spelling checker is smart enough to maintain different spelling checkers (dictionaries) for different languagesâand to recognize, within a single document, which language youâre using!
Fix spelling as you type. Note the difference. Checking your spelling just means âfinding the misspelled words.â Fixing means auto-correcting the errors as they occur, as you type. You might not even notice that itâs happening!
This most tantalizing option is EditâSpelling and GrammarâCorrect Spelling Automatically. And sure enough, when this option is turned on, common typos like teh and frmo and dont get fixed as you type; you donât have to do anything to make it happen.
Itâs not perfect. It doesnât correct all errors (or even most of them). It occasionally even corrects a word you didnât mean to have corrected, like turning brb (Internet shorthand for âbe right backâ) into bribe, or arent into arrant. (When it makes a mistake, hit â-Z, the Undo command, to restore what you typed.) And sometimes it doesnât make the change until youâre halfway through the sentence.
Still, though. Kind of cool.
This oneâs kind of cool: a new Snow Leopard feature that auto-replaces one thing you type with something else. Why? Because it can do any of these things.
Snow Leopard can insert attractive âcurly quotesâ automatically as you type âstraight ones,â or em dashesâlike thisâwhen you type two hyphens (--like that). It can also insert properly typeset fractions (like ½) when you type 1/2.
You can see the list of built-in substitutionsâand create your ownâin the System PreferencesâLanguage & TextâText tab, as shown in Figure 4-25.
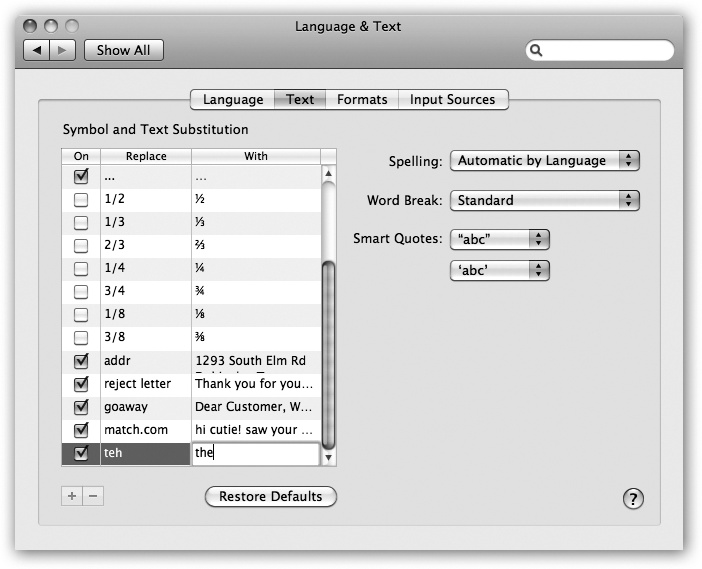
Figure 4-25. This is where you can manage Mac OS Xâs typographic substitutions. You can see already that typing common fractions are set to turn into typographically fancy ones as you type them. But you can add all kinds of auto-typo-corrections and even boilerplate text paragraphs.
Apple doesnât want to drive you nuts, though, so it makes sure youâre sure you really want these swappings to take place. So you have to turn on each of these features manually, in each program. (These commands are available anywhere you do a lot of typing, like TextEdit, Mail, and Stickies.)
Auto-quotes. To make the quotes curlify themselves, choose EditâSubstitutionsâSmart Quotes, so that a checkmark appears.
Auto-dashes. To turn double hyphens into these (â) long dashes, choose EditâSubstitutionsâSmart Dashes, so that a checkmark appears.
Smart links. Thereâs also an option to create Smart Links, where any Web address you type turns into a blue, underlined, clickable link to a Web page. Turn on EditâSubstitutionsâSmart Links.
You can also program addr to type your entire return address. Create two-letter abbreviations for big legal or technical words you have to type a lot. Set up goaway to type out a polite rejection letter for use in email. And so on.
This feature has been in Microsoft Office forever (called AutoCorrect), and itâs always been available as a shareware add-on (TypeIt4Me and TextExpander, for example). But now itâs built right into most Apple programs, plus any others that use Appleâs text-input plumbing.
You build your list of abbreviations in the System PreferencesâLanguage & TextâText tab, shown in Figure 4-25. See the list at left? Click the + button to create a new row in the scrolling table of substitutions.
Click in the left column and type the abbreviation you want (for example, addr). Click in the right column and type, or paste, the text you want Mac OS X to type instead.
Tip
Donât be shyâyouâre not limited to short snippets. The replacement text can be pages long, which is handy if youâre a lawyer and you build your contracts out of boilerplate chunks of canned text.
You can even create multiple paragraphsâbut not by hitting Return when you want a new line; no, hitting Return means, âIâm finished entering this textâ and closes up the box. Instead, press Option-Return when you want a paragraph break.
Here again, you have to explicitly turn on the text-replacement feature in each program (TextEdit, Mail, Stickies, and so on). To do that, choose EditâSubstitutionsâText Replacement, so that a checkmark appears.
Thatâs it! Now, whenever you type one of the abbreviations youâve set up, the Mac instantly replaces it with your substituted text.
The final new chunk in Snow Leopardâs text-massaging tool chest is case swappingâthat is, changing text youâve already typed (or pasted) from ALL CAPS to lowercase or Just First Letters Capitalized.
This oneâs simple: Select the text you want to change, and then choose from the EditâTransformations submenu. Your options are Make Upper Case (all caps), Make Lower Case (no caps), and Capitalize (first letters, like a movie title).
Keep that in mind the next time some raving lunatic SENDS YOU AN EMAIL THAT WAS TYPED ENTIRELY WITH THE CAPS LOCK KEY DOWN.
In Mac OS X, you can shift from language to language on the fly, as you type, even in midsentenceâwithout reinstalling the operating system or even restarting the computer.
First, tell your Mac which languages youâd like to have available. Open System PreferencesâLanguage & Text. On the Language tab, you see a listing of the different languages the Mac can switch into, in the corresponding languagesâFrançais, Español, and so on. Just drag one of the languages to the top of the list to select it as the target language, as shown in Figure 4-26.
Figure 4-26. Top: This is the list of the 18 âsystem localizationsâ that you get with a standard Mac OS X installation. Bottom: Hereâs Safari running in Dutch. Actually understanding Dutch would be useful at a time like thisâbut even if you donât, it canât help but brighten up your work day to choose commands like Spraakfunctie or Knip. (Alas, your success with this trick varies by program.)
Now launch Safari, TextEdit, Mail, or Stickies. Every menu, button, and dialog box is now in the new language you selected! If you log out and back in (or restart) at this point, the entire Finder will be in the new language, too.
Up To Speed: The Color Picker
Here and thereâin System Preferences, iMovie, TextEdit, Microsoft Office, and many other programsâMac OS X offers you the opportunity to choose a color for some element: for your desktop background, a window, and so on.
The dialog box that appears offers a miniature color lab that lets you dial in any color in the Macâs rainbow. Several color labs, actually, arrayed across the top, each designed to make color-choosing easier in certain circumstances:
Color Wheel. Drag the scroll bar vertically to adjust the brightness, and then drag your cursor around the ball to pick the shade.
Color Sliders. From the pop-up menu, choose the color-mixing method you prefer. CMYK stands for cyan, magenta, yellow, and black. People in the printing industry will feel immediately at home, because these four colors are the component inks for color printing. (These people may also be able to explain why K stands for black.)

RGB is how a TV or computer monitor thinks of colors: as proportions of red, green, and blue light. Gray Scale means shades of gray, like a black-and-white TV. And HSB stands for Hue, Saturation, and Brightnessâa favorite color-specifying scheme in scientific circles.
In each case, just drag the sliders to mix up the color you want, or type in the percentages of each component.
Color Palettes. This option presents canned sets of color swatches. Theyâre primarily for programmers who want quick access to the standard colors in Mac OS X. The Web Safe Colors list is useful for Web designers, too; they can tell whether a color will display properly on other computers.
Image Palettes. Hereâs the visible rainbow arrayed yet another way: in cloudy, color-arranged streaks. (Cool tip: If you drag a graphics file directly into the dialog box, it appears in the spectrumâs place. Thatâs a handy trick if youâre trying to identify the color of a certain spot of an image, for example. And donât miss the pop-up button at the bottom of the dialog box, which offers a few other stunts.)
Crayons. Now this is a good user interface. You can click each crayon to see its color name: Mocha, Fern, Cayenne, and so on. (Some interior decorator in Cupertino had a field day naming these crayons.)
In any of these color pickers, you can also âsampleâ a color thatâs outside the dialog boxâa color you found on a Web page, for example. Just click the magnifying-glass icon and then move your cursor around the screen. Youâll see the sliders and numbers change inside the dialog box automatically when you click.
Finally, note that you can store frequently used (or frequently admired) colors in the tiny palette squares at the bottom. To do that, drag the big rectangular color swatch (next to the magnifying glass) directly down into one of the little squares, where it will stay fresh for weeks.
If you donât have space for all the colors you want at the bottom of the window, you can drag the small circular dot down to make room for more.
Note
Programs differ widely in their "language awareness.â If you use a language beyond the 18 in the list, adding it (with the Edit List button) ensures that its relevant features will be available in all programs. (You may still have to add additional language software to make your menus and dialog boxes change.)
Of course, if you really speak French (for example), youâll also want to make these changes:
On the Formats tab, choose your French-speaking country from the Region pop-up menu, so that time and date formats, number punctuation, and currency symbols also conform to your local customs. (Turn on âShow all regions,â if necessary.)
For example, the decimal and thousands separator characters for displaying large numbers differ from country to country. (The number 25,600.99, for example, would be written as 25 600,99 in France, and as 25.600,99 in Spain.) And what appears to an American to be July 4 (the notation 7/4), to a European indicates April 7.
If, for some reason, Appleâs preprogrammed settings arenât right for your region, youâll see Customize buttons that let you override them.
Choose the French keyboard layout from the Input Menu tab, as explained on the following pages.
Gem In The Rough: Draw Those Chinese Characters
In Appleâs demos, it was one of the coolest features of Snow Leopard: If you want to write in Chinese, you can now draw the characters you want, right on your laptopâs trackpad. (This trick requires a recent Mac laptop, one of the multitouch models.)
To set this up, turn on ChineseâSimplified, choose the Chinese writing system you prefer, and turn on Trackpad Handwriting, in the System PreferencesâLanguage & TextâInput Sources pane.
Then, when youâre actually writing, use the flag (Input) menulet to choose PinyinâSimplified (or whichever system you like). Now press Shift-Control-space bar to make the writing panel appear, as shown here.
The trick here is to understand that the panel is a full map of your trackpad. You canât move the panel. Draw your character by dragging across the trackpad; white lines appear as you go.
On both sides of the onscreen panel, you see the Macâs interpretations of your character; to choose one, tap the corresponding spot on the outside edges of your actual trackpad. (Or, to delete your most recent line, tap the upper-left corner of your trackpad.) The Mac drops the character into your document.
Press Shift-Control-space bar again to hide the panel, and shake your head in wonder.
While the Mac can display many different languages, typing in those languages is another matter. The symbols you use when youâre typing in Swedish arenât the same as when youâre typing in English. Apple solved this problem by creating different keyboard layouts, one for each language. Each rearranges the letters that appear when you press the keys. For example, when you use the Swedish layout and press the semicolon key, you donât get a semicolon (;)âyou get an ö.
Use the list in the Input Menu pane to indicate which keyboard layout you want. If you select anything in the list, âShow input menu in menu barâ turns on automatically. A tiny flag icon appears in your menu barâa keyboard menulet that lets you switch from one layout to another just by choosing its name. (To preview a certain keyboard arrangement, launch the Keyboard Viewer program described next.)
Gem In The Rough: The Character Palette
There you are, two-thirds of the way through your local matchmaker newsletter, when it hits you that you need a heart symbol. Right now.
You know thereâs one in one of your symbol fonts, but youâre not about to type every single key combo until you produce the heart symbol. You canât help wishing there was an easier way to find those special symbols that hide among your fontsâfancy brackets, math symbols, special stars and asterisks, and so on.
The Keyboard Viewer (next page) is one solution. But thereâs a better one: the Character Palette. To make it appear, choose EditâSpecial Characters.
Most modern Mac programs have this command. If yours doesnât, hereâs the long way: Open System Preferences, click the International icon, click the Input Menu tab, and turn on the Character Palette checkbox.
Youâve just installed the Keyboard menulet.
Next time youâre word processing or doing page layout, choose Show Character Palette from this menu.
The resulting window rounds up all symbols from all your fonts at once. To find a particular symbol, click the âby Categoryâ tab, and then click the various category headings: Arrows, Stars/Asterisks, Math, and so on. Or, for an even more mind-blowing assortment (musical notes, Brailleâ¦), choose All Characters from the View pop-up menu.
You can preview variations of the same symbol by opening the Font Variation triangle. You can also use the Search box to find a symbol by name: âheartâ or âyenâ or âasterisk,â for example. When you find the symbol you want, double-click it.
In most Apple programs, the correct symbol pops into your document. (In others, you may get the correct character in the wrong font. In that case, change the font of the inserted character manually. To find out what font it came from, click the Font Variation flippy triangle to see the font name.)
Keyboard Viewer consists of a single window containing a tiny onscreen keyboard (Figure 4-27). When you hold down any of the modifier keys on your keyboard (like â, Option, Shift, or Control), you can see exactly which keys produce which characters. The point, of course, is to help you learn which keys to press when you need special symbols or non-English characters, such as © or ¢, in each font.
Note
Keyboard Viewer shows only the symbols you can produce by typing keystrokes. A font may contain thousands of other characters that canât actually be typed; the Character Palette (Input Menu Tab) is the only way to access these other symbols.
Itâs a great toolâif you can find it.
Hereâs how. Open System PreferencesâLanguage & Text, click Input Sources, and turn on Keyboard & Character Viewer at the top of the list. The window shown at bottom in Figure 4-27 appears. (Thereafter, youâll be able to choose its name from the Input menulet at the top of the screen, as shown at top in Figure 4-27.)
To see the effect of pressing the modifier keys, either click the onscreen keys or press them on your actual keyboard. The corresponding keys on the onscreen keyboard light up as theyâre pressed.
Tip
Youâre not stuck viewing the characters in a 12-point font sizeâa good thing, because some of them are hard to read when displayed that small. You can make the Keyboard Viewer window as large as you wantâfill the screen with it, why donât you?âby clicking its Zoom button or dragging its lower-right corner. That will magnify the Keyboard Viewer window and its font size.
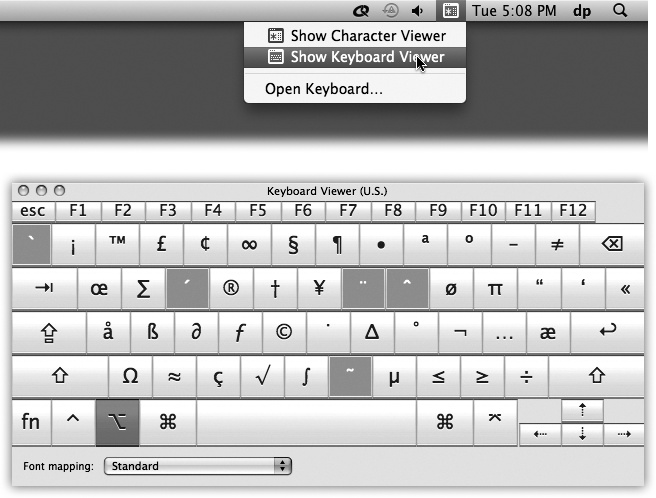
Figure 4-27. How do you make a Πsymbol? Top: Open Keyboard Viewer by choosing its name from the keyboard (flag) menulet. Bottom: Keyboard Viewer reveals the answer. When you press the Option key, the Keyboard Viewer keyboard shows that the pi character (Π) is mapped to the P key. To insert the symbol into an open document, just click it in the Keyboard Viewer window.
Hereâs a cool step-saver, something no other operating system offersâa little something Apple likes to call data detectors.
In short, Mac OS X recognizes commonly used bits of information that may appear in your text: a physical address, a phone number, a date and time, and so on. With one quick click, you can send that information into the appropriate Mac OS X program, like iCal, Address Book, or your Web browser (for looking up an address on a map).
Hereâs how it works: When you spot a name, address, date, or time, point to it without clicking. Mail draws a dotted rectangle around it. Control-click inside the rectangle, or right-click, or click the pop-up â¼ at the right side.
As shown in Figure 4-28, a shortcut menu appears. Its contents vary depending on what youâre pointing to:
Figure 4-28. Mail can detect street addresses, phone numbers, dates, and times. When it spots something you may want to add to another program, like Address Book or iCal, it draws a dotted line around the info when you point to it without clicking. Click the little â¼ to get a shortcut menu for further optionsâlike automatically adding the address to your Address Book program or seeing the address pinpointed on a Google map.
A mailing address. You can choose Show Map from the shortcut menu; your Web browser opens automatically and shows you that address on a Google map.
Alternatively, you can choose Create New Contact (to add an Address Book entry for this address) or Add to Existing Contact (if the person is in your Address Bookâjust not the address). Like magic, a little editing box sprouts out of the data-detected rectangle, prefilled with the information from the message, so that you can approve it.
A date and time. The shortcut menu offers two useful commands. Create New iCal Event opens Mac OS Xâs calendar program and creates a new appointment at the date and time identified in the message. Itâs up to you to type a name for the date, set an alarm, and do all the other usual appointment-setting things.
Tip
If, while working in iCal, you ever forget where this event came from, double-click it. In the Info balloon, youâll see a link that takes you right back to the original Mail message that started it all.
If you choose Show This Date in iCal, though, you go to iCal, which opens directly to the specified date and/or time. The logic of this feature is overwhelming; after all, when someone emails you to ask if youâre free for drinks next Thursday at 10, whatâs the first thing you usually want to do? Check your calendar, of course.
A phone number. As with mailing addresses, the shortcut menu here offers you things like Create New Contact and Add to Existing Contact. The third one, Large Type, is great when you want to call this person right nowâit displays the phone number in huge type, filling your screen, so you can see it from across your mansion.
A flight number. Thereâs a new data detector in Mac OS X 10.6: flights. When you highlight flight information in a text document (for example, âAA 152â), the data detector offers a Show Flight Information command. It opens the Flights widget of Dashboard, so you can see the flightâs departure time, arrival time, and other details. It works only if the airline is represented as a two-letter code, and as of Mac OS X 10.6.1, only in Mail and iChat.
Get Switching to the Mac: The Missing Manual, Snow Leopard Edition now with the O’Reilly learning platform.
O’Reilly members experience books, live events, courses curated by job role, and more from O’Reilly and nearly 200 top publishers.

