In the beginning, Jobs created the Save command—because computers were slow.
Every time you saved, your work was interrupted for a few seconds (or a lot of seconds) as the very slow program on your very slow computer saved your work onto a very slow floppy disk.
And that, ladies and gentlemen, is why most programs still don’t autosave: because the interruptions were just too annoying.
Apple figured it was high time the world revisit that scenario. Computers now have plenty of horsepower. They could be saving your work continuously, and you’d never even know it. Why shouldn’t all programs save your work as you go, automatically and invisibly? As long as you also have the option to rewind and take your document in a different direction, what could possibly be the harm?
And so it is that Auto Save was born.
Unfortunately, it’s available in only a few programs, at least right now. You’ll find it in Apple’s showcase programs like Pages, Keynote, Numbers, Preview, and TextEdit.
In these programs, your document is saved every time there’s even the tiniest pause in your typing or working—in the background. No progress bar, no interruption. If you quit or close the document without remembering to save, no problem: Your work will be there when you open the document again later.
Note
“But wait a minute,” cry the masses—“I like being able to close a document without saving changes! Sometimes all I wanted to do was fool around, play ‘what-if’ games—and then close it without saving changes!”
Just for you, Apple put a pair of sneaky little checkboxes into System Preferences→General. First, “Ask to keep changes when closing documents.” If that’s turned on, then when you close a document with unsaved changes, the Mac asks if you want to keep the edits, just as it does in all other programs.
But if you quit the program without saving, your changes are auto-preserved; Auto Save apps autosave your documents when you quit their programs, so you can pick up where you left off the next time. You can override that, too, if you like; turn on “Close windows when quitting an application,” also in System Preferences→General. Now you’ll get the “Save changes?” box when you quit the app with unsaved changes.
In those enlightened programs that work with Auto Save, there’s a more complicated but more powerful feature at work: Versions. It’s an invisible paper trail of every in-progress condition of your document—and you can return to any earlier version at any time. You can even return to an earlier version and copy just a chunk of it into the current version, which is great when one paragraph of your previous draft was gold, but the rest was junk.
The Versions world of document management is quite a bit different from the old setup. Here’s what you need to know:
All the version information is stored in the same original document file. (It’s not like there’s a rat’s nest of icons for each thing you’re working on.) But when you send the document to somebody else (by email or network, for example), the Mac is smart enough to send only the current version, stripping out all the history. Nobody will ever know how much you labored over your work (or how little).
OS X creates a new snapshot of your document once an hour. You can also create new snapshots manually at even shorter intervals—by using the File→Save command (⌘-S), as you always have.
These snapshots, or versions, represent rewind points that you can return to later, even months or years after you first created the document. Thoughtfully enough, the Mac records, invisibly, only what’s changed between versions, so your files don’t get all big and bloated.
There’s no Save As command anymore in these programs. Instead, when you want to spin off a different version of a document—because you want to experiment with taking it into a radical new direction, for example—choose File→Duplicate. (Or choose Duplicate from the title-bar menu shown in Figure 4-24.)
Before your very eyes, a copy of the open window springs into existence. If the original was called “Kumquat Tarts,” then the new one is called “Kumquat Tarts copy”—but that name is highlighted, selected, right in the title bar. That’s new in Mountain Lion.
If it’s OK to leave your duplicated document stored in the same folder as the original, then just type its new name and press Return. If you want to file it in a different folder, then choose File→Save instead. You get the standard Save dialog box, where you can choose a name and a folder for it.
Tip
You can also choose to move a document to a different folder later right there in the program—a first in the Mac operating system. Just choose File→Move To, and choose a new storage bin for it. (You can even store it in iCloud at this point; see Saving, Opening, and Moving Files.)
There’s a secret Versions menu in the title bar. Point to the name of your document. In Auto Save–compatible files, a little
 appears in the title bar (Figure 4-24).
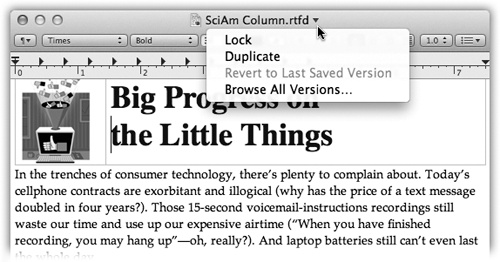
Figure 4-24. Point to the title of your document to see this secret menu. It contains the full list of commands that pertain to Versions.
The point of all of this, of course, is to make it easy to go back in time—to undo the mediocre work you’ve done, or to resurrect some genius work that you later deleted.
The quick way is to choose File→Revert to→Last Saved (or Last Opened). That command restores the document to the last snapshot version (or to the way it was when you most recently opened it, if no new versions have been created). That, of course, is nothing new; lots of programs have Revert to Saved commands that work similarly.
What’s new is that you can revert your document to any snapshot, even an ancient one from weeks or months ago.
To do that, choose File→Revert to→Browse All Versions. (Or open the Versions menu shown in Figure 4-24, and from the pop-up menu, choose Browse All Versions.)
After a moment, you see the stunning display shown in Figure 4-25. On the left, you see your document in its current condition. On the right, you see a stack of windows that represent all the different snapshots of your document, going back in time. (And behind it all, you see another sort of version: Apple’s animated version of the galaxy.)
You can have all kinds of productive fun in this version browser:
Compare the current version (on the left) with the next-most-recent one (on the right). These are live documents, so you can scroll through them as necessary. If you decide to stick with the latest edition on the left, just click Done. You leave the starry version-history world and go back to editing.
Zoom back in time to inspect older versions (snapshots) of your document. On the right side of the screen, you see earlier versions of the document—maybe even dozens of them, stretching back in time.
You can click individual windows’ title bars to see what’s in them. You can also click or drag your cursor through the notches at the right side. It’s like a time ruler that flies through the windows into the past. (As you go, the time/date stamp below the right-side window identifies where you are in time—that is, which version you’re examining.)
Restore an earlier version. If you finally find the incarnation of the document you consider superior to your current one, click Restore. You leave Starry Versionland and return to your document, which has now been rewound to its earlier condition.
If you later decide you should not have gone back to that earlier version, no problem. Your later version—the one you started out with—is still in the version browser, too. So you can fast-forward to it, if necessary.
Restore part of an earlier version. Often, the current version of your work is generally good, but you really wish you could recover one magical sentence or paragraph or section—something you’ve since edited or deleted.
You can do that in Starry Versionland, too, because Copy and Paste work here!
Use the time ruler to find the earlier edition of your document, the one containing the good stuff. Then drag through the desired text or graphics in the window on the right, as shown in Figure 4-25. Now copy the highlighted material (either press ⌘-C, or move your mouse to the top of the screen so that the menu bar appears, and choose Edit→Copy). Click in the current version of the document, the one at left, and now paste (⌘-V, or use the menu bar). Click Done to complete this astonishing act of salvation.
Delete a version. There are all kinds of reasons why you might want to delete one of your older snapshots. Maybe you wrote it in a fit of pique (or exhaustion), and you want to make sure nobody ever, ever reads that awful prose. Maybe you know there’s nothing valuable in it, and you’d rather not dedicate hard drive space to it.
Figure 4-25. Versions is your chance to go back in time to recover an earlier, better version of your document (or just a part of it).
In any case, deleting a version is easy to do. Once you’re in Starry Versionland, point to the
in the title bar of the version (on the
right side). You’ll discover that the menu now contains only
one command: Delete This Version. Click Delete in the
confirmation box. Any questions?

You can always revert to the Last Opened or Last Saved version of a file. Yes, even though Auto Save is constantly backing up your document, Mountain Lion also remembers how the file looked the moment you opened it. And you want to know what’s crazy? It can revert to that condition even if you’ve been manually saving your work all along!
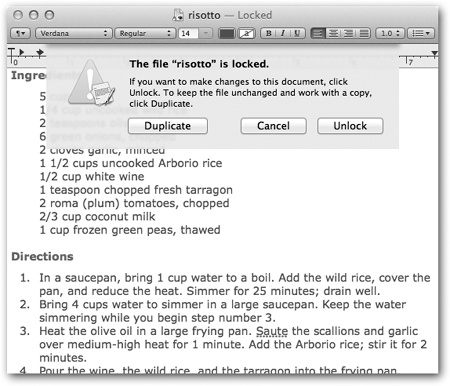
If all this version recording is making you dizzy, you can call a halt. You can freeze a document in its current condition so that nobody can make any further changes to it. You might lock a contract document before you send it to someone, for example, or just freeze your novel into what you hope is its final form.
To do that, click the ![]() in the title bar; from the shortcut menu,
choose Lock.
in the title bar; from the shortcut menu,
choose Lock.
Now the title bar says “Locked.” If you try to edit the document, you’re offered the dialog box shown in Figure 4-26.
Get Switching to the Mac: The Missing Manual, Mountain Lion Edition now with the O’Reilly learning platform.
O’Reilly members experience books, live events, courses curated by job role, and more from O’Reilly and nearly 200 top publishers.

