In its day, the concept of overlapping windows on the screen was brilliant, innovative, and extremely effective. (Apple borrowed this idea—well, bought it in a stock swap—from a research lab called Xerox PARC.) In that era before digital cameras, MP3 files, and the Web, managing windows was easy this way; after all, you had only about three of them.
These days, however, managing all the open windows in all the open programs can be like herding cats. Off you go, burrowing through the microscopic pop-up menus of your Dock, trying to find the window you want. And heaven help you if you need to duck back to the desktop—to find a newly downloaded file, for example, or to eject a disk. You’ll have to fight your way through 50,000 other windows on your way to the bottom of the “deck.”
Mission Control, one of Lion’s marquee features, tackles this problem in a fresh way. The concept: With one mouse click, keystroke, or finger gesture, Mac OS X shrinks all windows in all programs to a size that fits on the screen (Figure 4-8), like index cards on a bulletin board, clumped by open program. Now you feel like an air-traffic controller, with all your screens arrayed before you. You click the window or program you want, and you’re there. It’s fast, efficient, animated, and a lot of fun.
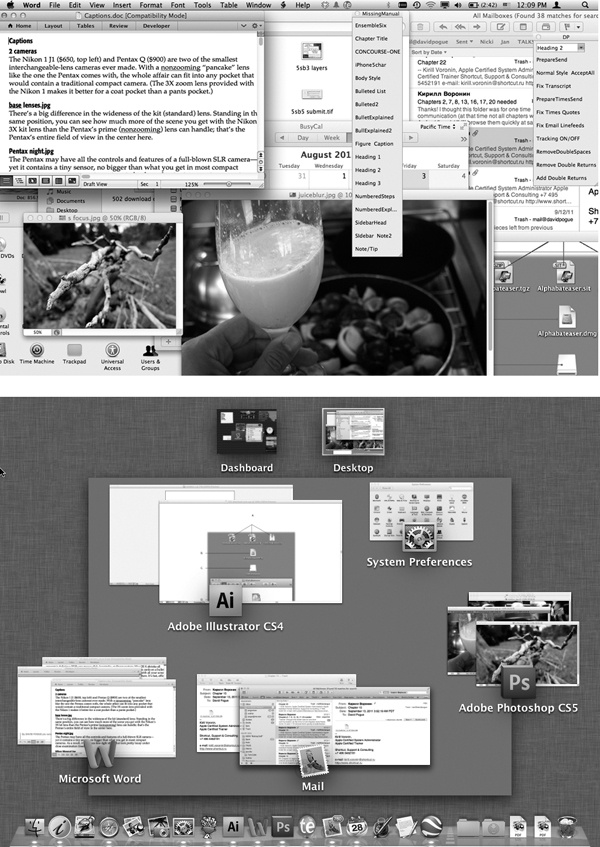
Figure 4-8. Top: Quick! Where’s System Preferences in all this mess? Bottom: With a three-finger upward swipe on the trackpad, you can spot that window, shrunken but not overlapped. Each program’s thumbnail cluster offers an icon and a label to help you identify it. These aren’t static snapshots of the windows at the moment you Mission Controlled them. They’re live, still-updating windows, as you’ll discover if one of them contains a playing QuickTime movie or a Web page that’s still loading.
Mission Control is a program, just like any other. So you can open it with a click on its Dock icon, from Launchpad, from the Applications folder, and so on.
But it’s really meant to be opened quickly, fluidly, naturally, whenever the mood seizes you—with a gesture. On the trackpad, that’s a swipe upward with three fingers. (On the Magic Mouse, it’s a double-tap with two fingers—taps, not clicks.)
Note
You can change this gesture so that it requires an additional finger, if you like, in System Preferences→Trackpad (or Mouse)→More Gestures→Mission Control. Use the pop-up menu.
Or you can press the dedicated ![]() key, if you have one, on the top row of your
keyboard. Substitute the F9 key if you don’t.
key, if you have one, on the top row of your
keyboard. Substitute the F9 key if you don’t.
And even that’s just the beginning of the ways you can open Mission Control; read on.
Note
To exit Mission Control without clicking any of your windows or virtual screens, swipe down with three fingers. Or tap the Esc key.
You can reassign the Mission Control trigger to a huge range
of other keys, with or without modifiers like Shift, Control, and
Option. To view your options, choose ![]() →System Preferences and then click the
Mission Control icon (Figure 4-9).
→System Preferences and then click the
Mission Control icon (Figure 4-9).
Here you’ll find four pop-up menus. The first one, Mission Control, lets you specify how you want to open Mission Control. The other three—“Application windows,” “Show Desktop,” and “Show Dashboard”—correspond to the three functions of the older Exposé and Dashboard features, described later in this chapter.
Within each pop-up menu, for example, you’ll discover that
all your F-keys—F1, F2, F3, and so on—are available as triggers.
If, while the pop-up menu is open, you press one or more of your
modifier keys (Shift, Option, Control, or ![]() ), all these F-key choices
change to reflect the key you’re pressing;
now the pop-up menu says Shift-F1, Shift-F2, Shift-F3, and so on.
That’s how you can make Shift-F1 trigger
Mission Control, for example.
), all these F-key choices
change to reflect the key you’re pressing;
now the pop-up menu says Shift-F1, Shift-F2, Shift-F3, and so on.
That’s how you can make Shift-F1 trigger
Mission Control, for example.
These pop-up menus also contain choices like Left Shift, which refers to the Shift key on the left side of your keyboard. That is, instead of pressing F9 to open Mission Control, you could simply tap the Shift key.
Note
This is only an example. Repeat: This is only an example. Actually using the Shift key to open Mission Control is a terrible, terrible idea, as you’ll quickly discover the next time you try to type a capital letter. This feature is intended exclusively for hunt-and-peck typists who never use the Shift key on one side.
If you have a laptop, you’ll also find out that you can tap the Fn key alone for Mission Control—and this time, it’s a great choice, because Fn otherwise has very little direction in life.
If your mouse has more than one button, you see a second column of pop-up menus in System Preferences. Each pop-up menu offers choices like Right Mouse Button, Middle Mouse Button, and so on. Use these pop-up menus to assign Mission Control (or Exposé, or Dashboard) to the various clickers on your mouse: right-click to hide all windows, left-side click to reveal the desktop, and so on.
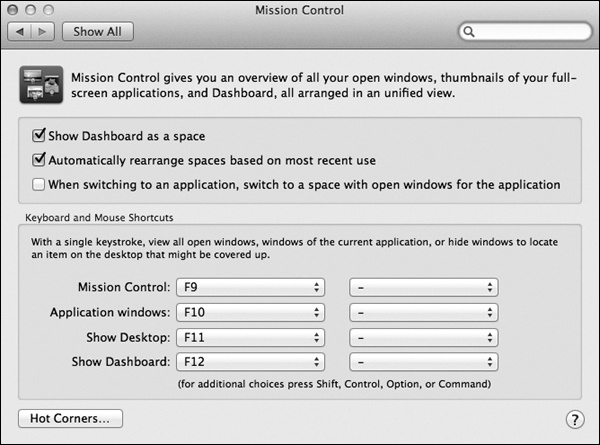
Figure 4-9. You can trigger Mission Control in any of five ways: by clicking its icon, with a finger gesture, by twitching your cursor into a certain corner of the screen, by pressing a key, or by clicking the extra buttons on a multibutton mouse, including Apple’s Mighty Mouse. Of course, there’s nothing to stop you from setting up all of these ways, so you can press or swipe in some situations and twitch or click in others.
Note, by the way, that on a laptop, for example, the wording isn’t “right mouse button”—it’s “secondary mouse button.” Which means “right-click.” Which means that on a laptop, you can set it up so that a “right-click” trackpad gesture triggers one of these functions.
If you click Hot Corners, you see a little map of your screen, including all four corners. Using the little pop-up menus, you can assign a Lion window-management feature to each corner; for example, if you choose Mission Control from the first pop-up menu, then when your pointer hits the upper-left corner of the screen, you’ll open Mission Control. (Launchpad is an option here, too.)
Depending on the size of your screen, this option can feel awkward at first. But if you’ve run out of keystrokes that aren’t assigned to other functions, be glad that Apple offers you this alternative.
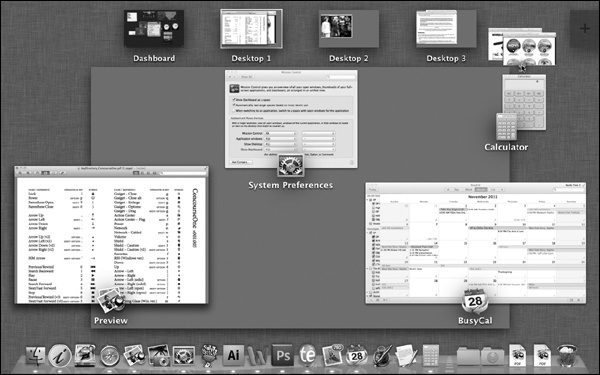
Once you open Mission Control, you see two major elements: your Spaces (virtual screens, described in a moment) at the top, and the actual window thumbnails below that.
You can click anything here to jump to it: Jump to a different Space (desktop) by clicking its thumbnail, switch to a different program by clicking its icon, or click one of the window miniatures.
Tip
Try holding down the Shift key as you do it. You’ll enjoy watching all your windows shift around with slow-motion animation, which can be quite a sight.
Or, if you decide to abandon ship and return to whatever you were doing, swipe down with three fingers on the trackpad (two on the Magic Mouse), or press the Esc key.
The trouble with miniaturized windows is that, well, they’re miniaturized. The more windows you have open, the smaller they are, and the harder it is to see what’s in them.
If you need a little help identifying a window miniature, you have three options:
Point to the cluster of windows in one app, and do a two-finger swipe up on the trackpad. Lion helpfully spreads the window thumbnails out and enlarges them a little bit, so it’s easier to tell them apart and click the one you want.
Point to a window thumbnail without clicking. Mac OS X puts a colored border on it to show that it’s highlighted; now press the space bar. That, of course, is the Quick Look keystroke, and it works here, too. It magnifies the window you’re pointing to, making it full size—big enough for you to read its contents and identify it.
Press
 -~. That keystroke takes you into
Application Exposé, described later in this chapter.
-~. That keystroke takes you into
Application Exposé, described later in this chapter.
Mission Control’s other star feature, Spaces, gives you up to 16 full-size monitors. Ordinarily, of course, attaching so many screens to a single computer would be a massively expensive proposition, not to mention the number it would do on your living space and personal relationships.
Fortunately, Spaces monitors are virtual. They exist only in the Mac’s little head. You see only one at a time, and you switch using Mission Control or a gesture.
But just because the Spaces screens are simulated doesn’t mean they’re not useful. You can dedicate each one to a different program or kind of program. Screen 1 might contain your email and chat windows, arranged just the way you like them. Screen 2 can hold Photoshop, with an open document and the palettes carefully arrayed. On Screen 3: your Web browser in full-screen mode.
You can also have the same program running on multiple screens—but with different documents or projects open on each one.
These desktops are also essential to Lion’s new full-screen apps feature, because each full-screen app gets its own Spaces desktop.
Now, virtual screens aren’t a new idea—this sort of software has been available for years. But until the Mac came along, it had never been a standard feature of a consumer operating system, and rarely has it been executed with such finesse.
Mission Control starts you off with two Spaces (or desktops,
as they’re labeled). One of them shows the Dashboard, described
later in this chapter; the other shows your regular Mac world. If
you’ve clicked the ![]() button in an app to make it full screen, it
fills an additional desktop unto itself.
button in an app to make it full screen, it
fills an additional desktop unto itself.
To create another desktop, enter Mission Control. You can now proceed in either of two ways:
The long way. Point to the upper-right corner of the screen; a big + button slides into view (Figure 4-10). Click it to create a new mini desktop in the top row.
Now it’s time to park some windows onto the new desktop. Either drag a window thumbnail onto the blank desktop—or, to move all of one program’s windows there, drag the application icon. All the windows go along for the ride.
The short way. Drag one window thumbnail into a blank spot at the upper-right corner of the screen—or, to move all of one program’s windows there, drag the application icon. Again, all the windows go along for the ride.
Tip
There are two ways to move a window to a different Space without opening Mission Control first. First, you can drag a window (using its title bar as a handle) all the way to the edge of the screen. Stay there with the mouse button still down. After about a second, you’ll see the adjacent screen slide into view; you’ve just moved the window.
Second, switch to the new Space. Hold your mouse down on the app’s icon; from the shortcut menu, choose Options→Assign To→This Desktop. Lion whisks that app’s windows from whatever other screen they’re on to this screen.
Once you’ve got Spaces set up and turned on, the fun begins. Start by moving to the virtual screen you want; it’s like changing the channel. Here are some ways to do that:
Swipe horizontally on your trackpad with three fingers. (On the Magic Mouse, it’s two fingers.) If you have a trackpad or a Magic Mouse, this is definitely the method to learn; it’s fast, fluid, and happy.
(You can change this gesture so that it requires an additional finger, if you like, in System Preferences→Trackpad [or Mouse]→More Gestures→“Swipe between full-screen apps.” Use the pop-up menu.)
Enter Mission Control. Click the desktop you want.
Press Control-← or Control-→ to rotate to the previous or next desktop.
While pressing the Control key, type the number of the desktop you want. For example, hit Control-3 to jump to your third screen. (You have to turn on this feature first, though. See Figure 4-11.)
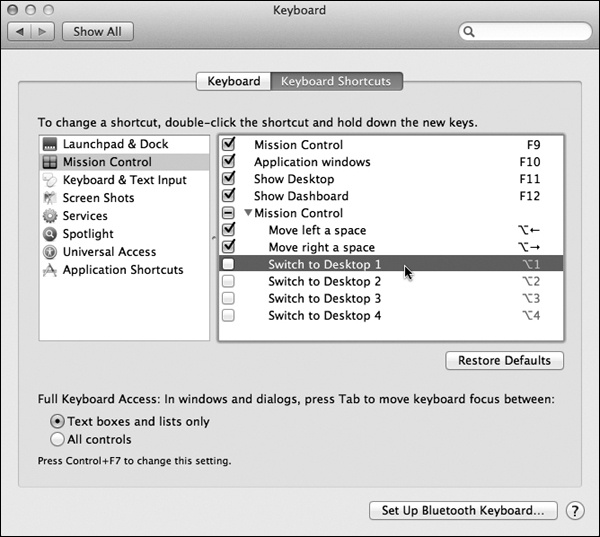
Figure 4-11. To control Spaces from the keyboard, open
![]() →System Preferences→Keyboard. Click Keyboard
Shortcuts and then Mission Control. As shown here, Apple has
preassigned keyboard shortcuts to your various Spaces—but they’re
not turned on yet. Turn on the checkboxes for the shortcuts you
want. (You can change those shortcuts here, too.)
→System Preferences→Keyboard. Click Keyboard
Shortcuts and then Mission Control. As shown here, Apple has
preassigned keyboard shortcuts to your various Spaces—but they’re
not turned on yet. Turn on the checkboxes for the shortcuts you
want. (You can change those shortcuts here, too.)
As you’ll quickly discover, Lion thinks your desktops are arranged horizontally. You can’t rearrange them.
When you make a switch, you see a flash of animation as one screen flies away and another appears. Now that you’re “on” the screen you want, open programs and arrange windows onto it as usual.
Tip
What if you’re using Spaces and you want to drag something from one screen (like a photo in iPhoto) into a window that’s on a different screen (like an outgoing email message)?
Start dragging. With the mouse button still down, press
![]() -Tab to open the application switcher.
Continue the drag onto the icon of the
receiving program, and still keep the mouse button down. Mac OS X
switches to the appropriate virtual screen automatically.
-Tab to open the application switcher.
Continue the drag onto the icon of the
receiving program, and still keep the mouse button down. Mac OS X
switches to the appropriate virtual screen automatically.
To delete a desktop, enter Mission Control. Point to one of the screen thumbnails without clicking until a – appears in its corner; click it. The desktop disappears, and whatever windows were on it get shoved onto Desktop #1, your main desktop.
Tip
If you don’t have the 1½ seconds to wait for the – to appear, then press Option as you point. The Close button appears instantly.
By the way, this trick doesn’t work for apps running in full-screen mode. You can’t get rid of their desktops unless you first switch to them and get out of full-screen mode.
Get Switching to the Mac: The Missing Manual, Lion Edition now with the O’Reilly learning platform.
O’Reilly members experience books, live events, courses curated by job role, and more from O’Reilly and nearly 200 top publishers.

