As we saw in Chapter 3, instance subclassing involves using the SetWindowLongPtr function to replace the window procedure of a specific window instance.
In this section, we’ll write our first simple subclassing application. The application will have two buttons, one to subclass the VB form and another to remove the subclass. The only other control will be a multiline text box that will display messages as they are sent to this form. I will add some more functionality to this application in the example following this one.
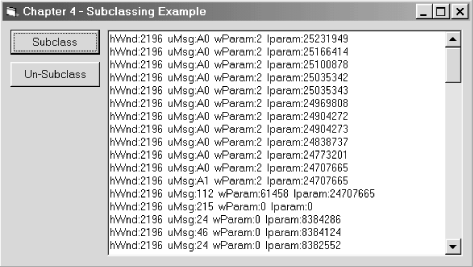
Let’s start with the layout of the form. It’s rather simple; the nondefault properties are listed in Table 4-1, and the form is displayed in Figure 4-2.
Table 4-1. Nondefault Properties of Form and Controls for Subclassing Example
|
Object |
Property Name |
Property Value |
|---|---|---|
|
frmCh4 |
Caption |
“Chapter 4 -- Subclassing Example” |
|
frmCh4 |
ClientHeight |
3612 |
|
frmCh4 |
ClientLeft |
48 |
|
frmCh4 |
ClientTop |
336 |
|
frmCh4 |
ClientWidth |
6960 |
|
Text1 |
Height |
3372 |
|
Text1 |
Left |
1560 |
|
Text1 |
MultiLine |
-1 `True’ |
|
Text1 |
ScrollBars |
2 `Vertical’ |
|
Text1 |
Top |
120 |
|
Text1 |
Width |
5292 |
|
cmdUnSubclass |
Caption |
“Un-Subclass” |
|
cmdUnSubclass |
Height |
372 |
|
cmdUnSubclass |
Left |
120 |
|
cmdUnSubclass |
Top |
600 |
|
cmdUnSubclass |
Width |
1332 |
|
cmdSubclass |
Caption |
“Subclass” |
|
cmdSubclass |
Height |
372 |
|
cmdSubclass |
Left |
120 |
|
cmdSubclass |
Top |
120 |
|
cmdSubclass |
Width |
1332 |
Here is how it will work. The text box is initially blank. When you click the Subclass button, messages that are sent to the window procedure for the VB form will display in the text box. Each line in the text box is a separate message. In our first cut at this project, messages will be displaying faster than you can read them. (We will discuss the number and frequency of messages sent to a window later in this chapter.) To remove the subclass procedure, simply click the Un-Subclass button; the messages will stop displaying.
The code will include functionality to handle problems such as clicking the Subclass button more than once and clicking the Un-Subclass button when no subclass procedure has been installed. There is also another problem that needs to be handled: prematurely ending the application before clicking the Un-Subclass button. In other words, you cannot stop an application cleanly without first removing any subclassed window procedure that has been installed. Ending an application any other way will cause a GPF to occur.
To demonstrate this, let’s assume that we forget to restore the
original window procedure before shutting down the application. The
subclassed window will continue to call our subclassed window
procedure even as the application is being destroyed. While the
application is being destroyed, the code within the BAS module that
contains the subclassed window procedure is removed from memory. If
the subclassed window receives any messages passed to it, such as
WM_DESTROY (the message indicating that the window
is about to be destroyed), the window tries to call the subclassed
window procedure using its function pointer. If the code for this
subclassed window procedure has been removed from memory, this
function pointer will point to unallocated memory and cause a GPF.
I should mention here that
the End statement in
VB will crash your application. The End statement
forces the application to stop dead in its tracks. This
means that any unload events for the Form or Terminate events for the
class modules will not execute. The Unload and Terminate events
provide the perfect place to clean up the application and prepare it
to shut down properly. These events are our last lines of defense. It
is here that I will place code to make absolutely sure that the
application can shut
down without a crash.
Using the End statement bypasses these events and
has the potential to create serious problems. Calling the
End statement after cleaning up your application
and preparing it to shut down would be fine, but being good
programmers, we would not use the End statement
anyway, right? As a note, the Stop
button in the VB IDE will act the same as
using the End statement.
This first example application will consist of a form (see Figure 4-2), a BAS module, and a class module:
The BAS module, as you guessed, holds the subclassed window procedure that will be installed before the original window procedure in the message stream. This, for now, is the extent of the code in the BAS module.
The class module is where the code to install and uninstall the subclassed window procedure contained in the BAS module resides. It would be nice to place the new subclassed window procedure in the class module as well, but as we know, the
AddressOfoperator does not support this. By placing code in the class module to control installing and uninstalling the subclassed window procedure, we are able to ensure that the application will function properly. By calling a public function in the class, we can install the subclassed windows procedure. But what if something goes wrong and either we forget to remove the subclassed window procedure or the application encounters an unhandled error? In either case, the class is destroyed before the form. The code that is placed in theClass_Terminateevent will allow the application to remove the subclassed window procedure and shut down gracefully.
A discussion of each module follows.
A good starting point is the code for the class module, which is named CSubclass. The private constants, the variables, and the Windows API function will be declared in the declarations section of the module, as follows:
Private Declare Function SetWindowLongPtr Lib "user32" Alias "SetWindowLongA" _
		(ByVal hwnd As Long, _
		ByVal nIndex As Long, _
		ByVal dwNewLong As Long) As Long

Private Const GWLP_WNDPROC = -4

Private m_lOrigWndProc As Long
Private m_hwnd As Long
SetWindowLongPtr will be used to do the
actual
subclassing. The GWLP_WNDPROC constant is used as
an argument to SetWindowLongPtr and indicates
that the window’s procedure is being replaced. The last two
private member variables will hold data pertaining to the window
being subclassed.
Two variables also are declared in
the class module’s declarations
section. The variable m_hwnd holds the window
handle of the subclassed window, and the
m_lOrigWndProc variable holds the original
window procedure for that same window. The
Class_Initialize event, which is shown in Example 4-1, is used to initialize these
two private member variables to
zero.
Example 4-1. The Class_Initialize Event Procedure
Private Sub Class_Initialize(  )
    m_lOrigClassProc = 0
    m_hwnd = 0
End Sub
Two public properties are needed for the two private member variables
m_hwnd and
m_lOrigWndProc; these are shown in Example 4-2.
Example 4-2. Properties of the CSubClass Class
Public Property Get OrigWndProc(  ) As Long
    OrigWndProc = m_lOrigWndProc
End Property

Public Property Let hwnd(Handle As Long)
    m_hwnd = Handle
End Property
The address of the original window procedure contained in the member
variable m_lOrigWndProc needs to be
available to the subclassed window
procedure in the BAS file. The first property that we expose in this
class, OrigWndProc, will take care of this
requirement. The second property is used only by an external function
to set the m_hwnd member variable. The
class needs to know the window (m_hwnd) in
which to install and remove the subclassed window procedure.
Now that we have the class data wrapped up, we can get to the meat of the class code. The public function that will actually perform the subclassing is shown in Example 4-3.
Example 4-3. The EnableSubclass Function
Public Function EnableSubclass(  ) As Boolean
    If m_lOrigWndProc > 0 Then
        'Already subclassed
        '  Do not allow to subclass a 2nd time
        MsgBox "Error: Already subclassed"
    Else
        m_lOrigWndProc = SetWindowLongPtr(m_hwnd, _
						GWLP_WNDPROC, _
						AddressOf Module1.NewWndProc)
    End If

    If m_lOrigWndProc > 0 Then
        EnableSubclass = True
    Else
        EnableSubclass = False
    End If
End Function
When this function is called, we want to check the
m_lOrigWndProc member
variable to find
out if it contains a number other than zero. If it does, we know that
this window has been subclassed and should not be subclassed a second
time. If the window were to be subclassed more than once using the
code in this example, we would lose the function pointer to our
original window procedure. Without this pointer to the original
window procedure, the application will crash when it is shut down.
Let me explain why in a little more detail.
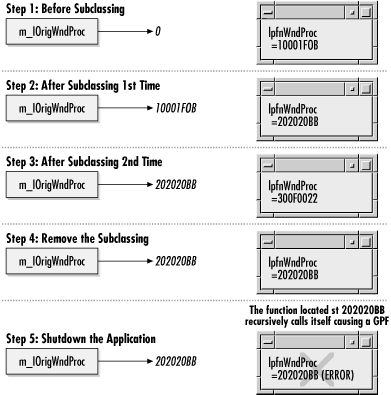
Looking at Figure 4-3, we see why subclassing a
window more than once will lead to a crash. The
m_lOrigWndProc member variable is first
initialized to zero to indicate that no subclassing has occurred.
When the window is subclassed using
SetWindowLongPtr, the pointer to the original
window procedure is stored in this variable. Removing the subclass at
this point will be successful. If instead the window is subclassed a
second time, and then we try to remove the subclassing, the
application will crash, and we will get a message similar to this:
PROJ_CH4 caused a stack fault in module MSVBVM60.DLL at 0167:66023e13.
A stack fault occurs when memory is accessed beyond the limits of the stack. The stack is a linked list used by function calls to store information that goes out of scope. Every thread has its own stack space. The stack space for any one thread can be up to 1MB in size. Information can only be inserted (pushed) onto the top of the stack or retrieved (popped) from the top of the stack. This is a First In, Last Out (FILO) type of structure. VB uses the stack mainly to store function arguments and local variables declared in functions.
Information such as global and static variables is stored in the application’s default heap. A heap is a block of memory set aside by the application to store information. Heap memory is accessible throughout the entire application, and therefore provides an excellent area to store global and static variables. Variables of this type never go out of scope, and thus require no stack space.
Variables local to a function go out of scope when calling another function. This is necessary to prevent variables local to one function from being modified from within another function. The stack provides a way to save the calling function’s local variables while the called function is executing. Upon returning from the called function the calling function’s local variables are restored properly.
Function arguments also are pushed
onto the stack. Arguments declared
as
ByVal have their actual data placed on the stack.
Arguments declared as ByRef have pointers to the
data placed on the stack. For ByRef arguments, the
called function obtains a pointer to the actual data and can
subsequently modify the actual data. ByVal
arguments only pass a copy of the data to a function. The copy can be
modified without also changing the value within the calling function.
To demonstrate this, a function foo is called in VB from the function Call_foo.
Private Function Call_foo(strX as string, lngY as Long) as long
	Dim intZ as Integer

	intZ = 1
	strX = "NULL"
	lngY = 100

	Debug.Print "Before Call"
	RetVal = foo(strX, lngY)
	Debug.Print "After Call"
End Function
The arguments to the function foo are placed at
the top of the stack. For this function, both strX
and lngY are placed on the stack. Though it is not
passed to the foo function, the integer
intZ also is placed on the stack because it is
local in scope to the Call_foo function. The
stack would look something like this:
Top of Stack ->       intZ = 1
			        lngY = pointer to the value of lngY
			        strX = "NULL"
Next, the function foo is called, and the system starts executing code in this function. Remember that the variables local to the function Call_foo are now out of scope. The foo function is as follows:
Private Function foo(ByVal in_strX as string, ByRef in_lngY as Long) as long
	StrX = "Text"
	LngY = 700
End Function
When End
Function is
encountered,
execution is returned to the
Call_foo function. The information on the stack
is removed and the Call_foo local variables are
restored. In this case:
intZwill still equal 1 because this local variable was only stored on the stack.lngYwill equal 700 because the pointer was passed in to the function foo.strXwill equalNULLbecause only a copy of this variable was modified in the function foo.
Now that we understand how the stack works, we can better understand the stack fault problem. When a function is called, various data related to that function is placed on the stack. When a function returns, the data placed on the stack is removed and the memory is freed so that it can be used again. If that function never returns, the information on the stack will remain and the memory will not be freed.
The problem with losing a function pointer to a window procedure is
illustrated in Figure 4-3, a step-by-step example
that shows the values of the original window procedure
(m_lOrigWndProc) and the pointer to the
correct window procedure (lpfnWndProc).
The address &H10001F0B points to the original window procedure,
&H202020BB points to the first subclassed window procedure, and
&H300F0022 points to the second subclassed window procedure. If
you notice when our second subclassed window procedure is called, it
thinks that the first subclassed window procedure is the original
window procedure (see Step 3 in Figure 4-3).
CallWindowProc will use the pointer stored in
the variable m_lOrigWndProc to call the
first subclassed window. Actually, this would be fine except for the
fact that we do not have the function pointer to the original window
procedure. This function pointer was lost when we subclassed this
window a second time. Unfortunately, the code now thinks that the
first subclassed window procedure is the original window procedure.
When CallWindowProc is executed in the first
window procedure, it calls itself because the function pointer in the
variable m_lOrigWndProc is pointing to
itself. This sets up a really nasty recursive function call in which
the first subclassed window procedure keeps calling itself and never
returns. This will continue to happen until the stack fills up and
then tries to write
past its
boundary, causing a stack fault.
To correct this problem, the address of each window procedure (including the original one) has to be saved. These values could possibly be stored in an array. When the second subclassed window procedure calls the CallWindowProc function, this array would be use to look up the next subclassed window procedure to call. In this case, it would be the first window procedure. After the first window procedure is finished, the original window procedure would be called. The original window procedure should be stored in this array as well.
There are two things to keep in mind with subclassing a window multiple times. First, the window procedures should be called in the reverse order in which they were installed. For example, the last installed subclassed window procedure should be called first, the second installed window procedure should be called next, and so on. Second, when removing the subclassed window procedures, they must be removed in the reverse order from which they were installed. Adhering to these rules will ensure that problems resulting from the interaction between subclassed window procedures are at a minimum.
Getting back to our EnableSubclass method, if no subclassing has occurred, SetWindowLongPtris called to place our new subclassed window procedure into the message stream just before the original window procedure. This function will return a success or error status to the calling function.
The next function in this class is the
DisableSubclass method, which
is shown in Example 4-4. This function removes the
installed subclassed window procedure and returns a success or error
status. Once again the m_lOrigWndProc
member variable is checked to see if in fact a subclassed window
procedure has been installed. A value of zero means that none has
been installed. If the value is nonzero,
SetWindowLongPtr is called, this time with the
m_lOrigWndProc variable passed in the last
argument to the function. The subclassed window procedure is removed
from the message stream. This will have the effect of resetting the
window to the way it operated before the subclassing was performed.
Example 4-4. The DisableSubclass Method
Public Function DisableSubclass(  ) As Boolean
    If m_lOrigWndProc = 0 Then
        'Do not remove subclass - none exist
        DisableSubclass = False
    Else
        SetwindowlongPtr m_hwnd, GWLP_WNDPROC, m_lOrigWndProc
        m_lOrigWndProc = 0
        DisableSubclass = True
    End If
End Function
There is one last bit of code to look at in the Class_Terminate event:
Private Sub Class_Terminate(  )
    Call DisableSubclass
End Sub
This code simply calls the DisableSubclass
method to make sure that the subclassing is properly removed. This
event is fired before the subclassed window finishes shutting down.
Note that, because DisableSubclass tests the
value of m_lOrigWndProc to make sure that
subclassing is in effect, we do not need to be concerned
that the class
Terminate event will
remove subclassing when none is in
effect.
The BAS module defines several API functions and constants that will be used throughout the project. They are as follows:
Public Declare Function CallWindowProc Lib "user32" Alias "CallWindowProcA" _
		(ByVal lpPrevWndFunc As Long, ByVal hwnd As Long, _
		ByVal Msg As Long, ByVal wParam As Long, ByVal lParam As Long) As Long

Public Declare Sub CopyMemory Lib "kernel32" Alias "RtlMoveMemory" _
		(Destination As Any, Source As Any, ByVal Length As Long)

Public Declare Function DefWindowProc Lib "user32" Alias "DefWindowProcA" _
		(ByVal hwnd As Long, ByVal wMsg As Long, ByVal wParam As Long, _
		ByVal lParam As Long) As Long

Public Const WM_CTLCOLOREDIT = &H133
Public Const WM_SETCURSOR = &H20
Public Const WM_NCHITTEST = &H84
Public Const WM_MOUSEMOVE = &H200
Public Const WM_NCLBUTTONDOWN = &HA1
Public Const WMSZ_BOTTOM = 6
Public Const WM_SIZING = &H214
Public Const HTMINBUTTON = 8
Public Const WM_SYSCOMMAND = &H112
Public Const SC_MINIMIZE = &HF020&

Public Type POINTAPI
        x As Long
        y As Long
End Type

Public Type MINMAXINFO
        ptReserved As POINTAPI
        ptMaxSize As POINTAPI
        ptMaxPosition As POINTAPI
        ptMinTrackSize As POINTAPI
        ptMaxTrackSize As POINTAPI
End Type
The BAS module contains only two items of interest: the public declaration of the class module variable and the subclassed window procedure. The code for the first item is:
Dim CSubClsApp As CSubclass
The object variable needs to be declared as a global variable in the
BAS module. It is then instantiated in the
Form_Load event, as follows:
Set CSubClsApp = New CSubclass
If you declare the variable in the form module, the application works
fine until it is stopped without first clicking the Un-Subclass
button. The problem is that the form module is destroyed before the
BAS module containing the subclassed window procedure is destroyed.
The subclassed window procedure has a reference to the form
module’s text box. We all know that when you access a control
on a form that is not loaded, Windows automatically loads the form.
This, in turn, creates a new CSubClsApp object.
The first CSubClsApp object is destroyed along
with its m_lOrigWndProc variable. When the
application tries to finish shutting down, the original window
procedure is not restored. At this point the window is still sending
messages to the subclassed window procedure in the BAS module. The
BAS module is then removed from memory, which invalidates the
function pointer to the subclassed window procedure. Now this
function pointer is pointing to garbage. When a message is sent to
this window, the application tries to call the subclassed window
procedure function using this invalid pointer, and the application
crashes.
The subclassed window procedure in the BAS module is the heart of the subclassing operation. This is where we can do all our magic. Basically, this subclassed window procedure displays all messages sent to the window by writing the subclassed window procedure’s parameters to the text box on the form. The following line of code does this:
frmCh4.txtMessages.Text = frmCh4.txtMessages.Text & _
		"hWnd:" & hwnd & _
		"  uMsg:" & Hex$(uMsg) & _
		"  wParam:" & wParam & _
		"  lparam:" & lParam & vbNewLine
If this is the only line of code in the subclassed window procedure (excluding the call to the CallWindowProc API function), every message sent to this window will display in the text box. The number of messages and the speed at which they are displayed are overwhelming. To make things more readable, let’s prevent some of the more frequent messages from displaying so that we can better see what is going on by modifying our code as follows:
If uMsg = WM_CTLCOLOREDIT Or _
        uMsg = WM_SETCURSOR Or _
        uMsg = WM_NCHITTEST Or _
        uMsg = WM_MOUSEMOVE Then
    'Skip displaying these messages
Else
    frmCh4.txtMessages.Text = frmCh4.txtMessages.Text & _
		"  hWnd:" & hwnd & _
		"  uMsg:" & Hex$(uMsg) & _
		"  wParam:" & wParam & _
		"  lparam:" & lParam & vbNewLine
End If
Adding this
If-Then-Else
statement to filter
out the more frequent
messages makes the remaining messages easier to read.
The final subclassed window procedure is shown in Example 4-5.
Example 4-5. NewWndProc, the Subclassed Window Procedure
Public Function NewWndProc(ByVal hwnd As Long, ByVal uMsg As Long, _
				ByVal wParam As Long, ByVal lParam As Long) As Long
    If uMsg = WM_CTLCOLOREDIT Or _
       uMsg = WM_SETCURSOR Or _
       uMsg = WM_NCHITTEST Or _
       uMsg = WM_MOUSEMOVE Then
    		'Skip displaying these messages
	Else
    	frmCh4.txtMessages.Text = frmCh4.txtMessages.Text & _
			"hWnd:" & hwnd & _
			"  uMsg:" & Hex$(uMsg) & _
			"  wParam:" & wParam & _
			"  lparam:" & lParam & vbNewLine
	End If

	'Pass message to the default window procedure
    NewWndProc = CallWindowProc(CSubClsApp.OrigWndProc, hwnd, uMsg, wParam, lParam)
End Function
When you run the finished application, if you remove the
If...Else...End If construct so that all messages are listed in the text
box, you’ll discover that far too many messages are generated
for you to meaningfully read and analyze. To understand why these
messages are being sent so frequently, let’s examine the
purpose of each message that we are deliberately ignoring. Every time
a new line of information is written to the text box and displayed,
the text box must repaint itself. The
WM_CTLCOLOREDIT message is sent
by the
multiline text box to its parent window (the one which we are
subclassing) every time the text box wants to repaint itself. The
parent (subclassed) window uses this information to direct the
repainting of the text box control.
The WM_SETCURSOR message is sent
to the window directly under the mouse
cursor whenever the mouse is moved over that window. You can get an
idea of the number of WM_SETCURSOR messages the
window receives just by removing the check for this message and then
moving the mouse back and forth over the subclassed window.
The WM_NCHITTEST
message
is similar to the
WM_SETCURSOR message because it is sent to the
window whenever the mouse is moved. The
WM_NCHITTEST message also is sent to the window
whenever any mouse button event (a mouse button down message, a mouse
button up message, and others) occurs as well. This message is sent
to the window before the actual mouse messages (e.g.,
WM_LBUTTONDOWN, WM_LBUTTONUP,
WM_MOUSEMOVE, etc.). The
WM_NCHITTEST message determines where the mouse
event occurred on the window. This information aids the system in
determining how to process the subsequent mouse message. For example,
WM_NCHITTEST can determine if the mouse event
occurred in the client or nonclient area of a window. If the left
mouse button was pressed in a nonclient portion of a window, the
WM_NCLBUTTONDOWN message would be sent. If the
same mouse event occurred in the client area of a window, the
WM_LBUTTONDOWN message would be sent.
The final message that will not be
displayed is the
WM_MOUSEMOVE message. At first glance it might
seem that this message is the same as the
WM_SETCURSOR message. Both are sent for mouse move
events. The difference is in each message’s parameters. The
WM_MOUSEMOVE message has parameters to determine
if a mouse button is depressed. This message can be useful when
subclassing a window to modify its drag-and-drop operations.
You should experiment by allowing specific messages or all messages to be displayed in the text box. This will give you an indication of the number of messages a window will receive every second of its existence.
The code for the form module, which is shown in Example 4-6, is very simple. When the form loads, it
creates an object instance of the CSubclass class and sets its
hWnd property. When the Subclass button is clicked, the subclassing
object (CSubClsApp) will subclass the window
identified by the CSubClsApp.hwnd property. This
is performed in the CSubClsApp.EnableSubclass
function. When the Un-Subclass button is clicked, the subclassing
code is removed by
calling
the CSubClsApp.DisableSubclass function.
Finally, the object we created is destroyed when we unload this
window. This allows the code in the
CSubclass_Terminate event to remove any
subclassing so
that the application can
shut down without crashing.
Example 4-6. Code for the frmCh4 Form
Private Sub Form_Load(  )
    Set CSubClsApp = New CSubclass
    CSubClsApp.hwnd = Me.hwnd
End Sub

Private Sub cmdSubclass_Click(  )
    Call CSubClsApp.EnableSubclass
End Sub

Private Sub cmdUnSubclass_Click(  )
    Call CSubClsApp.DisableSubclass
End Sub

Private Sub Form_QueryUnload(Cancel As Integer, UnloadMode As Integer)
    Set CSubClsApp = Nothing
End SubAlthough this is a good exercise in learning how to subclass a window, we are not doing anything useful here. In this section, I will show you how to allow a user to resize only one side of a window without resizing any other portion of the window. Also, I will override the default window’s minimize functionality by capturing messages specific to window minimization. By intercepting these messages, we can force the window to roll up or hide itself in any other way that we want when the user tries to minimize the window.
The first thing we must do, before writing any code, is figure out which message or messages to capture. I usually use the Spy++ tool in conjunction with the Microsoft Developer Network (MSDN) CD-ROM. I use the Spy++ tool to watch for specific messages or for patterns of messages. Then I look up their meanings in the MSDN. You also could do the reverse and figure out which messages you will need to watch for by looking up messages specific to the type of window you are subclassing in the MSDN. Then, using Spy++, watch for these specific messages.
Tip
Thoroughly research the messages that you will be trapping in the subclassed window procedure. Each message has its own idiosyncrasies.
Usually it takes more than one message to perform an action in Windows. Take, for example, resizing a window. During this operation, many messages are sent to and from a window when it is going through the resizing process. The following is a list of the messages sent and their order for the sizing process:
WM_NCLBUTTONDOWN                      - Posted
WM_SYSCOMMAND                         - Sent
     WM_ENTERSIZEMOVE                 - Sent
     WM_ENTERSIZEMOVE                 - Received
     WM_SIZING                        - Sent
     WM_SIZING                        - Received
     WM_WINDOWPOSCHANGING             - Sent
          WM_GETMINMAXINFO            - Sent
          WM_GETMINMAXINFO            - Received
     WM_WINDOWPOSCHANGING             - Received
     WM_WINDOWPOSCHANGED              - Sent
     WM_SIZE                          - Sent
		  (Window is repainted)
     WM_SIZE                          - Received
     WM_WINDOWPOSCHANGED              - Received
     WM_EXITSIZEMOVE                  - Sent
     WM_EXITSIZEMOVE                  - Received
WM_SYSCOMMAND                         - Received
The process starts with the user clicking the left mouse button over
a window border and dragging that border to resize it. A
WM_NCLBUTTONDOWN message is
posted to this window in response to the
user clicking and holding down the left mouse button. This message
contains information about which border the mouse is over in its
wParam argument. This message is then
passed on to the DefWindowProc function
after
the window procedure has finished processing it.
DefWindowProc determines if a sizing operation
needs to be initiated. If so, DefWindowProc
sends a WM_SYSCOMMAND message
to the
message queue of the window being resized. The
wParam member for this message contains
the value SC_SIZE, which informs the window that
it is being sized. The lParam member
contains the mouse cursor’s x and
y position. At this point, the user is
holding the left mouse button down while dragging a border of the
window. All messages from this point are nested within the
WM_SYSCOMMAND message. In other words, the window
procedure does not return immediately when it is passed this message;
instead, other messages are sent in response to this message.
The only message that is posted is
WM_NCLBUTTONDOWN; all other messages for the
sizing process are sent to the window. The difference is that posted
messages are sent to the window’s message queue, while sent
messages are sent directly to the window procedure for immediate
processing. The DefWindowProc function sends
these messages to the window so that they can be processed before any
pending messages in the queue. When sizing a window, the system does
not want any other messages to interfere with this operation.
In response to the WM_SYSCOMMAND message,
DefWindowProc sends the
WM_ENTERSIZEMOVE
message
to the window. This message informs the
window that it has entered a sizing or moving modal loop. While in
this modal loop, the window is forced to process only positioning or
sizing messages. This puts all other messages that could adversely
affect the sizing or positioning of a window on hold. This modal loop
runs from within the DefWindowProc function.
While in this loop, the function will only send messages to the
window relating to the sizing process.
After sending the WM_ENTERSIZEMOVE message, the
DefWindowProc function sends the
WM_SIZING message to the window. The
wParam member for this message contains
the window border that is being sized. The
lParam member contains a pointer to a RECT
structure, which defines the dimension and position of the window.
The window procedure sends this message to the
DefWindowProc function when it is finished
processing it.
Next, DefWindowProc sends the
WM_WINDOWPOSCHANGING message containing the new
values for the window size, position, and Z-order. This message
contains a pointer to the WINDOWPOS structure in
the lParam member and
NULL in the wParam
member. The WINDOWPOS structure contains the size,
position, and Z-order values of the window. These values can be
modified to override the default sizing, moving, and Z-order
behaviors.
In response to the WM_WINDOWPOSCHANGING message,
DefWindowProc sends a
WM_GETMINMAXINFO message to the window being
sized. This message allows the application to validate the window
size and position before proceeding. This message contains a pointer
to this structure defining the default values for this window’s
maximized position, maximized size, and tracking size in the
lParam member. The values in this
structure can be modified to control the outcome of the sizing or
moving operation. The wParam member
contains a NULL.
Next, DefWindowProc sends the
WM_WINDOWPOSCHANGED message. This message is
similar to the WM_WINDOWPOSCHANGING message,
except that the size, position, and Z-order of the window have been
changed. The lParam and
wParam members are exactly the same for
both messages. Modifications made to the WINDOWPOS
structure contained in the lParam member
of this message will have no effect on the window.
When the user releases the left mouse button, the
WM_SIZE message is sent by
DefWindowProc informing the window that the user
is finished sizing the window. The lParam
member of this message contains the SIZE_RESTORED
flag, which informs the window that it has been resized. The
wParam member contains the new width and
height of the client area of this window. More messages are sent to
reposition and repaint the newly sized window. Finally, a
WM_EXITSIZEMOVE message is sent by
DefWindowProc to the window, forcing the window
to exit the sizing modal loop and allow other messages in the message
queue to be processed normally. This message contains
NULLs in its wParam and
lParam members. It is here that the
WM_SYSCOMMAND message returns from the
DefWindowProc function and the window is once
again able to pull messages from its message queue.
Many actions performed on a window consist of a series of messages. Consider creating a window, destroying a window, maximizing a window, or even activating a window. This does not mean that all actions that take place are this complex, but be prepared to dig in to the messages and their definitions.
To determine which messages I was interested in, I set up Spy++ to
watch for General messages and Non-Client messages for a particular
window. Then I pressed the F8 key to allow Spy++ to start logging
messages. I activated the window that was being spied on and resized
a border. As soon as I was done, I stopped Spy++ from logging any
more messages. Many messages were fired, but fortunately many of
these were duplicates from such actions as moving the mouse.
WM_NCHITTEST is one of the messages that appear
multiple times. As I mentioned earlier in this chapter, in Section 4.3.2, this message is directly
related to mouse actions. Because mouse actions are required for
sizing a window border (clicking the mouse button and dragging the
window border), this message is of importance. Looking down through
the list of messages, I noticed the spot where sizing and repainting
messages started to appear (e.g., WM_SIZING,
WM_WINDOWPOSCHANGED, WM_SIZE,
etc.). This is the area where the window resizing took place. At the
beginning of the resizing operation, a
WM_NCLBUTTONDOWN message is posted with the
parameter HTBOTTOM. This means that the left mouse
button was clicked while the cursor was over the bottom border of the
window (HTBOTTOM).
So, now that we have a sense of the sequence of messages involved in
resizing a window, we can write a window procedure that will only
allow the window’s bottom border to be resized. This procedure,
which is shown in Example 4-7, uses
CallWindowProc to pass all messages on to the
original window procedure, with a single exception: any
WM_NCLBUTTONDOWN message whose
wParam member has a value other than
HTBOTTOM (indicating that the user is attempting
to resize the top, left, right, top right, top left, bottom right, or
bottom left borders) is handled by our window procedure alone. It
adds a line to the text box (“Skipping the resize
process”) and returns a 0, indicating that processing of the
message is complete. As a result, the default sizing behavior occurs
only when the wParam of this message is
equal to HTBOTTOM. Otherwise, the default sizing
routine is not called.
Example 4-7. Window Procedure to Allow Resizing of Only the Bottom Window Border
Public Function NewWndProc(ByVal hwnd As Long, ByVal uMsg As Long, _
				ByVal wParam As Long, ByVal lParam As Long) As Long
	If uMsg = WM_NCLBUTTONDOWN And _
      (wParam = HTLEFT Or wParam = HTRIGHT Or _
      wParam = HTTOP Or wParam = HTTOPLEFT Or _
      wParam = HTTOPRIGHT Or wParam = HTBOTTOMLEFT Or _
      wParam = HTBOTTOMRIGHT) Then
    	    frmCh4.txtMessages.Text = frmCh4.txtMessages.Text & _
			"Skipping the resize process" & vbNewLine
    	    NewWndProc = 0
	Else
		NewWndProc = CallWindowProc(CSubClsApp.OrigWndProc, _
			hwnd, uMsg, wParam, lParam)
	End If
End Function
Tip
To allow the window to perform the default processing for a message, it must be passed on to the original window procedure (CallWindowProc) or to the default window procedure (DefWindowProc).
There is one problem, though. If you click the system menu of the
subclassed window, choose the Size menu item, and then size any
window border, our code will not stop any but the bottom border from
being resized. For some reason, our code is not being executed. Why
is this? Start up Spy++ and watch the Non-Client and General messages
(select these two on the Messages tab of the Message Options dialog
box) when resizing the window using the Size system menu item. A
large number of WM_NCHITTEST messages will appear.
Oddly, no WM_NCLBUTTONDOWN messages appear. Sizing
the window borders using the Size menu item bypasses the
WM_NCLBUTTONDOWN message. Spy++ shows that this is
because when we resize a window by clicking and dragging with the
mouse, the WM_NCLBUTTONDOWN message is what causes
the WM_SYSCOMMAND message to be fired with a
wParam value of
SC_SIZE. When we resize the window by using the
Size menu item, the WM_SYSCOMMAND message with the
SC_SIZE
wParam value is
automatically posted to the window’s message queue. Thus,
because the window is already in the sizing modal loop, the
WM_NCLBUTTONDOWN message is unnecessary.
To solve our dilemma, we could remove the Size menu item from the
system menu, but a solution that does not force us to modify other
behaviors just to fix the immediate problem is preferable. These
short-term solutions are short cuts and have caused problems for many
a developer later on in the development cycle. Instead, in such
cases, more research and more observation usually helps. You might
notice in the Spy++ output that one message is always used in the
sizing process: WM_SIZING. This message, similar
to WM_NCLBUTTONDOWN, contains a constant
identifying the border that is being sized in the
wParam member. The
lParam member is a pointer to a
RECT structure defining the new size of the
window.
Limiting window sizing to the bottom border is straightforward. We’ll use the GetWindowRect API function to get the current size and position of the window. Remember, the window has not been sized at this point. GetWindowRect is defined in VB as follows:
Private Declare Function GetWindowRect Lib "user32" _
		(ByVal hwnd As Long, lpRect As RECT) As Long
Its parameters are:
-
hwnd The handle of the window
-
lpRect A pointer to a
RECTstructure
A RECT structure is defined in
VB as
follows:
Public Type RECT
        Left As Long         'Equal to the Left property of a form
        Top As Long          'Equal to the Top property of a form
        Right As Long        'Equal to the Width property of a form
        Bottom As Long       'Equal to the Height property of a form
End Type
GetWindowRect is used to get the previous
position and size of the window. This information is used to replace
the data pointed to by the lParam member
of the WM_SIZING message structure in all
situations except when the bottom border is being sized. The code to
do this is shown in Example 4-8.
Example 4-8. Window Procedure to Handle Resizing with the System Menu
Public Function NewWndProc(ByVal hwnd As Long, ByVal uMsg As Long, _
		ByVal wParam As Long, ByVal lParam As Long) As Long

    Dim RectStruct As RECT
    Dim OrigRectStruct As RECT

	If uMsg = WM_SIZING And wParam <> WMSZ_BOTTOM Then  'Do not size
        'Get new window dimensions
        CopyMemory RectStruct, ByVal lParam, LenB(RectStruct)

        'Get original window dimensions
        GetWindowRect hwnd, OrigRectStruct

        'Do not allow these sides to be sized
        RectStruct.Top = OrigRectStruct.Top
        RectStruct.Left = OrigRectStruct.Left
        RectStruct.Right = OrigRectStruct.Right

        'Set new window dimensions
        CopyMemory ByVal lParam, RectStruct, LenB(RectStruct)
    End If

    NewWndProc = CallWindowProc(CSubClsApp.OrigWndProc, hwnd, uMsg, wParam, lParam)
End Function
CopyMemory is used to retrieve and set the
lParam member of the
WM_SIZING message
structure.
For this next example, we will override the minimize behavior of the window. In short, when the Minimize button on the windows title bar is clicked, the default window behavior is replaced with a new behavior. Instead of minimizing the window, our window procedure will roll up the window so that only the title bar is showing. The result will look similar to Figure 4-4.
Let’s start with the WM_NCLBUTTONDOWN
message once again. This message provides great information on where
the mouse is located when the left mouse button is pressed. This
time, we are looking for the wParam
parameter to contain the HTMINBUTTON constant.
This means that the left mouse button has been clicked on the
Minimize button on the window’s title bar. As a note, we want
to make sure that our code is not executed when the window is
maximized, and that instead the default functionality is executed. If
we were to try to change the height of the window while it is
maximized, a GPF would occur in the application. We prevent this by
checking to make sure that the frmCh4.WindowState property is not
equal to vbMaximized. The first cut of the code in
the subclassed window procedure looks like Example 4-9.
Example 4-9. Window Procedure to Change the Default Minimize Behavior
Public Function NewWndProc(ByVal hwnd As Long, ByVal uMsg As Long, _
				ByVal wParam As Long, ByVal lParam As Long) As Long
	If uMsg = WM_NCLBUTTONDOWN And _
	 wParam = HTMINBUTTON And _
	 frmCh4.WindowState <> vbMaximized Then
          frmCh4.Height = 30
          NewWndProc = 0
	Else
    	'Pass message to the default window procedure
          NewWndProc = CallWindowProc(CSubClsApp.OrigWndProc, _
                       hwnd, uMsg, wParam, lParam))
	End If
End Function
If we use this code, our window will roll up when the Minimize button on the title bar is clicked. There are two problems with this approach. The first is similar to the previous example: the Minimize menu item in the system menu still minimizes the window without executing our code to roll it up. The second problem is that the Minimize button is not visually depressed when it is clicked. The cause of this second problem is that the code to draw the button in the depressed state is in the default window procedure. If you notice, the default window procedure is never called in our subclassed window procedure if the user clicks the Minimize button. In addition, there is a third minor problem. When the window is subclassed and rolled up, the restore functionality is not available. This is because the restore functionality is available only when the window is in the minimized state. In this case, the window is still in the normal state when it is rolled up; therefore, the Restore button and the Restore menu item are not available.
Instead of focusing on the cause of the minimization action, we will
focus on the result of clicking the Minimize button. Clearly, the
WM_SYSCOMMAND message with the
SC_MINIMIZE value for the
wParam argument is what instigates the
minimization action. Let’s use this message to trigger our
roll-up functionality. The code for this solution is shown in Example 4-10.
Example 4-10. Minimizing a Window Using the WM_SYSCOMMAND Message
Public Function NewWndProc(ByVal hwnd As Long, ByVal uMsg As Long, _
                ByVal wParam As Long, ByVal lParam As Long) As Long

    Dim SizingStruct As MINMAXINFO

    If uMsg = WM_SYSCOMMAND Then
        If wParam = SC_MINIMIZE Then
            If frmCh4.WindowState <> vbMaximized Then
                'Do not process message - instead do our own work
                 frmCh4.Height = 30
            Else
                 'Handle this however you want
            End If

            NewWndProc = 0
        Else
            NewWndProc = DefWindowProc(hwnd, uMsg, wParam, lParam)
        End if
    Else
        'Pass message to the default window procedure
        NewWndProc = CallWindowProc(CSubClsApp.OrigWndProc, _
                                    hwnd, uMsg, wParam, lParam)
    End If
End Function
This code works as it should. This is not to say that the
WM_NCLBUTTONDOWN message is problematic. Instead,
I wanted to show you how I arrived at my conclusions as well as show
examples of capturing different messages. As you can see from these
last two examples, modifying the default behavior of a window can
become a daunting
task.
Get Subclassing and Hooking with Visual Basic now with the O’Reilly learning platform.
O’Reilly members experience books, live events, courses curated by job role, and more from O’Reilly and nearly 200 top publishers.

