Chapter 4. Unlocking the Mysteries of the SharePoint Data View Web Part XSL Tags
The article I chose for inclusion in this book may seem at first glance to be an odd one. After all, it is not much more than an outline for a series of articles I did over four months at EndUserSharePoint.com (EUSP). However, this first article laid the foundation for that series, which was well read and which later became an ebook that we sold on the EUSP site. People continue to buy from me today. This is not about me advertising that, but about the fact that a single, simple article at EUSP, with the questions, comments, and feedback attached to it, can grow and stretch and can help a great many more people than its author expected.
Writing for EUSP has always been a pleasure. If you think about it, there is really no pressure—no more than writing on one’s own blog—yet one can help a great number of people.When Mark Miller first approached me to write for EUSP a few years ago, I felt honored, humbled, and secretly thrilled. EUSP had been a source of great content for me as a reader, and I felt like I had become a member of a little club of which I never thought I would be a member.
I have always really believed in education and collaboration. I am not the alpha dog type; I work best with people who can treat everyone on the team as equals. That does not mean that everyone is the same. No, far from it. It means that no one of us is better than the other simply by dint of some artificial rank or job title. We all bring skills to the table that have value, sometimes unexpectedly.
This is the promise of SharePoint as a platform to me. If implemented well, it can enable the entire organization using it to improve its performance. This has been a clear focus for me professionally for a long time, certainly as a management consultant focused on knowledge management and process performance in the mid-1990s, and earlier, as the Manager of Delivery Systems at Staples. Even when I was away at Phillips Exeter Academy for my last two years of high school, I saw the tremendous value of the Harkness system, in which everyone sits around a large, oval table to discuss the topics at hand—there is nowhere to hide. By attacking a challenge together, collaboratively, in almost a hive mentality, we can do great things together.
By educating everyone in the organization in the basic tenets of working together well and tying their own work to the overall strategy of the organization, that organization gains far more productive, effective, and efficient workers. If those workers can do the basics well, they have more time to focus on the higher-level endeavors for which they rarely have the time. That is where we see the innovation and serendipity that can drive an organization to another level of success.
You may wonder what all of this has to do with EUSP. Well to me, EUSP has always been a platform where people can learn. Usually, they learn something that they did not even know they needed to learn when they got there. The “End User” part of EUSP is important, too. Many of the topics that I, and others, have written about on EUSP are considered by some to be beyond the so-called End User. I say pshaw to that. There is no real boundary to what people can learn if they choose to. The labels we slap onto people seem like an attempt to lock down the potential of their capabilities, and that just should not happen. The more an End User knows, the better he can perform and the better he can use the massive technology that is SharePoint. Perhaps even more important, the more End Users know about SharePoint, the better they can work with the people who build things for them on top of SharePoint. When End Users see the possibilities, or at least see that there are possibilities, End User conversations with developers and administrators can have more meat to them. This happens all the time based on what people learn by reading articles on EUSP.
Most people are more mercenary than martyr, and I suppose I have to admit that is somewhat true of me as well. I want to be able to support my family in comfortable style, but I also truly love to educate. That is why I have written so many articles on my own blog and for EUSP over the last few years. However, EUSP has a far larger audience than my blog probably ever will. Writing for EUSP has gained me some notoriety, and I can parlay that into well-paying gigs as a consultant. For me, the real motivation is the comment on an article that says it helped someone solve a seemingly unsolvable business problem or prove that something was indeed possible (or was far simpler than everyone she had asked had told her) or give someone the courage or spark to change his or her career direction. Unbelievably, each of those things has happened based on my writing for EUSP. I have felt that at least some of my writings there have made a big difference for some people. That is the whole point, indeed.
More About Data View Web Parts
The humble Data View web part (DVWP) is far more than just the list of XSL tags I included in my original EUSP article. I mentioned then that DVWPs are sometimes called the Swiss Army Knife of SharePoint, and to me they truly are, more so than the Content Query web part (CQWP) or even the Content Editor web part (CEWP). If you have content in SharePoint and want to display it in unique and useful ways, the DVWP is the tool you need to understand. It can help you to display simple list content in exactly the format you want, show business intelligence information using graphics and summary information, customize forms to your heart’s content, and even more. Knowing that all of these things are possible means that you can imagine more than you would otherwise.
To be a master of the DVWP, you need to understand its parts. Let’s go through the major components of the DVWP and see how they all fit together. Once you understand those parts, you can use the XSL tags covered in the original article, “Unlocking the Mysteries of Data View Web Part XSL Tags”, and the subsequent articles in the series to build out whatever you want.
Note
You will hear people talking about the DVWP and the Data Form web part (DFWP) interchangeably. In earlier versions of SharePoint, it was the DVWP, and in SharePoint 2007, it was renamed the DFWP. We veterans of SharePoint all kept calling it the DVWP simply because it was easier. Any time that you see either name, know that the writer is talking about the same thing. The DVWP is not, however, the same thing as the Extended List View web part (XLV), which was introduced in SharePoint 2010. While they both are XSL-driven, there are other differences. I won’t go into those differences here, but I will say that I find the DVWP to be far more powerful and malleable than the XLV.
Adding a DVWP to Your Page
I’ll run through how to add a DVWP with SharePoint Designer 2010. (The steps are similar in SharePoint Designer 2007, but I won’t cover them here.) You can create DVWPs only in SharePoint Designer. This imposes a restriction in some cases in which SharePoint Designer usage is locked down or turned off. If you are in that situation, reach out to the team that manages your governance to find out what the concerns are and whether you can have the restrictions lifted.
Once you have a page open in SharePoint Designer, you should position your cursor where you would like to add the DVWP. I suggest working in Split mode (see Figure 4-1) when you are using SharePoint Designer so that you can see what effect your actions have in the page’s code.
To insert the DVWP, choose Insert on the top-level menu, then Data View, then Empty Data View, as shown in Figure 4-2.
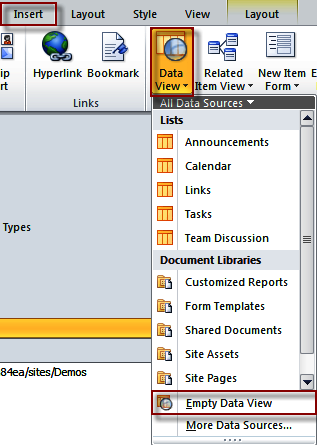
If you choose one of the lists or libraries in the All Data Sources panel instead, you will get an XLV in your page rather than a DVWP.
After SharePoint Designer chugs a little bit, you will see the start of your DVWP in the page, as you can see in Figure 4-3.
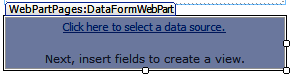
At this point, you have only the outer shell of the DVWP in place. As with all web parts that you add to a SharePoint page, the DVWP has an outer shell that declares its main characteristics. A typical outer shell might look something like the Code view shown in Figure 4-4 (I have cleaned it up a little to make it easier to read; I have done this cleanup with most of the following examples as well).
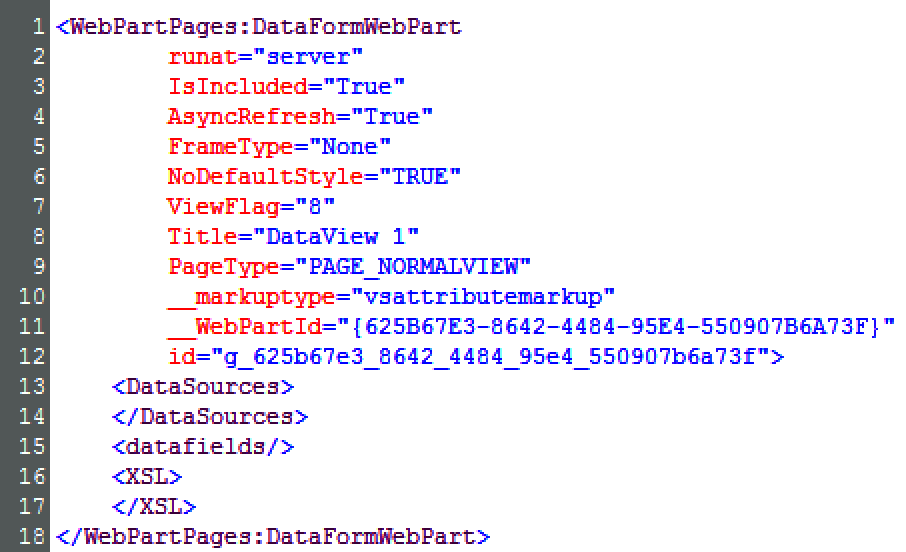
As you can see, there is not much there yet. The DVWP is declared
and a few of its gross characteristics are set, such as its Title (which
is displayed as part of its chrome by default), whether or not it will
autorefresh (AsyncRefresh="TRUE"),
its ID (which is based on a GUID), etc. At this point, there is no data
source or XSL, so there is not any meat in it yet.
The next step is to click “Click here to select a data source link”. This brings up the available data sources, which, in an out-of-the-box Team Site, will look something like the list shown in Figure 4-5.
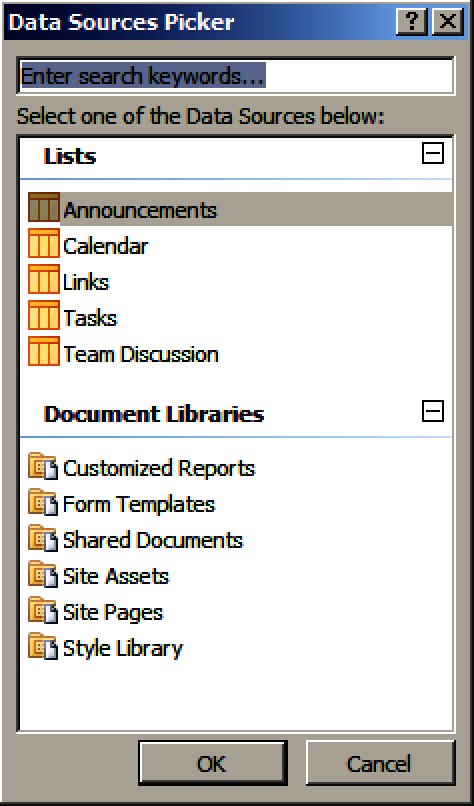
DVWPs can consume and display information from different types of data sources, but by far, the most common are lists and libraries. The other possibilities are linked data sources (this allows you to use more than one list or library in your DVWP), database connections (such as SQL), SOAP service connections (also known as web services, such as the lists web service), REST service connections (such as ListData.svc), and XML file connections (any XML file that you can refer to by URL). You can see these possibilities in Figure 4-6, which shows them in the Data Sources ribbon.

Let’s stick with a plain old list as we run through the process; we will select the Announcements list. Once you make that selection, the Data Source Details pane should open on the right side of your screen, and you will see the first five columns highlighted by default, as shown in Figure 4-7.
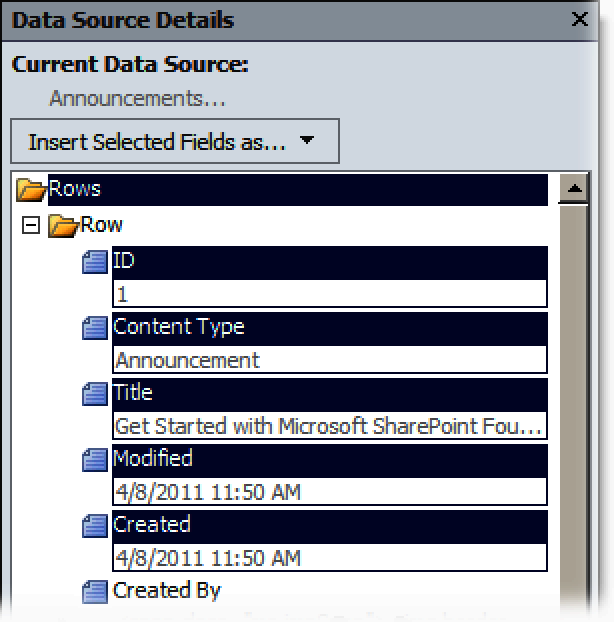
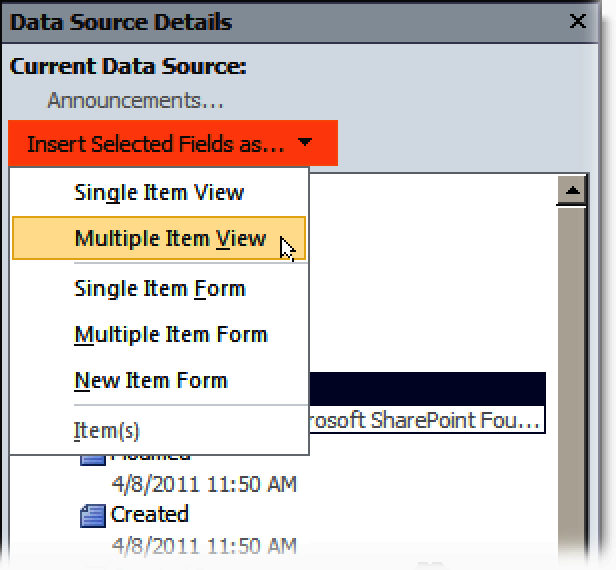
To keep things simple, we will only select the Title column and then choose Multiple Item View in the drop-down shown above the columns, as shown in Figure 4-8. This will show us just the Title column for all of the items in the list.
Now you should see something like Figure 4-9 in the Design pane.
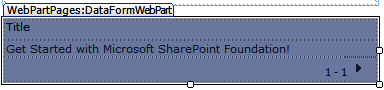
Notice that we are seeing one item here—the default announcement placeholder that SharePoint creates in an Announcements list—and that paging is on by default. At this point, you can make further adjustments to your DVWP using the Data View Tools section in the ribbon, shown in Figure 4-10.

However, we are looking to do far more with the DVWP than what you can do by clicking on buttons in the ribbon. The XSL tags in the original EUSP article series are contained in the code for the DVWP, and are often not available by clicking on options in the ribbon.
Customizing the DVWP in Code
You can customize each of the main sections in the DVWP based on what you would like to accomplish. There is no possible way to cover all of the potential variations in one chapter of a book, but if you understand the reason each section is present, you may see some of the possibilities.
DataSources
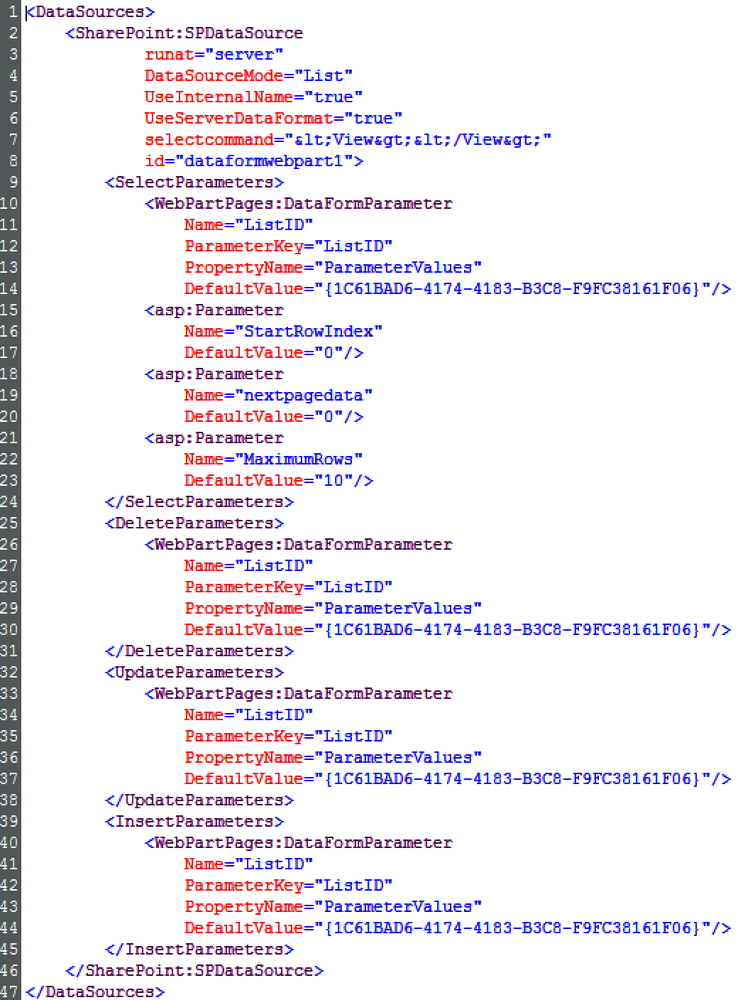
Look at the DataSources
section for our simple example in Figure 4-11. You can see
that the DataSourceMode is List, meaning that we are pulling data from
a list, of course. The selectcommand shows the simplest CAML there
is, as it is only the shell <View></View>. The ampersands
and other characters you see are simply the greater than and less than
signs encoded so the server interprets them correctly.
DVWPs are able to perform all four CRUD (create, read, update,
and delete) operations, though in SharePoint’s parlance, we have
Select, Delete,
Update, and Insert. Since we are
only displaying the contents of the list and do not want to do any
updating, we can remove the sections other than Select. We also don’t want paging, so we can
remove those parameters. That leaves us with the much more manageable
DataSources section, like the one
shown in Figure 4-12.
I point out this simple change to illustrate the fact that the DVWP is simply made up of code, and you can change any of that code to make your DVWP do what you want. Until you are comfortable working in the Code view, you can use the ribbon buttons, but watch the effect each change you make has on the code. After you see what changes for a while, you may feel more comfortable working in the Code view, or at least working in the Split view with confidence.
The DataSources section will
look different based on what type of data source(s) you choose. Let’s
look at a couple of examples.
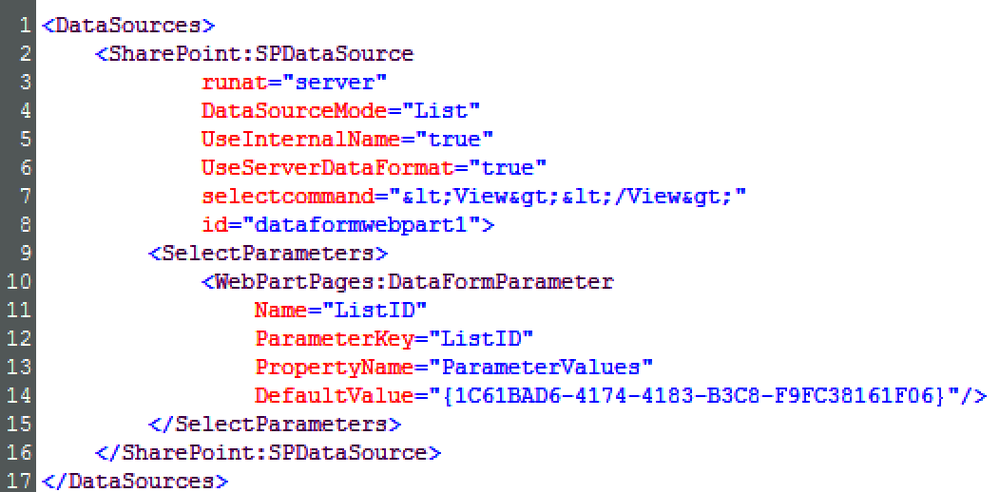
Figure 4-13 shows what a linked
data source looks like. In this case, the linked data source includes
the Calendar list and the Tasks list. I have reformatted things again
to make it easier to read, and I have also removed the Insert, Update, and Delete sections again for brevity.
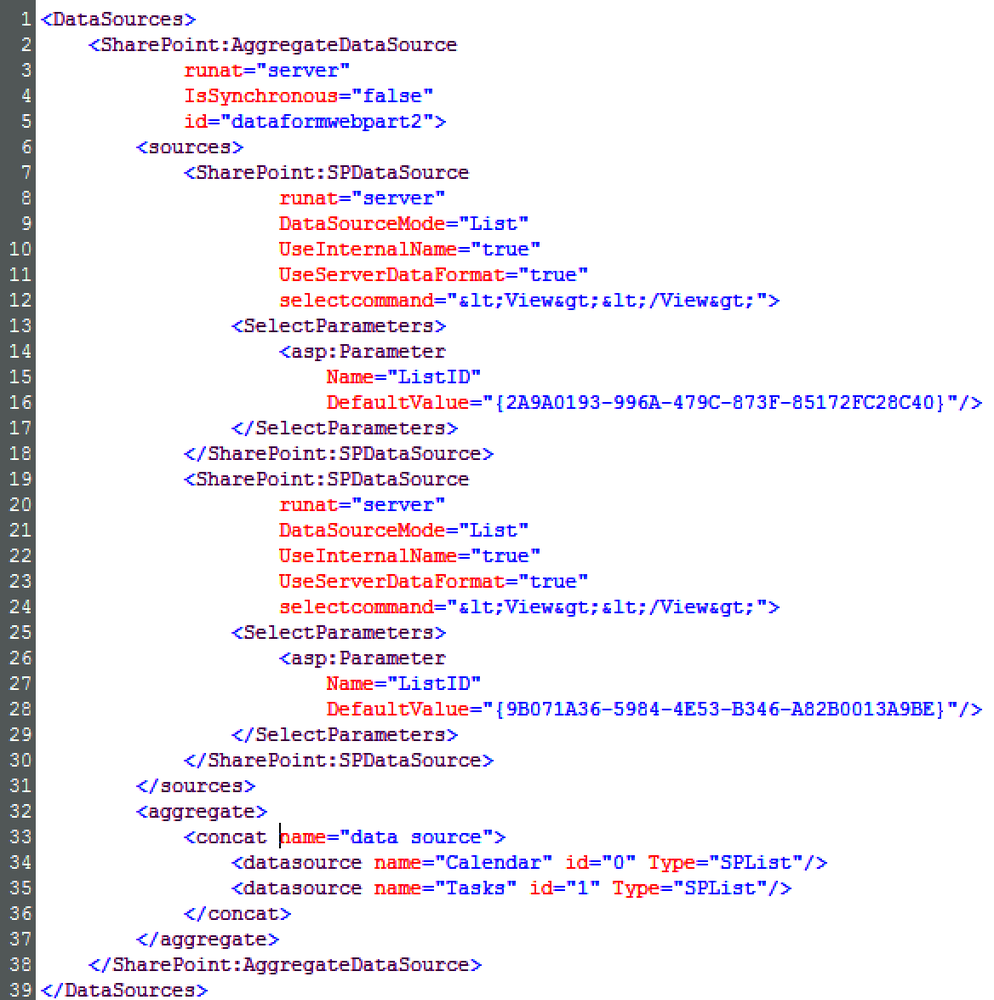
When you have an AggregateDataSource like this, you can refer
to each data source separately in your XSL based on the names you give
each data source in the aggregate section. For instance, you might
create a variable that contains the rowset from each data source, as
shown in Figure 4-14.

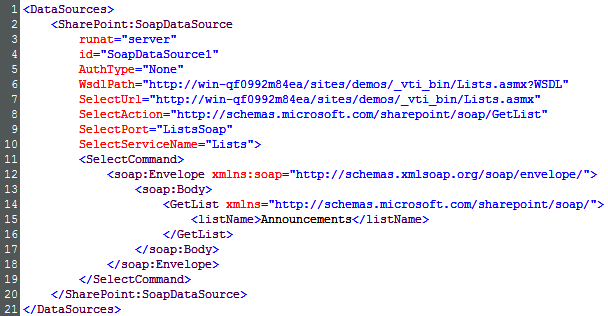
You also can use a SOAP web service data source to grab data
locally, from another Site Collection, or even from an external
source. The DataSource for this type of connection looks something
like the one shown in Figure 4-15.
Here, I am simply using the Lists web service to connect to the
Announcements list with the GetList
operation. This operation gives us information about the list
structure and its columns. SharePoint Designer constructs the SOAP
envelope for us and takes care of all of the other connection
information as well.
Many times, simply configuring your data sources using the
options on the ribbon will be adequate, but by looking at the code
that generates, you will be able to see how you might makes changes to
the DataSources code manually to
accomplish things that are more complex.
datafields
The next section that shows up in the code is the datafields section. I have never been able to figure out exactly what this
section provides, frankly, as you can delete it with no ill effects.
The one benefit I can see for it is that it shows the InternalName and DisplayName for all of the fields in your
data source. If nothing else, that provides a nice little catalog for
you to use as a reference as you are working. Figure 4-16 shows an example of the datafields section for the Announcements
list, greatly truncated.
parameterbindings
Next up is the parameterbindings section. Think of this section as a way to identify values you
want to work with that come from outside the DVWP but are not
contained in the DataSources. By
default, you will get a parameterbindings section that looks
something like the one shown in Figure 4-17.

SharePoint Designer adds each of these parameters in a sort of opportunistic way, expecting that you might need each of them in your DVWP. The other way to look at it is that SharePoint Designer is fundamentally a code generator, and it sets things up for all of the possible choices you might make using the options on the ribbon.
One of the reasons people get into trouble when they start to customize the DVWP is that they go beyond what SharePoint Designer understands. This can be the cause of those annoying hangs and crashes everyone complains about with SharePoint Designer. As you become more familiar with how things work, you will find that those unpleasant events happen less frequently.
Most of the options in the parameterbindings shown in Figure 4-17 are probably reasonably
self-explanatory. As you add new parameters, whether by using the
Parameters button on the ribbon or by typing in the ParameterBinding line yourself, you will get
new lines in the parameterbindings
section.
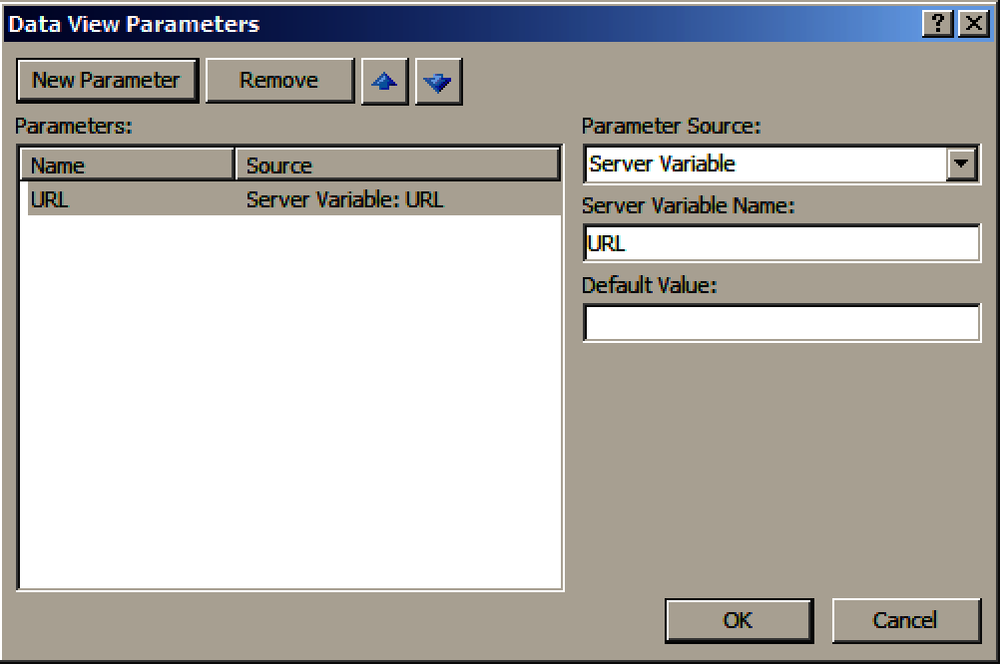
Starting from the ribbon, the sequence to add a new parameter through the dialogs works something like this. First, click on the Parameters button in the ribbon, shown in Figure 4-18.
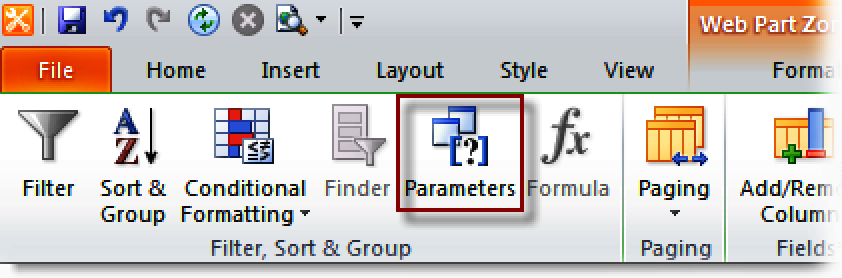
Figure 4-19 shows the dialog that will then pop up. Make the appropriate selections, enter the desired values in the dialog, and click OK. No, there is nothing here to help you out. You just have to know what the acceptable values for things like the Server Variable text box might be, unfortunately.
Finally, you end up with a line like what is shown in Figure 4-20 in the parameterbindings based on what you entered.
Once you get the hang of it, you may choose to type in the line
yourself.
XSL
The final section is the XSL
section. This section is the most important, as it determines what
ends up on the page. I always say XSL, which stands for eXtensible
Stylesheet Language, rather than XSLT, which you may hear more people
saying. The T stands for Transformation and, in my mind, you write the
XSL that then transforms the data in the XML from the data
source.
The XSL section can be as
simple or as complex as you need it to be, and it is where most of the
hardcoding work happens. You are limited only by your imagination, as
you can transform your data from its starting state into just about
anything using XSL and the XPath functions. That is what the original
EUSP article and the follow-on series was all about—how you can write
your own XSL using the DVWP’s XSL tags to make magic happen. A list of
the most frequently used XSL tags follows.
<xsl-template>Think of a template as a subroutine. It is a unit of XSL to which you pass control.
<xsl:call-template>This is how you call a template that you have defined with
<xsl-template>.<xsl:with-param>You use this with
<xsl:call-template>when you want to pass a value into a template, usually a value that varies.<xsl:param>A value you’ve passed into a template with
<xsl:with-param>. You need to have an<xsl:param>at the top of the template for each value you expect to be passed into it.<xsl:variable>A value you create for use within a template that is only defined within the scope of that template.
<xsl:for-each>A way to iterate over a nodeset (group of rows).
<xsl:sort>Used within an
<xsl:for-each>to determine the sort order in which the nodeset (group of rows) is processed.<xsl:if>A single conditional test. If the test is true, the contained code is executed.
<xsl:choose>Like
<xsl:if>, but with multiple possibilities, more like if-then-else.<xsl:when>Used within
<xsl:choose>as a conditional test. If the test is true, the contained code is executed and the<xsl:choose>is exited.<xsl:otherwise>Used within
<xsl:choose>as the “fall-back” condition. If none of the prior<xsl:when>s have been executed, the code contained here is executed.<xsl:value-of>Outputs the value to which it evaluates, such as the value of a column, a variable, etc.
<xsl:comment>Allows you to you put comments into your XSL. Comments: what a novel concept!
<xsl:text>Use this tag when you want to include a piece of text that will be treated entirely literally.
<xsl:attribute><xsl:attribute>allows you to set an attribute on an element programmatically.<xsl:import><xsl:import>allows you to import a section of XSL from an external file.
There are more XSL tags available, but this set is what you are most likely to find useful as you build your own DVWPs. SharePoint still uses the XSL 1.0 specification, so the list is shorter than you might see in other contexts.
Summary
I hope this overview of the DVWP gives you some more context with which to think about the DVWP and gives you a few ideas about how you might use one.
The original little EUSP article led to a 20-part series about the humble XSL tags and some of the XPath functions, with a few dalliances along the way. There were, in fact, more parts to that series than I had predicted in the introductory article. Because the series had such great readership, I tacked on quite a few more articles. To tell the truth, I didn’t think the outline through as well as I might have, and there was simply more to cover than I thought at first.
Thanks to Mark Miller for believing in my early scratchings enough to give me the chance to write for EUSP. Thanks also to all of the other talented writers at EUSP; their articles have often taught me something significant or caused me to rethink my own ways of doing things. Most of all, thanks to the quiet orchestrator of all that is EUSP, Natasha Felshman. I have greatly enjoyed my collaborations with Natasha, whether working on my own articles, trying to help her to format others’ articles, or wrangling the underlying technologies into submission. I am hoping there will be many more collaborations to come.
Get SharePoint 2010 at Work now with the O’Reilly learning platform.
O’Reilly members experience books, live events, courses curated by job role, and more from O’Reilly and nearly 200 top publishers.

