Find the NES emulator that works best for you.
For some people, Nintendo Entertainment System emulation is emulation. It’s the only console they’ve ever emulated; it’s the only console they will ever emulate. Sure, they probably know that you can emulate other systems. They might have even messed around with an Atari 2600 emulator once or twice, just to see if it really worked. But that was probably only for a few minutes. NES emulators can suck up hours, days, weeks. [2]
The numbers bear this theory out. While you’re lucky to find one working emulator for certain classic game systems, the NES page at the emulation portal Zophar’s Domain (http://www.zophar.net/nes.html) lists a whopping 77 different programs that run NES games on your home computer!
Thus, the challenge of getting started with NES emulation is not finding the programs—it’s figuring out which one you should download. In this hack, I’ll take a look at four emulators that are both popular and fully-featured. Between these four, you should be able to find something that fits your needs.
Tip
The how-to segments of this hack will concentrate on the Windows versions of the emulators. Some of them also have DOS versions. In general, if you check Zophar’s Domain you can get a good idea of what DOS emulators are out there.
I suggest that you use the web site PD Roms (http://www.pdroms.de) to find NES-compatible games that are freely distributed or in the public domain, such as the ones shown in the illustrations accompanying this hack.
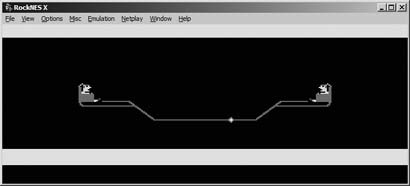
RockNES (http://rocknes.kinox.org/) has been my emulator of choice for a while. It has that rare combination of being both full-featured and fast— games will run at full speed in a large (800 x 600) window with perfect sound on my three-year-old laptop, something that no other emulator on this list has accomplished. Installation is quick and painless—just download the Zip file, extract the files to a new directory, and then run rocknesx.exe. In Figure 4-15, you can see the emulator running the homebrew game Hot Seat Harry.
Even better, its GUI builds a ROM list for you that you can click and scroll through rather than having to click File → Open and then scroll through folders every time you want to load a new game. You can add as many directories as you want to the automatic search feature by clicking Options → Folders, and then the Add button. Then, on the main GUI window, you need only click View, Refresh Game List and RockNES will search the folders you named for ROMs (which can be in the .nes format or zipped), building a handy list.
The reason that RockNES works so efficiently is because it adjusts the frame rate automatically based on your system’s performance. The program’s readme file suggests that you should expect the following frame rates in 800x600 windowed resolution and full 32-bit color:
Pentium 233 CPU, Trident video card: 60 fps (emulation), 35 fps (video)
Pentium II 300MHz CPU, TNT2 video card: 60 fps (emulation), 60 fps (video)
Pentium III 1GHz CPU, Trident video card: 60 fps (emulation), 10-30 fps (video)
Athlon 1.2GHz CPU, Sis6326 video card: 60 fps (emulation), 40 fps (video)
Athlon 1.2GHz CPU, GeForce3 video card: 60 fps (emulation), 60 fps (video)
Though it’s not likely, you may experience some sound issues—the audio might “pop” or stutter. If that’s the case, you’ll want to adjust the sound buffer. It’s set at a default of 66 milliseconds. If you’re having problems, raise this value by clicking Options → Audio Setup, and then moving the sliding bar to the right (towards “Safe”). You can also adjust the Audio Priority by clicking Options → Advanced—just be aware that this can have an adverse effect on your frame rate.
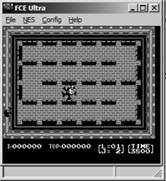
FCE Ultra (http://fceultra.sourceforge.net/) is an open source project that has been ported to many other operating systems, including Linux [Hack #40] . It doesn’t feature an elaborate GUI; in fact, when you first unzip it and run the fceu.exe file, all you’ll see is a tiny black window. But it’s a window to fun! Just look at FCE Ultra in Figure 4-16.
Since it doesn’t feature RockNES’ automatic frame-skipping routines, odds are that it will run slowly on your machine if the window size is anything over the standard 320x240. One thing you can do to increase the display size while speeding up emulation (which applies to all the emulators in this hack) is to display in Full Screen mode by hitting Alt-Enter. Note that if you put the emulator into Full Screen mode before you load up a ROM, you won’t be able to do anything since you can’t access the GUI in Full Screen.
FCE Ultra’s claim to fame, besides a generally high level of compatibility and stability, is that it can emulate many different quirky controllers that were released for the Famicom and NES. You can switch to these by clicking Config → Input and then selecting Famicom Expansion Port on the bottom drop-down box. FCE Ultra supports:
Sure, using your mouse as a Zapper gun might make Duck Hunt way too easy, but admit it: as a kid, you just put your gun up against the glass of the television screen and fired at point-blank range, too.
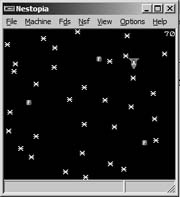
The promised land of NES emulation? For some, perhaps. When you boot it up, NEStopia (http://sourceforge.net/projects/nestopia/) looks very much like FCE Ultra—a small black window (see Figure 4-17). Mess around and you’ll see lots of the same options you’ll remember from the other NES emulators we’ve visited today. In the Options → Timing window you can select the Auto Frame Skip option, which should clear up any speed problems you experience.
You can also turn on and off the NES’ different sound channels in the Sound options menu, just in case you want to hear different parts of your favorite tunes separately. And in the Preferences menu you can easily use checkboxes to turn file associations on and off, which means that when you double-click on a supported file in Windows Explorer it will open automatically in NEStopia. This is not really preferable if you don’t want NEStopia to be your one and only emulator, nor if all your ROMs are in zipped format.
Hit Alt+L and you will bring up the optional Launcher, which is a very useful tool indeed. This provides functionality similar to RockNES, allowing you to search specific directories for ROM files, either in .nes format or zipped. Choose Options → Paths, and click Add to name as many directories as you want.
But wait, there’s more! Once you’ve got directories in there, you can check or uncheck them, causing NEStopia to search and skip them, respectively, all without permanently deleting them from the list. There’s even a checkbox that will let you eliminate duplicate files from the master list that is generated. As you can see, when combined with some judicious directory organizing on your part, the Launcher can make your emulation experience an easy one.
And now for something completely different. The NES emulator Nessie (http://nessie.emubase.de/) takes a very different approach to emulator design. Specifically, the author has taken pains to simplify the entire process, from downloading to running. Nessie is distributed as a single executable file that is not even zipped, so all you need to do is save it anywhere you wish, and then run it. If you want Nessie to support zipped ROMs, you have to save the file unzip.dll—also available on the project’s web site—to the same directory as Nessie.
Inside, things are even simpler. Click on Options → Preferences; where most emulators would feature screens full of options, Nessie only presents you with the tiny menu shown in Figure 4-18.
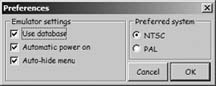
If you leave the settings at default, Nessie will use its built-in database to determine the names of ROMs automatically, power the “system” on as soon as you load a ROM, and hide the menu when you are playing a game.
But this small Preferences screen belies some of the very cool things that Nessie can do. Like most emulators, it can save your game at any point and let you resume it right where you left off. But Nessie doesn’t stop there. When you save a game, you can enter one line to describe the save (perhaps a description of where you left off, or even just the date and time). And when you select Load Game, you’ll be able to scroll through those descriptions, and each of them will feature a screenshot of the game from where you left off, as shown in Figure 4-19.
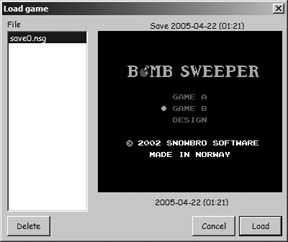
The tradeoff here is that, unlike most emulators, you can’t instantly save and load games by just tapping a single button; you have to navigate through the menus each time. But you might find that the helpful screenshots and descriptions are more suited to your playing style (especially if you’re not saving and loading every time you screw up, cheater).
Oh, and as you might have guessed, there’s one more tradeoff with Nessie: you can’t manually adjust any of the video or sound options. What this means is that if Nessie doesn’t run well on your computer as soon as you boot it up, it’s almost definitely never going to run well. But if it does work perfectly, you might really want to stick with it. Either way, with the many different emulators in this hack—and the seventy-three other NES emulators out there—you’re bound to find something that works.
Tip
If you’re running a very old DOS machine—a 486, for example—you might find that what works is the tastefully named emulator NESticle (http://bloodlust.zophar.net/NESticle/nes.html) . It’s been discontinued for over half a decade now, but then again, so has your old 486.
Get Retro Gaming Hacks now with the O’Reilly learning platform.
O’Reilly members experience books, live events, courses curated by job role, and more from O’Reilly and nearly 200 top publishers.

