Chapter 12. Frameworks for RESTful Services
As the REST design philosophy becomes more popular, new frameworks are springing up to make RESTful design easy. Existing frameworks are acquiring RESTful modes and features. This, in turn, drives additional interest in REST. In this chapter, I and a few knowledgeable contributors show you how to write resource-oriented services in three popular frameworks: Ruby on Rails, Restlet (for Java), and Django (for Python).
Back in Chapter 1 I said that REST isn’t an architecture, but a way of judging architectures. The Resource-Oriented Architecture is an architecture: it imposes constraints on your thinking that make it easy for you to break a problem down into RESTful resources. But these resources still only exist on an abstract level. They aren’t real until you expose them through specific web services.
If you’re writing a service from scratch (say, as a CGI script), you can translate your resources into code however you like. But most services aren’t written from scratch: they’re written using a web framework. A REST-aware web framework imposes constraints on your programming that make it easy for you to implement RESTful resources in a specific programming language. In this chapter I’ll show you how to integrate the lessons of this book with real frameworks.
Ruby on Rails
The simplifying assumption is the main driver of the success of Ruby on Rails. Rather than give you a large number of tools for accomplishing any task you can think of, Rails gives you one way to accomplish a wide variety of common tasks. You can create a Rails application very quickly if you’re trying to expose data from a relational database, if your database tables have certain names and structure, if you care to work with a Model-View-Controller architecture, and so on. Because so many problems in the web application domain fit these assumptions, the effect is rarely onerous and often liberating.
Earlier versions of Rails exposed a textbook REST-RPC hybrid architecture, but Rails 1.2 focuses on a more RESTful design. Perhaps this was inevitable: HTTP’s uniform interface is just another simplifying assumption. I’ve already shown in Chapter 7 how Rails can be used to make sophisticated RESTful services in very little code. In this section, I take a step back and describe the RESTful architecture of Rails in more general terms.
Routing
When an HTTP request comes in, Rails analyzes the requested URI and routes the request to the appropriate controller class. As shown in Example 12-1, the file config/routes.rb tells Rails how to handle certain requests.
# routes.rb
ActionController::Routing::Routes.draw do |map|
  map.resources :weblogs do |weblog|
    weblog.resources :entries
  end
end
A config/routes.rb file can get fairly sophisticated. The one in Chapter 7 is relatively complex: I had a lot of resources, and I had to fight the simplifying assumptions a little bit to get the URI structure I wanted. Example 12-1 shows a simpler routes.rb file that buys into the simplifying assumptions.
That file declares the existence of two controller classes (WeblogsController and
EntriesController), and tells Rails how to
route incoming requests to those classes.
WeblogsController handles requests for the URI
/weblogs, and for all URIs of the
form /weblogs/{id}. When present,
the path variable {id} is made
available as params[:id].
EntriesController handles requests for
the URI /weblogs/{weblog_id}/entries, and all URIs
of the form /weblogs/{weblog_id}/entries/{id}. The path
variable {weblog_id} is made
available as params[:weblog_id], and {id}, if present, is made available as
params[:id].
Variables like {id} and
{weblog_id} are typically used to associate a
resource with a particular object in the system. They often correspond
to database IDs, and get plugged into the ActiveRecord find method. In my del.icio.us clone I
tried to give them descriptive names like
{username}, and used them as identifying names
rather than IDs.
Resources, Controllers, and Views
As I showed in Chapter 7, every Rails controller might expose two kinds of resources. You can have a single “list” or “factory” resource, which responds to GET and/or POST requests, and you can have a large number of “object” resources, which respond to GET, PUT, and/or DELETE. The list resource often corresponds to a database table, and the object resources to the rows in the table.
Each controller is a Ruby class, so “sending” an HTTP request to
a class means calling some particular method. Rails defines five
standard methods per controller, as well as exposing two special view
templates through HTTP GET. For illustration’s sake, here are the
seven HTTP requests made possible by my call to map.resources :weblogs back in Example 12-1:
GET
            /weblogs
: A list of the weblogs. Rails calls theWeblogsController#indexmethod.GET /weblogs/new: The form for creating a new weblog. Rails renders the view in app/view/welogs/new.rhtml. This view is a hypermedia file describing what sort of HTTP request the client must make to create a new weblog.In other words, this is an HTML form (though it could also be a small WADL file). The form says that to create a new weblog, the client should send a POST request to
/weblogs(see below). It also tells the client how to format its representation of the new weblog, so that the server can understand it.POST /weblogs: Create a new weblog. Rails calls theWeblogsController#createmethod.GET /weblogs/{id}: A weblog. Rails callsWeblogsController#show.GET /weblogs/{id};edit: The form for editing a weblog’s state. Rails renders the view in app/view/welogs/edit.rhtml. This view is a hypermedia file describing what sort of HTTP request the client must make if it wants to edit a weblog’s state.In practice, this means the view is an HTML form, or short WADL file. The hypermedia file tells the client how to send or simulate a
PUTrequest to/weblogs/{id}.PUT /weblogs/{id}: Change a weblog’s state. Rails callsWeblogsController#update. The “state” here is the state associated with this particular resource: things like the weblog’s name and the author’s contact information. Individual entries are exposed as separate resources.DELETE /weblogs/{id}: Delete a weblog. Rails callsWeblogsController#delete.
You probably won’t expose all seven access points in every controller you create. In particular, you probably won’t use the special views unless you’re running your web service as a web site. This is no problem: just don’t implement the methods or view files you don’t intend to expose.
Outgoing Representations
Rails makes it easy to send different representations of a
resource based on the client’s request. Example 12-2
shows some hypothetical Ruby code that renders three different
representations of a weblog. Which representation is sent depends on
the URI the client accessed, or on the value it provided in the
Accept header. A client will get
the HTML rendition if it accesses /weblogs/1.html, but if the client accesses
/weblogs/1.png instead, the service will send a
graphical PNG rendition. The respond_to function takes care of
interpreting the client’s capabilities and desires. All you have to do
is implement the supported options, in order of precedence.
respond_to do |format|
  format.html { render :template => 'weblogs/show' }
  format.xml  { render :xml => weblog.to_xml }
  format.png  { render :text => weblog.generate_image,
                       :content_type => "image/png" }
end
Two especially common representation formats are HTML and
the ActiveResource XML serialization format. HTML representations are
expressed using Rails views, as they would be in a human-oriented web
application. To expose an ActiveRecord object as an XML document, you
can just call to_xml on an object
or a list of objects.
Rails plugins make it easy to expose data in other
representation formats. In Chapter 7, I
installed the atom-tools Ruby gem
so that I could render lists of bookmarks as Atom feeds. In Example 7-8 I have a respond_to code block, containing clauses
which distinguish between requests for Atom and generic XML
representations.
Incoming Representations
Rails sees its job as turning an incoming representation into a bunch of
key-value pairs, and making those key-value pairs available through
the params hash. By default, it knows how to parse
form-encoded documents of the sort sent by web browsers, and simple
XML documents like the ones generated by to_xml.
If you want to get this kind of action for your own incoming
representations, you can add a new Proc object
to ActionController::Base.param_parsers hash. The
Proc object is a block of code whose job is to
process an incoming representation of a certain media type. For
details, see the Rails documentation for the
param_parsers hash.
Web Applications as Web Services
Rails 1.2 does an excellent job of merging the human web and the
programmable web. As I showed in Chapter 3, Rails
comes with a code generator called scaffold which exposes a database table as a
set of resources. You can access the resources with a web browser, or
with a web service client like ActiveResource.
If you use a web browser to access a scaffold service, you’re served HTML
representations of the database objects, and HTML forms for
manipulating them (generated by the new.rhtml and edit.rhtml I mentioned earlier). You can
create, modify, and delete the resources by sending new
representations in form-encoded format. PUT and DELETE requests are simulated through
overloaded POST.
If you use a web service client to access a scaffold service, you’re served XML
representations of the database objects. You manipulate objects by
modifying the XML documents and sending then back with PUT.
Non-overloaded POST and DELETE work like you’d expect.
There’s no more compelling example of the human web’s basic similarity to the programmable web. In Chapter 7 I largely ignored this aspect of Rails for space reasons, but it makes a compelling argument for using Rails if you’re designing a web site and a web service to do the same thing. Rails makes it easy to expose them both as aspects of the same underlying code.
The Rails/ROA Design Procedure
The following list is a modified version of the generic design procedure from Chapter 6. It’s what I used, unofficially, to design the service in Chapter 7. The main difference is that you divide the dataset into controllers and the controllers into resources, rather than dividing the dataset into resources. This reduces the chance that you’ll end up with resources that don’t fit Rails’s controller system.
Figure out the dataset.
Assign the dataset to controllers.
For each controller:
Does this controller expose a list or factory resource?
Does this controller expose a set of object resources?
Does this controller expose a creation form or editing form resource?
For the list and object resources:
Design the representation(s) accepted from the client, if different from the Rails standard.
Design the representation(s) served to the client.
Connect this resource to existing resources.
Consider the typical course of events: what’s supposed to happen? The database-backed control flow from Chapter 9 should help here.
Consider error conditions: what might go wrong? Again, you can often use the database-backed control flow.
Restlet
by and
The Restlet project provides a lightweight but comprehensive framework for mapping REST concepts to Java classes. It can be used to implement any kind of RESTful system, not just RESTful web services, and it’s proven a reliable piece of software since its inception in 2005.
The Restlet project was influenced by the other major Java
technologies for developing Web applications: the Servlet API, Java
Server Pages, HttpURLConnection, and Struts. The
primary goal of the project is to provide the same level of
functionality while sticking closer to the goals of REST as expounded in
the Fielding thesis. Another key goal is to present a unified view of
the Web, suitable for use in both client- and server-side
applications.
The Restlet philosophy is that the distinction between HTTP client and HTTP server is architecturally unimportant. A single piece of software should be able to act as a web client, then as a web server, without using two completely different APIs.[32]
An early development was the split of the software into the Restlet API and Noelios Restlet Engine (NRE), a reference implementation. This separation allows other implementations to be compatible with the same API. The NRE includes several HTTP server connectors based on popular HTTP open source Java projects: Mortbay’s Jetty, Codehaus’s AsyncWeb, and the Simple framework. There’s even an adapter that lets you deploy a Restlet application inside standard Servlet containers like Apache Tomcat.
Restlet also provides two HTTP client connectors, one based on the
official HttpURLConnection class
and the other on Apache’s popular HTTP client library. Another connector
allows you to easily manipulate a JDBC source via XML documents in a
RESTful way, while an SMTP connector, based on the JavaMail API, lets
you send email with an XML document.
The Restlet API includes classes that can build representations
based on strings, files, streams, channels, and XML documents: it
supports SAX and DOM for parsing, and XSLT for transformation. It’s easy
to build JSP-style template-based representations, using the FreeMarker
or Apache Velocity template engines. You can even serve static files and
directories, like an ordinary web server, using a
Directory class, which supports content
negotiation.
Throughout the framework, the design principles are simplicity and flexibility. The API aims to abstract the concepts of HTTP, URIs, and REST into a consistent set of classes, without fully hiding low-level information such as the raw HTTP headers.
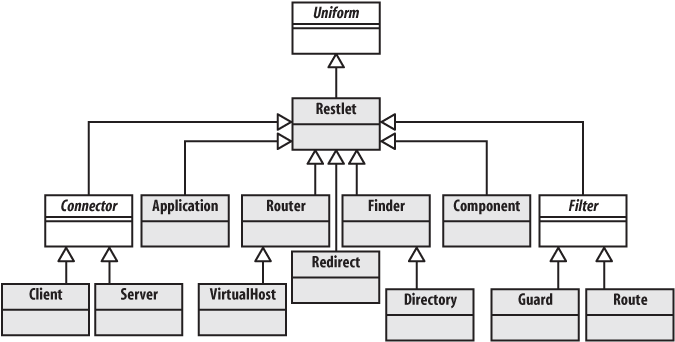
Basic Concepts
The Restlet terminology matches the terminology of REST as
described in the Fielding thesis: resource, representation, connector,
component, media type, language, and so on. A lot of this terminology
should be familiar to you from elsewhere in the book. Restlet adds
some specialized classes like Application,
Filter, Finder,
Router, and Route, to
make it easier to combine restlets with each other, and to map
incoming requests to the resources that ought to handle them.
The central concept of Restlet is the abstract Uniform class, and its
concrete subclass Restlet. As the name implies,
Uniform exposes a uniform interface as defined
by REST. This interface is inspired by HTTP’s uniform interface but
can be used with other protocols like FTP and SMTP.
The main method is handle,
which takes two arguments: Request and
Response. As you can see from Figure 12-1, every call handler that is exposed over the
network (whether as client or server) is a subclass of
Restlet—is a restlet—and respects this uniform
interface. Because of this uniform interface, restlets can be combined
in very sophisticated ways.
Every protocol that Restlet supports is exposed through the
handle method. This means HTTP
(server and client), HTTPS, and SMTP, as well as JDBC, the file
system, and even the class loaders all go through handle. This reduces the number of APIs the
developer must learn.
Filtering, security, data transformation, and routing are
handled by chaining together subclasses of
Restlet. Filters can
provide processing before or after the handling of a call by the next
restlet. Filter instances work like Rails
filters, but they respond to the same handle method as the other Restlet classes,
not to a filter-specific API.
A Router restlet has a number of
Restlet objects attached to it, and routes each
incoming protocol call to the appropriate
Restlet handler. Routing is typically done on
some aspect of the target URI, as in Rails. Unlike Rails, Restlet
imposes no URI conventions on your resource hierarchies. You can set
up your URIs however you want, so long as you program your
Routers appropriately.
Routers can stretch beyond this common
usage. You can use a Router to proxy calls with
dynamic load balancing between several remote machines! Even a setup
as complex as this still responds to Restlet’s uniform interface, and
can be used as a component in a larger routing system. The VirtualHost class (a subclass
of Router) makes it possible to host several
applications under several domain names on the same physical machine.
Traditionally, to get this kind of feature you’ve had to bring in a
front-end web server like Apache’s httpd. With Restlet, it’s just another
Router that responds to the uniform
interface.
An Application object can manage a
portable set of restlets and provide common services. A “service”
might be the transparent decoding of compressed requests, or
tunnelling methods like PUT and DELETE over overloaded POST using the
method query parameter. Finally,
Component objects can contain and orchestrate a
set of Connectors,
VirtualHosts, and
Applications that can be run as a standalone
Java application, or embedded in a larger system such as a J2EE
environment.
In Chapter 6 you saw a sequence of steps
for breaking a problem down into a set of resources that respond to
HTTP’s uniform interface. This procedure was modified in Chapter 7 to deal with the simplifying assumptions
imposed by Ruby on Rails. There’s no need to modify the procedure when
working with Restlet, because Restlet makes no simplifying
assumptions. It can implement any RESTful system. If you happen to be
implementing a RESTful resource-oriented web service, you can arrange
and implement the resources however you like. Restlet does provide
some classes that make it easy to create resource-oriented
applications. Most notably, there’s a Resource
class that can be used as the basis for all of your application
resources.
Throughout this book, URI Templates are used as shorthand to designate whole classes of URIs (see Chapter 9”). Restlet uses URI Templates to map URIs onto resources. A Restlet implementation of the Chapter 7 social bookmarking application might specify the path to a particular bookmark like so:
/users/{username}/bookmarks/{URI}
You can use this exact syntax when attaching a
Resource subclass to a
Router. If it sounds too good to be true, just
wait for the next section where I actually implement part of the
bookmarking service covered in Chapter 7.
Writing Restlet Clients
In Example 2-1 you saw a Ruby client that retrieved XML search results from Yahoo!’s web search service. The code in Example 12-3 is a Java implementation of the same client, written against version 1.0 of Restlet. In order to compile and run the upcoming examples, you’ll need to make sure that the following JARs are in your classpath:
org.restlet.jar (Restlet API)
com.noelios.restlet.jar (Noelios Restlet Engine core)
com.noelios.restlet.ext.net.jar (HTTP client connector based on JDK’s
HttpURLConnection)
All these are available in the lib directory of the Restlet distribution. Make sure that your Java environment supports Java SE version 5.0 or higher. If you really need to, you can easily backport the Restlet code to Java SE version 4.0 with Retrotranslator.
// YahooSearch.java
import org.restlet.Client;
import org.restlet.data.Protocol;
import org.restlet.data.Reference;
import org.restlet.data.Response;
import org.restlet.resource.DomRepresentation;
import org.w3c.dom.Node;

/**
 * Searching the web with Yahoo!'s web service using XML.
 */
public class YahooSearch {
    static final String BASE_URI =
	"http://api.search.yahoo.com/WebSearchService/V1/webSearch";

    public static void main(String[] args) throws Exception {
        if (args.length != 1) {
            System.err.println("You need to pass a term to search");
        } else {
            // Fetch a resource: an XML document full of search results
            String term = Reference.encode(args[0]);
            String uri = BASE_URI + "?appid=restbook&query=" + term;
            Response response = new Client(Protocol.HTTP).get(uri);
            DomRepresentation document = response.getEntityAsDom();

            // Use XPath to find the interesting parts of the data structure
            String expr = "/ResultSet/Result/Title";
            for (Node node : document.getNodes(expr)) {
                System.out.println(node.getTextContent());
            }
        }
    }
}
You can run this class by passing a search term as a command-line argument, just like with the Ruby example in Example 2-1. Here’s a sample run:
$ java YahooSearch xslt
	XSL Transformations (XSLT)
	The Extensible Stylesheet Language Family (XSL)
	XSLT Tutorial
        ...
This example demonstrates how easy it is with Restlet to
retrieve XML data from a web service and process it with standard
tools. The URI to the Yahoo! resource is built from a constant and the
user-provided search term. A client connector is instantiated using
the HTTP protocol. The XML document is retrieved with a method
(get) whose name mirrors the
method of HTTP’s uniform interface. When the call returns, the program
has the response entity as a DOM representation. As in the Ruby
example, XPath is the simplest way to search the XML I
retrieved.
Also as in the earlier Ruby example, this program ignores the
XML namespaces used in the result document. Yahoo! puts the entire
document into the namespace urn:yahoo:srch, but I access the tags as,
say, ResultSet instead of urn:yahoo:srch:ResultSet. The Ruby example
ignores namespaces because Ruby’s default XML parsers aren’t
namespace-aware. Java’s XML parsers are namespace-aware, and the
Restlet API makes it easy to deal with namespaces correctly. It
doesn’t make much difference in a simple case like this, but you can
avoid some subtle problems by handling documents in a namespace-aware
way.
Of course, saying urn:yahoo.srch:ResultSet all the time would
get old pretty fast. The Restlet API makes it easy to associate a
short prefix with a namespace, and then use the prefix in an XPath
expression instead of the full name. Example 12-4 shows a variant of the
document-handling code from the end of Example 12-3. This version uses namespace-aware XPath,
so that Yahoo’s ResultSet tag will
never be confused with the ResultSet tag from some other
namespace.
            DomRepresentation document = response.getEntityAsDom();

            // Associate the namespace with the prefix 'y'
            document.setNamespaceAware(true);
            document.putNamespace("y", "urn:yahoo:srch");

            // Use XPath to find the interesting parts of the data structure
            String expr = "/y:ResultSet/y:Result/y:Title/text()";
            for (Node node : document.getNodes(expr)) {
                System.out.println(node.getTextContent());
            }
Example 2-15 showed a second Ruby client for Yahoo!’s search service. That one requested a JSON representation of the search data, instead of an XML representation. Example 12-5 is the equivalent program for Restlet. It gets its JSON support from two additional JAR files, both included with Restlet:
org.restlet.ext.json_2.0.jar (Restlet extension for JSON)
org.json_2.0/org.json.jar (JSON official library)
// YahooSearchJSON.java
import org.json.JSONArray;
import org.json.JSONObject;
import org.restlet.Client;
import org.restlet.data.Protocol;
import org.restlet.data.Reference;
import org.restlet.data.Response;
import org.restlet.ext.json.JsonRepresentation;

/**
 * Searching the web with Yahoo!'s web service using JSON.
 */
public class YahooSearchJSON {
    static final String BASE_URI =
	"http://api.search.yahoo.com/WebSearchService/V1/webSearch";

    public static void main(String[] args) throws Exception {
        if (args.length != 1) {
            System.err.println("You need to pass a term to search");
        } else {
            // Fetch a resource: a JSON document full of search results
            String term = Reference.encode(args[0]);
            String uri = BASE_URI + "?appid=restbook&output=json&query=" + term;
            Response response = new Client(Protocol.HTTP).get(uri);
            JSONObject json = new JsonRepresentation(response.getEntity())
                    .toJsonObject();

            // Navigate within the JSON document to display the titles
            JSONObject resultSet = json.getJSONObject("ResultSet");
            JSONArray results = resultSet.getJSONArray("Result");
            for (int i = 0; i < results.length(); i++) {
                System.out.println(results.getJSONObject(i).getString("Title"));
            }
        }
    }
}
When you write a client against Yahoo!’s service, you can choose
the representation. Restlet supports both XML in the core API and JSON
with an extension. As you’d expect, the only difference between the
two programs is in processing the response. The
JsonRepresentation class allows you to convert
the response entity-body into an instance of
JSONObject (contrast with Ruby’s JSON library,
which converted the JSON data structure into a native data structure).
The data structure is navigated manually, since there’s not yet any
XPath-like query language for JSON.
Writing Restlet Services
The next set of examples is a little more complex. I’ll show you how to design and implement a server-side application. I’ve implemented a subset of the bookmark management application originally implemented with Ruby on Rails in Chapter 7. To keep things relatively simple, the only features this application supports are the secure manipulation of users and their bookmarks.
The Java package structure looks like this:
org
 restlet
  example
   book
    rest
     ch7
    	-Application
    	-ApplicationTest
    	-Bookmark
    	-BookmarkResource
	 	-BookmarksResource
	 	-User
	 	-UserResource
That is, the class
Bookmark is in the package org.restlet.example.book.rest.ch7, and so
on.
Rather than include all the code here, I’d like you to download it from the archive (http://www.oreilly.com/catalog/9780596529260), which contains all examples from this book. It’s also available on restlet.org. If you’ve already downloaded Restlet, you don’t have to do anything, since the examples for this section are shipped with Restlet, see src/org.restlet.example/org/restlet/example/book/rest.
I’ll start you off with some simple code in Example 12-6: the Application.main, which sets up the web
server and starts serving requests.
public static void main(String... args) throws Exception {
    // Create a component with an HTTP server connector
    Component comp = new Component();
    comp.getServers().add(Protocol.HTTP, 3000);

    // Attach the application to the default host and start it
    comp.getDefaultHost().attach("/v1", new Application());
    comp.start();
}
Resource and URI design
Since Restlets impose no restrictions on resource design, the
resource classes and the URIs they expose flow naturally from
considerations of ROA design. There’s no need to design around the
Restlet architecture, the way the resources in Chapter 7 were designed around Rails’s
controller-based architecture. Figure 12-2 shows how incoming URIs are
mapped to resources with a Router, and how
resources are mapped onto the underlying restlet classes.
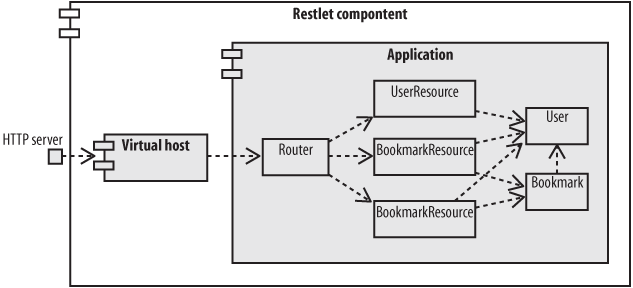
To understand how these mappings are coded in Java, let’s take
a look at the Application class and its createRoot method (see Example 12-7). This is the equivalent of the
Rails routes.rb file shown in
Example 7-3.
public Restlet createRoot() {
    Router router = new Router(getContext());

    // Add a route for user resources
    router.attach("/users/{username}", UserResource.class);

    // Add a route for user's bookmarks resources
    router.attach("/users/{username}/bookmarks", BookmarksResource.class);

    // Add a route for bookmark resources
    Route uriRoute = router.attach("/users/{username}/bookmarks/{URI}",
                                   BookmarkResource.class);
    uriRoute.getTemplate().getVariables()
      .put("URI", new Variable(Variable.TYPE_URI_ALL));
}
This code runs when I create an
Application object, as I do back in Example 12-6. It creates a clean and intuitive
relationship between the resource class
UserResource and the URI Template "/users/{username}". The
Router matches incoming URIs against the
templates, and forwards each request to a new instance of the
appropriate resource class. The value of the template variables are
stored in the request’s attributes map (similar to the params map in the Rails example), for easy
usage in the Resource code. This is both
powerful and simple to understand, which is very helpful when you
haven’t seen the code for a few months!
Request handling and representations
Suppose a client makes a GET request for the URI http://localhost:3000/v1/users/jerome.
I’ve got a Component listening on port 3000
of localhost, and an
Application object attached to /v1. The
Application has a
Router and a bunch of
Route objects waiting for requests that match
various URI Templates. The URI path fragment "/users/jerome" matches the
template "/users/{username}", and
that template’s Route is associated with the
UserResource class: a rough equivalent to the
Rails UsersController
class.
Restlet handles the request by instantiating a new
UserResource object and calling its handleGet method. The
UserResource constructor is reproduced in
Example 12-8.
/**
 * Constructor.
 *
 * @param context
 *            The parent context.
 * @param request
 *            The request to handle.
 * @param response
 *            The response to return.
 */
 public UserResource(Context context, Request request, Response response) {
    super(context, request, response);
    this.userName = (String) request.getAttributes().get("username");
    ChallengeResponse cr = request.getChallengeResponse();
    this.login = (cr != null) ? cr.getIdentifier() : null;
    this.password = (cr != null) ? cr.getSecret() : null;
    this.user = findUser();

    if (user != null) {
        getVariants().add(new Variant(MediaType.TEXT_PLAIN));
    }
}
By this time, the framework has set up a
Request object, which contains all the
information I need about the request. The
username attribute comes from the URI, and the
authentication credentials from the request’s Authorization header. I also call
findUser to look up a user in
the database based on the authentication credentials (to save space,
I won’t show the findUser
method here). These are the jobs done by Rails filters in Chapter 7.
After the framework instantiates a
UserResource, it invokes the appropriate
handle method on the resource
object. There’s one handle
method for every method of HTTP’s uniform interface. In this case,
the last act of the Restlet framework is to call UserResource.handleGet.
I don’t actually define UserResource.handleGet, so the inherited
behavior (defined in Restlet’s Resource.handleGet) takes over. The
default behavior of handleGet
is to find the representation of the resource that best fits the
client’s needs. The client expresses its needs through
content-negotiation. Restlet looks at the values of the Accept headers and figures out which
“variant” representation is the most appropriate. In this case,
there’s only one representation format, so it doesn’t matter what
the client asks for. This is handled by the getVariants and getRepresentation methods. Back in the
constructor, I defined text/plain
as the only supported representation format, so my implementation of
the getRepresentation method is
pretty simple (see Example 12-9).
@Override
public Representation getRepresentation(Variant variant) {
    Representation result = null;

    if (variant.getMediaType().equals(MediaType.TEXT_PLAIN)) {
        // Creates a text representation
        StringBuilder sb = new StringBuilder();
        sb.append("------------\n");
	       sb.append("User details\n");
	       sb.append("------------\n\n");
	       sb.append("Name:  ").append(this.user.getFullName()).append('\n');
	       sb.append("Email: ").append(this.user.getEmail()).append('\n');
	       result = new StringRepresentation(sb);
    }

    return result;
}
That’s just one method of one resource, but the other
resources, and the other HTTP methods of
UserResource, work the same way. A PUT
request for a user gets routed to
UserResource.handlePut, and so on. As I
mentioned earlier, this code is part of a complete bookmarking
application, so there’s much more example code available if you’re
interested in learning more.
You should now understand how the Restlet framework routes
incoming HTTP requests to specific Resource
classes, and to specific methods on those classes. You should also
see how representations are built up from resource state. You’ll
probably only have to worry about the
Application and the
Router code once, since a single router can
work for all of your resources.
Compiling, running, and testing
The Application class implements the
HTTP server that runs the social bookmarking service. It requires a
classpath that contains the following JAR files:
org.restlet.jar
com.noelios.restlet.jar
com.noelios.restlet.ext.net.jar
org.simpleframework_3.1/org.simpleframework.jar
com.noelios.restlet.ext.simple_3.1.jar
com.db4o_6.1/com.db4o.jar
All of these JAR files are included with the Restlet distribution,
and we’ve listed them relative to the lib directory in your Restlet
installation. Two things to notice: the actual web server work is
handled by a very compact HTTP server connector based on the Simple
Framework. Second, instead of making you set up a relational
database, we persist our domain objects (users and bookmarks) with
the powerful db4o object
database. Once all the example
files have been compiled, run
org.restlet.example.book.rest.ch7.Application,
which acts as the server endpoint.
The ApplicationTest class provides a
client interface to the service. It uses the Restlet client classes
described in the previous section to add and delete users and
bookmarks. It does this through HTTP’s uniform interface: users and
bookmarks are created with PUT and deleted with DELETE.
Run ApplicationTest.class from the
command line and you’ll get a message like this:
  Usage depends on the number of arguments:
 - Deletes a user     : userName, password
 - Deletes a bookmark : userName, password, URI
 - Adds a new user    : userName, password, "full name", email
 - Adds a new bookmark: userName, password, URI, shortDescription,
                        longDescription, restrict[true / false]
You can use this program to add some users and give them bookmarks. Then you can view an HTML representation of the users’ bookmarks by visiting the appropriate URIs in a standard web browser, such as http://localhost:3000/v1/users/jerome and so on.
Conclusion
The Restlet project delivered its final 1.0 version in early 2007. It took just more than 12 months to develop, and the project now has a thriving development and user community. The mailing list is friendly and welcoming to both new and experienced developers. Noelios Consulting, the founder and main developing force behind the project, offers professional support plans and training.
As of the time of writing, the 1.0 release is under maintenance,
and a new 1.1 branch has been started. Future plans include submission
of the Restlet API to the Java Community Process (JCP) for
standardization. There’s also a higher-level API for RESTful web
services in development, submitted by Sun Microsystems to the JCP and
known as JSR 311. This higher-level API should make it easy to expose
Java domain objects as RESTful resources. This will nicely complement
the Restlet API, especially its Resource class.
Noelios Consulting is part of the initial expert group and will
directly support the future annotations in its Restlet
engine.
Django
by
Django is a framework that makes it easy to develop web applications and web services in Python. Its design is very similar to Rails, though it makes fewer simplifying assumptions. You can apply the generic ROA design procedure to turn a dataset into a set of RESTful resources and implement those resources directly in Django.
I’ll show you how I implemented a social bookmarking service in Django, along the lines of the Rails implementation in Chapter 7. Since this book isn’t intended to be a Django tutorial, I’m leaving out most of the intermediary steps of Django development so I can focus on the parts that specifically apply to RESTful web services. If you’re interested in learning more about Django, you should check out the free online Django Book and the official Django documentation.
Create the Data Model
Most Django developers start by designing the data model. This corresponds to the first step of the generic ROA procedure, “Figure out the data set.” The model is usually stored in a relational database using Django’s object-relational mapping (ORM) tools. It’s certainly possible to write RESTful services that don’t use a database, but for the social bookmarking application a database makes the most sense. It’s fairly straightforward to translate the Rails migration from Example 7-1 into a Django model, as seen in Example 12-10.
from datetime import datetime
from django.db import models
from django.contrib.auth.models import User

class Tag(models.Model):
    name = models.SlugField(maxlength=100, primary_key=True)

class Bookmark(models.Model):
    user                = models.ForeignKey(User)
    url                 = models.URLField(db_index=True)
    short_description   = models.CharField(maxlength=255)
    long_description    = models.TextField(blank=True)
    timestamp           = models.DateTimeField(default=datetime.now)
    public              = models.BooleanField()
    tags                = models.ManyToManyField(Tag)
There’s a few subtleties and a lot of power squeezed into these few lines of code:
I chose to use the built-in Django
Usermodel, rather than create my ownuserstable as the Rails example does. This has a few advantages, the biggest being that the built-inUsermodel will handle much of the authentication and authorization. For more information on this, see Chapter 12 of the Django Book.Django has no direct analog to the Rails
acts_as_taggableplugin, so in the last line of theBookmarkdefinition I just define a many-to-many relation betweenBookmarkandTag.I’m defining the tag’s
nameas aSlugFieldrather than a string. This is a Django class that automatically restricts tag names to those that can show up in a URI. This makes it easy to prohibit tags that contain spaces or other non-alphanumeric characters.Most of the database indexes created explicitly in the Rails schema are automatically added by Django. In particular, slug fields and foreign keys automatically are given indexes. Notice, however, that I’ve had to explicitly specify
db_index=Trueon theurlfield. That field won’t get an index by default, but I want to search it.
Define Resources and Give Them URIs
The Rails implementation of the social bookmarking application exposes 11 resources. To keep the size of this section down, I’m only going to implement 4 of the 11:
A single bookmark
The list of a user’s bookmarks
The list of bookmarks a user has tagged with a particular tag
The list of tags a user has used
In particular, notice that I’m not exposing user accounts as resources. To use this service you’ll need to pre-create some sample user accounts in the database.
Ruby on Rails imposes simplifying assumptions that affect your URI design. Instead of defining resources, you define Rails controllers that expose resources at certain URIs. Django makes you design your URIs from scratch. Django’s philosophy is that the URI is an important part of a web application’s user interface, and should not be automatically generated. This fits in with the ROA philosophy, since a resource’s only interface elements are its URI and the uniform interface of HTTP.
Since Django forces you to design URLs explicitly, there’s no “path of least resistance” as there is in Rails, so I’m able to make my Django URIs a little more compact and readable than the Rails URIs were. I’ll modify the URI structure given for the Rails application in three ways:
The Django “house style” (as it were) is to always end URIs with a trailing slash. It’s possible to go either way, of course, but to fit more with what Django developers expect I’ll make all URIs include the trailing slash. That is, I’ll use URLs like
/users/{username}/instead of/users/{username}.Rails’s controller-based architecture make it convenient to expose bookmarks as
/users/{username}/bookmarks/{URL}/. In Django it’s just as convenient to use the more compact/users/{username}/{URL}/, so that’s what I’ll use.Since I’m not exposing user accounts as resources, I can use URIs of the form
/users/{username}/for a different purpose. I’m going to expose my “bookmark list” resources there.The Rails implementation uses POST to create a new bookmark as a subordinate resource of a bookmark list. I’ll create new bookmarks using the other technique: by sending a PUT to
/users/{username}/{URI}/, bypassing the bookmark list altogether. Rails had a problem with embedding a URI in another URI, so back then I exposed URIs like/users/{username}/bookmarks/{URI-MD5}. Here I can use the actual URIs themselves.
I can easily use a Django URI configuration file to map these
URIs to resources (Example 12-11). This is the
equivalent of the routes.rb file in
Example 7-3. It’s a lot simpler, though, because
Django doesn’t try to make decisions about URI format for me.
from django.conf.urls.defaults import *
from bookmarks.views import *

urlpatterns = patterns('',
    (r'^users/([\w-]+)/$',              bookmark_list),
    (r'^users/([\w-]+)/tags/$',         tag_list),
    (r'^users/([\w-]+)/tags/([\w-]+)/', tag_detail),
    (r'^users/([\w-]+)/(.*)',           BookmarkDetail()),
)
The urls.py file is a small
Python module that maps incoming URIs (represented as regular
expressions) to the functions that handle the requests. Any groups in
the regular expression are passed as arguments to the function. So if
a request comes in for users/jacobian/tags/python, Django will
match it against the third regular expression, and call the tag_detail function with two arguments:
“jacobian” and “python”.
Since Django evaluates the URI patterns in order, I have to put
the tag URIs before the bookmark URLs: otherwise,
Django would interpret /users/jacobian/tags/ as a request for a
bookmark of the (invalid) URI tags.
Of course, now I’m committed to writing four functions in a
module called bookmarks.views. I
won’t leave you hanging, so let’s move onto those functions.
Implement Resources as Django Views
Django interprets the Model-View-Controller pattern differently than Rails does. In Rails, to implement a resource’s behavior under the uniform interface, you put code in a controller class. In Django, that code goes into the view. The Django FAQ has more on this distinction, but I’ll show you the implementation of two views: the read-only view function for the “bookmark list” resource and the read/write view class for the “bookmark” resource.
The bookmark list view
The bookmark list view function is a nice simple one to start with, because the “bookmark list” resource only responds to GET (see Example 12-12). Remember, I’m exposing bookmark creation through PUT, not through POST on the bookmark list the way the Rails implementation does.
from bookmarks.models import Bookmark
from django.contrib.auth.models import User
from django.core import serializers
from django.http import HttpResponse
from django.shortcuts import get_object_or_404

def bookmark_list(request, username):
    u = get_object_or_404(User, username=username)
    marks = Bookmark.objects.filter(user=u, public=True)
    json = serializers.serialize("json", marks)
    return HttpResponse(json, mimetype="application/json")
The first step is to turn the argument
username into a Django
User object. The username
variable comes from the capture group in the regular expression from Example 12-11. It’s everything between the parentheses in
^users/([\w-]+)/$. Since a
request for a non-existent user’s bookmarks should return an HTTP
response code of 404 (“Not Found”), I look up a user with Django’s
get_object_or_404() shortcut
function. This will automatically raise a Http404 exception if the user doesn’t
exist, which Django will turn into an HTTP response code of 404.
This serves the same purpose as the if_found method defined in the Rails
application, way back in Example 7-9.
In Chapter 7 I kept the implementation
short by using ActiveRecord’s to_xml function to convert objects from
the database (such as user accounts) into XML representations. I’ve
used a similar trick here. Rather than represent lists of bookmarks
as Atom feeds, I use Django’s serialization API to turn database
rows into JSON data structures (see http://www.djangoproject.com/documentation/serialization/).
Django can also serialize database rows into a JSON data
structure or an ActiveRecord-like XML representation: switching to
the XML representation would be as easy as changing the serializer
type in the third line of the view, and the mimetype in the last line. Django’s
default JSON output is relatively straightforward. Example 12-13 shows what it does to a row from my
bookmarks table.
[{
    "pk": "1",
    "model": "bookmarks.bookmark",
    "fields": {
        "tags": ["example"],
        "url": "http:\/\/example.com\/",
        "timestamp": "2007-01-30 21:35:23",
        "long_description": "",
        "user": 1,
        "short_description": "Example",
        "public": true
    }
}]
The bookmark_list
implementation from Example 12-12 will
work, but it’s a bit naive. It returns all of a
user’s bookmarks every time it’s called, and that will chew up both
database resources and bandwidth. Example 12-14 shows an implementation that
adds support for conditional GET (see Conditional GET” in Chapter 7).
Adding handling for Last-Modified and If-Modified-Since does make this view more
complex, but the bandwidth savings will make it worth the
effort.
import datetime
from bookmarks.models import Bookmark
from django.contrib.auth.models import User
from django.core import serializers
from django.http import *
from django.shortcuts import get_object_or_404

# Use the excellent python-dateutil module to simplify date handling.
# See http://labix.org/python-dateutil
import dateutil.parser
from dateutil.tz import tzlocal, tzutc

def bookmark_list(request, username):
    u = get_object_or_404(User, username=username)

    # If the If-Modified-Since header was provided,
    # build a lookup table that filters out bookmarks
    # modified before the date in If-Modified-Since.
    lookup = dict(user=u, public=True)
    lm = request.META.get("HTTP_IF_MODIFIED_SINCE", None)
    if lm:
        try:
            lm = dateutil.parser.parse(lm)
        except ValueError:
            lm = None # Ignore invalid dates
        else:
            lookup['timestamp__gt'] = lm.astimezone(tzlocal())

    # Apply the filter to the list of bookmarks.
    marks = Bookmark.objects.filter(**lookup)

    # If we got If-Modified-Since but there aren't any bookmarks,
    # return a 304 ("Not Modified") response.
    if lm and marks.count() == 0:
        return HttpResponseNotModified()

    # Otherwise return the serialized data...
    json = serializers.serialize("json", marks)
    response = HttpResponse(json, mimetype="application/json")

    # ... with the appropriate Last-Modified header.
    now = datetime.datetime.now(tzutc())
    response["Last-Modified"] = now.strftime("%a, %d %b %Y %H:%M:%S GMT")
    return response
There’s a number of other improvements that could be made here—most notably the ability to show private bookmarks to authenticated users—but you’ve already seen these features in Chapter 7. I’ll leave porting them to Django as exercises, and forge ahead.
The bookmark detail view
The second view I’ll show you has more moving parts. A “bookmark list” resource only responds to GET, but a “bookmark” resource must handle three HTTP methods. GET on a bookmark retrieves a representation of the bookmark, PUT creates or updates a bookmark, and DELETE removes a bookmark. Since we don’t want users modifying each others’ bookmarks, the bookmark resource needs to take authentication into account.
The most obvious way to sketch out the bookmark_detail view is with a series of
if clauses:
def bookmark_detail(request, username, bookmark_url):
    if request.method == "GET":
        # Handle GET
    elif request.method == "POST":
        # Handle POST
    elif request.method == "PUT":
        # Handle PUT
    elif request.method == "DELETE":
        # Handle DELETE
However, this is unelegant and will quickly lead to an
unwieldy view. Instead, I’ll take advantage of Python’s “duck
typing” and implement the bookmark detail view as a callable object.
In Python, functions are first-class objects, and the syntax of a
function call (object(argument))
is transformed into a method call on the object (object.__call__(argument)). This means
that any object can be called like a function,
if it defines the __call__
method. I’m going to take advantage of this trick by implementing
the bookmark detail as a class with a __call__
method.
This is why the last line of Example 12-11
looks different from the other three. The first three tie regular
expressions to Python function objects: bookmark_list and the like. The last one
ties a regular expression to a custom object that happens to
implement __call__. The
__call__ implementation will do
some preliminary work, check the HTTP method of the incoming
request, and dispatch to an appropriate action function (see Example 12-15).
class BookmarkDetail:

    def __call__(self, request, username, bookmark_url):
        self.request = request
        self.bookmark_url = bookmark_url

        # Look up the user and throw a 404 if it doesn't exist
        self.user = get_object_or_404(User, username=username)

        # Try to locate a handler method.
        try:
            callback = getattr(self, "do_%s" % request.method)
        except AttributeError:
            # This class doesn't implement this HTTP method, so return
            # a 405 ("Method Not Allowed") response and list the
	    #allowed methods.
            allowed_methods = [m.lstrip("do_") for m in dir(self)
                                               if m.startswith("do_")]
            return HttpResponseNotAllowed(allowed_methods)

        # Check and store HTTP basic authentication, even for methods that
        # don't require authorization.
        self.authenticate()

        # Call the looked-up method
        return callback()
The BookmarkDetail.__call__ method checks the
HTTP method of the incoming requests, and dispatches each one to an
appropriate method of the form do_<METHOD>. For instance, a GET
request is dispatched to do_GET. Rails does something similar
behind the scenes, turning a GET
request into a call to
MyController#show.
The BookmarkDetail class also needs to
handle HTTP basic authentication, so let’s take a look at that now.
In a real application, these functions would go into a superclass to
be used by every view that required authentication. Think back to
Chapter 7, and the way I put the must_authenticate Rails filter into the
base ApplicationController class (see Example 12-16).
from django.contrib.auth import authenticate

class BookmarkDetail:

    # ...

    def authenticate(self):
        # Pull the auth info out of the Authorization header
        auth_info = self.request.META.get("HTTP_AUTHORIZATION", None)
        if auth_info and auth_info.startswith("Basic "):
            basic_info = auth_info[len("Basic "):]
            u, p = auth_info.decode("base64").split(":")

            # Authenticate against the User database. This will set
            # authenticated_user to None if authentication fails.
            self.authenticated_user = authenticate(username=u, password=p)
        else:
            self.authenticated_user = None

    def forbidden(self):
        response = HttpResponseForbidden()
        response["WWW-Authenticate"] = 'Basic realm="Bookmarks"'
        return response
Now we can check self.authenticated_user within the
individual do_{METHOD} methods.
I’ve also written a forbidden()
helper that sends an HTTP 401 (Forbidden) response with the correct
WWW-Authenticate header.
Now I’ll implement the “bookmark” resource’s response to each
HTTP method it exposes. GET is the simplest, so let’s start there.
Example 12-17 shows the implementation of
do_GET. It illustrates the same
concepts as the bookmark list’s response to GET, back in Example 12-14. The only major difference is
that we enforce the privacy of private bookmarks.
def do_GET(self):
    # Look up the bookmark (possibly throwing a 404)
    bookmark = get_object_or_404(Bookmark,
        user=self.user,
        url=self.bookmark_url
    )

    # Check privacy
    if bookmark.public == False and self.user != self.authenticated_user:
        return self.forbidden()

    json = serializers.serialize("json", [bookmark])
    return HttpResponse(json, mimetype="application/json")
Next up is PUT (see Example 12-18).
This method needs to take an incoming representation of a bookmark’s
state, and use it to either create a new bookmark or update an
existing one. The incoming representation is available as self.request.raw_post_data, and I use the
Django serialization library to turn it from a JSON data structure
to a Django database object.
def do_PUT(self):
    # Check that the user whose bookmark it is matches the authorization
    if self.user != self.authenticated_user:
        return self.forbidden()

    # Deserialize the representation from the request. Serializers
    # work the lists, but we're only expecting one here. Any errors
    # and we send 400 ("Bad Request").
    try:
        deserialized = serializers.deserialize("json",
                                               self.request.raw_post_data)
        put_bookmark = list(deserialized)[0].object
    except (ValueError, TypeError, IndexError):
        response = HttpResponse()
        response.status_code = 400
        return response

    # Look up or create a bookmark, then update it
    bookmark, created = Bookmark.objects.get_or_create(
        user = self.user,
        url = self.bookmark_url,
    )
    for field in ["short_description", "long_description",
                  "public", "timestamp"]:
        new_val = getattr(put_bookmark, field, None)
        if new_val:
            setattr(bookmark, field, new_val)
    bookmark.save()

    # Return the serialized object, with either a 200 ("OK") or a 201
    # ("Created") status code.
    json = serializers.serialize("json", [bookmark])
    response = HttpResponse(json, mimetype="application/json")
    if created:
        response.status_code = 201
        response["Location"] = "/users/%s/%s" % \
                                    (self.user.username, bookmark.url)
    return response
After all that, DELETE (Example 12-19) looks very simple.
def do_DELETE(self):
    # Check authorization
    if self.user != self.authenticated_user:
        return self.forbidden()

    # Look up the bookmark...
    bookmark = get_object_or_404(Bookmark,
        user=self.user,
        url=self.bookmark_url
    )

    # ... and delete it.
    bookmark.delete()

    # Return a 200 ("OK")
    response = HttpResponse()
    response.status_code = 200
return responseConclusion
Django isn’t just a framework for handling HTTP requests. Like
Rails, it contains a lot of sub-libraries that handle common problems
in web application and web service design. You’ve seen the
object-relational mapper that works like Rails’s ActiveRecord, the
built-in User model, and the serialization of
model objects into JSON representations. Django has many other
libraries, including a comment model and a tool for generating
syndication feeds. Though it’s mostly used for web applications,
Django makes an excellent base for Python implementations of RESTful
web services.
[32] Here Restlet follows Benjamin
Carlyle’s sound advice. Carlyle points out a flaw in the
standard Java API: that “the
HttpURLConnection class itself looks nothing
like a servlet.”
Get RESTful Web Services now with the O’Reilly learning platform.
O’Reilly members experience books, live events, courses curated by job role, and more from O’Reilly and nearly 200 top publishers.

