If you want to report and analyze your financial performance to see where your business comes from and which type is most profitable, categorizing your QuickBooks customers and jobs is the way to go. For example, customer and job types can help you produce a report of kitchen remodel jobs that youâre working on for residential customers. With that report, you can order catered dinners to treat those clients to customer service theyâll brag about to their friends. If you run a construction company, knowing that your commercial customers cause fewer headaches and that doing work for them is more profitable than residential jobs is a strong motivator to focus your future marketing efforts on commercial work. The box on Categorizing with Classes explains how you can analyze your business in even more detail.
If you take the time to plan your customers and jobs in QuickBooks in advance, youâll save yourself hours of effort later, when you need information about your business. You can add customer and job types (as well as customers and jobs) anytime. If you donât have time to add types now, come back to this section when youâre ready to learn how.
Business owners often like to look at the performance of different segments of their business. Say your building-supply company has expanded over the years to include sales to homeowners, and you want to know how much you sell to homeowners versus professional contractors. In that case, you can use customer types to designate each customer as a homeowner or contractor to make this comparison, and then total sales by Customer Type, as shown in Figure 4-10. As youâll learn on Specifying additional customer information, categorizing a customer is as easy as choosing a customer type from the aptly named Customer Types list.
Customer types are yours to mold into whatever categories help you analyze your business. A healthcare provider might classify customers by their insurance, because reimbursement levels depend on whether a patient has Medicare, major medical insurance, or pays privately. A clothing maker might classify customers as custom, retail, or wholesale, because the markup percentages are different for each. And a training company could categorize customers by how they learned about the companyâs services.
Note
As youâll see throughout this book, QuickBooksâ lists make it easy to fill in information in most QuickBooks dialog boxes by choosing from a list instead of typing.
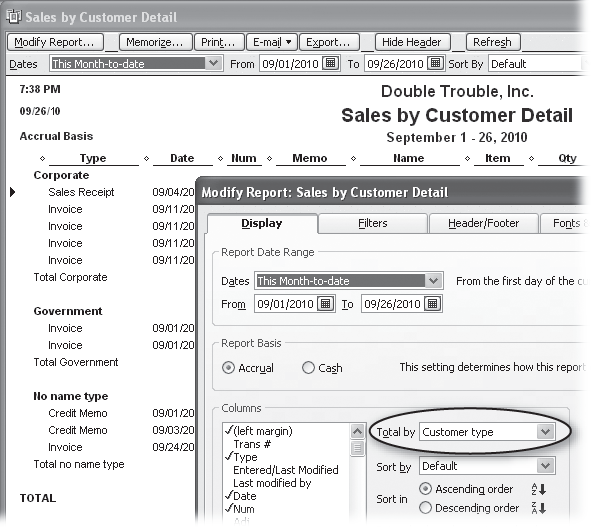
Figure 4-10. The âSales by Customer Detailâ report initially totals income by customer. To subtotal income by customer type (corporate vs. government customers, in this example), click Modify Report. On the Display tab of the dialog box that appears, choose âCustomer typeâ in the âTotal byâ drop-down list (circled), and then click OK.
When you create your company file using an industry-specific edition of QuickBooks or the EasyStep Interview (About the EasyStep Interview), QuickBooks fills in the Customer Type List with a few types of customers that are typical for your industry. If your business sense is eccentric, you can delete QuickBooksâ suggestions and replace them with your own entries. If youâre a landscaper, you might include customer types such as Lethal, Means Well, and Green Thumb, so you can decide whether Astroturf, cacti, or orchids are most appropriate.
Tip
A common mistake is creating customer types that donât relate to customer characteristics. For example, if you provide consulting services in several areasâlike financial forecasting, investment advice, and reading fortunesâyour customers might hire you to perform any or all of those services. So if you classify your customers by the services you offer, youâll wonder which customer type to choose when someone hires you for two different services. Instead, go with types that are more useful, like Homeowner, Contractor, General Contractor, and Commercial Construction.
Here are some suggestions for using customer types and other QuickBooks features to analyze your business in different ways:
Customer business type. Use customer types to classify your customers by their business sector, such as corporate, government, and small business.
Nonprofit âcustomers.â For nonprofit organizations, customer types such as Member, Individual, Corporation, Foundation, and Government Agency can help you target fundraising efforts.
Location or region. Customer types or classes can help track business performance if your company spans multiple regions, offices, or business units.
Services. To track how much business you do for each service you offer, set up separate income accounts in your Chart of Accounts, as outlined on Creating an Account.
Products. To track product sales, create one or more income accounts in your Chart of Accounts.
Marketing. To identify the income you earned based on how customers learned about your services, create classes such as Referral, Web, Newspaper, and Blimp, or enter text in a custom field (Entering payment information). That way, you can create a report that shows the revenue youâve earned from different marketing effortsâand figure out whether each one is worth the money.
Customer support. You may find it handy to use classes to categorize customers by their headache factor, such as High Maintenance, Average, and Easy To Please (as long as youâre careful to keep the class designation off of the invoices you send out).
You can create customer types when you set up your QuickBooks company file or at any time after setup. Hereâs how:
Choose ListsâCustomer & Vendor Profile ListsâCustomer Type List.
The Customer Type List window opens, displaying the existing customer types.
To add a new type, press Ctrl+N or, at the bottom of the Customer Type List window, click Customer Type, and then choose New.
The New Customer Type dialog box, shown in Figure 4-11, opens.
Type a name for the new type in the Customer Type box and then click OK.
If you want, you can set up a customer type as a subtype of another type. Figure 4-11 explains how.
To create another customer type, click Next.
Lather, rinse, and repeat. When youâre done, click OK.
When you close the New Customer Type dialog box, the new types appear in the Customer Types list.
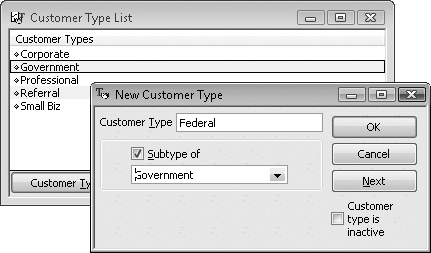
Figure 4-11. To define a customer type as a subtype of another, turn on the âSubtype ofâ checkbox as shown here. Then, in the drop-down list, choose the top-level customer type. For example, if you sell to different levels of government, the top-level customer type could be Government and contain subtypes Federal, State, County, and Local.
Jobs are optional in QuickBooks, so job types matter only if you track your work by job. So if your sole source of income is selling organic chicken fat ripple ice cream to health-obsessed carnivores, jobs and job types donât matterâyour relationship with your customers is one long run of selling and delivering products. But for project-based businesses, job types add another level of filtering to the reports you produce. If youâre a writer, then you can use job types to track the kinds of documents you produce (Manual, White Paper, and Marketing Propaganda, for instance) and filter the Job Profitability Report by job type to see which forms of writing are the most lucrative.
Creating a job type is similar to creating a customer type (described in the previous section): Choose ListsâCustomer & Vendor Profile ListsâJob Type List. When the Job Type List window opens, press Ctrl+N to open the New Job Type window, and then enter a name for the job type. If you want to create a subtype, turn on the âSubtype ofâ checkbox and choose the job type this subtype belongs to.
Get QuickBooks 2011: The Missing Manual now with the O’Reilly learning platform.
O’Reilly members experience books, live events, courses curated by job role, and more from O’Reilly and nearly 200 top publishers.

