Chapter 1. Creating a Company File
A company file is where you store your company’s records in QuickBooks, and it’s the first thing you need to work on in the program. You can create a company file from scratch or convert records previously kept in a small business accounting program or Quicken. The easiest approach is to use a file that someone else created. If you’ve worked with an accountant to set up your company, she might provide you with a QuickBooks company file configured precisely for your business so you can hit the ground running.
If you have to create your own company file, this chapter tells you how to use the QuickBooks EasyStep Interview to get started, and points you to the other chapters that explain how to finish the job. If you already have a company file, you’ll learn how to open it, update it to a new version of QuickBooks, and modify basic company information.
Opening QuickBooks
Here are the easiest ways to open QuickBooks:
Desktop icon. If you told QuickBooks to create a desktop shortcut during installation (Running QuickBooks for the First Time), double-click the shortcut to launch QuickBooks.
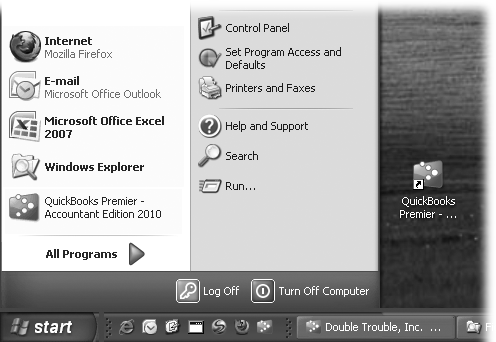
Quick Launch toolbar. The fastest way to open QuickBooks is to click its icon on the toolbar (Figure 1-1).
If you have a QuickBooks desktop shortcut, right-drag (that’s dragging while holding down the right mouse button) the desktop shortcut onto the Quick Launch toolbar and then choose Copy Here to create a second shortcut on the toolbar. (If you’re trying to clean up your desktop, choose Move Here instead.) You can also use the right-drag technique to copy or move a shortcut in Windows Explorer or from the Start menu.
Programs menu. Without a desktop icon, you can launch QuickBooks from the Start menu. Click Start → QuickBooks Pro 2010 (or QuickBooks Premier Edition 2010). If QuickBooks isn’t already listed on the menu, choose All Programs → QuickBooks → QuickBooks Pro 2010 (or QuickBooks Premier Edition 2010).
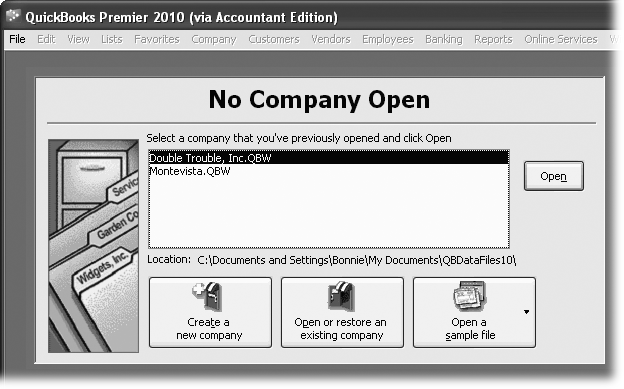
The first time you launch QuickBooks, you’re greeted by the “Welcome to QuickBooks” window. You have to create or open a company file, and then you’re ready to dive into bookkeeping. Later, if you close a company file, the No Company Open window appears (Figure 1-2). The rest of this chapter tells you how to create or open company files, no matter which window is open.
About the EasyStep Interview
Keeping books requires accuracy, attention to detail, and persistence, hence the customary image of spectacled accountants hunched over ledgers. QuickBooks can help you keep your books without ruining your vision or your posture—as long as you start your QuickBooks company file with good information.
The EasyStep Interview tries to make creating a company file as painless as possible, but the process isn’t pain free. The EasyStep Interview is kind of like a family reunion, where you’re asked lots of questions you don’t want to answer. But unlike the reunion, you can skip parts of the Interview, leave it at any time (once QuickBooks creates the company file), or return to it when you’re better prepared for the interrogation.
In QuickBooks 2010, the Interview is relatively short and sweet; it takes about 30 minutes. All it wants to know is some company information, the industry you’re in, and the features you want to use. The Interview sets your preferences and creates a few accounts (like basic income and expense accounts and your checking account), but you have to do the bulk of the setup work later.
Before You Create Your Company File
If you’ve just started a business and want to inaugurate your books with QuickBooks, your prep work will be a snap. On the other hand, if you have existing books for your business, you have a few small tasks to complete before you jump into QuickBooks’ setup. Whether your books are paper ledgers or electronic files in another program, gather your company information before you open QuickBooks. That way, you can hunker down in front of your computer and crank out a company file in record time. Here’s a guide to what you need to create your company file in QuickBooks.
Start Date
To keep your entire financial history at your fingertips, you need every transaction and speck of financial information in your QuickBooks company file. But you have better things to do than enter years’ worth of checks, invoices, and deposits, so the comprehensive approach is practical only if you just recently started your company.
The more realistic approach is to enter your financial state as of a specific date and from then on, add all new transactions in QuickBooks. The date you choose is called the start date, and you shouldn’t choose it randomly. Here are your start date options and the ramifications of each:
The last day of the previous fiscal year. If you’re setting up QuickBooks during the first half of the year, bite the bullet and fill in your records for the entire year. Choose the last day of your company’s previous fiscal year as the QuickBooks start date. That way, the account balances on your start date are like the ending balances on a bank statement, and you’re ready to start bookkeeping fresh on the first day of the fiscal year.
Yes, you have to enter checks, credit card charges, invoices, and other transactions that happened since the beginning of the year, but that won’t take as much time as you think. You’ll regain those hours when tax time rolls around, as you nimbly generate the reports you need to complete your tax returns. During the second half of the year, the best approach is to be patient and postpone your QuickBooks setup until the next fiscal year. Intuit releases new versions of QuickBooks in October or November for just that reason.
The first day of a fiscal period. The next best start date is the first day of a fiscal quarter (or fiscal month at the very least).
Waiting until next year isn’t always an option, particularly if your old accounting system vendor wants a truckload of cash for an upgrade. Starting in the middle of a fiscal year makes the entire year’s accounting more difficult. Even if you fill in year-to-date values for all your accounts, since your company file doesn’t contain a full year’s worth of detail, you’ll have to switch between QuickBooks and your old filing cabinets to prepare your tax returns and look up financial information. Starting at the beginning of a fiscal period mitigates this hassle but doesn’t eliminate it.
Account Balances
Unless you begin using QuickBooks when you start your business, you need to know your account balances as of the start date to get things rolling. For example, if your checking account has $342 at the end of the year, that value goes into QuickBooks during setup. Here are the balances you need to know and where you can find them in your records:
Cash balances. For each bank account you use in your business (checking, savings, money market, petty cash, and so on), find the bank statements with statement dates as close to—but earlier than—the start date for your QuickBooks file.
Gather deposit slips and your checkbook register to identify the transactions that haven’t yet cleared in your bank accounts. You’ll need them to enter transactions, as described in the upcoming chapters. If you have petty cash lying around, count it and use that number to set up your petty cash account.
Customer balances. If customers owe you money, pull the paper copy of every unpaid invoice or statement out of your filing cabinet so you can give QuickBooks what it needs to calculate your Accounts Receivable balance. If you didn’t keep copies, you’ll have to figure out how much you sold in services and products, the discounts you applied, what you charged for shipping and other charges, and the amount of sales tax. As a last resort, you can ask your customers for copies of the invoices they haven’t paid or create invoices in QuickBooks to match the payments you receive.
Vendor balances. If your company thinks handing out cash early is more painful than data entry, find the bills you haven’t paid and get ready to enter them in QuickBooks. If you’d rather reduce the transactions you have to enter, simply pay those outstanding bills and record the payments in QuickBooks.
Asset values. When you own assets such as buildings or equipment, the value of those assets depreciates over time. If you’ve filed a tax return for your company, you can find asset values and accumulated depreciation on your most recent tax return (yet another reason to start using QuickBooks at the beginning of the year). If you haven’t filed a tax return for your company, the asset value is typically the price you paid for the asset, and you won’t have any depreciation until you file that first return.
Liability balances. Unpaid vendor bills that you enter in QuickBooks generate the balance for your Accounts Payable liability account. However, you have to find the current balances you owe on any loans or mortgages.
Inventory. For each product you stock, you need to know how many items you had in stock as of the start date, how much you paid for them, and what you expect to sell them for.
Note
The basic QuickBooks editions like QuickBooks Pro or QuickBooks Premier aren’t very good at working with inventory that you assemble from components or raw materials. See Inventory Part Fields to learn how to track inventory you assemble.
Payroll. Payroll services are a great value for the money, which you’ll grow to appreciate as you collect the information you need for payroll (including salary and wages, tax deductions, benefits, pensions, 401(k) deductions, and other stray payroll deductions you might have). You also need to know who receives withholdings, such as tax agencies or the company handling your 401(k) plan. Oh yeah—and you need payroll details for each employee. Chapter 14 explains the ins and outs of payroll in QuickBooks.
Other Important Information
If you’re starting at the beginning of the fiscal year, you need every transaction that’s happened since the beginning of the year—sales you’ve made, expenses you’ve incurred, payroll and tax transactions, and so on—to reestablish your asset, liability, equity, income, and expense accounts. So dig that information out of your existing accounting system (or shoebox). Federal tax returns and payroll tax returns (federal and state) include all sorts of information that QuickBooks setup wants to know, like your federal tax ID number. And the balance sheet that goes with the return is a great starting point for your account balances.
Starting the EasyStep Interview
You can create a brand-new company file by clicking “Create a new company” from either the Welcome to QuickBooks window or the No Company Open window. What Intuit considers an “easy” interview seems to change with every new version of QuickBooks. Although the EasyStep Interview wizard doesn’t provide hints about which step comes next, the interview covers the basics of creating and customizing a company file to fit your business. After you start the Interview, click Next or Back to move from screen to screen.
The Get Started screen assures you that you’ll be ready to start using QuickBooks in about 30 minutes. Start by choosing one of the following three buttons:
Convert Data. If you have existing records in Quicken or another accounting program, you’re in luck. Converting your books (Converting from Quicken Home & Business) is easier than starting from scratch.
Skip Interview. If you’re something of a QuickBooks expert, this option lets you set up a company file without a safety net. It opens the “Enter your company information” window, followed by a few screens of data entry. If you need help during the process, you can always click the “Get answers” link. (Choose Help → Learning Center Tutorials for some fast training on accounting with QuickBooks.)
Start Interview. If you don’t fit into either of the previous categories, this one’s for you. The following sections take you through the process step by step, from start to finish. If you leave the interview before QuickBooks creates the company file, QuickBooks won’t save any of the information you entered. So make sure you have at least 10 minutes to complete the first set of steps.
Company Information
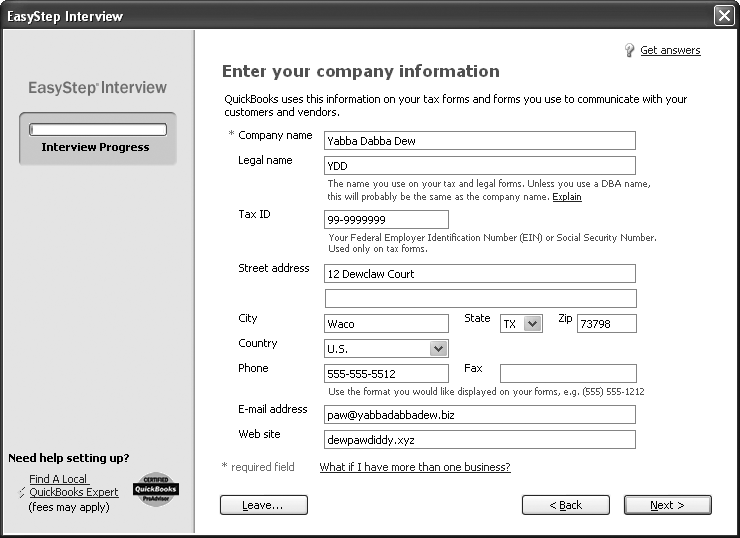
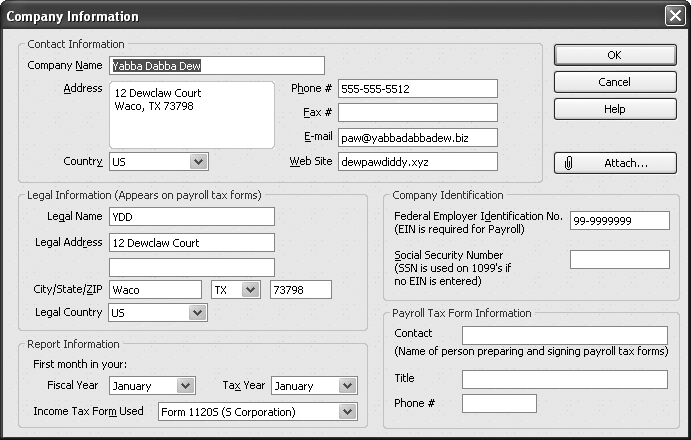
The first setup screen asks you for the basic 411 about your company, such as legal name and tax ID, as you can see in Figure 1-3. If any of the fields are confusing, try clicking “Get answers” in the upper-right corner. Click Next when you’re done.
After you complete the basics, the EasyStep Interview walks you through several screens of questions. Here’s what the EasyStep Interview wants to know before it creates your company file:
Your industry. Choose carefully on the “Select your industry” screen. The list of industries is robust, so chances are good you’ll find one that’s close to what your company does. Based on your choice, QuickBooks adjusts its settings and the chart of accounts it creates to match how your business operates. For example, the program creates income and expense accounts for your type of business or turns on features like sales tax and inventory if your industry typically uses them. If QuickBooks makes assumptions you don’t like, you can change preferences (An Introduction to Preferences) and accounts (Modifying Accounts) later.
If you don’t see an obvious choice in the Industry list, scroll to the bottom and choose either General Product-based Business or General Service-based Business.
Figure 1-3. In the “Company name” field, type the name you want to appear on invoices, reports, and other forms. In the “Legal name” field, type the company name as it should appear on contracts and other legal documents. The company name and the legal name are usually the same unless you use a DBA (doing business as) company name. If you own a corporation, the legal name is what appears on your Certificate of Incorporation. The Tax ID box is for the federal tax ID number you use when you file your taxes—your Social Security Number or Federal Employer Identification Number.The type of company. The tax form you use depends on the type of business entity you choose. The “How is your company organized?” screen lists the most common types from sole proprietorships and partnerships, to corporations and nonprofits. When you select an option for the type of company, QuickBooks assigns the corresponding tax form to your company file. To see the tax form, choose Company → Company Information (to see what it looks like, peek ahead to Figure 1-6). The Income Tax Form Used box at the bottom of the Company Information window shows the tax form for your company type.
The first month of your fiscal year. When you start your company, you choose a fiscal year. QuickBooks automatically sets the “My fiscal year starts in” box to January, because so many small businesses stick with the calendar year for simplicity. If you start your fiscal year in another month, choose it in the dropdown menu.
The Administrator password. The administrator can do absolutely anything in your company file: set up other users, log in as other users, and access any area of the company files. Surprisingly, the administrator password is optional. QuickBooks lets you click Next and skip right over it, but this is no time for shortcuts, as the box on Creating Your Company File explains. Type the password you want to use in both the “Administrator password” and “Retype password” boxes. Keep the login name and password in a safe but memorable place.
Creating Your Company File
After you set the administrator password and click Next, the “Create your company file” screen appears. If you’re new to QuickBooks, click the “Where should I save my company file?” link, which opens a QuickBooks Help window that explains the pros and cons of storing files in different places. QuickBooks veterans can click Next to specify the filename and location.
QuickBooks opens the “Filename for New Company” dialog box, which is really just a Save File dialog box. Navigate to the folder where you want to store your company file (Setting Up QuickBooks on a Network explains why you should). Initially, the program sets the “File name” box to the company name you entered and the “Save as type” box to “QuickBooks Files (*.QBW, *.QBA)”. But you’re free to change the file name. Here are some guidelines:
QuickBooks fills in the “File name” field with the company name that you entered earlier in the Interview. Keep this name or type one that’s shorter or that better identifies the company’s records within.
Consider storing your company file in a folder with the rest of your company data so that it gets backed up along with everything else. For example, you could create a Company Files folder in My Documents—if you’re the only person who uses QuickBooks. See Setting Up QuickBooks on a Network for some background on choosing a location for your company files.
When you click Save in the “Filename for New Company” dialog box, QuickBooks may take a minute or so to create the new file. In the meantime, a message box with a progress bar appears. Go grab a coffee, because when the company file is ready, the EasyStep Interview displays the “Customizing QuickBooks for your business” screen. Click Next to dig in.
Note
At this point, the progress bar in the left margin of the EasyStep Interview window is depressingly short because you still have to do the bulk of company file setup. If you need a break before continuing, click Leave. The EasyStep Interview continues where you left off the next time you open that company file.
Customizing Your Company File
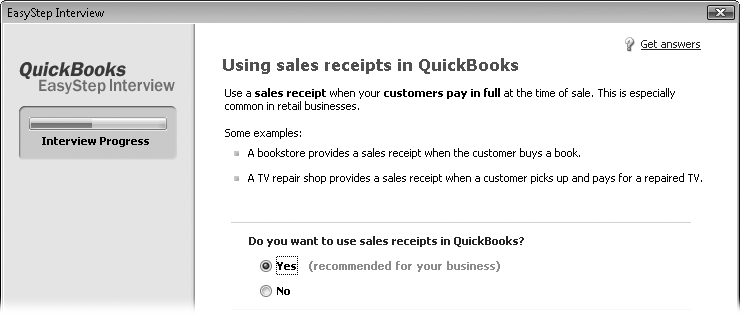
The next several screens in the EasyStep Interview ask questions about your business to help QuickBooks decide which features to turn on, what to include on your QuickBooks Home page, and so on. The wizard displays “(recommended for your business)” next to the options that are typical for a company in your industry, as you can see in Figure 1-4.
Here are some guidelines for answering the questions on the screens that follow:
The What do you sell? screen is where you tell QuickBooks whether you sell services, products, or both. When you choose one of these options, QuickBooks knows which types of income accounts you need. If you select “Products only” or “Both services and products”, the Interview asks about whether you track inventory later.
The Do you sell products online? screen appears if your business sells things. Whether you want to sell online or not, you can bypass Intuit’s marketing pitch for their add-on sales services by selecting the “I don’t sell online and I am not interested in doing so” option.
The Do you charge sales tax? screen has only Yes or No options. If you’re one of the unfortunate souls who has to navigate the rocky shoals of sales tax, select Yes. If you don’t charge sales tax, select No and breathe a sigh of relief. For detailed instructions on dealing with sales tax in QuickBooks, see Setting Up Sales Tax.
On the Do you want to create estimates in QuickBooks? screen, select Yes or No to turn the estimate feature on or off. If you prepare quotes, bids, or estimates for your customers and want to do so in QuickBooks (Creating an Estimate), select Yes.
Note
If you use QuickBooks Premier, the “Tracking customer orders in QuickBooks” screen asks whether you want to use sales orders to track backorders (Using Pending Invoices for Backorders) or other orders that you plan to fill at a later date.
The Using sales receipts in QuickBooks screen is targeted to retailers who provide sales receipts when customers purchase or pick up products and pay in full. Simply select Yes if you want to create sales receipts in QuickBooks (see Creating Sales Receipts).
Using statements in QuickBooks is where you tell the program whether you generate statements to send to your customers (Choosing the date range). For example, your wine-of-the-month club might send monthly statements to your members. Or, a consultant could send invoices for work performed and then send a statement that summarizes the fees, payments, and outstanding balance.
The Using progress invoicing screen asks whether you invoice customers based on the percentage you’ve completed on a job. To learn why (and how) you might use this feature, see Creating Progress Invoices.
Managing bills you owe asks whether you plan to write checks to pay bills immediately (select No) or enter bills in QuickBooks and then pay them later (select Yes). You can read about bill preferences on Bills and payment preferences on Payroll & Employees.
The Do you print checks? screen asks whether or not you print checks. If you want a sales pitch about the benefits of printing checks, select the “I don’t currently print checks, but I would like to” option.
Tracking inventory in QuickBooks is the screen where you tell QuickBooks whether you keep track of the products you have in stock. This screen provides a few examples of when to track or bypass inventory, but Should You Track Inventory with Items? includes more guidelines for whether tracking inventory makes sense for your business.
The Do you accept credit cards? screen lets you tell QuickBooks whether you take credit cards for payment (and whether you want to get a sales pitch about Intuit’s card).
If you bill by the hour, Tracking time in QuickBooks is ideal. Select Yes to track the hours people work and create invoices for their time. Read Chapter 8 to learn how to set time tracking up properly.
Do you have employees? is where you specify whether you want to use QuickBooks’ payroll and 1099 features (select Yes). If you use non-Intuit services to run payroll or generate contractors’ 1099s, select No.
The Tracking multiple currencies in QuickBooks? screen lets you tell QuickBooks whether you buy or sell in more than one country (and currency). You can’t turn off multiple currencies once you’ve turned them on, so select No unless you’re sure you need multiple currencies. You can turn this preference on later (Multiple Currencies).
When you click Next on the “Tracking multiple currencies in QuickBooks?” screen, you see the “Using accounts in QuickBooks” screen and the progress bar indicating that you’re about three-quarters of the way through the Interview. With a few more steps, you’ll have your start date and most of the accounts you want to use. Here are the last things you set up during the Interview:
The Select a date to start tracking your finances screen gives you a summary of what you learned about start dates on Before You Create Your Company File. To start at the beginning of this fiscal year (which QuickBooks can figure out using the current calendar year and the starting month you selected), select the “Beginning of this fiscal year: 01/01/10” option. (The year that you see depends on the current calendar year.) If you’ve already decided which start date to use, select the “Use today’s date or the first day of the quarter or month” option, and then type or choose that date in the box.
The Add your bank account screen asks if you’d like to add an existing bank account. Select Yes if you’d like QuickBooks to walk you through setting up the bank account. If you’re comfortable setting up the account on your own (Creating Accounts and Subaccounts), select “No, I’ll add a bank account later.”
If you select Yes, the next screen asks for the bank account name, bank account number, bank routing number, and when you opened the account. Click Next again. If the opening date for the bank account is before the start date for your company file, another screen asks for the statement ending date and ending balance prior to your company file’s start date. If you opened the bank account after your company file starting date, QuickBooks creates the account with a zero opening balance. After you create that account, you can add additional bank accounts, or select No to add the rest after you finish the Interview.
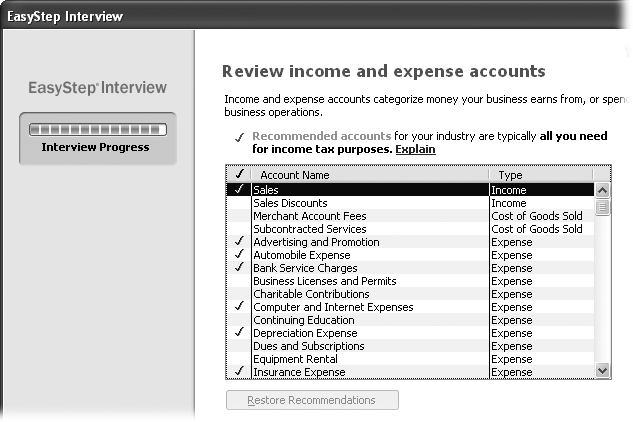
The Review income and expense accounts screen lists the accounts typically used by companies in your industry, as shown in Figure 1-5.
When you click Next, you’ll see a bright orange, but premature, “Congratulations!” You still have a few more steps before you can open your company file, as the next section explains.
Beginning to Use QuickBooks
When your company file first opens, you’ll see the QuickBooks Home page (Getting Around the QuickBooks Home Page) with the QuickBooks Coach pane front and center. If you click Start Working, you can get down to bookkeeping and dock the QuickBooks Coach pane at the upper right of the QuickBooks main window. You may also see the QuickBooks Learning Center window with links to tutorials and Help topics about new features (Other Kinds of Help). At this point, you have four choices:
Watch a tutorial. Click “View the Tutorial” to have the coach walk you through QuickBooks.
Setup and Training. Click this button if you want to pay Intuit to help you get set up. A browser window opens to the Intuit QuickBooks Set-up & Training Services web page (http://quickbooks.intuit.com/product/training/setup-training-services.jsp). A quick ramp-up costs $99, while setup and training goes for $249.
Note
To ask a question in the QuickBooks Live Community, choose Help → Live Community. The “Have a Question?” window opens with a box where you type your question. Live Community explains how to use this feature.
Get coaching as you work. When you create a new company, QuickBooks automatically turns on the coach. With the coach running, you see coach icons (blue circles with an “i” inside); click them to find out about any part of the QuickBooks workflow. See The QuickBooks Coach for the full scoop on the QuickBooks Coach.
Use QuickBooks without any assistance. To start working with QuickBooks without a coach or tutorial, click the icon for the bookkeeping task you want to perform. Initially, QuickBooks displays coach icons in the Home page. To hide the Coach Tips, in the QuickBooks Coach pane, click the Hide Coach Tips button (it’s below the “View the Tutorial” and “Setup and Training” buttons).
Tip
See Choosing a Color Scheme to learn how to turn the coach off completely.
Modifying Company Information
In the EasyStep Interview, QuickBooks gets the basic information about your company in small chunks spread over several screens. But after your company file exists, you can edit any of this information in one dialog box, shown in Figure 1-6. Remember, the legal name and address are the ones you use on your federal and state tax forms. To open this dialog box, choose Company → Company Information.
What’s Next?
The EasyStep Interview doesn’t tell you what to do next. The Interview completes quite a bit of setup for you, but you may need guidance for the rest. Look no further than the book in your hands. Here are the ways you can flesh out your company file:
Set up your users and passwords. See Assigning the Administrator User Name and Password on Setting Up the Administrator.
Review and/or change the preferences that QuickBooks set. See An Introduction to Preferences on An Introduction to Preferences.
Set up or edit the accounts in your Chart of Accounts. If you didn’t set up all your accounts in the EasyStep Interview, you can create them now. See Creating Accounts and Subaccounts on Creating Accounts and Subaccounts.
Create a journal entry to specify account opening balances. See Creating General Journal Entries on Creating General Journal Entries.
Create items for the products and services you sell. See What Items Do on What Items Do.
Set up sales tax codes. See Setting Up Sales Tax on Setting Up Sales Tax.
Set up your 1099 tracking. See Tax: 1099 on Time & Expenses.
Sign up for Intuit Payroll Service if you want help with payroll. See Choosing a Payroll Service on Choosing a Payroll Service.
Enter your historical transactions. For invoices, see Creating an Invoice on Creating an Invoice; for bills, see Entering Bills on Entering Bills; for payroll, see Chapter 14.
Create a backup copy. See Backing Up Files on Backing Up Files.
Customize your forms. See Customizing Forms on Customizing Forms.
Opening an Existing Company File
After you’ve opened a company file in one session, QuickBooks kicks off your next session by opening the same company file. If you keep the books for only one company, you might never have to manually open a QuickBooks company file again.
For irrepressible entrepreneurs or bookkeepers who work on several companies’ books, you don’t have to close one company file before you open another. You can open another company file in QuickBooks any time you want. The following sections describe the different ways to do so.
Opening a Recently Opened Company File
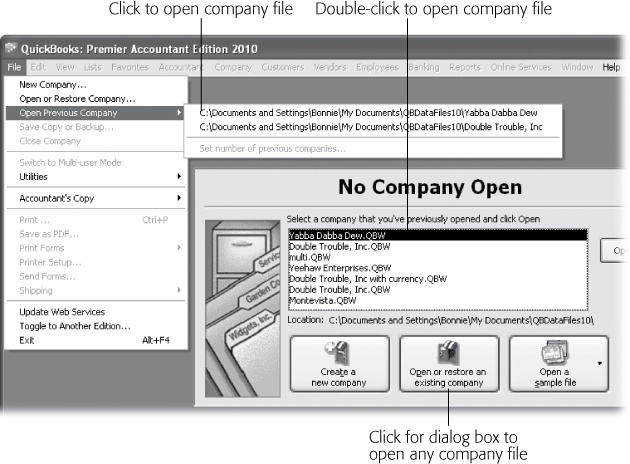
If you work on more than one file, you may frequently switch between them. The easiest way to open a recent file is to choose File → Open Previous Company, and then choose the file you want to open on the submenu, as shown in Figure 1-7. If the Open Previous Company menu doesn’t list the company file you want to open, follow the steps in the next section instead.
Opening Any Company File
Sometimes, a company file you want to open falls off the recent file list. Say your bookkeeping business is booming and you work on dozens of company files every month. (You can tell QuickBooks how many companies to list on the Open Previous Company submenu, as the box on the next page explains.) Or maybe you want to upgrade a file from a previous version (see the box on Opening a Portable Company File). Here are the steps to open any company file, no matter how long it’s been:
Choose File → “Open or Restore Company”.
If you’re in the No Company Open window, you can click “Open or restore an existing company”.
In the “Open or Restore Company” dialog box, select the “Open a company file” option and click Next.
The “Open a Company” dialog box opens.
Navigate to the folder with the company file you want and double-click the filename.
You can also click the filename and then click Open.
If the QuickBooks Login window appears (which it will if you’ve assigned a password to the Admin account or set up multiple users), type your user name and password, and then click OK.
The company file opens and you’re ready to keep the books.
Restoring a Backup File
Backup files are the answer to the adrenaline rush you get when you do something dumb with your company file, your hard drive crashes, or a plume of smoke wafts up from your computer. To restore a backup file, choose File → “Open or Restore Company”. In the “Open or Restore Company” dialog box, select the “Restore a backup copy” option and click Next. To learn how to create backup files in the first place, as well as the details on restoring them, see Restoring Backups.
Opening a Portable Company File
Portable files are a special file format that makes QuickBooks company files more compact, so you can email them more easily. Opening a portable file is similar to opening a regular file. Here are the steps:
Choose File → “Open or Restore Company”.
The “Open or Restore Company” dialog box opens.
Select the “Restore a portable file” option and click Next.
The Open Portable Company File dialog box appears.
Navigate to the folder with the portable file and double-click the filename.
QuickBooks automatically changes the “Files of type” box to QuickBooks Portable Company Files (*.QBM).
Converting from Another Program to QuickBooks
If you launched your small business from your basement and kept your records with Quicken Home & Business Edition, your accountant has probably recommended that you make the leap to using QuickBooks. On the other hand, you may have used another accounting program like Peachtree or Microsoft Small Business Accounting and have decided to move to QuickBooks. Regardless of which other program you used, the command to convert your records to QuickBooks is the same. Choose File → Utilities → Convert. Then, choose From Quicken, From Peachtree, or From Microsoft Small Business Accounting or Microsoft Office Accounting.
Converting from Quicken Home & Business
Quicken doesn’t report your business performance in the way that most accountants want to see, nor does it store your business transactions the way QuickBooks does. If you want the conversion to proceed as smoothly as possible, do some cleanup in your Quicken file first.
For example, you have to record overdue scheduled transactions and send online payments before you convert your Quicken file. Delete accounts you don’t want in QuickBooks, because once they’re in QuickBooks you can’t delete accounts that have any transactions. Make sure that customer names are consistent and unique. QuickBooks doesn’t support repeating online payments, so you also have to send an instruction in Quicken to delete any repeating online payments you’ve set up. In addition, you need complete reports of your past payroll because Quicken payroll transactions don’t convert to QuickBooks.
Intuit publishes a detailed guide to help you prepare for a Quicken conversion. The easiest way to find this info is to point your browser to http://www.quickbooks.com/support. On the Intuit QuickBooks Support web page, you’ll see a Search box front and center. If the label doesn’t show the QuickBooks edition you use, click the “Choose a different product” link to choose your edition. In the Search box, type Quicken convert, and then press, Enter. Click the “Convert data to QuickBooks from other programs” link. On the article web page, under the heading “Is your data already in QuickBooks or Quicken format?” click the "Converting or upgrading between different versions of QuickBooks or Quicken” link.
Note
If you run into problems converting from Quicken to QuickBooks, Intuit technical support just intensifies your headache. You’re likely to get bounced back and forth between Quicken and QuickBooks technical support, with neither one being particularly helpful. If you’ve already cleaned up your Quicken file and run into conversion problems in QuickBooks, check the QuickBooks company file for errors by choosing File → Utilities → Verify Data, described on Verifying Your QuickBooks Data. Another potential solution is to remove transactions prior to the current fiscal year and then try to convert the file. If nothing you try works and you’re willing to send your financial data to Intuit, QuickBooks technical support may agree to convert the file for you.
When your Quicken file is ready for conversion to QuickBooks, you have two options in QuickBooks:
Choose File → New Company. In the EasyStep Interview window, click Convert Data and then choose Quicken.
Choose File → Utilities → Convert → From Quicken.
Converting from a Non-Intuit Program
To convert files created in other accounting programs like Peachtree or Microsoft Small Business Accounting, you have to download a conversion tool from the QuickBooks website. Choose File → Utilities → Convert and then choose the product you want to convert from. In the dialog box that opens, click Yes to tell QuickBooks to go online to download the QuickBooks Conversion Tool. The web page that opens tells you a little bit about the tool. Scroll to the bottom of the page, fill in the boxes for your name and email address, and then click Submit.
Get QuickBooks 2010: The Missing Manual now with the O’Reilly learning platform.
O’Reilly members experience books, live events, courses curated by job role, and more from O’Reilly and nearly 200 top publishers.

