Now that the software is installed, let’s look at how to build a Palm PRC program from within VB. Start by launching the VB IDE. Notice that there is now an AppForge project type available from the New Project dialog, as shown in Figure 1-5.
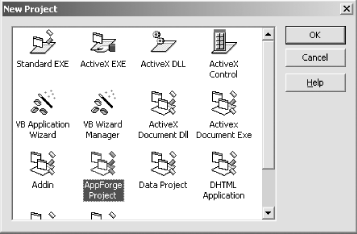
You might have to scroll the dialog a little to see the AppForge project icon, especially if you have a lot of other project types and wizards installed. Once you select AppForge, you will get another dialog asking you to select a runtime target—Palm OS or Pocket PC. Since this is a book about Palm software development, choose Palm OS.
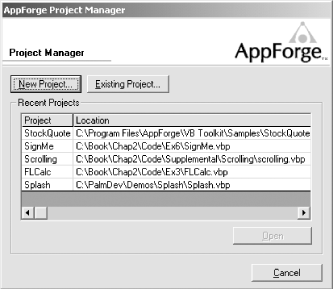
Alternatively, you can use the Start
AppForge menu option that is accessible from the
AppForge program group. This starts the VB IDE and brings up a
history of recent Palm OS projects, as shown in Figure 1-6. Choose the New
Project button, and once again select Palm OS as
the runtime target.
The first thing you will see after creating a new AppForge project is a very small form. Get used to it—that’s all there is on the Palm PDA. We’ll look into the user interface issues imposed by the Palm’s stark 160 x 160 pixel screen in Chapter 2.
We’re going to build the simplest possible
application, so add the following code to the usual
Form1:
Option Explicit

Private Sub Form_Load(  )

    MsgBox "Hello, Hand-held World!"

End Sub
Push F5 to run the program, and note that the form
and message box come up. AppForge projects—ingots, database
libraries, and all—run almost as well on Windows as on the
Palm. With judicious use of conditional compilation, this capability
is a great debugging technique. Many of the AppForge tutorial
projects use this idea, although we don’t stress it
in this book.
Before compiling, we need to configure the
project.
From the AppForge menu, select the
AppForge Settings option. This brings up a dialog
window to target a selected Palm device, configure the PRC file
setting as necessary, and update any dependencies for the project.
See Figure 1-7 for an example.
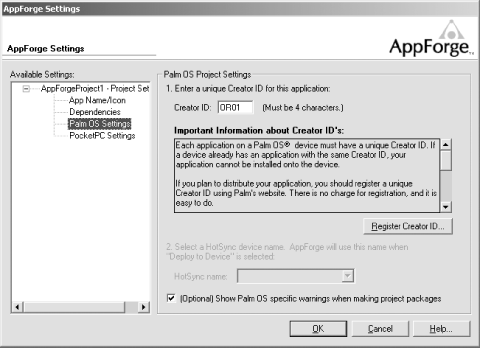
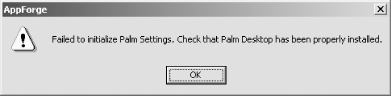
Note that this dialog supports two possible devices: Palm OS and Pocket PC. Select Palm OS. If you do not have the Palm Desktop software installed, you will see an error similar to that shown in Figure 1-8. This simply means that AppForge will not be able to install software directly to the HotSync manager.
The dialog supports two settings for the PRC file: the Creator ID and
a profile for the Palm Desktop.[7] The Creator ID is a four-byte string
that uniquely identifies an application and any associated databases.
Enter a Creator ID of CH01 for this simple
application. If you plan to distribute your applications, you must
reserve a unique Creator ID with Palm. See “The Palm
Creator ID” sidebar, later in this chapter.
The Dependency tab on the Project Setting window is used to identify any dependencies that
the PRC will need during operation, such as:
Associated PDB files
Converted graphics, movies, or fonts
There are no dependencies for this simple application. We will discuss dependencies in greater detail in Chapter 2.
Before compiling with AppForge, be sure
to
save your project. The AppForge compiler is distinct from the VB
compiler, and it only sees files—or file content—that
have been saved to disk. Note that the Palm application name is taken
from the VB project name, which you set from the VB
Project
→
Properties menu option. We use the name Hello for
this example.
Select Compile and Validate from the
AppForge
Add-In menu (which was
previously shown in Figure 1-4). AppForge displays
status information as it validates and compiles your project. All
compilation errors in your project are displayed in a dedicated error
window, which floats at the top of the screen. If an error has a line
number, double-clicking the error message opens the corresponding
code module, and highlights the offending entity. This is a nice
feature when sifting through a lot of open code windows, and much
better than the VB compiler, which stops at the first
error.[8]
The compilation process by itself doesn’t produce a PRC file, unlike the VB Make command that builds an EXE file. Instead, compilation has validated the syntax of your AppForge project files and generated intermediate code, which is saved in the project directory.
The last step when building is to link the intermediate code into the
PRC file. To do this, select either Deploy to Device or Save Project Package from the
AppForge menu. Chose the first option if you have
the Palm Desktop installed and you want the new program installed
with the next HotSync. Choose the second option to save the PRC file
locally. AppForge will combine the intermediate code; when that
successfully completes, AppForge prompts for a directory to store the
new PRC file. If you have a Palm PDA and the Desktop software, you
can now install and run this PRC file as you would any other
application.
Remember, to run an AppForge program, you must have the Booster on
your Palm PDA. You can do this by selecting the Install Booster on Device menu choice. Note that the Booster
requires initialization to function correctly. After it is installed,
the Palm PDA will perform a soft reset, which will allow the Booster
to configure itself.
You can use the Upload Project menu choice to
queue the application file for installation. If all went well and you
chose the Deploy to Device option, you are
prompted to synchronize the device to install the software.
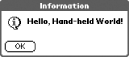
At this point, the program and Booster are installed and ready to run on the Palm PDA. When launched, the application displays the simple message box, as shown in Figure 1-9.
If you don’t have a Palm PDA, then you can run the application in the Palm Operating System Emulator. As implied by its name, the Emulator mimics the hardware and software of the Palm PDA.
If you study the various models of Palm PDA available on the market,
you will notice that most share a common hardware
base—the Motorola
Dragonball chip, a touch screen, some buttons,
infrared, and serial ports. What is different between the models is
the memory architecture—the read-only memory, or ROM, and the
operating system.
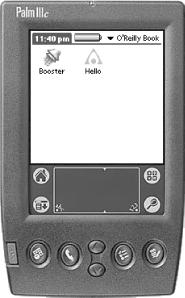
The Emulator can load different ROM images, allowing it to simulate
any device in the Palm PDA family. And it can load different
bitmapped
skins, allowing the software to take on the
appearance of any Palm PDA. See Figure 1-10 for an
example of the Emulator configured as a Palm IIIc.
By using the Emulator, it is possible to develop and test many features of an application without ever uploading the PRC to a physical Palm PDA.
The Emulator software is freely downloadable from the Palm web site, http://www.palmos.com/dev/tools/emulator. There are several WinZip archives that need to be downloaded, one for the Emulator itself and another that contains the skins. Un-zip both the archives into the same directory; and be certain to use the subdirectory paths defined in the files.
Tip
You must use POSE version 3.3 or higher when testing AppForge programs. Earlier versions of POSE have bugs that prevent the AppForge Booster from running properly.
At this point, the Emulator will not run because it is missing the ROM image file. Having the Emulator alone is like having a computer with no operating system. There are two ways to get ROM files:
Download the ROM image from a Palm PDA. You must have an actual device to use this technique
Get the ROM image from Palm. You must join the Palm OS Developer Program and sign a non-disclosure agreement
The first method is a little tricky; it requires the installation of a special ROM transfer application onto the Palm PDA. This is useful if you need to debug something, because by transferring the device ROM into the Emulator, an exact copy of the Palm PDA is made. Refer to the documentation that comes with the ROM transfer application for more details.
After you complete the legal paperwork for the Palm OS Developer program and are accepted into the program, you will be able to download various ROM images from the Resource Pavilion web site.[9]
Running Emulator.exe for the first time will
open the New Session dialog, as shown in Figure 1-11. Select one of the ROM files previously
downloaded from the Palm Alliance Pavilion.
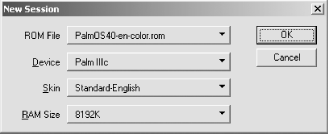
The Emulator determines which device types are compatible with the
chosen ROM. For example, if you select Palm OS
3.5-en-color.rom, the Emulator knows that the device can
only be a Palm IIIc. Likewise, the Emulator knows which skins to use,
based on information in the ROM. The RAM size selection allows you to
control how much memory is in the simulated Palm PDA; any setting is
fine.
Press OK to create a new emulator session. To save
the session, select the Save As choice from the
Emulator context menu.
You interact with the Emulator as if it were an actual Palm PDA—the Windows mouse even functions as a stylus! Substitute the mouse for a finger when pressing the four main buttons or the power switch. To change any settings, right-click anywhere on the Emulator to access a context menu with all settings and options.
There are several ways
to install applications into an
Emulator session. The simplest is to drag-and-drop a PRC file onto
the Emulator. To run the sample application, drag it and the
necessary Booster files into your session. Our simple application
requires the following Booster files:
AFCore.prc,
ByteStreamVM.prc, pCOM.prc,
and BasicIngots.prc.[10]
Tip
After installing the Booster files, you must do a soft reset of the
Emulator before running AppForge applications. This is easily done by
bringing up the context menu and selecting the
Reset option.
One of the features of the Emulator is to report dangerous application behavior. The AppForge Booster requires direct access to certain Palm system functions, such as processor registers and screen memory addresses usually controlled by the operating system. Occasionally you will see an error message from the Emulator when running AppForge applications.
You can disable these messages from the Emulator context menu. Select
Settings
→
Debug Menu and then unselect the checkboxes,
as shown in Figure 1-12.
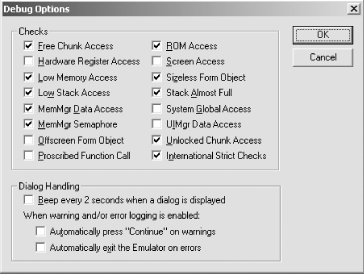
Note that the Debug Options screen changes
between
releases; don’t worry if your screen
doesn’t look exactly like Figure 1-12. We aren’t going to explain
every setting for the Emulator in this book, since it is well
documented by Palm. The Emulator does have some special features that
make it a great complement to testing only on actual hardware.
The ROM images obtained from Palm contain debugging information for the Emulator, allowing it to trap many kinds of programming errors. Other features include Gremlins, a powerful application stress test, and Reporter, an application log tool. We’ll cover how to use the Emulator to test and debug applications in Chapter 10.
At this point, you can run the sample application in this chapter in the Emulator. When running, you should see an “Hello World” screen like that shown earlier in Figure 1-9.
[7] The profile drop-down combo box will be disabled if the Desktop software is not installed.
[8] You can also compile your application for Windows using the traditional File → Make EXE commands. This is useful if you want to build a prototype or debug your logic right in Windows.
[9] You can sign up at http://www.palmos.com/dev/programs/pdp/join.html. Be warned that the acceptance process often takes a day or more.
[10] These files
are located in the directory where you installed AppForge, in the
Platforms\PalmOS\TargetImage
subdirectory.
Get Programming Visual Basic for the Palm OS now with the O’Reilly learning platform.
O’Reilly members experience books, live events, courses curated by job role, and more from O’Reilly and nearly 200 top publishers.

