Chapter 4. Using Convention and Configuration for Relationships
In Chapter 3, you learned about convention and configuration that affect attributes of properties and the effects that these have on the database. In this chapter, the focus will be on convention and configuration that affects the relationships between classes. This includes how classes relate to one another in memory, as well as the corresponding foreign key constraints in the database. You’ll learn about controlling multiplicity, whether or not a relationship is required, and working with cascade deletes. You’ll see the conventional behavior and learn how to control the relationships using Data Annotations and the Fluent API.
You’ll start seeing more configuration that can be performed with the Fluent API but cannot be done through Data Annotations. Recall, however, that if you really love to apply configuration with attributes, the note in Mapping to Non-Unicode Database Types points to a blog post that demonstrates how to create attributes to perform configuration that is only available through the Fluent API.
You’ve already seen some of the relationship conventions in action
throughout the earlier chapters of this book. You built a Destination class (Example 4-1) that has a Lodgings property which is a List<Lodging>.
publicclassDestination{publicintDestinationId {get;set; }publicstringName {get;set; }publicstringCountry {get;set; }publicstringDescription {get;set; }publicbyte[] Photo {get;set; }publicList<Lodging> Lodgings {get;set; } }
On the other end of the relationship, the Lodging class (Example 4-2) has a Destination property that represents a single
Destination instance.
publicclassLodging{publicintLodgingId {get;set; }publicstringName {get;set; }publicstringOwner {get;set; }publicboolIsResort {get;set; }publicdecimalMilesFromNearestAirport {get;set; }publicDestinationDestination {get;set; } }
Code First sees that you have defined both a reference and a
collection navigation property, so by convention it will configure this as a
one-to-many relationship. Based on this, Code First can also determine that
Lodging is the dependent end of the
relationship (the end with the foreign key) and Destination is the principal end (the end with the
primary key). It therefore knows that the table Lodging maps to will need a foreign key pointing
back to the primary key of Destination.
You saw this played out in Chapter 2,
where it created the Destination_DestinationId foreign key field in the
Lodgings table.
In the rest of this chapter, you will get an understanding of the full set of conventions that Code First has around relationships and how to override those conventions when they don’t align with your intent.
Working with Multiplicity
As you’ve seen, Code First will create relationships when it sees navigation properties and, optionally, foreign key properties. Details about those navigation properties and foreign keys will help the conventions determine multiplicity of each end. We’ll focus on foreign keys a little later in this chapter; for now, let’s take a look at relationships where there is no foreign key property defined in your class.
Code First applies a set of rules to work out the multiplicity of each relationship. The rules use the navigation properties you defined in your classes to determine multiplicity. There can either be a pair of navigation properties that point to each other (bidirectional relationship) or a single navigation property (unidirectional relationship):
If your classes contain a reference and a collection navigation property, Code First assumes a one-to-many relationship.
Code First will also assume a one-to-many relationship if your classes include a navigation property on only one side of the relationship (i.e., either the collection or the reference, but not both).
If your classes include two collection properties, Code First will use a many-to-many relationship by default.
If your classes include two reference properties, Code First will assume a one-to-one relationship.
In the case of one-to-one relationships, you will need to provide some additional information so that Code First knows which entity is the principal and which is the dependent. You’ll see this in action a little later on in this chapter, in the Working with One-to-One Relationships section. If no foreign key property is defined in your classes, Code First will assume the relationship is optional (i.e., the one end of the relationship is actually zero-or-one as opposed to exactly-one).
In the Working with Foreign Keys section of this chapter, you will see that when you define a foreign key property in your classes, Code First uses the nullability of that property to determine if the relationship is required or optional.
Looking back at the Lodging to
Destination relationship that we just
revisited, you can see these rules in action. Having a collection and a
reference property meant that Code First assumed it was a one-to-many
relationship. We can also see that, by convention, Code First has
configured it as an optional relationship. But in our scenario it really
doesn’t make sense to have a Lodging
that doesn’t belong to a Destination.
So let’s take a look at how we can make this a required
relationship.
Configuring Multiplicity with Data Annotations
Most of the multiplicity configuration needs to be done using the
Fluent API. But we can use Data Annotations to specify that a
relationship is required. This is as simple as placing the Required annotation on the reference property
that you want to be required. Modify Lodging by adding the Required annotation to the Destination property (Example 4-3).
publicclassLodging{publicintLodgingId {get;set; }publicstringName {get;set; }publicstringOwner {get;set; }publicboolIsResort {get;set; }publicdecimalMilesFromNearestAirport {get;set; } [Required]publicDestinationDestination {get;set; } }
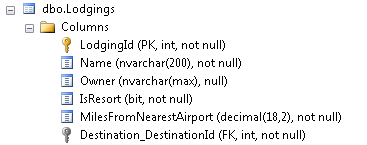
If you were to run the application so that the database gets
recreated with the change you just made, you would see that the Destination_DestinationId column in the
Lodgings table no longer allows null
values (Figure 4-1).
This is because the relationship is now required.
Configuring Multiplicity with the Fluent API
Configuring relationships with the Fluent API can look confusing if you haven’t taken the time to understand the fundamental ideas. We’ll lead you down the path to enlightenment.
When fixing relationships with Data Annotations, you apply annotations directly to the navigation properties. It’s very different with the Fluent API, where you are literally configuring the relationship, not a property. In order to do so, you must first identify the relationship. Sometimes it’s enough to mention one end, but most often you need to describe the complete relationship.
To identify a relationship, you point to its navigation properties. Regardless of which end you begin with, this is the pattern:
Entity.Has[Multiplicity](Property).With[Multiplicity](Property)The multiplicity can be Optional (a property that can have a single
instance or be null), Required (a
property that must have a single instance), or Many (a property with a collection of a single
type).
The Has methods are as follows:
HasOptional
HasRequired
HasMany
In most cases you will follow the Has method with one of the following With methods:
WithOptional
WithRequired
WithMany
Example 4-4 shows
a concrete example using the existing one-to-many relationship between
Destination and Lodging. This configuration doesn’t really do
anything, because it is configuring exactly what Code First detected by
convention. Later in this chapter, you will see that this approach is
used to identify a relationship so that you can perform further
configuration related to foreign keys and cascade delete.
modelBuilder.Entity<Destination>()
  .HasMany(d => d.Lodgings)
  .WithOptional(l => l.Destination);
Example 4-5 shows
what this same configuration would look like inside an EntityTypeConfiguration class rather than directly
inside OnModelCreating.
HasMany(d => d.Lodgings)
  .WithOptional(l => l.Destination);
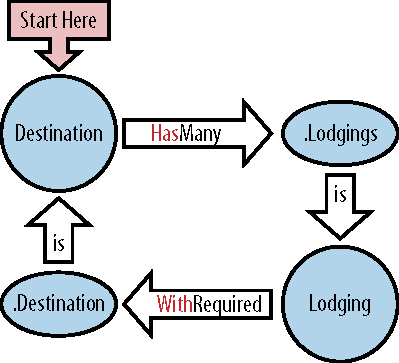
This identifies a relationship that Destination Has. It has a Many relationship that is defined by its
property, Lodgings. And the Lodgings end of the relationship comes along
With a relationship (which is
Optional) to Destination. Figure 4-2 attempts to help
you visualize this relationship the way the model builder sees
it.
We looked at how to change this to be a required relationship with
Data Annotations, so now let’s see how to do the same with the Fluent
API. Add the configuration shown in Example 4-6 to your DestinationConfiguration class.
HasMany(d => d.Lodgings)
  .WithRequired(l => l.Destination);
This looks very similar to the configuration we saw in Example 4-5, except, instead
of calling HasOptional, you are now
calling HasRequired. This lets Code
First know that you want this one-to-many relationship to be
required rather than optional. Run the application
again and you will see that the database looks the same as it did in
Figure 4-1 when you used
Data Annotations to configure the relationship to be required.
Note
If you are configuring a one-to-one relationship where both ends are required or both ends are optional, Code First will need some more information from you to work out which end is the principal and which end is the dependent. This area of the Fluent API can get very confusing! The good news is that you probably won’t need to use it very often. This topic is covered in detail in Working with One-to-One Relationships.
Working with Foreign Keys
So far we’ve just looked at relationships where there isn’t a
foreign key property in your class. For example, Lodging just contains a reference property that
points to Destination, but there is no
property to store the key value of the Destination it points to. In these cases, we
have seen that Code First will introduce a foreign key in the database for
you. But now let’s look at what happens when we include the foreign key
property in the class itself.
In the previous section you added some configuration to make the
Lodging to Destination relationship required. Go ahead and
remove this configuration so that we can observe the Code First
conventions in action. With the configuration removed, add a DestinationId property into the Lodging class:
publicintDestinationId {get;set; }
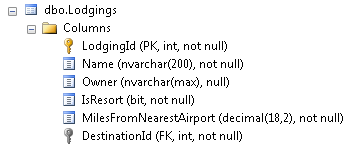
Once you have added the foreign key property to the Lodging class, go ahead and run your
application. The database will get recreated in response to the change you
just made. If you inspect the columns of the Lodgings table, you will notice that Code First
has automatically detected that DestinationId is a foreign key for the Lodging to Destination relationship and is no longer
generating the Destination_DestinationId foreign key (Figure 4-3).
As you might expect by now, Code First has a set or rules it applies
to try and locate a foreign key property when it discovers a relationship.
The rules are based on the name of the property. The foreign key property
will be discovered by convention if it is named [Target Type
Key Name], [Target Type Name] + [Target Type
Key Name], or [Navigation Property Name] +
[Target Type Key Name]. The DestinationId property you added matched the
first of these three rules. Name matching is case-insensitive, so you
could have named the property DestinationID,
DeStInAtIoNiD, or any other variation of casing. If no
foreign key is detected, and none is configured, Code First falls back to
automatically introducing one in the database.
There’s something else interesting that happens when you add the
foreign key property. Without the DestinationId foreign key property, Code First
convention allowed Lodging.Destination
to be optional, meaning you could add a Lodging without a Destination. If you check back to Figure 2-1 in Chapter 2, you’ll see that the Destination_DestinationId field in the Lodgings table is nullable. Now with the
addition of the DestinationId property,
the database field is no longer nullable and you’ll find that you can no
longer save a Lodging that has neither
the Destination nor DestinationId property populated. This is
because DestinationId is of type
int, which is a value type and cannot
be assigned null. If DestinationId was
of type Nullable<int>, the
relationship would remain optional. By convention, Code First is using the
nullability of the foreign key property in your class to determine if the
relationship is required or optional.
Specifying Unconventionally Named Foreign Keys
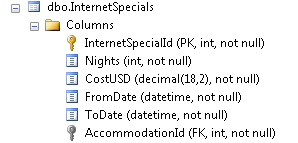
What happens when you have a foreign key, but it doesn’t follow Code First convention?
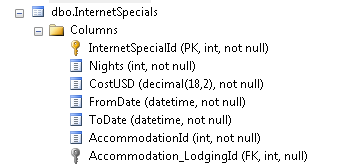
Let’s introduce a new InternetSpecial class that allows us to keep
track of special pricing for the various lodgings (Example 4-7). This class has both a
navigation property (Accommodation)
and a foreign key property (AccommodationId) for the same
relationship.
usingSystem;namespaceModel {publicclassInternetSpecial{publicintInternetSpecialId {get;set; }publicintNights {get;set; }publicdecimalCostUSD {get;set; }publicDateTimeFromDate {get;set; }publicDateTimeToDate {get;set; }publicintAccommodationId {get;set; }publicLodgingAccommodation {get;set; } } }
Lodging will need a new
property to contain each lodging’s special prices:
publicList<InternetSpecial>InternetSpecials{get;set; }
Code First can see that Lodging
has many InternetSpecials and that
InternetSpecials has a Lodging (called Accommodation). Even though there’s no
DbSet<InternetSpecial>,
InternetSpecial is reachable from
Lodging and will therefore be
included in the model.
Note
You’ll learn more about how the model builder finds or ignores entities in Chapter 5.
When you run your application again, it will create the table
shown in Figure 4-4.
Not only is there an AccommodationId
column, which is not a foreign key, but there is also another column
there which is a foreign key, Accommodation_LodgingId.
You’ve seen Code First introduce a foreign key in the database
before. As early as Chapter 2,
you witnessed the Destination_DestinationId field added to the
Lodgings table because Code First
detected a need for a foreign key. It’s done the same here. Thanks to
the Accommodation navigation
property, Code First detected a relationship to Lodging and created the Accommodation_LodgingId field using its
conventional pattern. Code First convention was not able to infer that
AccommodationId is meant to be the
foreign key. It simply found no properties that matched any of the three
patterns that Code First convention uses to detect foreign key
properties, and therefore created its own foreign key.
Fixing foreign key with Data Annotations
You can configure foreign key properties using the ForeignKey annotation to clarify your
intention to Code First. Adding ForeignKey to the AccommodationId, along with information
telling it which navigation property represents the relationship it is
a foreign key for, will fix the problem:
[ForeignKey("Accommodation")]publicintAccommodationId{get;set; }publicLodgingAccommodation{get;set; }
Alternatively, you can apply the ForeignKey annotation to the navigation
property and tell it which property is the foreign key for the
relationship:
publicintAccommodationId{get;set; } [ForeignKey("AccommodationId")]publicLodgingAccommodation{get;set; }
Which one you use is a matter of personal preference. Either
way, you’ll end up with the correct foreign key in the database:
AccommodationId, as is shown in
Figure 4-5.
Fixing foreign key with the Fluent API
The Fluent API doesn’t provide a simple way to configure the property as a foreign key. You’ll use the relationship API to configure the correct foreign key. And you can’t simply configure that piece of the relationship; you’ll need to first specify which relationship you want to configure (as you learned how to do earlier in this chapter) and then apply the fix.
To specify the relationship, begin with the InternetSpecial entity. We’ll do that
directly from the modelBuilder,
although you can certainly create an EntityTypeConfiguration class for InternetSpecial.
In this case, we’ll be identifying the relationship but not changing the multiplicity that Code First selected by convention. Example 4-8 specifies the existing relationship.
modelBuilder.Entity<InternetSpecial>()
  .HasRequired(s => s.Accommodation)
  .WithMany(l => l.InternetSpecials)
What we want to change, however, is something about the foreign
key that is also involved with this relationship. Code First expects
the foreign key property to be named LodgingId or one of the other conventional
names. So we need to tell it which property truly is the foreign
key—AccommodationId. Example 4-9 shows adding the
HasForeignKey method to the
relationship you specified in Example 4-8.
modelBuilder.Entity<InternetSpecial>()
  .HasRequired(s => s.Accommodation)
  .WithMany(l => l.InternetSpecials)
  .HasForeignKey(s => s.AccommodationId);
This, too, will result in the database schema shown in Figure 4-5.
Working with Inverse Navigation Properties
So far Code First has always been able to work out that the two
navigation properties we have defined on each end of a relationship are in
fact different ends of the same relationship. It has been able to do this
because there has only ever been one possible match. For example, Lodging only contains a single property that
refers to Destination (Lodging.Destination); likewise, Destination only contains a single property that
references Lodging (Destination.Lodgings).
While it isn’t terribly common, you may run into a scenario where there are multiple relationships between entities. In these cases, Code First won’t be able to work out which navigation properties match up. You will need to provide some additional configuration.
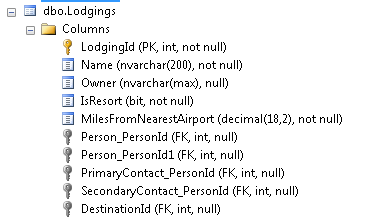
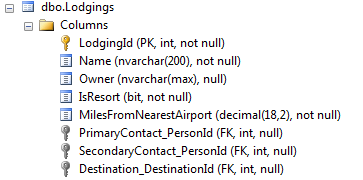
For example, what if you kept track of two contacts for each
lodging? That would require a PrimaryContact and SecondaryContact property in the Lodging class. Go ahead and add these properties
to the Lodging class:
publicPersonPrimaryContact {get;set; }publicPersonSecondaryContact {get;set; }
Let’s also introduce the navigation properties on the other end of
the relationship. This will allow you to navigate from a Person to the Lodging instances that they are primary and
secondary contact for. Add the following two properties to the Person class:
publicList<Lodging> PrimaryContactFor {get;set; }publicList<Lodging> SecondaryContactFor {get;set; }
Code First conventions will make the wrong assumptions about these new relationships you have just added. Because there are two sets of navigation properties, Code First is unable to work out how they match up. When Code First can’t be sure which navigation properties are the inverse of each other, it will create a separate relationship for each property. Figure 4-6 shows that Code First is creating four relationships based on the four navigation properties you just added.
Code First convention can identify bidirectional relationships, but
not when there are multiple bidirectional relationships between two
entities. The reason that there are extra foreign keys in Figure 4-6 is that Code First
was unable to determine which of the two properties in Lodging that return a Person link up to the List<Lodging> properties in the Person class.
You can add configuration (using Data Annotations or the Fluent API)
to present this information to the model builder. With Data Annotations,
you’ll use an annotation called InverseProperty. With the Fluent API, you’ll use
a combination of the Has/With
methods to specify the correct ends of these relationships.
You can place the annotations on either end of the relationship (or
both ends if you want). We’ll stick them on the navigation properties in
the Lodging class (Example 4-10). The InverseProperty Data Annotation needs the name
of the corresponding navigation property in the related class as its
parameter.
[InverseProperty("PrimaryContactFor")]publicPersonPrimaryContact {get;set; } [InverseProperty("SecondaryContactFor")]publicPersonSecondaryContact {get;set; }
With the Fluent API, you need to use the
Has/With pattern that you learned
about earlier to identify the ends of each relationship. The first
configuration in Example 4-11 describes the
relationship with Lodging.PrimaryContact on one end and Person.PrimaryContactFor on the other. The
second configuration is for the relationship between SecondaryContact and SecondaryContactFor.
Working with Cascade Delete
Cascade delete allows dependent data to be automatically deleted
when the principal record is deleted. If you delete a Destination, for example, the related Lodgings will also be deleted automatically.
Entity Framework supports cascade delete behavior for in-memory data as
well as in the database. As discussed in Chapter 19 of the second edition
of Programming
Entity Framework, it is recommended that you implement
cascade delete on entities in the model if their mapped database objects
also have cascade delete defined.
By convention, Code First switches on cascade delete for required
relationships. When a cascade delete is defined, Code First will also
configure a cascade delete in the database that it creates. Earlier in
this chapter we looked at making the Lodging to Destination relationship required. In other
words, a Lodging cannot exist without a
Destination. Therefore, if a Destination is deleted, any related Lodgings (that are in memory and being
change-tracked by the context) will also be deleted. When SaveChanges is called, the database will delete
any related rows that remain in the Lodgings table, using its cascade delete
behavior.
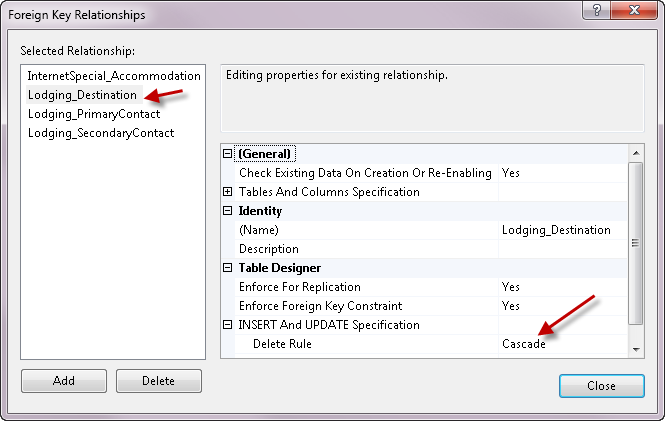
Looking at the database, you can see that Code First carried through
the cascade delete and set up a constraint on the relationship in the
database. Notice the Delete Rule in
Figure 4-7 is set to
Cascade.
Example 4-12 shows a new
method called DeleteDestinationInMemoryAndDbCascade, which
we’ll use to demonstrate the in-memory and database cascade delete.
The code uses a context to insert a new
Destination with a couple of
Lodgings. It then saves these
Lodgings to the database and records the primary of the
new Destination. In a separate context, the code then
retrieves the Destination and its
related Lodgings, and then uses the
Remove method to mark the Destination instance as Deleted. We use Console.WriteLine to inspect the state of one of
the related Lodging instances that are in memory. We’ll do this using the
Entry method of DbContext. The Entry method
gives us access to the information that EF has about the state of a given
object. Next, the call to SaveChanges
persists the deletions to the database.
private static voidDeleteDestinationInMemoryAndDbCascade() {intdestinationId;using(varcontext =newBreakAwayContext()) {vardestination =newDestination{ Name ="Sample Destination", Lodgings =newList<Lodging> {newLodging{ Name ="Lodging One"},newLodging{ Name ="Lodging Two"} } }; context.Destinations.Add(destination); context.SaveChanges(); destinationId = destination.DestinationId; }using(varcontext =newBreakAwayContext()) {vardestination = context.Destinations .Include("Lodgings") .Single(d => d.DestinationId == destinationId);varaLodging = destination.Lodgings.FirstOrDefault(); context.Destinations.Remove(destination);Console.WriteLine("State of one Lodging: {0}", context.Entry(aLodging).State.ToString()); context.SaveChanges(); } }
After calling Remove on the Destination, the state of a Lodging is displayed in the console window. It
is Deleted also even though we did not
explicitly remove any of the Lodgings. That’s because
Entity Framework used client-side cascade deleting to delete the dependent
Lodgings when the code explicitly
deleted (Removed) the
destination.
Next, when SaveChanges is called,
Entity Framework sent three DELETE
commands to the database, as shown in Figure 4-8. The first two are to
delete the related Lodging instances
that were in memory and the third to delete the Destination.

Now let’s change the method. We’ll remove the eager loading
(Include) that pulled the Lodging data into memory along with Destination. We’ll also remove all of the
related code that mentions the Lodgings. Since there are no Lodgings in memory, there will be no client-side
cascade delete, but the database should clean up any orphaned Lodgings because of the cascade delete defined
in the database (Figure 4-7). The revised method
is listed in Example 4-13.
private static voidDeleteDestinationInMemoryAndDbCascade() {intdestinationId;using(varcontext =newBreakAwayContext()) {vardestination =newDestination{ Name =, Lodgings ="Sample Destination"newList<Lodging> {newLodging{ Name ="Lodging One"},newLodging{ Name ="Lodging Two"} } }; context.Destinations.Add(destination); context.SaveChanges(); destinationId = destination.DestinationId; }using(varcontext =newBreakAwayContext()) {vardestination = context.Destinations .Single(d => d.DestinationId == destinationId); context.Destinations.Remove(destination); context.SaveChanges(); }using(varcontext =newBreakAwayContext()) {varlodgings = context.Lodgings .Where(l => l.DestinationId == destinationId).ToList();Console.WriteLine("Lodgings: {0}", lodgings.Count); } }
When run, the only command sent to the database is one to delete the
destination. The database cascade delete will delete the related lodgings
in response. When querying for the Lodgings at the end, since the database deleted
the lodgings, the query will return no results and the lodgings variable will be an empty list.
Turning On or Off Client-Side Cascade Delete with Fluent Configurations
You might be working with an existing database that does not use
cascade delete or you may have a policy of being explicit about data
removal and not letting it happen automatically in the database. If the
relationship from Lodging to Destination is optional, this is not a
problem, since by convention, Code First won’t use cascade delete with
an optional relationship. But you may want a required relationship in
your classes without leveraging cascade delete.
You may want to get an error if the user of your application tries
to delete a Destination and hasn’t
explicitly deleted or reassigned the Lodging instances assigned to it.
For the scenarios where you want a required relationship but no cascade delete, you can explicitly override the convention and configure cascade delete behavior with the Fluent API. This is not supported with Data Annotations.
Keep in mind that if you set the model up this way, your application code will be responsible for deleting or reassigning dependent data when necessary.
The Fluent API method to use is called WillCascadeOnDelete and takes a Boolean as a parameter. This configuration is
applied to a relationship, which means that you first need to specify
the relationship using a Has/With
pairing and then call WillCascadeOnDelete.
Working within the LodgingConfiguration class, the relationship
is defined as:
HasRequired(l=>l.Destination)
 .WithMany(d=>d.Lodgings)
From there, you’ll find three possible configurations to add.
WillCascadeOnDelete is one of them,
as you can see in Figure 4-9.

Now you can set WillCascadeOnDelete to false for this relationship:
HasRequired(l=>l.Destination)
  .WithMany(d=>d.Lodgings)
  .WillCascadeOnDelete(false)
Warning
If you add the above code to your project, remove it again before continuing with the rest of this chapter.
This will also mean that the database schema that Code First
generates will not include the cascade delete. The Delete Rule that was
Cascade in Figure 4-7 would become
No Action.
In the scenario where the relationship is required, you’ll need to
be aware of logic that will create a conflict, for example, the current
required relationship between Lodging
and Destination that requires that a
Lodging instance have a Destination or a DestinationId. If you have a Lodging that is being change-tracked and you
delete its related Destination, this
will cause Lodging.Destination to
become null. When SaveChanges is
called, Entity Framework will attempt to synchronize Lodging.DestinationId, setting it to null. But
that’s not possible and an exception will be thrown with the following
detailed message:
The relationship could not be changed because one or more of the foreign-key properties is non-nullable. When a change is made to a relationship, the related foreign-key property is set to a null value. If the foreign-key does not support null values, a new relationship must be defined, the foreign-key property must be assigned another non-null value, or the unrelated object must be deleted.
The overall message here is that you have control over the cascade delete setting, but you will be responsible for avoiding or resolving possible validation conflicts caused by not having a cascade delete present.
Setting Cascade Delete Off in Scenarios That Are Not Supported by the Database
Some databases (including SQL Server) don’t support multiple
relationships that specify cascade delete pointing to the same table.
Because Code First configures required relationships to have cascade
delete, this results in an error if you have two required relationships
to the same entity. You can use WillCascadeOnDelete(false) to turn off the
cascade delete setting on one or more of the relationships. Example 4-14 shows an example
of the exception message from SQL Server if you don’t configure this
correctly.
System.InvalidOperationException was unhandledMessage=The database creation succeeded, but the creation of the database objectsdid not.See InnerException for details.InnerException: System.Data.SqlClient.SqlExceptionMessage=Introducing FOREIGN KEY constraint 'Lodging_SecondaryContact' on table'Lodgings' may cause cycles or multiple cascade paths. Specify ON DELETENO ACTION or ON UPDATE NO ACTION, or modify other FOREIGN KEYconstraints. Could not create constraint. See previous errors.
Exploring Many-to-Many Relationships
Entity Framework supports many-to-many relationships. Let’s see how Code First responds to a many-to-many relationship between two classes when generating a database.
If you’ve had many-to-many relationships when using the database-first strategy, you may be familiar with the fact that Entity Framework can create many-to-many mappings when the database join table contains only the primary keys of the related entities. This mapping rule is the same for Code First.
Let’s add a new Activity class to
the model. Activity, shown in Example 4-15, will be related to the Trip class. A Trip can have a number of Activities scheduled and an Activity can be
scheduled for a variety of trips. Therefore Trip and Activity will have a many-to-many
relationship.
usingSystem.ComponentModel.DataAnnotations;usingSystem.Collections.Generic;namespaceModel {publicclassActivity{publicintActivityId {get;set; } [Required,MaxLength(50)]publicstringName {get;set; }publicList<Trip> Trips {get;set; } } }
There’s a List<Trip> in the
Activity class. Let’s also add a
List<Activity> to the Trip class for the other end of the many-to-many
relationship:
publicList<Activity> Activities {get;set; }
When you run the application again, Code First will recreate the database because of the model changes. Code First convention will recognize the many-to-many relationship and build a join table in the database with the appropriate keys of the tables it’s joining. The keys are both primary keys of the join table and foreign keys pointing to the joined tables, as shown in Figure 4-10.
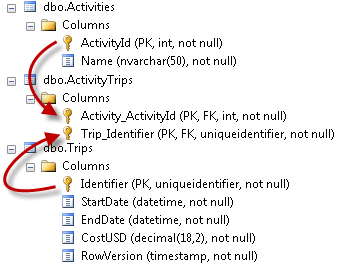
Notice that Code First convention created the table name by combining the names of the classes it’s joining and then pluralizing the result. It also used the same pattern we’ve seen earlier for creating the foreign key names. In Chapter 5, which focuses on table and column mappings, you’ll learn how to specify the table name and column names of the join table with configurations.
Once the many-to-many relationship exists, it behaves in just the same way that many-to-many relationships have worked in Entity Framework since the first version. You can query, add, and remove related objects by using the class properties. In the background, Entity Framework will use its knowledge of how your classes map to the database to create select, insert, update, and delete commands that incorporate the join table.
For example, the following query looks for a single trip and eager
loads the related Activities:
vartripWithActivities = context.Trips .Include("Activities").FirstOrDefault();
The query is written against the classes with no need to be concerned about how the trip and its activities are joined in the database. Entity Framework uses its knowledge of the mappings to work out the SQL that performs the join and returns a graph that includes all of the activities that are bound to the first trip. This may not be exactly how you would construct the SQL, but remember that Entity Framework constructs the store SQL based on a pattern that can be used generically regardless of the structure of your classes or the schema of the database.
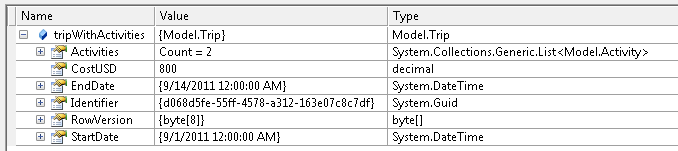
The result is a graph of the trip and its activities. Figure 4-11 shows the
Trip in a debug window. You can see it has two Activities that were pulled back from the
database along with the Trip.
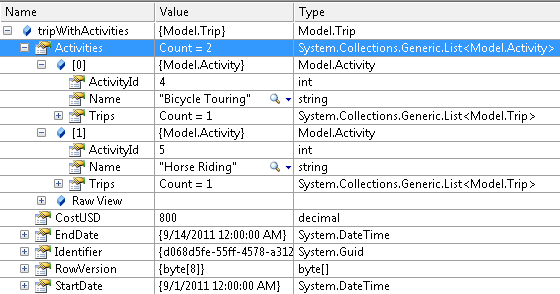
Expanding the Activities in Figure 4-12 shows the details of
the activities returned. Notice that there is a circular reference
pointing back to the Trip that each
Activity is attached to in
memory.
Entity Framework took care of the joins to get across the join table without you having to be aware of its presence. In the same way, any time you do inserts, updates, or deletes within this many-to-many relationship, Entity Framework will work out the proper SQL for the join without you having to worry about it in your code.
Working with Relationships that Have Unidirectional Navigation
So far we have looked at relationships where a navigation property is defined in both classes that are involved in the relationship. However, this isn’t a requirement when working with the Entity Framework.
In your domain, it may be commonplace to navigate from a Destination to its associated Lodging options, but a rarity to navigate from a
Lodging to its Destination. Let’s go ahead and remove the
Destination property from the
Lodging class (Example 4-16).
publicclassLodging{publicintLodgingId {get;set; }publicstringName {get;set; }publicstringOwner {get;set; }publicboolIsResort {get;set; }publicdecimalMilesFromNearestAirport {get;set; }publicintDestinationId {get;set; }//public Destination Destination { get; set; }publicList<InternetSpecial> InternetSpecials {get;set; }publicPersonPrimaryContact {get;set; }publicPersonSecondaryContact {get;set; } }
Entity Framework is perfectly happy with this; it has a very clear
relationship defined from Lodging to
Destination with the Lodgings property in the Destination class. This still causes the model
builder to look for a foreign key in the Lodging class and Lodging.DestinationId satisfies the
convention.
Now let’s go one step further and remove the foreign key property
from the Lodging class, as shown in
Example 4-17.
publicclassLodging{publicintLodgingId {get;set; }publicstringName {get;set; }publicstringOwner {get;set; }publicboolIsResort {get;set; }publicdecimalMilesFromNearestAirport {get;set; }//public int DestinationId { get; set; }//public Destination Destination { get; set; }}
Note
Removing DestinationId will break a previous
sample, the DeleteDestinationInMemoryAndDbCascade
method in Example 4-12. Comment
that method out so that your solution will still compile
properly.
Remember the Code First convention that will introduce a foreign key
if you don’t define one in your class? That same convention still works
when only one navigation property is defined in the relationship.
Destination still has a property that defines its
relationship to Lodging. In Figure 4-13 you can see that a Destination_DestinationId column is added into
the Lodgings table. You might recall
that the convention for naming the foreign key column was
[Navigation Property Name] +
[Primary Key Name]. But we no longer have a
navigation property on Lodging. If no
navigation property is defined on the dependent entity, Code First will
use [Principal Type Name] +
[Primary Key Name]. In this case, that happens
to equate to the same name.
Note
What if we tried to just define a foreign key and no navigation properties in either class? Entity Framework itself supports this scenario, but Code First does not. Code First requires at least one navigation property to create a relationship. If you remove both navigation properties, Code First will just treat the foreign key property as any other property in the class and will not create a foreign key constraint in the database.
Now let’s change the foreign key property to something that won’t
get detected by convention. Let’s use LocationId instead of DestinationId, as shown in Example 4-18. Remember that we have
no navigation property; it’s still commented out.
publicclassLodging{publicintLodgingId {get;set; }publicstringName {get;set; }publicstringOwner {get;set; }publicboolIsResort {get;set; }publicdecimalMilesFromNearestAirport {get;set; }publicintLocationId {get;set; }//public Destination Destination { get; set; }publicList<InternetSpecial> InternetSpecials {get;set; }publicPersonPrimaryContact {get;set; }publicPersonSecondaryContact {get;set; } }
Thanks to Destination.Lodgings,
Code First knows about the relationship between the two classes. But it
cannot find a conventional foreign key. We’ve been down this road before.
All we had to do was add some configuration to identify the foreign
key.
In previous examples, we placed the ForeignKey annotation on the navigation property
in the dependent class or we placed it on the foreign key property and
told it which navigation property it belonged to. But we no longer have a
navigation property in the dependent class. Fortunately, we can just place
the data annotation on the navigation property we do have (Destination.Lodgings). Code First knows that
Lodging is the dependent in the
relationship, so it will search in that class for the foreign key:
[ForeignKey("LocationId")]publicList<Lodging> Lodgings {get;set; }
The Fluent API also caters to relationships that only have one
navigation property. The Has part of the configuration
must specify a navigation property, but the With part
can be left empty if there is no inverse navigation property. Once you
have specified the Has and With
sections, you can call the HasForeignKey method you used earlier:
modelBuilder.Entity<Destination>()
  .HasMany(d => d.Lodgings)
  .WithRequired()
  .HasForeignKey(l => l.LocationId);
While a unidirectional relationship may make sense in some
scenarios, we want to be able to navigate from a
Lodging to its Destination. Go ahead
and revert the changes to the Lodging class. Uncomment
the Destination property and rename the foreign key
property back to DestinationId, as shown in Example 4-19. You’ll also need to remove the
ForeignKey annotation from
Destination.Lodging and remove the above Fluent API
configuration if you added it.
publicclassLodging{publicintLodgingId {get;set; }publicstringName {get;set; }publicstringOwner {get;set; }publicboolIsResort {get;set; }publicdecimalMilesFromNearestAirport {get;set; }publicintDestinationId {get;set; }publicDestinationDestination {get;set; }publicList<InternetSpecial> InternetSpecials {get;set; }publicPersonPrimaryContact {get;set; }publicPersonSecondaryContact {get;set; } }
Working with One-to-One Relationships
There is one type of relationship that Code First will always require configuration for: one-to-one relationships. When you define a one-to-one relationship in your model, you use a reference navigation property in each class. If you have a reference and a collection, Code First can infer that the class with the reference is the dependent and should have the foreign key. If you have two collections, Code First knows it’s many-to-many and the foreign keys go in a separate join table. However, when Code First just sees two references, it can’t work out which class should have the foreign key.
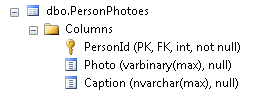
Let’s add a new PersonPhoto class
to contain a photo and a caption for the people in the Person class. Since the photo will be for a
specific person, we’ll use PersonId as
the key property. And since that is not a conventional key property, it
needs to be configured as such with the Key Data Annotation (Example 4-20).
usingSystem.ComponentModel.DataAnnotations;namespaceModel{publicclassPersonPhoto{ [Key]publicintPersonId{get;set; }publicbyte[]Photo{get;set; }publicstringCaption{get;set; }publicPersonPhotoOf{get;set; } } }
Let’s also add a Photo property
to the Person class, so that we can
navigate both directions:
publicPersonPhotoPhoto {get;set; }
Remember that Code First can’t determine which class is the dependent in these situations. When it attempts to build the model, an exception is thrown, telling you that it needs more information:
Unable to determine the principal end of an association between the types ‘Model.PersonPhoto’ and ‘Model.Person’. The principal end of this association must be explicitly configured using either the relationship fluent API or data annotations.
This problem is most easily solved by using a ForeignKey annotation on the dependent class to
identify that it contains the foreign key. When configuring one-to-one
relationships, Entity Framework requires that the primary key of the
dependent also be the foreign key. In our case PersonPhoto is the dependent and its key,
PersonPhoto.PersonId, should also be
the foreign key. Go ahead and add in the ForeignKey annotation to the PersonPhoto.PersonId property, as shown in Example 4-21. Remember to specify the
navigation property for the relationship when adding the ForeignKey annotation.
publicclassPersonPhoto{ [Key] [ForeignKey("PhotoOf")]publicintPersonId {get;set; }publicbyte[] Photo {get;set; }publicstringCaption {get;set; }publicPersonPhotoOf {get;set; } }
Running the application again will successfully create the new
database table, although you’ll see that Entity Framework didn’t deal well
with pluralizing the word “Photo.” We’ll clean that up in Chapter 5, when you learn how
to specify table names. More importantly, notice that PersonId is now both a PK and an FK. And if you
look at the PersonPhoto_PhotoOf foreign
key constraint details, you can see that it shows the People.PersonId is the primary table/column in
the relationship and PersonPhotoes.PersonId is the foreign key
table/column (Figure 4-14). This
matches our intent.
Earlier in this chapter, we also saw that you could place the
ForeignKey annotation on the navigation
property and specify the name of the foreign key property (in our case,
that is PersonId). Since both classes
contain a PersonId property, Code First
still won’t be able to work out which class contains the foreign key. So
you can’t employ the configuration in that way for this scenario.
Of course, there is also a way to configure this in the Fluent API.
Let’s assume for the moment that the relationship is one-to-zero-or-one,
meaning a PersonPhoto must have a
Person but a Person isn’t required to have a PersonPhoto. We can use the HasRequired and WithOptional combination to specify this:
modelBuilder.Entity<PersonPhoto>()
  .HasRequired(p => p.PhotoOf)
  .WithOptional(p => p.Photo);
That’s actually enough for Code First to work out that PersonPhoto is the dependent. Based on the
multiplicity we specified, it only makes sense for Person to be the principal and PersonPhoto to be the dependent, since a
Person can exist without a PersonPhoto but a PersonPhoto must have a Person.
Notice that you didn’t need to use HasForeignKey to specify that PersonPhoto.PersonId is the foreign key. This is
because of Entity Framework’s requirement that the primary key of the
dependent be used as the foreign key. Since there is no choice, Code First
will just infer this for you. In fact, the Fluent API won’t let you use
HasForeignKey. In IntelliSense, the
method simply isn’t available after combining HasRequired and WithOptional.
Configuring One-to-One Relationships When Both Ends Are Required
Now let’s tell Code First that a Person must have a PersonPhoto (i.e., it’s required). With Data
Annotations, you can use the same Required data annotation that we used earlier
on Destination.Name and Lodging.Name. You can use Required on any type of property, not just
primitive types:
[Required]publicPersonPhotoPhoto {get;set; }
Now update the Main method to
call the InsertPerson method you
defined back in Chapter 3 and run the
application again. An exception will be thrown when SaveChanges is called. In the exception,
Entity Framework’s Validation API reports that the validation for the
required PersonPhoto failed.
Ensuring that the sample code honors the required Photo
If you want to leave the Photo property as Required and avoid the validation errors,
you can modify the InsertPerson and
UpdatePerson methods so that they
add data into the Photo field. For
the sake of keeping the code simple, we’ll just stuff a single
byte into the Photo’s byte array rather than worrying
about supplying an actual photo.
In the InsertPerson method,
modify the line of code that instantiates a new Person object to add the Photo property, as shown in Example 4-22.
varperson =newPerson{ FirstName ="Rowan", LastName ="Miller", SocialSecurityNumber = 12345678, Photo =newPersonPhoto{ Photo =newByte[] { 0 } } };
In the UpdatePerson method,
we’ll add some code to ensure that any Person data you’ve already added before we
created the Photo class gets a
Photo at the same time that you
update. Modify the UpdatePerson method as shown in
Example 4-23 so that it
allocates a new PersonPhoto when it tries to update
a person without a photo.
private static voidUpdatePerson() {using(varcontext =newBreakAwayContext()) {varperson = context.People.Include("Photo").FirstOrDefault(); person.FirstName ="Rowena";if(person.Photo ==null) { person.Photo =newPersonPhoto{ Photo =newByte[] { 0 } }; } context.SaveChanges(); } }
The updated method will use Include to also
retrieve the Person’s Photo when
fetching the data from the database. We then check if the
Person has a Photo and add a new
one if they do not. Now the Photo
requirement in the Person class
will be fulfilled any time you execute the InsertPerson and UpdatePerson methods.
Configuring one-to-one with the Fluent API
Not surprisingly, you can also configure the same relationship with the Fluent API. But you’ll need to let Code First know which class is the principal and which is the dependent. If both ends are required, this can’t simply be implied from the multiplicity.
You might expect to call HasRequired followed by WithRequired. However, if you start with
HasRequired, you will have the
additional options of WithRequiredPrincipal and WithRequiredDependent in the place of
WithRequired. These methods take
into account the entity that you are configuring; that is, the entity
that you selected in modelBuilder.Entity or the entity that your
EntityTypeConfiguration class is
for. Selecting WithRequiredPrincipal will make the entity
that you are configuring the principal, meaning it contains the
primary key of the relationship. Selecting WithRequiredDependent will make the entity
that you are configuring the dependent, meaning it will have the
foreign key of the relationship.
Assuming you are configuring PersonPhoto, which you want to be the
dependent, you would use the following configuration:
modelBuilder.Entity<PersonPhoto>()
  .HasRequired(p => p.PhotoOf)
  .WithRequiredDependent(p => p.Photo);
Configuring a one-to-one relationship where both ends are
optional works exactly the same, except you start with HasOptional and select either WithOptionalPrincipal or WithOptionalDependent.
Summary
In this chapter, you’ve seen that Code First has a lot of
intelligence about relationships. Code First conventions are able to
discover relationships of any multiplicity with or without a provided
foreign key. But there are many scenarios where your intentions don’t
coincide with Code First conventions. You’ve learned many ways to “fix”
the model by configuring with Data Annotations and the Fluent API. You
should have a good understanding of how to work with relationships in the
Fluent API based on its Has/With
pattern.
In the next chapter, we’ll look at another set of mappings in Code First that are all about how your classes map to the database, including how to map a variety of inheritance hierarchies.
Get Programming Entity Framework: Code First now with the O’Reilly learning platform.
O’Reilly members experience books, live events, courses curated by job role, and more from O’Reilly and nearly 200 top publishers.

