The C# programming language (pronounced “see sharp”) can be used for many kinds of applications, including websites, desktop applications, games, phone apps, and command-line utilities. C# has been center stage for Windows developers for about a decade now, so when Microsoft announced that Windows 8 would introduce a new[1] style of application, optimized for touch-based interaction on tablets, it was no surprise that C# was one of the four languages to offer full support from the start for these applications (the others being C++, JavaScript, and Visual Basic).
Although Microsoft invented C#, the language and its runtime are documented by the standards body ECMA, enabling anyone to implement C#. This is not merely hypothetical. The open source Mono project (http://www.mono-project.com/) provides tools for building C# applications that run on Linux, Mac OS X, iOS, and Android.
Although there are many ways you can use C#, other languages are always an option. Why might you choose C# over them? It will depend on what you need to do, and what you like and dislike in a programming language. I find that C# provides considerable power and flexibility, and works at a high enough level of abstraction that I don’t expend vast amounts of effort on little details not directly related to the problems my programs are trying to solve. (I’m looking at you, C++.)
Much of C#’s power comes from the range of programming techniques it supports. For example, it offers object-oriented features, generics, and functional programming. It supports both dynamic and static typing. It provides powerful list- and set-oriented features, thanks to Language Integrated Query (LINQ). The most recent version of the language adds intrinsic support for asynchronous programming.
Some of the most important benefits of using C# come from its runtime, which provides services such as security sandboxing, runtime type checking, exception handling, thread management, and perhaps its most important feature, automated memory management. The runtime provides a garbage collector that frees developers from much of the work associated with recovering memory that the program is no longer using.
Of course, languages do not exist in a vacuum—high-quality libraries with a broad range of features are essential. There are some elegant and academically beautiful languages that are glorious right up until you want to do something prosaic, such as talking to a database or determining where to store user settings. No matter how strong a set of programming idioms a language offers, it also needs to provide full and convenient access to the underlying platform’s services. C# is on very strong ground here, thanks to the .NET Framework.
The .NET Framework encompasses both the runtime and the libraries that C# programs use on Windows. The runtime part is called the Common Language Runtime (usually abbreviated to CLR) because it supports not just C#, but any .NET language. Numerous languages can run in .NET. Microsoft’s development environment, Visual Studio, provides Visual Basic, F#, and .NET extensions for C++, for example, and there are open source .NET-based implementations of Python and Ruby (called IronPython and IronRuby, respectively). The CLR has a Common Type System (CTS) that enables code from multiple languages to interoperate freely, which means that .NET libraries can usually be used from any .NET language—F# can consume libraries written in C#, C# can use Visual Basic libraries, and so on. The .NET Framework includes an extensive class library. This library provides wrappers for many features of the underlying operating system (OS), but it also provides a considerable amount of functionality of its own. It contains over 10,000 classes, each with numerous members.
Note
Some parts of the .NET Framework class library are specific to Windows. There are library features dedicated to building Windows desktop applications, for example. However, other parts are more generic, such as the HTTP client classes, which would be relevant on any operating system. The ECMA specification for the runtime used by C# defines a set of library features that are not dependent on any particular operating system. The .NET Framework class library supports all these features, of course, as well as offering Microsoft-specific ones.
The libraries built into the .NET Framework are not the whole story—many other frameworks provide their own .NET class libraries. SharePoint has an extensive .NET application programming interface (API), for example. And libraries do not have to be associated with frameworks. There’s a large ecosystem of .NET libraries, some commercial and some free and open source. There are mathematical utilities, parsing libraries, and user interface components, to name just a few.
Even if you get unlucky and need to use an OS feature that doesn’t have any .NET library wrappers, C# offers various mechanisms for working with older style APIs, such as Win32 and COM. Some aspects of the interoperability mechanisms are a little clunky, and if you need to deal with an existing component, you might need to write a thin wrapper that presents a more .NET-friendly face. (You can still write the wrapper in C#. You’d just be putting the awkward interoperability details in one place, rather than letting them pollute your whole codebase.) However, if you design a new COM component carefully, you can make it straightforward to use directly from C#. Windows 8 introduces a new kind of API for writing full-screen applications optimized for tablet computers, an evolution of COM called WinRT, and—unlike interoperability with older native Windows APIs—using WinRT from C# feels very natural.
In summary, with C# we get a strong set of abstractions built into the language, a powerful runtime, and easy access to an enormous amount of library and platform functionality.
To understand a language, it’s useful to compare it with alternatives, so it’s worth looking at some of the reasons you might choose some other language. C#’s nearest competitor is arguably Visual Basic (VB), another native .NET language that offers most of the same benefits as C#. The choice here is mostly a matter of syntax. C# is part of the C family of languages, and if you are familiar with at least one language from that group (which includes C, C++, Objective-C, Java, and JavaScript), you will feel instantly at home with C#’s syntax. However, if you do not know any of those languages, but you are at home with pre-.NET versions of Visual Basic, or with the scripting variants such as Microsoft Office’s Visual Basic for Applications (VBA), then the .NET version of Visual Basic would certainly be easier to learn.
Visual Studio offers another language designed specifically for the .NET Framework, called F#. This is a very different language from C# and Visual Basic, and it seems to be aimed mostly at calculation-intensive applications such as engineering, and the more technical areas of finance. F# is primarily a functional programming language, with its roots firmly in academia. (Its closest non-.NET relative is a programming language called OCaml, which is popular in universities but has never been a commercial hit.) It is good for expressing particularly complex computations, so if you’re working on applications that spend much more of their time thinking than doing, F# may be for you.
Then there’s C++, which has always been a mainstay of Windows development. The C++ language is always evolving, and in the recently published C++11 standard (ISO/IEC standard 14882:2011, to use its formal name), the language gained several features that make it significantly more expressive than earlier versions. It’s now much easier to use functional programming idioms, for example. In many cases, C++ code can provide significantly better performance than .NET languages, partly because C++ lets you get closer to the underlying machinery of the computer, and partly because the CLR has much higher overheads than the rather frugal C++ runtime. Also, many Win32 APIs are less hassle to use in C++ than C#, and the same is true of some (although not all) COM-based APIs. For example, C++ is the language of choice for using the most recent versions of Microsoft’s advanced graphics API, DirectX. Microsoft’s C++ compiler even includes extensions that allow C++ code to integrate with the world of .NET, meaning that C++ can use the entire .NET Framework class library (and any other .NET libraries). So on paper, C++ is a very strong contender. But one of its greatest strengths is also a weakness: the level of abstraction in C++ is much closer to the underlying operation of the computer than in C#. This is part of why C++ can offer better performance and make certain APIs easier to consume, but it also tends to mean that C++ requires considerably more work to get anything done. Even so, the trade-off can leave C++ looking preferable to C# in some scenarios.
Note
Because the CLR supports multiple languages, you don’t have to pick just one for your whole project. It’s common for primarily C#-based projects to use C++ to deal with a non-C#-friendly API, using the .NET extensions for C++ (officially called C++/CLI) to present a C#-friendly wrapper. The freedom to pick the best tool for the job is useful, but there is a price. The mental “context switch” developers have to make when moving between languages takes its toll, and could outweigh the benefits. Mixing languages works best when each language has a very clearly defined role in the project, such as dealing with gnarly APIs.
Of course, Windows is not the only platform, and the environment in which your code runs is likely to influence your language choice. Sometimes you will have to target a particular system (e.g., Windows on the desktop, or perhaps iOS on handheld devices) because that’s what most of your users happen to be using. But if you’re writing a web application, you can choose more or less any server-side language and OS to write an application that works just fine for users running any operating system on their desktop, phone, or tablet. So even if Windows is ubiquitous on desktops in your organization, you don’t necessarily have to use Microsoft’s platform on the server. Frankly, there are numerous languages that make it possible to build excellent web applications, so the choice will not come down to language features. It is more likely to be driven by the expertise you have in house. If you have a development shop full of Ruby experts, choosing C# for your next web application might not be the most effective use of the available talent.
So not every project will use C#. But since you’ve read this far, presumably you’re still considering using C#. So what is C# like?
Although C#’s most superficially obvious feature is its C-family
syntax, perhaps its most distinctive feature is that it was the first
language designed to be a native in the world of the CLR. As the name
suggests, the Common Language Runtime is flexible enough to support many
languages, but there’s an important difference between a language that has
been extended to support the CLR and one that puts it at the center of its
design. The .NET extensions in Microsoft’s C++ compiler make this very
clear—the syntax for using those features is visibly different from
standard C++, making a clear distinction between the native world of C++
and the outside world of the CLR. But even without different
syntax,[2] there will still be friction when two worlds have different
ways of working. For example, if you need a collection of numbers, should
you use a standard C++ collection class such as vector<int>, or one from the .NET
Framework such as List<int>?
Whichever you choose, it will be the wrong type some of the time: C++
libraries won’t know what to do with a .NET collection, while .NET APIs
won’t be able to use the C++ type.
C# embraces the .NET Framework, both the runtime and the libraries,
so these dilemmas do not arise. In the scenario just discussed, List<int> has no rival. There is no
friction when using .NET libraries because they are built for the same
world as C#.
That much is also true of Visual Basic, but that language retains links to a pre-.NET world. The .NET version of Visual Basic is in many respects a quite different language than its predecessors, but Microsoft went to some lengths to retain many aspects of older versions. The upshot is that it has several language features that have nothing to do with how the CLR works, and are a veneer that the Visual Basic compiler provides on top of the runtime. There’s nothing wrong with that, of course. That’s what compilers usually do, and in fact C# has steadily added its own abstractions. But the first version of C# presented a model that was very closely related to the CLR’s own model, and the abstractions added since have been designed to fit well with the CLR. This gives C# a distinctive feel from other languages.
This means that if you want to understand C#, you need to understand the CLR, and the way in which it runs code. (By the way, I will mainly talk about Microsoft’s implementations in this book, but there are specifications that define language and runtime behavior for all C# implementations. See the sidebar .)
For years, the most common way for a compiler to work was to process source code, and to produce output in a form that could be executed directly by the computer’s CPU. Compilers would produce machine code—a series of instructions in whatever binary format was required by the kind of CPU the computer had. Many compilers still work this way, but the C# compiler does not. Instead, it uses a model called managed code.
With managed code, the runtime generates the machine code that the CPU executes, not the compiler. This enables the runtime to provide services that are hard or even impossible to provide under the more traditional model. The compiler produces an intermediate form of binary code, the intermediate language (IL), and the runtime provides the executable binary at runtime.
Perhaps the most visible benefit of the managed model is that the compiler’s output is not tied to a single CPU architecture. You can write a .NET component that can run on the 32-bit x86 architecture that PCs have used for decades, but that will also work well in the newer 64-bit update to that design (x64), and also on completely different architectures such as ARM and Itanium. With a language that compiles directly to machine code, you’d need to build different binaries for each of these. You can compile a single .NET component that not only can run on any of them, but also would be able to run even on platforms that weren’t supported at the time you compiled the code, if a suitable runtime became available in the future. More generally, any kind of improvement to the CLR’s code generation—whether that’s support for new CPU architectures, or just performance improvements for existing ones—are instantly of benefit to all .NET languages.
The exact moment at which the CLR generates executable machine code can vary. Typically, it uses an approach called just in time (JIT) compilation, in which each individual function is compiled at runtime, the first time it runs. However, it doesn’t have to work this way. In principle, the CLR could use spare CPU cycles to compile functions it thinks you may use in the future (based on what your program did in the past). Or you can get more aggressive: a program’s installer can request machine code generation ahead of time so that the program is compiled before it first runs. And for applications deployed online via Microsoft’s application store, such as those that run on Windows 8 and Windows Phone, it’s even possible for the store to compile the code before sending it to the user’s computer or device. Conversely, the CLR can sometimes regenerate code at runtime some time after the initial JIT compilation. Diagnostics tools can trigger this, but the CLR could also choose to recompile code to better optimize it for the way the code is being used. Recompilation for optimization is not a documented feature, but the virtualized nature of managed execution is designed to make such things possible in a way that’s invisible to your code. Occasionally, it can make its presence felt. For example, virtualized execution leaves some latitude for when and how the runtime performs certain initialization work, and you can sometimes see the results of its optimizations causing things to happen in a surprising order.
Processor-independent JIT compilation is not the main benefit offered by managed code. The greatest payoff is the set of services the runtime provides. One of the most important of these is memory management. The runtime provides a garbage collector (GC), a service that automatically frees memory that is no longer in use. This means that in most cases, you do not need to write code that explicitly returns memory to the operating system once you have finished using it. Depending on which languages you have used before, either this will be wholly unremarkable, or it will profoundly change how you write code.
Warning
Although the garbage collector does take care of most memory handling issues, you can defeat its heuristics, and that sometimes happens by accident. I will describe the GC’s operation in detail in Chapter 7.
Managed code has ubiquitous type information. The file formats dictated by the CLI require this to be present, because it enables certain runtime features. For example, the .NET Framework provides various automatic serialization services, in which objects can be converted into binary or textual representations of their state, and those representations can later be turned back into objects, perhaps on a different machine. This sort of service relies on a complete and accurate description of an object’s structure, something that’s guaranteed to be present in managed code. Type information can be used in other ways. For example, unit test frameworks can use it to inspect code in a test project and discover all of the unit tests you have written. This relies on the CLR’s reflection services, which are the topic of Chapter 13.
The availability of type information enables an important security feature. The runtime can check code for type safety, and in certain situations, it will reject code that performs unsafe operations. (One example of unsafe code is the use of C-style pointers. Pointer arithmetic can subvert the type system, which in turn can allow you to bypass security mechanisms. C# supports pointers, but the resultant unsafe code will fail the type safety checks.) You can configure .NET to allow only certain code known to be trustworthy to use unsafe features. This makes it possible to support the download and local execution of .NET code from potentially untrustworthy sources (e.g., some random website) without risk of compromising the user’s machine. The Silverlight web browser plug-in uses this model by default, because it provides a way to deploy .NET code to a website that client machines can download and run, and needs to ensure that it does not open up a security hole. It relies on the type information in the code to verify that all the type safety rules are met.
Although C#’s close connection with the runtime is one of its main defining features, it’s not the only one. Visual Basic has a similar connection with the CLR, but C# is distinguished from Visual Basic by more than just syntax: it also has a somewhat different philosophy.
C# favors general-purpose language features over specialized ones. Over the years, Microsoft has expanded C# several times, and the language’s designers always have specific scenarios in mind for new features. However, they have always tried hard to ensure that each new element they add is useful beyond the scenario for which it was designed.
For example, one of the goals for C# 3.0 was that database access should feel well integrated with the language. The resulting technology, Language Integrated Query (LINQ), certainly supports that goal, but Microsoft achieved this without adding any direct support for data access to the language. Instead, a series of quite diverse-seeming capabilities were added. These included better support for functional programming idioms, the ability to add new methods to existing types without resorting to inheritance, support for anonymous types, the ability to obtain an object model representing the structure of an expression, and the introduction of query syntax. The last of these has an obvious connection to data access, but the rest are harder to relate to the task at hand. Nonetheless, these can be used collectively in a way that makes certain data access tasks significantly simpler. But the features are all useful in their own right, so as well as supporting data access, they enable a much wider range of scenarios. For example, version 3.0 of C# made it very much easier to process lists, sets, and other groups of objects, because the new features work for collections of things from any origin, not just databases.
Perhaps the clearest illustration of this philosophy of generality was a language feature that C# chose not to implement, but that Visual Basic did. In VB, you can write XML directly in your source code, embedding expressions to calculate values for certain bits of content at runtime. This compiles into code that generates the completed XML at runtime. VB also has intrinsic support for queries that extract data from XML documents. These same concepts were considered for C#. Microsoft Research developed extensions for C# that supported embedded XML, which were demonstrated publicly some time before the first release of Visual Basic that did so. Nevertheless, this feature didn’t ultimately make it into C#. It is a relatively narrow facility, only useful when you’re creating XML documents. As for querying XML documents, C# supports this functionality through its general-purpose LINQ features, without needing any XML-specific language features. XML’s star has waned since this language concept was mooted, having been usurped in many cases by JSON (which will doubtless be eclipsed by something else in years to come). Had embedded XML made it into C#, it would by now feel like a slightly anachronistic curiosity.
That said, C# 5.0 has a new feature that looks relatively specialized. In fact, it has only one purpose. However, it’s an important purpose.
The most significant new feature in C# 5.0 is support for asynchronous programming. .NET has always offered asynchronous APIs (i.e., ones that do not wait for the operation they perform to finish before returning). Asynchrony is particularly important with input/output (I/O) operations, which can take a long time and often don’t require any active involvement from the CPU except at the start and end of an operation. Simple, synchronous APIs that do not return until the operation completes can be inefficient. They tie up a thread while waiting, which can cause suboptimal performance in servers, and they’re also unhelpful in client-side code, where they can make a user interface unresponsive.
The problem with the more efficient and flexible asynchronous APIs has always been that they are considerably harder to use than their synchronous counterparts. But now, if an asynchronous API conforms to a certain pattern, you can write C# code that looks almost as simple as the synchronous alternative would.
Although asynchronous support is a rather specialized aspect of C#, it’s still fairly adaptable. It can use the Task Parallel Library (TPL) introduced in .NET 4.0, but the same language feature also works with the new asynchronous mechanisms in WinRT (the API for writing the new style of application introduced in Windows 8). And if you want to write your own custom asynchronous mechanisms, you can arrange for these to be consumable by the native asynchronous features of the C# language.
I’ve now described some of the defining features of C#, but Microsoft provides more than just a language and runtime. There’s also a development environment that can help you write, test, debug, and maintain your code.
Visual Studio is Microsoft’s development environment. There are various editions of it, ranging from free to eye-wateringly expensive. All versions provide the basic features—such as a text editor, build tools, and a debugger—as well as visual editing tools for user interfaces. It’s not strictly necessary to use Visual Studio—the .NET build system that it uses is available from the command line, so you could use any text editor. But it is the development environment that most C# developers use, so I’ll start with a quick introduction to working in Visual Studio.
Note
You can download the free version of Visual Studio (which Microsoft calls the Express edition) from http://www.microsoft.com/express.
Any nontrivial C# project will have multiple source code files, and in Visual Studio, these will belong to a project. Each project builds a single output, or target. The build target might be as simple as a single file—a C# project might produce an executable file or a library,[3] for example—but some projects produce more complicated outputs. For instance, some project types build websites. A website will normally comprise multiple files, but collectively, these files represent a single entity: one website. Each project’s output will typically be deployed as a unit, even if it consists of multiple files.
Project files usually have extensions ending in proj. For example, C# projects have a .csproj extension, while C++ projects use .vcxproj. If you examine these files with a text editor, you’ll find that they usually contain XML. (That’s not always true, however. Visual Studio is extensible, and each type of project is defined by a project system that can use whatever format it likes, but the built-in languages use XML.) These files list the contents of the project and configure how it should be built. The XML format that Visual Studio uses for C# project files can also be processed by the msbuild tool, which enables you to build projects from the command line.
You will often want to work with groups of projects. For example, it is good practice to write tests for your code, but most test code does not need to be deployed as part of the application, so you could typically put automated tests into separate projects. And you may want to split up your code for other reasons. Perhaps the system you’re building has a desktop application and a website, and you have common code you’d like to use in both applications. In this case, you’d need one project that builds a library containing the common code, another producing the desktop application executable, another to build the website, and three more projects containing the unit tests for each of the main projects.
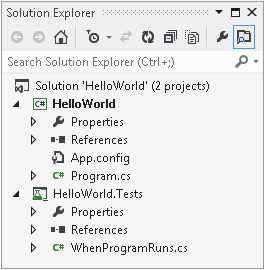
Visual Studio helps you to work with multiple related projects through what it calls a solution. A solution is simply a collection of projects, and while they are usually related, they don’t have to be—a solution is really just a container. You can see the currently loaded solution and all the projects it contains in Visual Studio’s Solution Explorer. Figure 1-1 shows a solution with two projects. (I’m using Visual Studio 2012 here, which is the latest version at the time of this writing.) The body of this panel is a tree view, and you can expand each project to see the files that make up that project. This panel is normally open at the top right of Visual Studio, but it’s possible to hide or close it. You can reopen it with the View→Solution Explorer menu item.
Visual Studio can load a project only if it is part of a solution. When you create a brand-new project, you can add it to an existing solution, but if you don’t, Visual Studio will create one for you; if you try to open an existing project file, Visual Studio will look for an associated solution, and if it can’t find one, it will insist that you either provide one or let it create one. That’s because lots of operations in Visual Studio are scoped to the currently loaded solution. When you build your code, it’s normally the solution that you build. Configuration settings, such as a choice between Debug and Release builds, are controlled at the solution level. Global text searches can search all the files in the solution.
A solution is just another text file, with an .sln extension. Oddly, it’s not an XML file—solution files contain plain text, although also in a format that msbuild understands. If you look at the folder containing your solution, you’ll also notice an .suo file. This is a binary file that contains per-user settings, such as a record of which files you have open, and which project or projects to launch when starting debug sessions. That ensures that when you open a project, everything is more or less where you left it when you last worked on the project. Because these are per-user settings, you do not normally check .suo files into source control.
A project can belong to more than one solution. In a large codebase, it’s common to have multiple .sln files with different combinations of projects. You would typically have a master solution that contains every single project, but not all developers will want to work with all the code all of the time. Someone working on the desktop application in our hypothetical example will also want the shared library, but probably has no interest in loading the web project. Not only do larger solutions take longer to load and compile, but they may also require the developer to do extra work—web projects require the developer to have a local web server available, for example. Visual Studio supplies a simple web server, but if the project makes use of features specific to a particular server (such as Microsoft’s Internet Information Services, or IIS), then you’d need to have that server installed and configured to be able to load the web project. For a developer who was planning to work only on the desktop app, that would be an annoying waste of time. So it would make sense to create a separate solution with just the projects needed for working on the desktop application.
With that in mind, I’ll show how to create a new project and solution, and I’ll then walk through the various features Visual Studio adds to a new C# project as an introduction to the language. I’ll also show how to add a unit test project to the solution.
Note
This next section is intended for developers who are new to Visual Studio—this book is aimed at experienced developers, but does not assume any prior experience in C#. The majority of the book is suitable if you have some C# experience and are looking to learn more, but if that’s you, you might want to skim through this next section quickly, because you will already be familiar with the development environment by now.
To create a new project, you can use Visual Studio’s FILE→New→Project menu item,[4] or if you prefer keyboard shortcuts, type Ctrl-Shift-N. This opens the New Project dialog, shown in Figure 1-2. On the lefthand side is a tree view categorizing projects by language and then project type. I’ve selected Visual C#, and I’ve chosen the Windows category, which includes not just projects for desktop applications, but also for dynamic link libraries (DLLs) and console applications. I’ve selected the latter.
Note
Different editions of Visual Studio offer different sets of templates. Also, even within a single edition, the structure of the tree view on the left of the New Project dialog will vary according to the choice you make when you first run Visual Studio. The program offers various configurations according to your language preference. I chose C#, but if you selected something else, C# may be buried one level farther down under Other Languages.
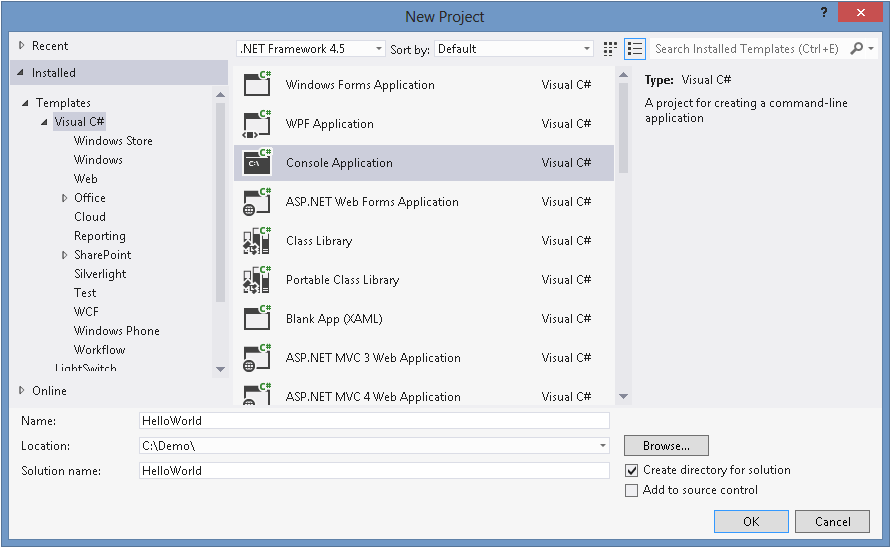
Toward the bottom of the dialog, the Name field affects three things. It controls the name of the .csproj file on disk. It also determines the filename of the compiled output, although you can change that later. Finally, it sets the default namespace for newly created code, which I’ll explain when I show the code. Visual Studio offers a checkbox that lets you decide how the associated solution is created. If you set it to unchecked, the project and solution will have the same name and will live in the same folder on disk. But if you plan to add multiple projects to your new solution, you will typically want the solution to be in its own folder, with each project stored in a subfolder. If you check the “Create directory for solution” checkbox, Visual Studio will set things up that way, and it also enables the “Solution name” text box so you can give the solution a different name from the first project if necessary.
I’m intending to add a unit test project to the solution as well as the program, so I’ve checked the checkbox. I’ve set the project name to HelloWorld, and Visual Studio has set the solution name to match, which I’m happy with here. Clicking OK creates a new C# project. So I currently have a solution with a single project in it.
To add a unit test project to the solution, I can go to the Solution Explorer panel, right-click on the solution node (the one at the very top), and choose Add→New Project. Alternatively, I can open the New Project dialog again. If you do that when you’ve already got a solution open, it shows an extra drop-down control, offering a choice between adding the project to the current solution or creating a new one.
Apart from that detail, this is the same New Project dialog I used for the first project, but this time, I’ll select Visual C#→Test from the categories on the left, and then pick the Unit Test Project template. This will contain tests for my HelloWorld project, so I’ll call it HelloWorld.Tests. (Nothing demands that naming convention, by the way—I could have called it anything.) When I click OK, Visual Studio creates a second project, and both are now listed in Solution Explorer, which will look similar to Figure 1-1.
The purpose of this test project will be to ensure that the main project does what it’s supposed to. I happen to prefer the style of development where you write your tests before you write the code being tested, so we’ll start with the test project. (This is sometimes called test-driven development, or TDD.) To be able to do its job, my test project will need access to the code in the HelloWorld project. Visual Studio has no way of guessing which projects in a solution may depend on which other projects. Even though there are only two here, if it tried to guess which depends on the other, it would most likely guess wrong, because HelloWorld will produce an .exe file, while unit test projects happen to produce a .dll. The most obvious guess would be that the .exe would depend on the .dll, but here we have the somewhat unusual requirement that our library (which is actually a test project) depends on the code in our application.
To tell Visual Studio about the relationship between these two projects, I right-click on the HelloWorld.Test project’s References node in Solution Explorer, and select the Add Reference menu item. This shows the Reference Manager dialog, which you can see in Figure 1-3. On the left, you choose the sort of reference you want—in this case, I’m setting up a reference to another project in the same solution, so I have expanded the Solution section and selected Projects. This lists all the other projects in the middle, and there’s just one in this case, so I check the HelloWorld item and click OK.

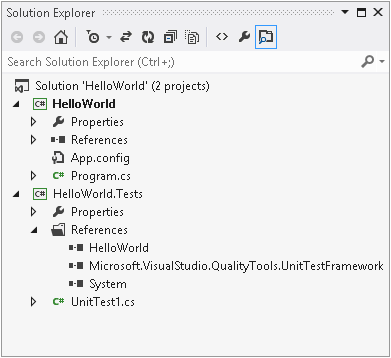
When you add a reference, Visual Studio expands the References node in Solution Explorer, so that you can see what you just added. As Figure 1-4 shows, this will not be the only reference—a newly created project has references to several standard system components. It does not reference everything in the .NET Framework class library, though. Visual Studio will choose the initial set of references based on the project type. Unit test projects get a very small set. More specialized applications, such as desktop user interfaces or web applications, will get additional references for the relevant parts of the framework. You can always add a reference to any component in the class library by using the Reference Manager dialog. If you were to expand the Assemblies section, visible at the top left of Figure 1-3, you’d see two items, Framework and Extensions. The first gives you access to everything in the .NET Framework class library, while the second provides access to other .NET components that have been installed on your machine. (For example, if you have installed other .NET-based SDKs, their components will appear here.)
Now I need to write a test. Visual Studio has provided me with a test class to get me started, in a file called UnitTest1.cs. I want to pick a more informative name. There are various schools of thought as to how you should structure your unit tests. Some developers advocate one test class for each class you wish to test, but I like the style where you write a class for each scenario in which you want to test a particular class, with one method for each of the things that should be true about your code in that scenario. As you’ve probably guessed from the project names I’ve chosen, my program will only have one behavior: it will display a “Hello, world!” message when it runs. So I’ll rename the UnitTest1.cs source file to WhenProgramRuns.cs. This test should verify that the program prints out the required message when it runs. The test itself is very simple, but unfortunately, getting to the point where we can run the test is a bit more involved. Example 1-1 shows the whole source file; the test is near the end, in bold.
Example 1-1. A unit test class for our first program
using System;
using Microsoft.VisualStudio.TestTools.UnitTesting;

namespace HelloWorld.Tests
{
    [TestClass]
    public class WhenProgramRuns
    {
        private string _consoleOutput;

        [TestInitialize]
        public void Initialize()
        {
            var w = new System.IO.StringWriter();
            Console.SetOut(w);

            Program.Main(new string[0]);

            _consoleOutput = w.GetStringBuilder().ToString().Trim();
        }

        [TestMethod]
        public void SaysHelloWorld()
        {
            Assert.AreEqual("Hello, world!", _consoleOutput);
        }
    }
}
I will explain each of the features in this file once I’ve shown
the program itself. For now, the most interesting part of this example
is that it defines some behavior we want our program to have. The test
states that the program’s output should be the message “Hello, world!”
If it’s not, this test will report a failure. The test itself is
pleasingly simple, but the code that sets things up for the test is a
little awkward. The problem here is that the obligatory first example
that all programming books are required by law to show isn’t very
amenable to unit testing of individual classes, because you can’t really
test anything less than the whole program. We want to verify that the
program prints out a particular message to the console. In a real
application, you’d probably devise some sort of abstraction for output,
and your unit tests would provide a fake version of that abstraction for
test purposes. But I want my application (which Example 1-1 merely tests) to
keep to the spirit of the standard “Hello, world!” example. To avoid
overcomplicating my program, I’ve made my test intercept console output
so that I can check that the program printed what it was supposed to.
(Chapter 16 will describe the features I’m
using from the System.IO namespace to
achieve this.)
There’s a second challenge. Normally, a unit test will, by
definition, test some isolated and usually small part of the program.
But in this case, the program is so simple that there is only one
feature of interest, and that feature executes when we run the program.
This means my test will need to invoke the program’s entry point. I
could have done that by launching my HelloWorld program in a whole new
process, but capturing its output would have been rather more complex
than the in-process interception done by Example 1-1. Instead, I’m just
invoking the program’s entry point directly. In a C# application, the
entry point is usually a method called Main defined in a class called Program. Example 1-2
shows the relevant line from Example 1-1, passing an empty
array to simulate running the program with no command-line
arguments.
Unfortunately, there’s a problem with that. A program’s entry point is typically only accessible to the runtime—it’s an implementation detail of your program, and there’s not normally any reason to make it publicly accessible. However, I’ll make an exception here, because that’s where the only code in this example will live. So to get the code to compile, we’ll need to make a change to our main program. Example 1-3 shows the relevant line from the code from the Program.cs file in the HelloWorld project. (I’ll show the whole thing shortly.)
Example 1-3. Making the program entry point accessible
public class Program
{
    public static void Main(string[] args)
    {
...
I’ve added the public keyword
to the start of two lines to make the code accessible to the test,
enabling Example 1-1 to
compile. There are other ways I could have achieved this. I could have
left the class as it is, made the method internal, and then applied the InternalsVisibleToAttribute to my program to
grant access just to the test suite. But internal protection and
assembly-level attributes are topics for later chapters (3 and 15, respectively),
so I decided to keep it simple for this first example. I’ll show the
alternative approach in Chapter 15.
Warning
Microsoft’s unit testing framework defines a helper class called
PrivateType,
which provides a way to invoke private methods for test purposes, and
I could have used that instead of making the entry point public.
However, it’s considered bad practice to invoke private methods
directly from tests, because a test should have to verify only the
observable behavior of the code under test. Testing specific details
of how the code has been structured is rarely helpful.
I’m now ready to run my test. To do this, I open the Unit Test
Explorer panel with the Test→Windows→Test
Explorer menu item. Next, I build the project with the Build→Build Solution menu. Once I’ve done that, the
Unit Test Explorer shows a list of all the unit tests defined in the
solution. It finds my SayHelloWorld
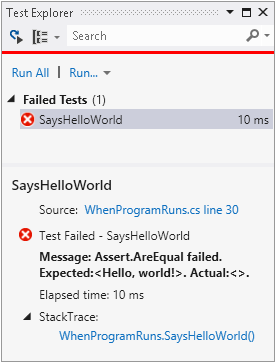
test, as you can see in Figure 1-5. Clicking
on Run All runs the test, which fails because we’ve not put any code in
our main program yet. You can see the error at the bottom of Figure 1-5. It says it was expecting a “Hello,
world!” message, but that there was no console output.
So it’s time to look at our HelloWorld program, and to add the missing code. When I created the project, Visual Studio generated various files, including Program.cs, which contains the program’s entry point. Example 1-4 shows this file, including the modifications I made in Example 1-3. I will explain each element in turn, as it provides a useful introduction to some important elements of C# syntax and structure.
Example 1-4. Program.cs
using System;
using System.Collections.Generic;
using System.Linq;
using System.Text;
using System.Threading.Tasks;

namespace HelloWorld
{
    public class Program
    {
        public static void Main(string[] args)
        {
        }
    }
}
The file begins with a series of using directives. These
are optional, but almost all source files contain them, and they tell
the compiler which namespaces we’d like to use,
raising the obvious question: what’s a namespace?
Namespaces bring order and structure to what would otherwise be a horrible mess. The .NET Framework class library contains over 10,000 classes, and there are many more classes out there in third-party libraries, not to mention the classes you will write yourself. There are two problems that can occur when dealing with this many named entities. First, it becomes hard to guarantee uniqueness unless everything either has a very long name, or the names include sections of random gibberish. Second, it can become challenging to discover the API you need; unless you know or can guess the right name, it’s difficult to find what you need from an unstructured list of thousands of things. Namespaces solve both of these problems.
Most .NET types are defined in a namespace. Microsoft-supplied
types have distinctive namespaces. When the types are part of the .NET
Framework, the containing namespaces start with System, and when they’re part of some
Microsoft technology that is not a core part of .NET, they usually begin
with Microsoft. Libraries from other
vendors tend to start with the company name, while open source libraries
often use their project name. You are not forced to put your own types
into namespaces, but it’s recommended that you do. C# does not treat
System as a special namespace, so
nothing’s stopping you from using that for your own types, but it’s a
bad idea, because it will tend to confuse other developers. You should
pick something more distinctive for your own code, such as your company
or project name.
The namespace usually gives a clue as to the purpose of the type.
For example, all the types that relate to file handling can be found in
the System.IO namespace, while those
concerned with networking are under System.Net. Namespaces can form a hierarchy.
So the framework’s System namespace
doesn’t just contain types. It also holds other namespaces, such as
System.Net, and these often contain
yet more namespaces, such as System.Net.Sockets and System.Net.Mail. These examples show that
namespaces act as a sort of description, which can help you navigate the
library. If you were looking for regular expression handling, for
example, you might look through the available namespaces, and notice the
System.Text namespace. Looking in
there, you’d find a System.Text.RegularExpressions namespace, at
which point you’d be pretty confident that you were looking in the right
place.
Namespaces also provide a way to ensure uniqueness. The namespace
in which a type is defined is part of that type’s full name. This lets
libraries use short, simple names for things. For example, the regular
expression API includes a Capture
class that represents the results from a regular expression capture. If
you are working on software that deals with images, the term
capture is more commonly used to mean the
acquisition of some image data, and you might feel that Capture is the most descriptive name for a
class in your own code. It would be annoying to have to pick a different
name just because the best one is already taken, particularly if your
image acquisition code has no use for regular expressions, meaning that
you weren’t even planning to use the existing Capture type.
But in fact, it’s fine. Both types can be called Capture, and they will still have different
names. The full name of the regular expression Capture class is effectively System.Text.RegularExpressions.Capture, and
likewise, your class’s full name would include its containing namespace
(e.g., SpiffingSoftworks.Imaging.Capture).
If you really want to, you can write the fully qualified name of a
type every time you use it, but most developers don’t want to do
anything quite so tedious, which is where the using directives at the start of Example 1-4 come in. These state the namespaces of the types
this source file intends to use. You will normally edit this list to
match your file’s requirements, but Visual Studio provides a small
selection of commonly used ones to get you started. It chooses different
sets in different contexts. If you add a class representing a user
interface control, for example, Visual Studio would include various
UI-related namespaces in the list.
With using declarations like
these in place, you can just use the short, unqualified name for a
class. When I finally add the line of code that enables my HelloWorld
example to do its job, I’ll be using the System.Console class, but because of the first
using directive, I’ll be able to
refer to it as just Console. In fact,
that’s the only class I’ll be using, so we could remove all the other
using directives.
Note
Earlier, you saw that a project’s References describe which
libraries it uses. You might think that References are redundant—can’t
the compiler work out which external libraries we are using from the
namespaces? It could if there
were a direct correspondence between namespaces and libraries, but
there isn’t. There is sometimes an apparent connection—System.Web.dll contains classes in the
System.Web namespace, for example.
But there often isn’t—the class library includes System.Core.dll, but there is no System.Core namespace. So it is necessary to
tell Visual Studio which libraries your project depends on, as well as
saying which namespaces any particular source file uses. We will look
at the nature and structure of library files in more detail in Chapter 12.
Even with namespaces, there’s potential for ambiguity. You might
use two namespaces that both happen to define a class of the same name.
If you want to use that class, then you will need to be explicit,
referring to it by its full name. If you need to use such classes a lot
in the file, you can still save yourself some typing: you only need to
use the full name once because you can define an
alias. Example 1-5 uses aliases to resolve a
clash that I’ve run into a few times: .NET’s user interface framework,
the Windows Presentation Foundation (WPF), defines a Path class for working with Bézier curves,
polygons, and other shapes, but there’s also a Path class for working with filesystem paths,
and you might want to use both types together to produce a graphical
representation of the contents of a file. Just adding using directives for both namespaces would
make the simple name Path ambiguous
if unqualified. But as Example 1-5 shows, you can define
distinctive aliases for each.
Example 1-5. Resolving ambiguity with aliases
using System.IO;
using System.Windows.Shapes;

using IoPath = System.IO.Path;
using WpfPath = System.Windows.Shapes.Path;
With these aliases in place, you can use IoPath as a synonym for the file-related
Path class, and WpfPath for the graphical one.
Going back to our HelloWorld example, directly after the using directives comes a namespace
declaration. Whereas using
directives declare which namespaces our code will consume, a namespace
declaration states the namespace in which our own code lives. Example 1-6 shows the relevant code from Example 1-4. This is followed by an opening brace ({).
Everything between this and the closing brace at the end of the file
will be in the HelloWorld namespace.
By the way, you can refer to types in your own namespace without
qualification, without needing a using directive.
Visual Studio generates a namespace declaration with the same name as your project. You’re not required to keep this—a project can contain any mixture of namespaces, and you are free to edit the namespace declaration. But if you do want to use something other than the project name consistently throughout your project, you should tell Visual Studio, because it’s not just the first file, Program.cs, that gets this generated declaration. By default, Visual Studio adds a namespace declaration based on your project name every time you add a new file. You can tell it to use a different namespace for new files by editing the project’s properties. If you double-click on the Properties node inside a project in Solution Explorer, this opens the properties for the project, and if you go to the Application tab, there’s a “Default namespace” text box. It will use whatever you put in there for namespace declarations of any new files. (It won’t change the existing files, though.)
The .NET Framework class library nests its namespaces, and
sometimes quite extensively. The System namespace contains numerous important
types, but most types are in more specific namespaces such as System.Net or System.Net.Sockets. If the complexity of
your project demands it, you can also nest your own namespaces. There
are two ways you can do this. You can nest namespace declarations, as
Example 1-7 shows.
Alternatively, you can just specify the full namespace in a single declaration, as Example 1-8 shows. This is the more commonly used style.
Any code you write in a nested namespace will be able to use
types not just from that namespace, but also from its containing
namespaces without qualification. Code in Example 1-7 or Example 1-8 would not need
explicit qualification or using
directives to use types either in the MyApp.Storage namespace or the MyApp namespace.
When you define nested namespaces, the convention is to create a
matching folder hierarchy. If you create a project called MyApp, by
default Visual Studio will put new classes in the MyApp namespace when you add them to the
project, and if you create a new folder in the project (which you can
do in Solution Explorer) called, say, Storage, Visual Studio will put any new
classes you create in that folder into the MyApp.Storage namespace. Again, you’re not
required to keep this—Visual Studio just adds a namespace declaration
when creating the file, and you’re free to change it. The compiler
does not care if the namespace does not match your folder hierarchy.
But since the convention is supported by Visual Studio, life will be
easier if you follow it.
Inside the namespace declaration, my Program.cs file defines a
class. Example 1-9
shows this part of the file (which includes the public keywords I added earlier). The class keyword is followed by the name, and of
course the full name of the type is effectively HelloWorld.Program, because this code is
inside the namespace declaration. As you can see, C# uses braces ({}) to
delimit all sorts of things—we already saw this for namespaces, and here
you can see the same thing with the class as well as the method it
contains.
Example 1-9. A class with a method
public class Program
{
    public static void Main(string[] args)
    {
    }
}
Classes are C#’s mechanism for defining entities that combine state and behavior, a common object-oriented idiom. But, as it happens, this class contains nothing more than a single method. C# does not support global methods—all code has to be written as a member of some type. So this particular class isn’t very interesting—its only job is to act as the container for the program’s entry point. We’ll see some more interesting uses for classes in Chapter 3.
By default, the C# compiler will look for a method called Main and use that as the entry point
automatically. If you really want to, you can tell the compiler to use a
different method, but most programs stick with the convention. Whether
you designate the entry point by configuration or convention, the method
has to meet certain requirements, all of which are evident in Example 1-9.
The program entry point must be a static
method, meaning that it is not necessary to create an
instance of the containing type (Program, in this case) in order to invoke the
method. It is not required to return anything, as signified by the
void keyword here, although if you
wish you can return int instead,
which allows the program to return an exit code that the operating
system will report when the program terminates. And the method must
either take no arguments at all (which would be denoted by an empty pair
of parentheses after the method name) or, as in Example 1-9, it can accept a single argument: an
array of text strings containing the command-line arguments.
Note
Some C-family languages include the filename of the program itself as the first argument, on the grounds that it’s part of what the user typed at the command prompt. C# does not follow this convention. If the program is launched without arguments, the array’s length will be 0.
The method declaration is followed by the method body, which is currently empty. We’ve now looked at everything that Visual Studio generated for us in this file, so all that remains is to add some code inside the braces delimiting the method body. Remember, our test is failing because our program fails to meet its one requirement: to print out a certain message to the console. This requires the single line of code shown in Example 1-10, placed inside the method body.
With this in place, if I run the tests again, the Unit Test Explorer shows a checkmark by my test and reports that all tests have passed. So apparently the code is working. And we can verify that informally by running the program. You can do that from Visual Studio’s Debug menu. The Start Debugging option runs the program in the debugger, although you’ll find it runs so quickly that it finishes before you have a chance to see the output. So you might want to choose Start Without Debugging; this runs without attaching the Visual Studio debugger, but it also runs the program in such a way as to leave the console window that displays the program’s output visible after the program finishes. So if you run the program this way (which you can also do with the Ctrl-F5 keyboard shortcut), you’ll see it display the traditional message in a window that stays open until you press a key.
Now that the program is working, I want to go back to the first
code I wrote, the test, because that file illustrates some C# features
that the main program does not. If you go back to Example 1-1, it starts in a
pretty similar way to the main program: we have a series of using directives and then a namespace
declaration, the namespace being HelloWorld.Tests this
time, matching the test project name. But the class looks different.
Example 1-11 shows the relevant part of
Example 1-1.
Immediately before the class declaration is the text [TestClass]. This is an
attribute. Attributes are annotations you can apply
to classes, methods, and other features of the code. Most of them do
nothing on their own—the compiler records the fact that the attribute is
present in the compiled output, but that is all. Attributes are useful
only when something goes looking for them, so they tend to be used by
frameworks. In this case, I’m using Microsoft’s unit testing framework,
and it goes looking for classes annotated with this TestClass attribute. It will ignore classes
that do not have this annotation. Attributes are typically specific to a
particular framework, and you can define your own, as we’ll see in Chapter 15.
The two methods in the class are also annotated with attributes.
Example 1-12 shows the relevant excerpts from
Example 1-1. The test
runner will execute any methods marked with [TestInitialize] once for every test the class contains,
and will do so before running the actual test method itself. And, as you
have no doubt guessed, the [TestMethod]
attribute tells the test runner which methods represent tests.
Example 1-12. Annotated methods
[TestInitialize]
public void Initialize()
...

[TestMethod]
public void SaysHelloWorld()
...
There’s one more feature in Example 1-1: the class contents
begin with a field, shown again in Example 1-13. Fields
hold data. In this case, the Initialize method stores the console output
that it captures while the program runs in this _consoleOutput field, where it is available
for test methods to inspect. This particular field has been marked as
private, indicating that it is for
this particular class’s own use. The C# compiler will permit only code
that lives in the same class to access this data.
And with that, we’ve examined every element of a program and the test project that verifies that it works as intended.
You’ve now seen the basic structure of C# programs. I created a
Visual Studio solution containing two projects, one for tests and one for
the program itself. This was a simple example, so each project had only
one source file of interest. Both were of similar structure. Each began
with using directives indicating which
types the file uses. A namespace declaration stated the namespace that the
file populates, and this contained a class containing one or more methods
or other members such as fields.
We will look at types and their members in much more detail in Chapter 3, but first, Chapter 2 will deal with the code that lives inside methods, where we express what we want our programs to do.
[1] New to Windows, at any rate.
[2] Microsoft’s first set of .NET extensions for C++ resembled ordinary C++ more closely. In the end, it turned out to be less confusing to use a distinct syntax for something that is quite different from ordinary C++, so Microsoft deprecated the first system (Managed C++) in favor of the newer, more distinctive syntax, which is called C++/CLI.
[3] Executables typically have an .exe file extension in Windows, while libraries use .dll (historically short for dynamic link library). These are almost identical, the only difference being that an .exe file specifies an application entry point. Both file types can export features to be consumed by other components. These are both examples of assemblies, the subject of Chapter 12.
[4] Yes, Visual Studio 2012’s top-level menu items are in UPPERCASE. This is a design feature: the boxy lettering delineates the menu’s screen area without needing a border, which would waste space and add clutter. But, to avoid looking like I’m shouting, I’ll use Mixed Case hereafter.
Get Programming C# 5.0 now with the O’Reilly learning platform.
O’Reilly members experience books, live events, courses curated by job role, and more from O’Reilly and nearly 200 top publishers.

