It’s fair to say that this book relies on Visual Studio to do a fair amount of the code generation for you as you work through the examples. Such features as the Toolbox, the data source wizards you’ll see in Chapter 7, the Language Integrated Query (LINQ) editors in Chapter 10, and much more all speed up our development time, and the debugger is a fantastic piece of work. However, that’s not to say it’s the only way to do it. Before we start getting comfortable with VS2008, let’s look at a little example to show that you really can write a web page with a simple text editor and how much easier it is to do the same thing in VS2008.
You will create the same simple web page in two different ways: once using a text editor (Notepad) and then again using VS2008.
Tip
This is the only time in the entire book that you will create a website without using VS2008, and it requires you to have Microsoft Internet Information Services (IIS) installed. If you don’t have it installed, you cannot run the page without opening it in VS2008.
XP users can install it via Control Panel → Add\Remove Programs → Windows Components. Vista users will find the option under Control Panel → Programs and Features → Turn Windows features on or off. In both cases, you’ll need administrative privileges to install it, and you can accept the default options.
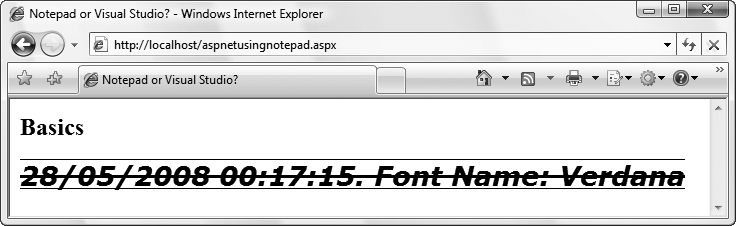
Using either technique, the resultant web page should look something like that shown in Figure 4-1. This page will demonstrate some of the properties, events, and methods common to all ASP.NET server controls.
To create this web page without the benefit of VS2008, open Notepad or your favorite editor that is capable of creating a flat text file (not Microsoft Word, for example, unless you want to jump through hoops). Enter into the file the code in Example 4-1.
Example 4-1. ASPNETUsingNotepad.aspx
<%@ Page Language="C#" %>
<script runat="server">
   void lblTime_Init(object sender, EventArgs e)
   {
      lblTime.Font.Name = "Verdana";
      lblTime.Font.Size = 20;
      lblTime.Font.Underline = true;
      lblTime.Font.Bold = true;
      lblTime.Font.Italic = true;
      lblTime.Font.Overline = true;
      lblTime.Font.Strikeout = true;
      lblTime.Text = DateTime.Now.ToString() +
         ". Font Name: " +
         lblTime.Font.Name;
   }
</script>

<html>
   <head runat="server">
      <title>Notepad or Visual Studio?</title>
   </head>
   <body>
      <form id="form1" runat="server">
         <h2>Basics</h2>
         <asp:Label ID="lblTime" runat="server"
                    OnInit="lblTime_Init" />
      </form>
   </body>
</html>
To see your page processed by ASP.NET on a web server, you need to access the page in a browser via localhost. Localhost is the domain that browsers use to make requests to an IIS web server on the local machine. The default home directory for IIS is c:\inetpub\wwwroot, so you’ll need to save the file in this directory as ASPNETUsingNotepad.aspx. If you’re an administrator, you can do this directly, but if not, you’ll need to save it in your Documents folder and then move it. The text editor will just refuse to save the file directly, but moving the file will give you the opportunity to supply an administrative password to complete the move.
Now you can open a browser and point it at http://localhost/ASPNETUsingNotepad.aspx. The browser will wait a moment while the ASP.NET runtime processes the page and returns the rendered HTML, as shown earlier in Figure 4-1.
Now you’ll create an equivalent web page using VS2008. Open the integrated development environment (IDE) and create a new website called C4_BasicControls. When Default.aspx opens, close it and delete it from the site in the Solution Explorer. Add to the site a new web form called ASPNETUsingVS2008.aspx, making sure to clear the box marked “Place code in separate file”. Change the <title> element text to "Notepad or Visual Studio?", delete the <div> element in the form, and switch to Design view. Drag a Label control onto the page and select it. In the Properties window, change the Label’s ID property to lblTime and then click the lightning bolt icon in the window to show a list of events for the Label. Double-click the box next to Init, and VS2008 will generate the skeleton code for that event handler and will switch back to Source view with the cursor in the right place for you to start writing code. Copy the highlighted code for the handler from Example 4-1 and note that as you type, the IntelliSense feature in VS2008 helps you write your code more quickly and with fewer mistakes. The finished code looks something like Example 4-2.
Example 4-2. ASPNETUsingVS2008.aspx
<%@ Page Language="C#" %>

<!DOCTYPE html PUBLIC "-//W3C//DTD XHTML 1.0 Transitional//EN"
 "http://www.w3.org/TR/xhtml1/DTD/xhtml1-transitional.dtd">

<script runat="server">

    protected void lblTime_Init(object sender, EventArgs e)
    {
        lblTime.Font.Name = "Verdana";
        lblTime.Font.Size = 20;
        lblTime.Font.Underline = true;
        lblTime.Font.Bold = true;
        lblTime.Font.Italic = true;
        lblTime.Font.Overline = true;
        lblTime.Font.Strikeout = true;
        lblTime.Text = DateTime.Now.ToString() +
           ". Font Name: " +
           lblTime.Font.Name;
    }
</script>

<html xmlns="http://www.w3.org/1999/xhtml">
<head runat="server">
    <title>Notepad or Visual Studio?</title>
</head>
<body>
    <form id="form1" runat="server">
    <h2>Basics</h2>
    <asp:Label ID="lblTime" runat="server"
      OnInit="lblTime_Init" Text="Label"></asp:Label>
    </form>
</body>
</html>
Run the page by either pressing F5 or selecting the Debug → Start menu item. You will see the same results as the previous page, shown earlier in Figure 4-1.
You can also repeat the exercise using a web form with its code in a separate file. Add to the site a new web form called ASPNETUsingCodeBehind.aspx, making sure the box marked “Place code in separate file” is checked, and follow the instructions again for ASPNETUsingVS2008.aspx. When you’re done, select Edit → IntelliSense → Organize Usings → Remove Unused Usings, to remove references to framework libraries that aren’t necessary. The results in the browser will be the same as will the HTML generated in the .aspx file. The code-behind page will look a bit different, as shown in Example 4-3.
Example 4-3. ASPNETUsingCodeBehind.aspx.cs
using System;

public partial class ASPNETUsingCodeBehind : System.Web.UI.Page
{
    protected void Page_Load(object sender, EventArgs e)
    {

    }
    protected void lblTime_Init(object sender, EventArgs e)
    {
        lblTime.Font.Name = "Verdana";
        lblTime.Font.Size = 20;
        lblTime.Font.Underline = true;
        lblTime.Font.Bold = true;
        lblTime.Font.Italic = true;
        lblTime.Font.Overline = true;
        lblTime.Font.Strikeout = true;
        lblTime.Text = DateTime.Now.ToString() +
           ". Font Name: " +
           lblTime.Font.Name;
    }
}
These three examples demonstrate a Label control, an event handler, and properties being set for a control. This simple web page has static HTML text and a Label web server control. The Label control has been assigned an ID of lblTime, which allows the control to be referred to in the code.
Of more interest is the onInit attribute, which declares a method (known as a delegate in this case) to be bound to the Init event. The Init event, a member of the Control class, is called when a control is initialized. It is the first step in each control’s life cycle. All WebControl objects, because they are derived from Control, have an Init event.
In Examples Example 4-1, Example 4-2, and Example 4-3, the Init event is handled by a method called lblTime_Init, defined in the code block at the top of the .aspx file or in the code-behind file. The lblTime_Init method sets several properties of the label’s font (Name, Size, etc.) and sets the value of the Text property. The Text property value is a concatenation of the current date and time, a literal string, and the name of the font used. Because DateTime.Now is of type DateTime, it must be converted to a string in the C# code.
The results, shown in Figure 4-1, are not pretty, but they are instructive. The figure shows how several text attributes—bold, italic, overline, underline, and strikeout—can be applied to a Label.
Fonts deserve special mention. Fonts contain the subproperties listed in Table 4-1.
Table 4-1. Subproperties of the Font object
Subproperty | Type | Values | Description |
|---|---|---|---|
| Boolean |
| Makes the text bold; default is |
| Boolean |
| Italicizes the text; default is |
| String |
| Automatically updates the first item in the |
| String |
| Ordered array of font names. Stores a list of available font names. The |
| Boolean |
| Puts a line through the text; default is |
| Boolean |
| Puts a line under the text; default is |
| Boolean |
| Puts a line over the text; default is |
|
|
| Sets the size of the font either as a named size preset in the browser or in points. |
When used in HTML, subproperties are accessed declaratively in code in the following form:
Font-Size = "small"
When used in code blocks, subproperties are accessed programmatically in this form:
lblTime.Font.Size = new FontUnit("Small");Or, when used in Visual Basic:
lblTime.Font.Size = 20
Get Programming ASP.NET 3.5, 4th Edition now with the O’Reilly learning platform.
O’Reilly members experience books, live events, courses curated by job role, and more from O’Reilly and nearly 200 top publishers.

