Chapter 4. Branching and Integration
In the course of software development, we branch files to do concurrent, parallel work on them, and we integrate files to combine the results of such work. In this chapter, weâll look at how to do branching and integration with Perforce.
This chapter wonât dwell on reasons to branch, what to branch, or how to work with different kinds of branches, Not that those things arenât importantâthey are, and theyâll be given due consideration in Part II. But for now, weâll limit our discussion to the mechanics of branching and integrating.
The Classic Case for A Branch
Of all the uses for branching , the one best understood is that of branching recently developed software for a product release. For example, assume that we are Ace Engineering and that weâve been working on a software product called Ace. Weâre gearing up to make the first release of Ace available. Our plan is to release Ace Version 1.0 while simultaneously developing new features for a future release. For this, weâre going to have to make a branch.
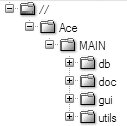
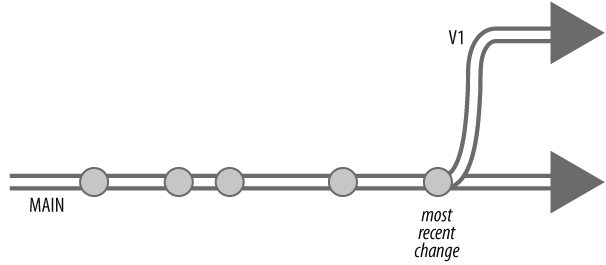
So far, thereâs one tree of files that constitutes the Ace product. Itâs in the //Ace/MAIN directory path of our depot. Until now, weâve all worked together on the files in the //Ace/MAIN tree, shown in Figure 4-1.
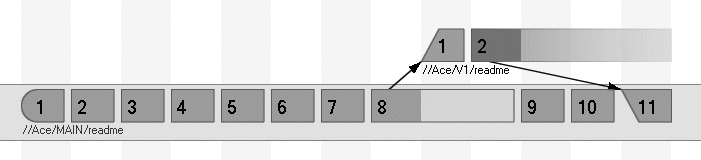
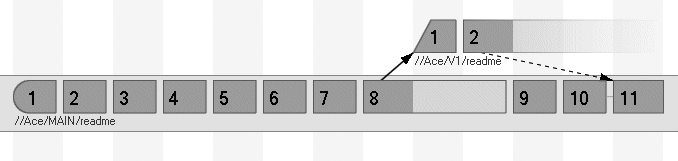
With Perforce, we can simply clone the //Ace/MAIN file tree into a new //Ace/V1 file tree. This allows us to continue working on new features in the //Ace/MAIN tree. Meanwhile, those of us testing and stabilizing the 1.0 release can work in the //Ace/V1 tree. The two file trees are shown in Figure 4-2.
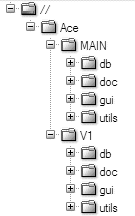
At the outset, every file in the //Ace/MAIN tree has an identical counterpart in the //Ace/V1 tree. Over time, content diverges between the two trees as new development proceeds. The //Ace/V1 tree holds the stable, 1.0 version of the product, and the //Ace/MAIN tree holds the bleeding-edge, unreleased version.
This notion of cloning a tree of files from another is the essence of branching in Perforce. We clone a tree of files so that we can make changes to either treeâor branchâwithout affecting the other. The two file trees are peers in the depot hierarchy. Moreover, every file is a full-fledged file in its own right. Files in either branch can be edited, added, deleted, renamed, or moved. And changes made in one branch can be merged or otherwise integrated to the other.
Behind the scenes, Perforce keeps track of branching. Although every branched file is a file in its own right, its lineage is stored in the Perforce database. Perforce keeps track of a fileâs integration history as well. As we successively integrate changes between a pair of branches, Perforce uses file history to keep us from having to re-merge changes weâve already merged.
Even more important is that Perforce can tell us the integration history of a branch. Given a pair of branches, Perforce can tell us which changes have already been integrated from one into the other, and which have yet to be integrated.
If all this were as simple it sounds, you wouldnât need this book. Many branch and integration operations in Perforce are quite simple, of course, but some of the simplest ones are a bit unintuitive and one or two of the essential ones just arenât that simple. The goal of this chapter is to front-load you with knowledge to keep you from making the common mistakes the first time out. And if itâs too late for that, this chapter will at least help you understand your prior missteps.
Weâll use the classic branch-for-release use case throughout this chapter to demonstrate Perforce commands and their consequences. However, the classic case is certainly not the only use to which Perforce branching can be applied. Later in this book, youâll see how Perforce branching can be used to configure products, distribute software, trace object origins, and shepherd web content, among other things.
Creating Branches
As with all operations that affect depot files, creating a branch is a two-step process in Perforce. First you use integrate to open files for branching , then you use submit to make them appear in the depot.[*]
Opening files for branching
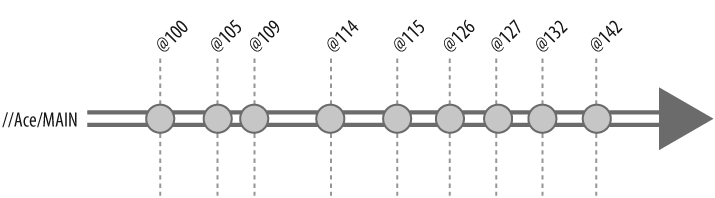
So, back to our Ace example. We can think of the evolution of //Ace/MAIN as a single timeline, punctuated by submitted changelists. (see Figure 4-3.)
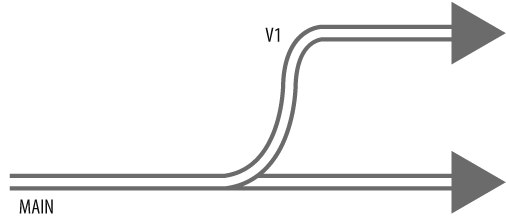
Now itâs time to branch //Ace/MAIN into //Ace/V1. (Weâll call these branches MAIN and V1, for short. See Figure 4-4.)
Making the branch is simply a matter of using integrate to clone one directory from another:
p4 integ //Ace/MAIN/... //Ace/V1/...
//Ace/V1/db/Jamfile#1 - branch/sync from //Ace/MAIN/db/Jamfile#1,#32
//Ace/V1/db/dbAcc.cpp#1 - branch/sync from //Ace/MAIN/db/dbAcc.cpp#1,#3
//Ace/V1/db/dbDefN.cpp#1 - branch/sync from //Ace/MAIN/db/dbDefN.cpp#1,#7
...(Whatâs integ? An alias of integrate.) The integrate command takes two filespecs as arguments.[*] The first identifies the donor files and the second identifies like-named target filesâthe files that will be created, in this case.
Tip
Whether itâs used to branch, rename, or integrate files, the higher calling of integrate is to propagate change. Change comes from âdonor filesâ and flows to âtarget files.â Thus the integrate command always involves a pair of filespecs, one being the donor and the other the target.
As you can see, every file in MAIN is branched to a corresponding file in V1. For example, donor file //Ace/MAIN/db/Jamfile#32 is branched to target //Ace/V1/db/Jamfile#1. From integrateâs output, we can infer that #32 is the head revision of the donor. The message branch/sync ... Jamfile#1,#32 lets us know that revisions #1 through #32 of the donor are going on record as having been integrated into revision #1 of the target.
Perforce bootstraps the new branch by copying donor files from the depot into target files in your workspace. (Thatâs what the branch/sync messages in the output of integrate mean.)
Tip
The target files, even though they donât exist yet in your workspace or in the depot, must be mapped in your workspace client view. The donor files need not be. This is commonly misunderstood.[*]
For example, to run:
p4 integ //Ace/MAIN/... //Ace/V1/...you must have a client view that encompasses the //Ace/V1 files. But it doesnât matter whether your view encompasses the //Ace/MAIN files.
Chapter 2 showed how to configure client views. Weâll see many more examples in this chapter and in the chapters that follow.
Branching from a point in time
The integrate command normally branches each donor file from its head revision. In other words, it branches from the current point in time. (Figure 4-5.)
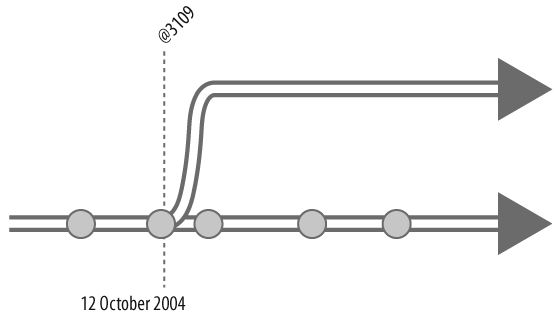
You can make integrate branch from a previous point in time by providing a revision in the donor filespec. For example, to branch MAIN from its 12 October 2004 state, you could use:
p4 integ //Ace/MAIN/...@2004/10/12 //Ace/V1/...As far as depot evolution is concerned, changelist numbers are points in time. So you could just as well use a changelist number as a branch point. For example:
p4 integ //Ace/MAIN/...@3109 //Ace/V1/...Figure 4-6 illustrates the result in either case.
Perforce is usually quite happy to let you run any integrate command you want. Before running an actual integrate, you can run it with -n to see a preview of what it will do. For example:
p4 integ -n //Ace/MAIN/... //Ace/V1/...The preview output, which is almost identical to the actual output, will help you assure that:
You arenât branching more or fewer files than you expected.
Youâre branching files into the correct paths. (And that youâve spelled the new pathname correctly!)
All of the target files are in your client view.
You have permission for the operation.
Oops, I branched the wrong files!
Even if youâve already run the integrate command, you always have the option of reverting files instead of submitting them. For example:
p4 revert //Ace/V1/...removes the newly branched //Ace/V1 files from your workspace and takes them off your pending changelist.
Itâs not a branch until the files are submitted
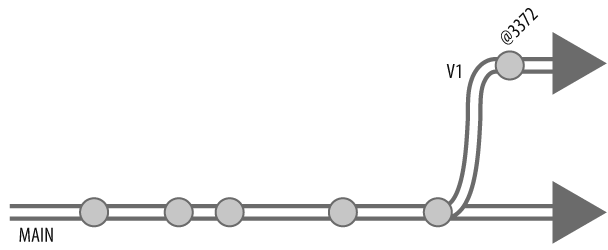
Like other Perforce commands that work on files, integrate doesnât actually affect the depot. Instead, it simply opens files to be branched. The new branch doesnât appear in the depot until youâve submitted the files:
p4 submit //Ace/V1/...
...
Change 3372 submitted.
In the timeline of the new branch, the changelist you submitted is the first event, as shown in Figure 4-7.
Can you undo and redo a branch?
Once youâve submitted branched files, theyâre a permanent part of depot history. In other words, you canât undo a branch. However, you can effectively redo a branch, in a way that satisfies most of the reasons youâd want to:
- Wrong files branched
For example, you branched files from //Ace/MAIN/... into //Ace/V1-R1.0/... when you meant to branch from //Ace/V1/.... To fix the problem, delete the branched files, then branch the correct files:
p4 delete //Ace/V1-R1.0/...
p4 submit
p4 integ -d //Ace/V1/... //Ace/V1-R1.0/...
p4 submit
(The -d option tells Perforce to go ahead and branch new files on top of deleted ones.)
- Files branched to wrong place
If youâve branched files into the wrong place, delete the branched files and rebranch the files to the right place.
- Branch not needed
If it turns out the branch wasnât need, after all, delete the branched files.
Creating really huge branches
You may think it heavy-handed that Perforce copies files into your workspace when all youâre trying to do is create a new branch in the depot. Perforce does this as a convenience to you. It assumes that if you are creating a new branch, youâre going to want to work on the newly branched files.
However, if youâre branching a really huge tree of files, a copy of the whole thing in your workspace may be the last thing you want. You can, at your optionally skip the workspace copying. The -v flag on integ does that:
p4 integ -v //Ace/MAIN/... //Ace/V1/...
//Ace/V1/db/Jamfile#1 - branch from //Ace/MAIN/db/Jamfile#1,#32
//Ace/V1/db/dbAcc.cpp#1 - branch from //Ace/MAIN/db/dbAcc.cpp#1,#3
//Ace/V1/db/dbDefN.cpp#1 - branch from //Ace/MAIN/db/dbDefN.cpp#1,#7
etc.
(The -v is for virtual as opposed to real files in your workspace.) When you use integ -v, youâll still need the target path in your client view, youâll still have files open for branching, and youâll still have to submit a changelist. But the branched files themselves wonât appear in your workspace. If you do want them in your workspace, youâll have to synchronize with them after submitting them.
Working in a New Branch
People can begin working in a new branch as soon as you submit the branched files. Working in a new branch is the same as working with files in any depot path. All thatâs needed is a workspace with a client view that includes the new branch.
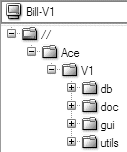
For example, if Bill wants to configure his Bill-V1 workspace for working in the new V1 branch, he can set up this client view:
p4 client Bill-V1
Â
Client Bill-V1
Root c:\ws-v1
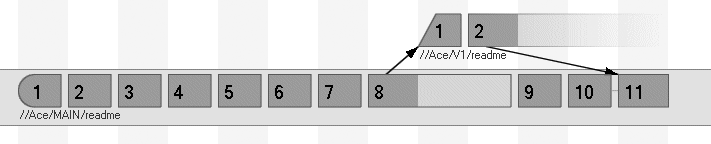
View //Ace/V1/... //Bill-V1/...The P4V screenshot in Figure 4-8 shows the scope of the Bill-V1 workspace.
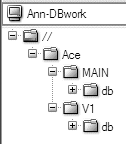
You donât have to have the whole branch in your client view, of course. In fact, you can even mix and match branch subdirectories in your workspace. Ann, for example, is doing some analysis that requires her to have the db subdirectories from both branches, MAIN and V1, in her workspace. She has her client view set up like this:
p4 client Ann-DBwork
Â
Client Ann-DBwork
Root /usr/team/ann/dbtests
View //Ace/MAIN/db/... //Ann-DBwork/MAIN/db/...
//Ace/V1/db/... //Ann-DBwork/V1/db/...The Ann-DBwork workspaceâs client view is shown in Figure 4-9.
Browsing branch history
You can use the changes command to display the history of a branch. For example:
p4 changes //Ace/V1/...
Change 3459 on 2004/10/05 by pete 'Fix titles of...'
Change 3456 on 2004/10/04 by rob 'Delete junk files...'
Change 3372 on 2004/10/04 by bill 'Branch V1...'
P4V can show you the history of a branch with its Folder History command.
Comparing branches
You can use diff2 to compare branches. It lists and diffs the files that are no longer identical:
p4 diff2 -q //Ace/MAIN/... //Ace/V1/...
= == = //Ace/MAIN/doc/Jamfile/#7 - //Ace/V1/doc/Jamfile#4 = == = (content)
= == = //Ace/MAIN/doc/index.html#1 - <none> = == =
= == = //Ace/MAIN/utils/readme#8 - <none> = == =
 (The -q option suppresses the actual diffs.)
In P4V you can use Tools â Diff files to bring up an expanding, side-by-side comparison of the two branches. Figure 4-10 shows an example.

Integrating Changes from Branch to Branch
So, Ace Engineering now has two branches, V1 and MAIN. New development continues in MAIN as bugs are fixed and last-minute changes are submitted in V1. When and why to integrate are topics weâll discuss later in the book. For now, weâll focus on how itâs done. In this case, letâs assume weâre interested in integrating V1âs changes into MAIN.
Which Changes Need Integrating?
The changes command tells us how the V1 branch has evolved:
p4 changes //Ace/V1/...
Change 3470 on 2004/10/05 by rob 'New threshold for...'
Change 3459 on 2004/10/05 by pete 'Fix titles of...'
Change 3456 on 2004/10/04 by rob 'Delete junk files...'
Change 3372 on 2004/10/04 by bill 'Branch V1...'
Not all of these changes need integrating to MAIN. Changelist 3372, as you recall, was the change that created the branch. To find out which changes do need integrating, we can use interchanges:[*]
p4 interchanges //Ace/V1/... //Ace/MAIN/...
Change 3456 on 2004/10/04 by rob 'Delete junk files...'
Change 3459 on 2004/10/05 by pete 'Fix titles of...'
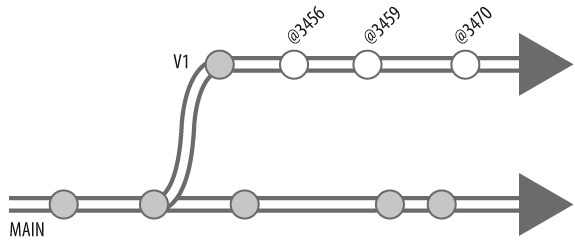
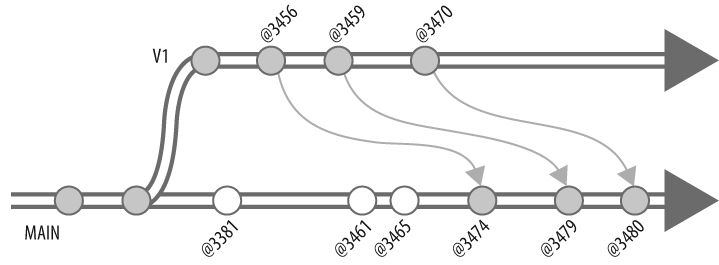
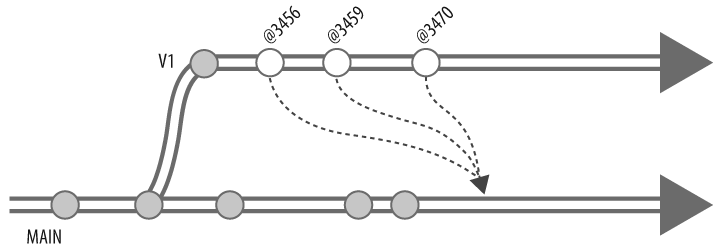
Change 3470 on 2004/10/05 by rob 'New threshold for...'Whereas changes shows all changes to a branch, interchanges shows only the changes that are not accounted for in a target branch. (See "What interchanges really tells us" later in the chapter.) In this example we see that of the three changes made to V1 since it was created, none have been integrated to MAIN. Figure 4-11 shows these changes.
Integrating Changes incrementally
A very practical way to integrate changes between branches is incrementallyâchangelist by changelist, in order. This method preserves logical changes as theyâre propagated from branch to branch. It also keeps the problems of reconciling, resolving, and merging files to a minimum. Itâs a good technique to start off with, if youâre not sure how to go about integating changes between branches.
Incremental integration is similar to branching from a point in time, using a changelist number instead of a date. Each time we integrate, we use interchanges to find out which changelist number to use.
Returning to the scenario in the previous example, here are the V1 changes as yet unaccounted for in MAIN:
p4 interchanges //Ace/V1/... //Ace/MAIN/...
Change 3456 on 2004/10/04 by rob 'Delete junk files...'
Change 3459 on 2004/10/05 by pete 'Fix titles of...'
Change 3470 on 2004/10/05 by rob 'New threshold for...'
From this we see that changelist 3456 marks the next increment to integrate, as shown in Figure 4-12.
Before doing the actual integration, letâs run integ -n to get a preview of whatâs involved:
p4 integ -n //Ace/V1/...@3456 //Ace/MAIN/...
//Ace/MAIN/doc/issues#7 - delete from //Ace/V1/doc/issues#2
//Ace/MAIN/doc/readme#10 - integrate from //Ace/V1/doc/readme#2
//Ace/MAIN/doc/setup.gif#1 - branch/sync from //Ace/V1/doc/setup.gif#1
//Ace/MAIN/qa/t102.pl#4 - integrate from //Ace/V1/qa/t102.pl#2
//Ace/MAIN/src/Jamfile#32 - integrate from //Ace/V1/src/Jamfile#2
Here we see that integrating change 3456 from V1 to MAIN will involve merging three files, branching one, and deleting another. (Remember that integrateâs target files must be in your client view. In other words, youâll need //Ace/MAIN/... in your view for this integ command to work.)
Note that Perforce isnât actually operating on a changelist. Itâs operating on file revisions. However, when you put a changelist number on the donor filespec, Perforce considers only the file revisions that existed as of the changelistâs point in time. What weâre really doing here is asking Perforce to treat the donor branch as if it had not yet evolved past the point in time represented by @3456.
Tip
Perforce assumes that if you added files in the donor branch, youâll want to add them in the target branch when you integrate. Trying to be helpful, it branches new target files from new donors. Ditto for deleted filesâif you deleted files in the donor, Perforce assumes youâll want to delete them in the target as well. If Perforce has assumed correctly, youâre all set. But if you donât want these changes propagated to the target branch, youâll have a bit of reconciling to do before you submit your changelist. See "Reconciling Structural Changes.â later in this chapter.
Once youâve familiarized yourself with what integrateâs going to do, run it for real (that is, without -n):
p4 integ //Ace/V1/...@3456 //Ace/MAIN/...Weâre not listing integrateâs output here because itâs nearly identical to that of the preview we just saw. It shows us that Perforce has:
Found files in V1 that have been modified since they were branched, and opened corresponding MAIN files for integrating.
Found files that are new in V1 and branched them into corresponding MAIN files. (Strictly speaking, it opened new MAIN files for branching.)
Found files in V1 that have been deleted and opened corresponding MAIN files for deleting.
To complete the integration, youâll now have to resolve the files that are open for integrating and submit your pending changelist:
p4 resolve
p4 submit
(In upcoming sections weâll take a look at the finer points of resolving files opened for integrating.)
Integrations wonât be repeated
So now youâve integrated change @3456 from V1 into MAIN. Look what happens when you try to integrate the same change again:
p4 integ //Ace/V1/...@3456 //Ace/MAIN/...
... - all revision(s) already integrated.Youâll get this message from the integrate command when Perforce detects that relevant revisions in the donor branch have already been accounted for in the target branch. This behavior is dictated by integration history. (See "The mechanics of integration" later in the chapter for the gory details.)
And notice that interchanges no longer reports that change 3456 needs integrating:
p4 interchanges //Ace/V1/... //Ace/MAIN/...
Change 3459 on 2004/10/05 by pete 'Fix titles of...'
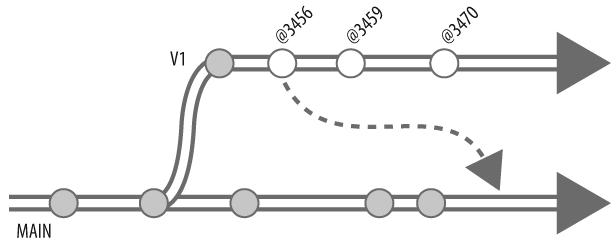
Change 3470 on 2004/10/05 by rob 'New threshold for...'If you proceed to integrate each of the remaining V1 changelists into MAIN, youâll eventually reach a point where all V1 changes are accounted for, as shown in Figure 4-13.
Now hereâs something even more interesting. What if we now try integrating in the other direction? Which changelists does Perforce think need integrating? Not the ones created by integrating V1 to MAIN, it turns out. When we flip the V1 and MAIN arguments, interchanges omits the integration changes. It lists only the MAIN changes that didnât come from V1:
p4 interchanges //Ace/MAIN/... //Ace/V1/...
Change 3381 on 2004/11/05 by sue 'New attributes...'
Change 3461 on 2004/11/05 by jan 'Optional flag for...'
Change 3465 on 2004/11/05 by jan 'Fix precedence...'
The output of interchanges is illustrated in Figure 4-14.
When Perforce detects that a change was integrated from a target, it keeps you from integrating it back into the target. Again, for the gory details, see "The mechanics of integration.â
The integrate command can open target files for branching , deleting, or integrating.[*] Files opened for integrating have to be resolved before you can submit them. Why?
Because, for each target file opened for integrating , Perforce needs to know whether you want to:
Merge the donor file into the target file
Copy the donor file to the target file
Ignore changes that were made in the donor file
You can use resolve to see which files need resolving. For example:
p4 resolve -n -o
C:\ws\MAIN\readme - merging //Ace/V1/doc/readme#2
    using base //Ace/V1/doc/readme#1
C:\ws\MAIN\qa\t102.pl - merging //Ace/V1/qa/t102.pl#2
    using base //Ace/V1/qa/t102.pl#1
C:\ws\MAIN\src\Jamfile - merging //Ace/V1/src/Jamfile#2
    using base //Ace/V1/src/Jamfile#1
(The -n flag makes resolve give you a preview. -o makes it display the base files.)
âYoursâ, âtheirsâ, and âbaseâ, revisited
Resolving, as you know, is how you tell Perforce what you want done with parallel changes to files. In Chapter 3, you read about how the files you have opened for editing can be resolved with newer revisions submitted by other people.
Resolving files during integration is almost exactly the same, only in this case files in a target branch are resolved with newer revisions in a donor branch. And, as with files youâre editing, Perforce uses the same âyoursâ, âtheirsâ, and âbaseâ terminology to identify three variants of each file. This terminology can be a little confusing when youâre integrating, however:
âYoursâ is the target file, the file being integrated into. This is the file integrate opens in your workspace, and it is the file you will submit.
âTheirsâ is the donor file, the file you are integrating from. (Even when the donor file contains changes youâve made, Perforce still calls it theirs!)
The âbaseâ is a file that will be used to compute the merged result, if you choose to merge the donor into the target.
Although the integrate command allows you to operate on entire branches, Perforce is actually processing files individually. Each file opened for integration has its own yours-theirs-base triplet of files to resolve.
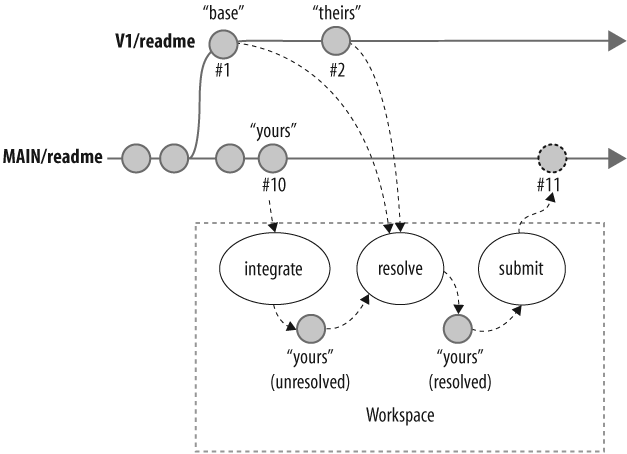
For example, readme is a file open for integration from V1 into MAIN. V1âs readme#1 was originally branched from MAIN. Its revision as of changelist 3456 is #2. In MAIN, readme#10 is the head revision. Resolving will involve a triplet of filesâMAINâs #10 as yours, V1âs #2 as theirs, and V1âs #1 as the base. (Figure 4-15.)
When you resolve readme, youâll choose whether you want to ignore theirs, copy theirs into yours, or merge theirs into yours. All this happens in your workspace, of course. Once your workspace file is resolved you can submit it. That creates readme#11 in the MAIN branch.
Perforce normally selects the head revision of the target file as âyoursâ so that youâll be merging changes into the most up-to-date file. If your workspace copy is not
already synchronized with the head revision, the integrate command resynchronizes for you. The revisions Perforce selects as theirs and the base depend on revisions you supply to the integrate command and on recorded integration history, as youâll see in "The mechanics of integration.â later in this chapter.
Merging the donor file into the target
Text files can be resolved by merging . In fact, resolveâs default behavior is to merge text files when necessary. For example, letâs say the readme file has been edited in both branches since it was branched from MAIN into V1, as illustrated in Figure 4-15. Integrating from V1 into MAIN opens the MAIN/readme file:
p4 integ -o //Ace/V1/...@3456 //Ace/MAIN/...
...
//Ace/MAIN/readme#10 - integrate from //Ace/V1/readme#2
    using base //Ace/V1/readme#1
...
(The -o flag on integrate causes the base revision to be listed.) As in the previous example, MAIN/readme#10 is yours, V1/readme#2 is theirs, and V1/readme#1 is the base. Letâs assume auto-resolving merges the file without conflict:
p4 resolve -am
...
C:\ws\MAIN\readme - merging //Ace/V1/readme#2
Diff chunks: 2 yours + 3 theirs + 0 both + 0 conflicting
- merge from //Ace/V1/readme
...
(Recall that the -am flag tells resolve to accept merges.) Your workspace file now contains the merged result. When you submit your changelist, the file is sent to the depot and MAIN/readme#11 is created:
p4 submit
...
//Ace/MAIN/readme#11 - integrate
...P4Vâs Revision Graph illustrates this, as Figure 4-16 shows.
The filelog command shows the integration history:
p4 filelog -m1 //Ace/MAIN/readme
//Ace/MAIN/readme
... #11 change 5420 integrate 2004/10/15 rob 'Pull in V1...'
... ... merge from //Ace/V1/readme#2
...
Had there been conflicts, you would have had to resolve the file interactively and edit it. And, because youâd edited it, the submitted file would have had a slightly different integration history:
p4 filelog -m1 //Ace/MAIN/readme
//Ace/MAIN/readme
... #11 change 5420 integrate 2004/10/15 rob 'Pull in V1...'
... ... edit from //Ace/V1/readme#2
...
Copying the donor file into the target
You can resolve files by copying donors to targets. Auto-resolving will do this for you, in cases where the donor file has changed and the target file has not. When Perforce encounters these conditions during interactive resolving, youâll be prompted you to resolve by copying.
For example, assume MAIN/readme#8 was branched into V1/readme#1. Since then, someone has submitted V1/readme#2. MAIN/readme hasnât changed.
As you submit files, Perforce records a history of file revisions that were integrated and how they were resolved. Youâll see integration history as you examine file history. For example, the //Ace/MAIN/readme file was branched to //Ace/DEV/readme. Hereâs its history:
p4 filelog //Ace/MAIN/readme
//Ace/MAIN/readme
... #8 change 3712 integrate ...
... ... copy from //Ace/DEV/readme#3
... #7 change 3710 edit ...
... #6 change 3709 integrate ...
... ... ignored //Ace/DEV/readme#2
... #5 change 3708 edit ...
... #4 change 3707 edit ...
... #3 change 3703 edit ...
... ... branch into //Ace/DEV/readme#1
... #2 change 3702 edit ...
... #1 change 3701 add ...
The reciprocal details show up in the history of //Ace/DEV/readme:
p4 filelog //Ace/DEV/readme
//Ace/DEV/readme
... #3 change 3711 edit ...
... ... copy into //Ace/MAIN/readme#8
... #2 change 3705 edit ...
... ... ignored by //Ace/MAIN/readme#6
... #1 change 3704 branch ...
... ... branch from //Ace/MAIN/readme#1,#3
Another way to dig up integration history is with the integrated command. For example:
p4 integrated //Ace/DEV/readme
//Ace/DEV/readme#1 - branch from //Ace/MAIN/readme#1,#3
//Ace/DEV/readme#2 - ignored by //Ace/MAIN/readme#6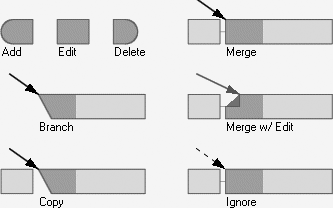
//Ace/DEV/readme#3 - copy into //Ace/MAIN/readme#8P4Vâs Revision Graph produces a great birdâs-eye view of a fileâs integration history, with succinct symbols that show how file revisions were created and integrated. Figure 4-17 shows the legend of Revision Graph symbols.
Here are the commands that integrate from V1 into MAIN:
p4 integ //Ace/MAIN/...@3456 //Ace/V1/...... //Ace/MAIN/readme#8 - integrate from //Ace/V1/readme#2 ... Âp4 resolve -am... C:\ws\MAIN\readme - merging //Ace/V1/readme#2 Diff chunks: 0 yours + 1 theirs + 0 both + 0 conflicting - copy from //Ace/V1/readme ...p4 submit... integrate //Ace/MAIN/readme#9 ...
Integrating from V1 into MAIN opens MAIN/readme#8 in your workspace, resolving copies V1/readme#2 to the MAIN/readme file in your workspace, and submitting creates a MAIN/readme#9 in the depot whose content is the same as V1/readme#2.[*]
The Revision Graph for the preceding example is shown in Figure 4-17. Compare this figure with Figure 4-17 to see the subtle difference in the symbol for MAIN/readme#11.
The history of MAIN/readme shows how V1/readme was integrated:
p4 filelog -m1 //Ace/MAIN/readme
//Ace/MAIN/readme
... #9 change 5420 integrate 2004/11/17 rob 'Pulling in V1... '
... ... copy from //Ace/V1/readme#2
You can also make resolve copy the donor file to the target regardless of whether the target file has been changed. (This is called copy-integrating.) Use the -at flag for this. For example:
p4 resolve -at
...
C:\ws\MAIN\readme - vs //Ace/V1/readme#2
Diff chunks: 1 yours + 1 theirs + 0 both + 0 conflicting
- copy from //Ace/V1/readme
...
Ignoring the donor fileâs changes
Perforce normally resolves by ignoring when it detects that nothing has changed in the donor fileâthat is, when the base and theirs have the same content.
Tip
If the donor still has the same content that it had when it was branched, isnât the donor accounted for in the target? Not necessarily. For example, the donor file may have been edited simply to change its file type. Or it may have been changed twiceâthe second time to back out the first change.
You have the option of resolving by ignoring even when the donor file has changed. Youâd do this when integrating a change that, for one reason or another, isnât applicable to the target branch.
For example, assume V1âs change 3456 is not accounted for in MAIN:
p4 interchanges //Ace/V1/... //Ace/MAIN/...
...
Change 3456 on 2004/10/05 by pete 'Promo for release...'
...
And letâs say you plan to ignore change 3456 because itâs not applicable to the MAIN branch. Still, you integrate it, so that you have a record of the fact that itâs not applicable. One of the files opened for integrating is readme:
p4 integ //Ace/V1/...@3456 //Ace/MAIN/...
...
//Ace/MAIN/readme#10 - integrate from //Ace/V1/readme#2
...
Now you auto-resolve, using the âaccept yoursâ option:
p4 resolve -ay
c:\ws\MAIN\readme - vs //Ace/V1/readme#2
- ignored //Ace/V1/readme(âAccept yoursâ is the same as âignore theirs.â) When you resolve this way, your workspace file is left unchanged. Even so, you must submit it in order to record the integration:
p4 submit
...
integrate //Ace/MAIN/readme#11
...
The Revision Graph is shown in Figure 4-18.
History now shows that V1/readme#2âs change has is been ignored, yet accounted for, in MAIN/readme:
p4 filelog //Ace/MAIN/readme
.. #11 change 5420 integrate 2004/11/17 rob 'Ignoring promo...'
... ... ignored //Ace/V1/readme#2
As you would expect, thereâs no content difference between MAINâs readme#10 and readme#11:
p4 diff2 //Ace/MAIN/readme#10 //Ace/MAIN/readme#11
= == = //Ace/MAIN/readme#10 - //Ace/MAIN/readme#11 = == = identicalAs you know, you can edit files in the course of resolving them. But what if you need to edit files after you resolve them? You can do this; you simply need to reopen the files for editing first, to make them writable.
For example, src/Jamfile is one of the files in changelist 3456. Integrating changelist 3456 will open MAINâs src/Jamfile. Thereâs nothing to keep you from reopening it for editing before you submit it:
p4 integ //Ace/V1/...@3456 //Ace/MAIN/...
p4 resolve
p4 edit //Ace/MAIN/src/Jamfile
In fact, you can run edit and integrate in any order. A file that is already opened for editing can be opened for integrating, and a file that is already opened for integrating can be opened for editing.
Integrating by subdirectory
When feasible, you can limit the scope of the integrate command to a particular subdirectory. For example, letâs say weâre interested in integrating changes to the db subdirectory. To find out which db changes in V1 need to be integrated to MAIN, we use:
p4 interchanges //Ace/V1/db/... //Ace/MAIN/db/...
Change 3470 on 2004/10/05 by rob 'New threshold for...'
This lists all the changes in V1 that involved as-yet unintegrated file revisions in the db subdirectory. It shows us that the next change to integrate is 3470. Now we double-check to make sure change 3470 affects no files outside of the db subdirectory:
p4 describe -s 3470
Change 3470 by rob on 2004/10/05
    New threshold for db page allocation ...
...
... //Ace/V1/db/dbLng.cpp#2 edit
... //Ace/V1/db/Jamfile#2 edit
This is good; we see that changelist 3470 references db files only. (To find out why this is so important, see the upcoming section "Donât break up changelists.â) To integrate the change, we use:
p4 integ //Ace/V1/db/...@3470 //Ace/MAIN/db/...
p4 resolve
p4 submit
Cherry-picking changes to integrate
âCherry-pickingâ integration is where you integrate a single change, or sequence of changes, out of order, from one branch into another. For example, assume these are the changes that currently need integration from V1 into MAIN:
p4 interchanges //Ace/V1/... //Ace/MAIN/...
Change 3456 on 2004/10/04 by rob 'Delete junk files...'
Change 3459 on 2004/10/05 by pete 'Fix titles of...'
Change 3470 on 2004/10/05 by rob 'New threshold for...'Letâs say you want to integrate Peteâs change before integrating the other two changes. (Figure 4-19.)

You can cherry-pick a change to integrate by using its changelist number in a revision range, like this:
p4 integ //Ace/V1/...@3459,@3459 //Ace/MAIN/...
//Ace/MAIN/gui/opRList.cpp#12 - integrate from //Ace/V1/gui/opRList.cpp#3,#3
//Ace/MAIN/gui/opRList.h#9 - integrate from //Ace/V1/gui/opRList.h#3,#3
The @n,@n revision syntax[*] restricts the operation to the files that were involved in changelist 3459. Two files were involved; their MAIN counterparts are now open for integrating. All you have to do now is resolve the files, submit them, and voila, change 3459 is integrated into MAIN.
Thatâs the good news. The bad news is that interchanges is not always able to detect cherry-picked changes. Thus, even after youâve submitted integrated change 3459 from V1 to MAIN, the change may still show up as unintegrated because itâs nested between two changes that really do need integrating:
p4 interchanges //Ace/V1/... //Ace/MAIN/...
Change 3456 on 2004/10/04 by rob 'Delete junk files...'
Change 3459 on 2004/10/05 by pete 'Fix titles of...'
Change 3470 on 2004/10/05 by rob 'New threshold for...'
This is an idiosyncracy of the interchanges command, not of integration history. (See "What interchanges really tells us.â) If you were to try to cherry-pick the same change again, you would see that it is already accounted for:
p4 integ //Ace/V1/...@3459,@3459 //Ace/MAIN/...
... - all revision(s) already integrated.
Tip
There are often good reasons to integrate a single change out of sequence. But unless the change is small and self-contained, cherry-picking may create more problems than it solves. What if the change builds on a previous change? If youâre not careful, you could end up integrating half of the previous change along with all of the current one. What if the change involves a renamed file? If youâve skipped past the change in which the rename occured, should you propagate the new name or not?
Itâs hard enough to keep collaboration going smoothly when changes are integrated in order. Integrating changes out of order adds complexity. Complexity, in turn, makes it more likely that something will go wrong.
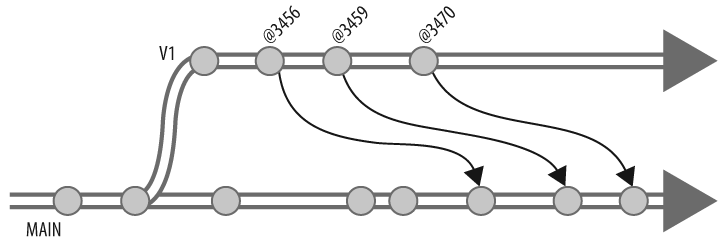
Integrating all changes at once
You have the option of integrating all changes, all at once, from one branch into another. (Figure 4-20.)
Be aware, though, that integrating everything at once can be a challenge. For one thing, it puts you in a position of having to merge several changes at the same time. The more youâre merging at once, the bigger your diffs, and the bigger your diffs, the more likely it is that merge errors will slip in unnoticed. For another, structural changes that are easy to reconcile piecemeal can be impossible to reconcile when combined with other changes. Youâll understand why after reading "Reconciling Structural Changes" later in this chapter.
For all-at-once integration you donât need to specify a donor revision. To integrate all of V1âs changes into MAIN, for example, youâd use:
p4 integ //Ace/V1/... //Ace/MAIN/...
p4 resolve
p4 submit
Because you didnât give a revision on the integ commandâs donor argument, Perforce assumes you want changes up to and including the most recent V1 change to be considered for integration. (Of course, as it considers changes, Perforce opens only the files that need integrating. So if you run this sequence of commands frequently, itâs pretty much the same as integrating incrementally.) The single change submitted to the target will effectively account for all the corresponding changes in the donor.
Which Changes Were Integrated?
If you have comm and sort programs available[*] you can use them with changes to show changes that have been integrated to a branch. For example, to list the V1 changes that have been integrated into MAIN:
p4 changes //Ace/V1/... | sort > tempfile1
p4 changes -i //Ace/MAIN/... | sort > tempfile2
comm -1 -2  tempfile1 tempfile2
Change 3456 on 2004/10/04 by rob 'Delete junk files...'
Change 3459 on 2004/10/05 by pete 'Fix titles of...'
(The changes command reports changelists that refer to files in a given filespec. tempfile1, therefore, is a list of every change submitted to V1. The -i option makes changes include the changelists that have been integrated to the files in question. tempfile2 is therefore a list of changes that were either submitted or integrated into MAIN. The comm command compares tempfile1 and tempfile2 and shows only the lines common to both.)
Donât break up changelists
You may recognize that if all of the files in changelist 3471 are within the src subdirectory, these two commands are the same:
p4 integ //Ace/V1/...@3471 //Ace/MAIN/...
p4 integ //Ace/V1/src/...@3471 //Ace/MAIN/src/...
But if changelist 3471 involves files outside of src, the commands are not the same. The first of the two integrates the entire change; the second breaks up the changelist.
Thereâs nothing to stop you from breaking up a changelistâyou can resolve and submit the src files whether or not other files were involved in changelist 3471. But you will have integrated only part of the change, not the entire change. The same thing can happen if youâre using a workspace with a client view limited to the src subdirectory. The scope of your integrate commands is limited accordingly and you wonât be able to integrate the entire change.
The unintegrated part of a change can always be integrated later, of course. But there are two problems with partially integrated changes. The first is the obvious one: youâre breaking up a logical change. Whatever it may be, the reason files were changed together in the V1 branch argues for integrating the entire change to the MAIN branch.
The second problem is that partially integrated changes can lead to false positives from some Perforce commands. If a change is only partially integrated, changes -i will report that itâs been integrated, for example. Likewise, interchanges reports partially integrated changes as unintegrated. The jobs and fixes commands, which youâll read about in later chapters, can also yield false positives on partially integrated changes.
Reconciling Structural Changes
Earlier we said that files can evolve independently in their own branches. This is completely true. Files can be added, deleted, moved, renamed, split, or combined in one branch without affecting any other branch. However, structural changes like these canât be resolved during integration. In fact, when you use the integrate command, Perforce simply matches donor and target files by name. The state of each donor file, whatever it is, is imposed upon the like-named target file. If the donor file was deleted, integrate deletes the target file. If the target file doesnât exist, it branches the donor file into it.
Matching donor and target files by name is normally quite effective for propagating structural changes. For example, say MAIN/readme#8 was branched into V1/readme#1 when you created the V1 branch . Since then, the V1/readme file has been renamed to V1/readme.txt and edited a couple of times.
Now, as you integrate from V1 to MAIN, hereâs what happens:
p4 integ //Ace/V1/... //Ace/MAIN/...
//Ace/MAIN/readme.txt#1 - branch/sync from //Ace/V1/readme.txt#3
//Ace/MAIN/readme#11 - delete from //Ace/V1/readme#3
So far, so good. Although Perforce gave you no choice in the matter, and nothing is left for you to resolve, the outcome is exactly what you wanted. When you submit your changelist, Perforce will delete MAIN/readme and branch V1/readme.txt into MAIN, effectively propagating both the content change and the structural change from V1 to MAIN.
But what if you wanted to merge the content change and ignore the structural change? What if the structural change had occured in MAIN instead of V1? Neither integrate nor resolve offers a way for you to handle these cases. However, as with files youâre editing, there are several ways to reconcile structural changes. One way is to provide Perforce with some guidance as to how branches correspond structurally. This is where branch views come in.
Using branch views
To save you from having to jot down your frequently used donor and target filespecs on a cocktail napkin, Perforce lets you save them in named, reusable branch views. Branch views are similar to client views in that they map one set of files to another. In branch views, depot files are mapped to other depot files instead of to workspace files. A branch view named V1toMAIN, that stores a mapping between V1 and MAIN, for example, looks like this:
Branch
V1toMAIN
View
//Ace/V1/... //Ace/MAIN/...
To create or change a branch view, use the branch command. This is the command that created the branch view called V1toMAIN:
p4 branch V1toMAINNote that the branch command doesnât branch filesâin fact, it has no effect at all on files.
A branch view is a spec, like client specs. When you run the branch command, youâre given a form to fill out. Once you save the form, you can use your new branch view with the integrate command. Given the branch view definition shown earlier, these two commands will now do exactly the same thing:
p4 integ -b V1toMAIN
p4 integ //Ace/V1/... //Ace/MAIN/...
Branch views change the way you use revisions with integrate. For example, these commands are equivalent:
p4 integ -b V1toMAIN @3456
p4 integ //Ace/V1/...@3456 //Ace/MAIN/...
as are these commands:
p4 integ -b V1toMAIN @3459,3459
p4 integ //Ace/V1/...@3459,3459 //Ace/MAIN/...Whatâs happening here is that when youâre using a branch view, the integrate command already knows which donor and target path to use. The revision you supply is applied to the donor path. (You canât put revisions in the branch view specs themselves, by the way.)
You can also use branch views with interchanges and diff2. The following commands are equivalent, for example:
p4 interchanges -b V1toMAIN
p4 interchanges //Ace/V1/... //Ace/MAIN/...
as are these:
p4 diff2 -q -b V1toMAIN
p4 diff2 -q //Ace/V1/... //Ace/MAIN/...
In a moment weâll show how to augment branch views to reconcile structural differences between branches.
Looking for a branch view
To list the branch views that have already been defined, use:
p4 branches
Branch V1toMAIN 2004/10/15 'Created by laura'
You can inspect a branch viewâs definition with branch -o. For example:
p4 branch -o V1toMAIN
Branch: V1toMAIN
View:
    //Ace/V1/... //Ace/MAIN/...
Branch views are reversible
You can use the same branch view to integrate changes in either direction. To apply a branch view in reverse, use integrate -r. For example, when the V1toMAIN branch view is defined as previously, these commands are equivalent:
p4 integ -r -b V1toMAIN
p4 integ //Ace/MAIN/... //Ace/V1/...
Mapping one directory structure to another
So, why all the fuss about branch views? They give us a way to coerce integrate into mapping the old directory structure in one branch to the new directory structure in another. For example, say that in changelist 3461, V1âs readme was renamed to readme.txt. As you just saw, simply integrating from V1 to MAIN will replicate the structural change:
p4 integ -n //Ace/V1/...@3461 //Ace/MAIN/...
...
//Ace/MAIN/readme.txt#1 - branch/sync from //Ace/V1/readme.txt#1
//Ace/MAIN/readme#11 - delete from //Ace/V1/readme#4
...
But what if you donât want to replicate the structural change? What if, from here on, changes to V1âs readme.txt are to be integrated into MAINâs readme? You can effect this behavior through a branch view. Weâll use the V1toMAIN branch view in this example. We update the view to map V1âs new structure to MAINâs old structure:
p4 branch V1toMAINBranch
V1toMAIN
View
//Ace/V1/...          //Ace/MAIN/...
//Ace/V1/readme.txt   //Ace/MAIN/readme
Now, when we use the V1toMAIN branch view with integrate, look what happens:
p4 integ -b V1toMAIN @3461
... - all revision(s) already integrated
Perforce makes no attempt to integrate V1âs readme change to MAIN. Why not? Because itâs now matching V1âs readme.txt to MAINâs readme. V1âs readme.txt@3461 has integration history that shows that it has not been edited since it was branched from its ancestor, readme#10 in MAIN. Therefore, there is nothing to integrate.
Once V1âs readme.txt is edited, however, Perforce will find reason to open MAINâs readme for integration. For example, say V1âs readme.txt was edited in change 3466.
Now, letâs integrate V1 to MAIN, again using the branch view:
p4 integ -o -b V1toMAIN @3466
...
//Ace/V1/readme#10 - integrate from //Ace/V1/readme.txt#2
- using base //Ace/V1/readme#3
...
As you can see, Perforce is matching V1/readme.txt to MAIN/readme. And, having found a revision of the former that is not accounted for in the latter, it opens the latter for integrating. You can resolve and submit the opened file as you would any other file opened for integrating.
Keeping added files from being propagated
You can also use branch views to prevent replication of added files. Normally, when integrate finds a new file in the donor branch, it branches it into the target branch. But you may have a situation where a file added in one branch is not appropriate for another.
For example, say the v1promo.html file that was added in V1 is not appropriate for MAIN. Unless you do something about it, v1promo.html is going to be branched when you integrate from V1 into MAIN. You can prevent this from happening by adding a line to the V1toMAIN branch view that excludes v1promo.html. For example:
p4 branch V1toMAINBranch
V1toMAIN
View
 //Ace/V1/...            //Ace/MAIN/...
 //Ace/V1/readme.txt     //Ace/MAIN/readme
-//Ace/V1/v1promo.html   //Ace/MAIN/v1promo.html
(A line that begins with â-â excludes files from the view.) Now the V1toMAIN branch view will effectively hide v1promo.html from commands that use it. That is, commands like interchanges and integrate will pay no attention to the file when you use them with the V1toMAIN branch view. If youâre working in V1, of course, youâll still be able to see and work on v1promo.html.
Keeping target files from being deleted
Normally, when integrate sees that files in the donor branch were deleted, it assumes you want the corresponding targeted files deleted as well. You can use branch views to keep integrate from deleting target files.
You can do the same thing for files that have been deleted. Normally, when integrate sees that files in the donor branch were deleted, it assumes that you want the corresponding targeted files deleted as well.
For example, say V1âs doc/issues file has been deleted. When you integrate from V1 to MAIN, Perforce either tells you that MAINâs doc/issues will be deleted:
p4 integ -b V1toMAIN @3456
...
//Ace/MAIN/doc/issues#7 - delete from //Ace/V1/doc/issues#2
...
or it tells you that it wants to delete it:
p4 integ -b V1toMAIN @3456
...
//Ace/MAIN/doc/issues#8 - can't delete from
    //Ace/V1/doc/issues#2 with -d or -Dt flag
...
(The second behavior is what youâd see if MAINâs doc/issues file had been changed recently.) In any case, letâs assume you donât want the MAIN file deleted. To keep Perforce from attempting to delete it, you can exclude it from the branch view:
p4 branch V1toMAINBranch
V1toMAIN
View
 //Ace/V1/...             //Ace/MAIN/...
 //Ace/V1/readme.txt      //Ace/MAIN/readme
-//Ace/V1/v1promo.html    //Ace/MAIN/v1promo.html
-//Ace/V1/doc/issues      //Ace/MAIN/doc/issues
Now when you run integrate using the branch view, Perforce will skip over the doc/issues file.
Deleted target files are usually of no concern to Perforce when you run integrate. Perforce cares only about propagating change from donor to target; the change that deleted the files is already accounted for in the target. But if the corresponding donor files have as-yet unintegrated changes, Perforce warns you that something is amiss.
For example, say new development in MAIN has involved deleting the entire db directory. (Granted, this is an extreme example.) And say a recent bug fix in V1 involved a change to files in db. Now, every time you integrate from V1 to MAIN, Perforce will give you warnings about the deleted target files:
p4 integ -b V1toMAIN @3467
...
//Ace/MAIN/db/dbPgLoad.cppâcan't branch from
//Ace/V1/db/dbPgLoad.cpp#2 without -d or -Dt flag
...What Perforce is telling you is that it found a change to V1âs db files that isnât accounted for in MAIN. But when it looked for db files in MAIN, all it found was deleted files. It tells you that if you really want to propagate the change, it can oblige you by branching V1âs db files into MAIN. But youâll have to run integrate using the -d flag to get it to do that.
Chances are good, however, that new development in MAIN has made changes to V1âs db files irrelevant. Perforce emits warnings because it has no way of knowing that this is the case. If the warnings annoy you, you can exclude the db files from the branch view:
p4 branch V1toMAINBranch
V1toMAIN
View
 //Ace/V1/...             //Ace/MAIN/...
 //Ace/V1/readme.txt      //Ace/MAIN/readme
-//Ace/V1/v1promo.html    //Ace/MAIN/v1promo.html
-//Ace/V1/doc/issues      //Ace/MAIN/doc/issues
-//Ace/V1/db/...          //Ace/MAIN/db/...
Henceforth your integrate commands will ignore the db files, as long as you use them with the V1toMAIN branch view.
The Arcana of Integration
(Heavens, itâs all rather arcane, isnât it?)
Reconciling Split and Combined Files
Itâs worth noting that there are ways to reconcile branches so that changes can be integrated between them even when files have been split or combined in one of them. Reconciling split and combined files is a bit of a parlor trick, but that it can be done at all is a distinguishing feature of Perforce.
Consider this case: after V1 was branched from MAIN, MAINâs parse.cpp was split into two files, parse.cpp and eval.cpp. Meanwhile, change 3472 has been submitted in V1 which affects parse.cpp.
As is your custom, you integrate change 3472 from V1 to MAIN thus:
p4 integ -b V1toMAIN @3472
...
//Ace/MAIN/parse.cpp#5 - integrate from //Ace/V1/parse.cpp#2
...MAINâs parse.cpp is opened for integrating, which is good. Maybe the change in V1âs parse.cpp should be merged into it. But what if the change should be merged into MAINâs eval.cpp? What if part of the V1 change should be merged into MAINâs parse.cpp and part of it should be merged into eval.cpp?
Unfortunately, since nothing maps V1âs parse.cpp to MAINâs eval.cpp, integrate has no way of knowing it should open the latter. Even if there were such a mapping in the V1toMAIN branch view, it would eclipse the mapping between the two parse.cpp files, because there can be only one mapping per file in a branch view. (When there is more than one, the last takes precedence.)
However, thereâs nothing to keep you from running more than one integrate command. If you know that part of MAINâs parse.cpp has been spun off into eval.cpp, you can integrate change 3472 using a pair of integrate commands:
p4 integ -o -b V1toMAIN @3472... //Ace/MAIN/parse.cpp#6 - integrate from //Ace/V1/parse.cpp#2 using base //Ace/V1/parse.cpp#1 ... Âp4 integ -o //Ace/V1/parse.cpp@3472 //Ace/MAIN/eval.cpp//Ace/MAIN/eval.cpp#1 - integrate from //Ace/V1/parse.cpp#2 using base //Ace/MAIN/parse.cpp#5
This sequence of commands opens two target files for integrating from the same donor file. When you resolve themâwhich you should do interactivelyâyouâll have a chance to pick the correct merged result for each. Whether itâs easy or hard to pick a merged result, and whether conflicts are involved, will depend on how the MAIN file was split and how the V1 file was changed.
Integration involving split and combined files is definitely in the category of things not to make a habit of. Nevertheless, software development being what it is, refactoring happens, and branches diverge. In Chapter 7 weâll look at ways to organize and use branches so that most change flows between fairly similar branches and changes that increase divergence donât have to traverse too many branches.
Integration history canât be undone
Integration history is permanent. Once integrated, changes wonât come up for integration again. So what can you do if youâve botched an integration?
For example, say youâve been incrementally integrating changes from V1 into MAIN. Youâve just integrated 3461 from V1 to MAIN, creating change 3484 in MAIN. Now you find out that change 3461 wasnât applicable to MAIN.
You always have the option of undoing an integration by simply backing out the change. (You read about how to do this in Chapter 2) For example, you can back out change 3484. This will restore the MAIN branch to what it was before you submitted the bad integration.
Backing out a change doesnât change integration history. When you next look for changes to integrate, 3461 wonât show up. As far as Perforce knows, V1âs 3461 is accounted for in MAIN. Hopefully this is what you wanted, because thereâs nothing you can do to change it.
Forcing Perforce to Redo an Integration
But what if you do want to redo an integration? For example, letâs say change 3461 was meant for MAIN. One file, db/Jamfile, was merged during the integration. Now you discover that in editing conflicts in the merged result, you managed to delete entire chunks of the file. And, in your haste, you submitted your integration before realizing what youâd done.
There are two ways to fix this. One way, of course, is to simply open MAIN/Jamfile for editing and put the missing chunks back in by cutting and pasting.
The other way to fix a bad merge is to coerce Perforce into redoing the integration. This gives you another chance at merging the orginal files.
Hereâs what youâll need to do:
Synchronize with the last good revision of the target file:
p4 sync //Ace/MAIN/db/Jamfile@3483Use this form of integrate to open the file for integrating:
p4 integ -h -f //Ace/MAIN/db/Jamfile@3484,3484(-h makes Perforce use the revision you have as the target. -f forces Perforce to ignore previous integration history. The revision range, @3484,3484, makes Perforce use @3483 as the merge base.)
Take another crack at resolving the file:
p4 resolveResynchronize the file and resolve it by ignoring the depot version:
p4 sync //Ace/MAIN/db/Jamfile
p4 resolve -ay
(The depot version, as you recall, is currently the mangled one.)
If youâre happy with the result, submit the file:
p4 submit
Note that you can redo only the parts of an integration that involve resolving files. With the procedure shown here, for example, you can redo a merge. But for integrations that involve branching or deleting files, youâll have to resort to backing out changes.
The mechanics of integration
Thanks to filespecs and changelist numbers, you can use integrate to operate on entire branches, complete changes, points in time, and various combinations thereof. But underneath it all, Perforce operates on individual file revisions. In this section we take a look at what happens to the files involved in integration operations.
When you run integrate, you provide filespecs that describe sets of donor and target files. You provide them as command arguments, in a branch view, or through a combination of both. Once integrate has analyzed donor and target files, it opens a subset of the target files. In other words, integrate operates on target files, not donor files.
Your workspaceâs client view limits the scope of the integrate command. No matter how you invoke it, integrate wonât operate on files that arenât in your client view. The target files donât necessarily have to be synchronized in your workspace, but they do have to be in your client view. The donor files, although they will be analyzed, will not be opened by integrate. So it doesnât matter whether the donor files are in your client view.
You can always use integrate -n to find out exactly which target files will be opened. For example:
p4 integ -n //Ace/MAIN/...@3456 //Ace/V1/...The Perforce Server does quite a bit of analysis to figure out which files to open. It begins the analysis by:
Making a list of the donor files that currently exist. (Note that a file exists even if its current revision is marked deleted.)
Computing a target filename for each donor filename. This is done strictly by pattern-matching, using filespecs you provide in a branch view or as command arguments. File history has no bearing on matching target filenames to donor filenames.
Now Perforce has a list of donor-target file pairs to analyze. From here on, it analyzes each donor-target pair individually. So when we say donor and target in the explanation that follows, we mean the individual files, not the entire sets.
Perforceâs next step is to assess the history of the donorâat least, as much of its history as is relevant to the current integrate command. The relevant history is tempered by:
Whether the donor was ever deleted and re-added. For integration, Perforce usually treats the donor as if it had begun life when it was was most recently re-added. (Rebranched revisions have the same effect as re-added revisions.)
Whether you supplied a revision on the integrate command. When you integrate one changelist at a time, or cherry-pick changes to integrate, youâre narrowing the relevant history of the donor.
In the context of its relevant history, the donor file is either a deleted file or not. Perforce can tell whether it needs to do anything, in some cases, without any further analysis:
If the donor is deleted and the target does not exist, nothing happens. There is nothing to integrate.
If the donor and target file are both deleted, nothing happens. There is nothing to integrate.
If the donor is not deleted, and the target does not exist, the donor needs to be branched to the target. (This is the familiar âcloningâ a file case.) The target file will be opened for branching.
These are the simple cases; even more analysis is needed for the rest. Perforce now takes stock of all the revisions in the donorâs relevant history and inspects them to see which are already accounted for in the target.
A donor revision is accounted for if it was branched or integrated into the target, or if it was branched or integrated from the target without editing. (See "Why does editing matter?" a bit latex in the chapter) A donor revision may also be considered accounted for if itâs related to the target indirectly by a trail of integration history. If all revisions of the donor have been accounted for in the target, nothing happens to the targetâthere is nothing to integrate.
If there are donor revisions not yet accounted for in the target, Perforce tests a number of factors to decide what to do with the target:
If the donor is deleted and the target is not, Perforce assumes that you want to delete the target. But before doing anything, it asks itself, âIs the target evolving, too?â If the answer is yes, it warns you that if you really want it to delete a file thatâs been modified, youâll have to run integrate -d. If the answer is no, it opens the target for deleting.
If the target is deleted but the donor is not, Perforce gives you a warning. It tells you that it can re-branch the donor file on top of the target, but youâll have to run integrate -d to force it to do so.
And, finally, in the case where both donor and target exist, and neither is deleted, Perforce synchronizes the target in the workspace, opens it for integrating, and leaves it for you to resolve.
As you know, resolving a file involves three files, âyoursâ, âtheirsâ, and the âbaseâ. The donorâs highest, unnaccounted-for revision will be used as âtheirsâ. The target file in your workspace will be used as âyoursâ.
Perforce picks the base using a formula that takes into account previous integration history.[*] As you can imagine, itâs a complicated formula; explaining it doesnât make anything clearer. Letâs just say that:
Usually the base is the revision of the donor you last integrated. This is excellent for three-way merging, because it keeps changes youâve already merged from showing up as diffs.
When you cherry-pick, the base is the the donor revision that precedes the lowest revision in the range you specified. For three-way merging, this has the effect of making changes within a revision range look like âtheirâ diffs.
Sometimes the base is a revision of the donor that is lower than the revision you last integrated. This happens when youâre integrating changes that were skipped by previous cherry-picking.
Sometimes the base is a revision of the file the donor was branched from. This makes it possible to merge changes to and from renamed files.
Sometimes the base is a file only indirectly related to both donor and target. Perforce picks a base like this when the donor has never been integrated into the target. This makes it possible to merge changes that have occured since a distant branch point.
When Perforce canât find anything better, it uses the donorâs revision #1 as the base.
Finally, new integration history is recorded when you submit the target file. The lowest and highest of the donor revisions as yet unnaccounted for are associated with the new revision of the target. The next time you integrate between donor and target, these revisions will be taken into account.
What interchanges really tells us
As you read in "Cherry-picking changes to integrate,â earlier in this chapter, interchanges can imply that a change needs integrating when in fact the change has already been cherry-picked. Once youâve fathomed the mechanics of integration, youâll see why the interchanges command behaves this way.
Perforce isnât keeping track of changelists as they are integrated from donor to target files. Instead, itâs keeping track of individual file revisions. When you run the integ command, it operates on the individual revisions that havenât been integrated. (As youâve seen in this chapter, you can run integ -n to get a list of these revisions.)
The problem with integ -n is that it yields too much information. When youâre trying to figure out what to integrate next, an itemized list of file revisions isnât that helpful. What is helpful is a list of changelistsâlogical units of work submitted by developersâthat need integrating.
The interchanges command meets this need by analyzing the donor-target integration history that would be recorded if its operands were used by integ. As you just read in âThe mechanics of integration,â each donor file has a lowest and highest revision that will be associated by integration with the new revision of its target. Each low-to-high range involves one or more files revisions, and each file revision has one changelist associated with it. The interchanges command aggregates all of the revisions in all of the low-to-high ranges and reports the sorted list of unique changelists associated with them. If a low-to-high range includes revisions previously integrated by cherry-picking, previously integrated changelists can show up in the output of interchanges.
However, as long as youâre careful about integrating changelists in order and in their entirety, interchanges will give you useful output. And as it turns out, there are other good reasons to integrate changelists in order and in their entirety. Weâll get to that in Chapter 8.
Decoding integration history
In the output of various Perforce commands, you may have noticed integration history described in terms like add from and edit into. This looks like English, but what it really is is a very terse vocabulary of integration events. The actual output depends on the commands emitting them, but once you recognize the keywords, itâs easy to interpret. Table 4-1 explains the keywords.
|
Keywords |
Explanation |
|
branch |
You branched a file. Content-wise, the file is identical to its donor. |
|
branch+add |
You branched a file and modified it before submitting it. The branched file may or may not be identical to its donor. |
|
integrate+merge |
You integrated a file and resolved it by merging. You submitted the file Perforce constructed; you didnât edit the merged result. |
|
integrate+edit |
You integrated a file and modified it before submitting it. You may have edited it to resolve merge conflicts, or you may have reopened it for editing before or after resolving it. |
|
integrate+copy |
You integrated a file and resolved it by copying the donor to it. The file is identical to its donor. |
|
integrate+ignore |
You integrated a file and resolved it by ignoring the donor. |
|
delete from/into |
You integrated a deleted file. (That is, you used integrate to delete a file.) |
|
branch+import |
You branched a file from a remote depot. The file is identical to its donor. |
Why does editing matter?
During integration, content can be merged into a file with or without your intervention. Likewise, content can be copied to a file during branching with or without your intervention. In either case, you have the option of editing the file before submitting it. (And you may not have a choice, as when editing a file to resolve merge conflicts.)
When you edit a fileâthat is, if you change any of its actual contentâyouâre doing something to it that canât be derived by copying or merging another file.[*] So, as Perforce records integration history, it notes whether youâve edited files. It uses this distinction later, to determine which donor revisions can be considered accounted for in targets.
For example, look at this integration history:
p4 integrated apples
...
apples#9 - merge from fruit#4
...
apples#1 - branch from fruit#1,#3
Here, apples#1 was branched from fruit#3. Nothing in its content was introduced by the user. And apples#9 was created by integrating from fruit into apples and resolving by merging. Because no editing was involved in creating either apples#1 or apples#9, both revisions of apples are considered accounted for in the history of fruit.
Now look at this history:
p4 integrated oranges
...
oranges#9 - edit from fruit#4
...
oranges#1 - add from fruit#1,#3
Here, oranges#1 was branched from fruit#3. Add from tells us it was edited before it was submitted. And, although oranges#9 was created by integrating from fruit, edit from tells us it was edited before it was submitted. In any case, neither oranges#1 nor oranges#9 is considered accounted for in the history of fruit, because both contain content edited by a user.
Finally, the last bit of arcana is for command-line users. Itâs about using branch views, filespecs, and revisions together on the integrate command.
When you use a branch view with integrate, the branch view dictates the donor files. You can pass filespecs as command arguments, and when you do, the filespecs are assumed to be target files.
For example, letâs say that you want to integrate the src directoryâs changes from V1 into MAIN. You can use the V1toMAIN branch view and supply MAINâs src directory as a command argument:
p4 integ -b V1toMAIN //Ace/MAIN/src/...The donor files, in this case, are the files in //Ace/V1/src, as dictated by the V1toMAIN branch view.
Now, what if you wanted to cherry-pick and integrate V1âs change 3488 while limiting the scope to the src directory? Surprisingly, the syntax is:
p4 integ -b V1toMAIN //Ace/MAIN/src/...@3488,3488This is a surprise because the filespec //Ace/MAIN/src/...@3488,3488 is an empty set. The revision range @3488,3488 refers to files in V1, not MAIN. No files in MAIN were involved in changelist 3488.
The integrate command is special in that when you use a branch view, target filepecs, and donor revisions together, you must combine the donor revision with the target filespec. This quirky syntax overloading applies only when you use a branch view. Without a branch view, you must supply both a donor and a target filespec; the donor revision is attached to the donor filespec, as you would expect:
p4 integ //Ace/V1/src/...@3488,3488 //Ace/MAIN/src/...[*] "Open,â as you recall, is Perforceâs term describing files you plan to submit.
[*] The root of this misunderstanding may be that the integrate command always cites donor files rather than target files in error messages about views. For example, say youâre integrating a/foo.c into b/foo.c. Youâll get the message a/foo.c - no target file(s) in both client and branch view if the b/... path is not in your view.
[*] interchanges is a new Perforce command; itâs still nominally undocumented. (Itâs actually documented in p4 help undoc, but itâs not guaranteed to behave the same way, or even be available, in future releases.)
[*] In fact, integrate can even open files for importing from another Perforce domain, if the donor path is in a remote depot. See Chapter 6.
[*] When you submit files that have been resolved by copying, Perforce doesnât actually send your workspace files to the depot. It simply makes lazy copies, as described in Chapter 4.
[*] @3459, @3459 is syntactically equivalent to @=3459. However, because the former syntax can be used to select a sequence of revisions, itâs often more useful than the latter for cherry-picking.
[*] comm is a program that compares lists. It comes with Unix; several Windows toolkits offer it as well. The comm command requires alphabetically sorted input; hence the need for sort. Both Windows and Unix have sort commands that can be used to filter the output of P4 commands.
[*] There is a big difference between Release 2004.2 and previous releases of Perforce when it comes to picking the revision to use as the base for merging. As of Release 2004.2, the Perforce Server uses the common ancestor as the merge base. In previous releases, it used either the closest revision of the donor that had already been integrated orâif nothing had ever been integrated from itâthe first revision of the donor.
[*] Editing a file simply to remove conflict markers is not considered a change to the content of a merged file.
Get Practical Perforce now with the O’Reilly learning platform.
O’Reilly members experience books, live events, courses curated by job role, and more from O’Reilly and nearly 200 top publishers.

