In most cases, you won't want to change the background color of your slides. Instead, you'll rely on the professionally designed themes that come with PowerPoint, which coordinate text and background color and effects into an aesthetically pleasing package.
Of course, there's an exception or two to every rule. In the case of background color, one exception to the don't-change-it rule is when you need to match your presentation to a specific (non-PowerPoint) corporate or organizational palette, such as the one your Marketing department uses for brochures and four-color ads.
Another exception is if you've monkeyed with your font color as described in Section 3.2.4. Because the human eye sees color in a relative context, black text (for example) appears different depending on whether you set it against a white background, a pink background, or a dark blue background. So when you change the color of your text, you may want to adjust the background color of your slide, too, until you find a combination that looks good to you.
To change the background color of one, some, or all of the slides in a presentation:
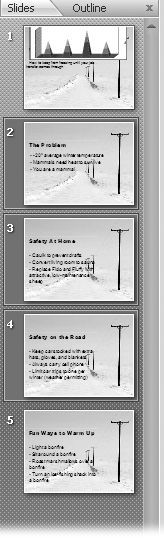
In the Slides pane (see Figure 4-6), Ctrl-click to select the slides you want to change.
You can skip this step if you want to change the background of the currently selected slide only. To select all of the slides in a presentation press Ctrl+A.
Figure 4-6. If you don't see the Slides pane on the left side of your PowerPoint window, youâor someone else who has access to your computerâmay have turned it off. In that case, head down to the Status bar and click Normal (or select View â Presentation Views â Normal). If your Slides pane doesn't look similar to this one, make sure the Slides tab is selected.
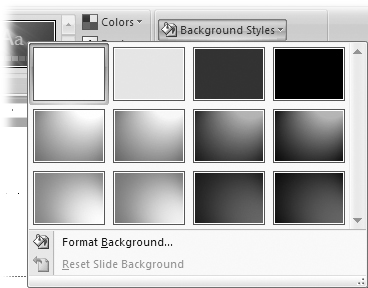
Choose Design â Background Styles.
A gallery of background color options, complete with cool gradient effects, appears (Figure 4-7).
From the gallery, click to choose an option.
The gallery disappears, and PowerPoint applies the new color-and-gradient background to all the currently selected slides.
Note
PowerPoint doesn't police you. If you apply a black background to a slide containing black text, your text becomes unreadableâand PowerPoint doesn't warn you in advance.
If you don't see a color option you like in the gallery, you can choose from a broader selection:
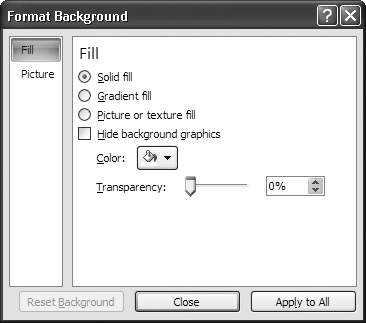
In the Background Styles gallery, choose Format Background.
The Format Background dialog box opens.
On the Fill tab, turn on the radio button next to "Solid fill."
The options you see in Figure 4-8 appear.
Figure 4-8. Click Color to display a color picker that lets you choose a new background color (see Figure 3-12 for an example). Most of the time, you'll want to stick with one of the Theme colors PowerPoint offers. After all, the whole point of themes is to help you create tasteful presentations. But if you prefer, you can always head to the bottom of the color picker and click "More colors" to apply your own custom-blended background color.
Click the Color drop-down box to display a color picker, from which you can choose the color you want.
In most cases, you should stick with a color in the Themes Colors section, so that your background color coordinates with the theme you've applied to your presentation. (You can see how to reapply a theme in Section 4.3.1.)
If you want to vary the tint of your color, drag the transparency slider. You can also change the percentage in the Transparency box.
Whether you drag the transparency slider or use the transparency box, PowerPoint automatically previews the transparency effect on the slide.
When you're satisfied with the color and transparency you've chosen, click Close (to dismiss the Format Background dialog box and apply your new background to the currently selected slides) or Apply to All (to dismiss the Format Background dialog box and apply your new background to every slide in your presentation).
A solid colored background, like the ones you learned to apply in the previous section, sometimes do the trick. But some folks think a gradient effect (Figure 4-9) looks a bit more sophisticated. Instead of a single color, gradients blend multiple bands of color for mild to wild effects. All of the basic background options that PowerPoint suggests (Figure 4-7) include gradients, but you can apply your own custom gradient effect quickly and easily.
To apply a gradient effect to your background:
Choose Design â Background â Background Styles.
A gallery of background color options appears, complete with cool gradient effects.
In the gallery, choose Format Background.
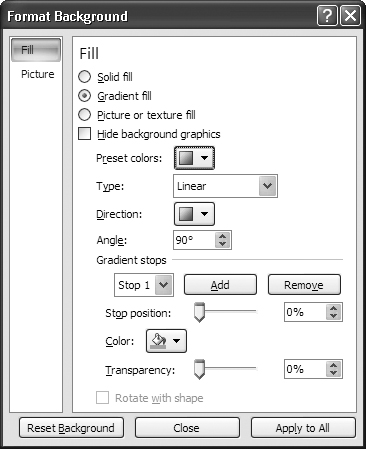
The Format Background dialog box appears.
On the Fill tab, turn on the radio box next to "Gradient fill."
PowerPoint applies a basic fill to your slide, and the gradient-related options you see in Figure 4-10 appear.
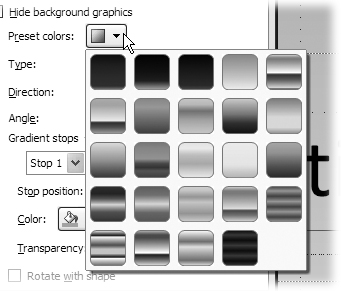
Click the down arrow next to "Preset colors."
A gallery of preset gradient options appears (Figure 4-11).
Click to choose one of the gradient presets.
If you like, you can customize the preset you selected by adding one of the following options:
Hide background objects. Tells PowerPoint not to display background graphics on top of your gradient (assuming you've added background graphics to your slides). See Section 9.4.7 for details.
Type. Lets you choose from among Linear (straight bands), Radial (bulls-eye bands), Rectangular (rectangular bands), Path (rectangular bulls-eye bands), or "Shade from title." Shade from title tells PowerPoint to display the gradient radiating from the title area outward; otherwise, the gradient radiates from the bottom right corner of the slide.
Direction. Available only if you choose a type of Linear, Radial, or Rectangle, this option lets you choose from thumbnails showing gradient bands running in different directions (straight across, up at an angle, and so on).
Angle. Available only if you choose the Linear gradient, this option lets you choose the angle at which the bands appear (45 percent is diagonal; 90 percent is straight across).
Gradient stops. Click Add to tell PowerPoint to display an additional gradient band (10's the max). To delete one of the gradient bands you begin with, choose one from the drop-down box and then click Remove.
Color. Click the down arrow next to this option to display a color picker and choose a color to apply to your gradient.
Stop position. Drag the slider (or click the arrows) next to this option to tell PowerPoint where to begin your gradient's color bands.
Transparency. Drag the slider (or click the arrows) next to this option to fade your gradient, from 100 percent (see-through) to 0 percent (completely opaque).
Rotate with shape. Normally, choosing this option tells PowerPoint to rotate the gradient bands along with the shapeâbut when you apply a gradient background effect to a slide, PowerPoint deactivates (grays out) this radio box.
When you're satisfied with your gradient effect, choose Close to apply it to the currently selected slide or Apply to All to apply it to all of the slides in your presentation.
Get PowerPoint 2007 for Starters: The Missing Manual now with the O’Reilly learning platform.
O’Reilly members experience books, live events, courses curated by job role, and more from O’Reilly and nearly 200 top publishers.

