Photoshop Elements lets you do practically anything you want to your digital images. You can colorize black-and-white photos, remove demonic red-eye stares, or distort the facial features of people whoâve been mean to you. The downside is that all those options can make it tough to find your way around Elements, especially if youâre new to the program.
This chapter helps get you oriented in Elements. Youâll learn what to expect when you launch the program, how to use Elements to fix photos with just a couple of keystrokes, and how to sign up for and connect to all the goodies that await you on Photoshop.com. Youâll also learn how to use Guided Edit mode to get started editing your photos. Along the way, youâll find out about some of Elementsâ basic controls and how to get to the programâs Help files.
People complained for a long time about how different the Mac and Windows versions of Elements were. (Previously, the Mac version gave you Adobe Bridge instead of the Elements Organizer, for instance.) In Elements 9, things are much more alike between the two platforms, but there are still a few differences.
One of the biggest differences is what you see when you launch Elements. In Windows, the program presents you with a Welcome screen (explained below) where you choose which part of Elements you want to use: the Editor or the Organizer (youâll learn about both in this chapter). On a Mac, you donât have to bother with thatâyou go right to the Editor to work on your photos. The only time you see the Welcome screen on a Mac without deliberately seeking it out is if you launch Elements for the very first time by clicking the Adobe Photoshop Elements 9 button in the last screen of the installer (Beyond This Book tells you how to install Elements).
Note
If you donât care for Elementsâ dark color scheme, unfortunately youâre out of luck in Elements 9. While the past couple of versions gave you a way to choose a lighter color for the background of the programâs windows, this is gone from Elements 9. On the plus side, the contrast between the programâs background and the text on it is a bit better than in previous versions.
When you launch the Windows version of Elements for the first time, youâre greeted by the Welcome screen (Figure 1-1). This is where you register Elements and sign up for your free Photoshop.com account (which you can only get if you live in the U.S.; Photo Downloader explains how).
Interestingly, the Welcome screen isnât actually Elements. Itâs just a launching pad that starts up one of two different programs, depending on the button you click:
You can easily hop back and forth between the Editor and the Organizerâwhich you can think of as the two halves of Elementsâand you probably wonât do much in one without eventually needing to get into the other. But in some ways, they function as two separate programs. If you start in the Organizer, then once youâve picked a photo to edit, you have to wait a few seconds while the Editor loads. When you have both the Editor and the Organizer running, just quitting the Editor doesnât close the Organizerâyou have to close both programs independently.
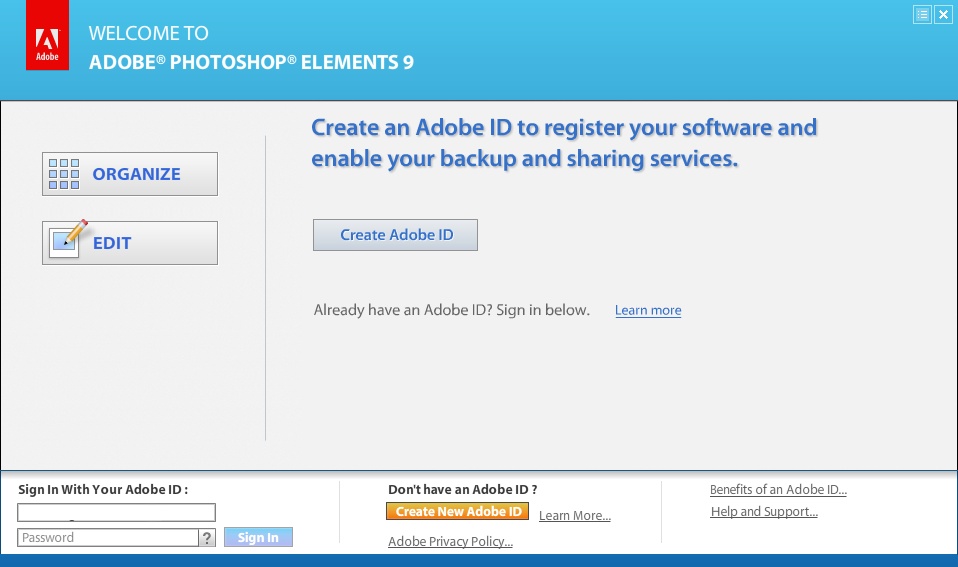
Figure 1-1. Elementsâ Welcome screen. What you see in the right part of the window changes occasionally, so it may not be exactly the same as this illustration. The left part of the window is always the same, though; itâs where you choose whether to organize or edit photos. The bottom of the screen always has links for signing into your Photoshop.com account, if you have one. You canât bypass the Welcome screen just by clicking the upper-right Close (X) button. If you do that, the screen goes awayâbut so does Elements. Fortunately, youâve got options: The box on page 18 tells you how to permanently say goodbye to this screen.
In the upper-right part of the Editorâs main window is a button that you can click to launch the Organizer or switch over to it once itâs running. The button looks like a white square with smaller squares on it. If you want to do the oppositeâget photos from the Organizer to the Editorâselect the photo(s) and then either right-click/Control-click one of the selected thumbnails and choose âEdit with Photoshop Elementsâ, or go to FixâEdit Photos, or click the down arrow to the right of the word âFixâ and choose Full, Quick, or Guided Edit. Whichever method you use, your photo(s) appear in the Editor so you can work on them. You can also just click the Editor or the Organizer icon in the Windows taskbar or the Mac Dock to switch from one to the other.
Adobe built Elements around the assumption that most people work on their photos in the following way: First, you bring photos into the Organizer to sort and keep track of them. Then, you open photos in the Editor to work on them and save them back to the Organizer when youâve finished making changes. You can work differently, of courseâlike opening photos directly in the Editor and bypassing the Organizer altogetherâbut you may feel like youâre always swimming against the current if you choose a different workflow. (The next chapter has a few hints for disabling some of Elementsâ features if you find theyâre getting in your way.)
The Welcome screen can also serve as your connecting point for signing onto Photoshop.com. Photo Downloader has more about this website, but for now you just need to know that a basic account is free if youâre in the United States (itâs not available in other countries), and it gives you access to all the interesting features in Elements 9 that require an Internet connection. If youâre signed into Photoshop.com already, you can see how much of your online storage youâve already used by looking at the graph at the bottom of the Welcome screen. Thereâs also a reminder of your personal URL at Photoshop.com and links to online help, tips, and tricks for using Elements. However, you can also get to all these things from within the Editor or the Organizer, so thereâs no need to keep the Welcome screen around just for that.
Tip
After you create your Photoshop.com account, you may have trouble with the Welcome screen if youâre not connected to the Internet when you start Elements. If the Welcome screen hangs or freezes while trying to gather your account info, just quit it (in Windows, you may need to do this in Windowsâ Task Managerâpress Ctrl+Alt+Del in XP or Ctrl+Shift+Esc in Windows 7 or Vista to call it up), then follow the directions in the box below for starting the Editor or the Organizer directly from the program file. On a Mac, click the Welcome Windowâs Dock icon (if you canât tell it from the Editorâs icon, itâs the one that says â9.0â at the end of its name when you hover your mouse over it), then choose Force Quit.
On a Mac, navigating between the Editor and the Organizer works just as described above, except that you donât normally have to go through the Welcome screen to get to them. Double-clicking the Adobe Photoshop Elements icon (in either ApplicationsâAdobe Photoshop Elements 9 or in the Dock) sends you directly to Elementsâ Editor, described on Editing Your Photos. If you prefer to start with the Organizer (see the next section), just go to ApplicationsâAdobe Elements 9 Organizer instead of going to the Adobe Photoshop Elements 9 folder in the Applications folder.
You can make permanent Dock icons for either part of Elements by either dragging the Editor or Organizerâs icon to the Dock (be sure to drag the icon, not the folder itâs in), or just launching the part of the program you want, and then, in the Dock, click and hold its iconâOptionsââKeep in Dockâ (in OS X 10.5, hold the iconââKeep in Dockâ). If you really want to see what all this Welcome screen business is about, Figure 1-2 explains how. The Welcome screen itself is exactly the same on both Windows computers and Macs.
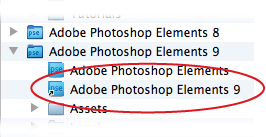
Figure 1-2. If you have a Mac and for some reason you want to see the Welcome screen, go to ApplicationsâAdobe Photoshop Elements 9, and you see two very similar icons. Double-click the one thatâs third from the top here (which is called just âAdobe Photoshop Elementsâ) to launch the Editor. Double-click the one with the curved black arrow on it (circled here) to bring up the Welcome Screen.
The Organizer is where your photos come into Elements and go out again when itâs time to print or email them. The Organizer catalogs and keeps track of your photos, and you automatically come back to it for many activities that involve sharing your photos, like emailing them (Emailing Photos) or creating an online gallery of them (Online Albums). The Organizerâs main window (Figure 1-4), which is sometimes called the Media Browser, lets you view your photos, sort them into albums, and assign keyword labels to them. (In some previous versions of Elements it was called the Photo Browser, so you may hear that term, too.)
The Organizer has lots of really cool features youâll learn about throughout this book when theyâre relevant to the task at hand. The next chapter shows you how to use the Organizer to import and organize your photos, and online Appendix B covers all the Organizerâs different menu options. Whatâs more, if you sign up for a Photoshop.com account (Photo Downloader), then you can access and organize your photos from any computer, not just at home.
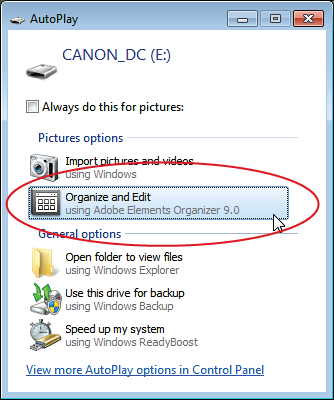
Elements has yet another component, which you may have seen already if youâve plugged a camera into your computer after installing Elements: the Photo Downloader (Figure 1-3), which helps get photos straight into the Organizer directly from your cameraâs memory card.
In Windows, the Downloader appears as one of your options in the regular Windows dialog box that you see when you connect a device. If you want to use the Downloader, then just choose it from the list.
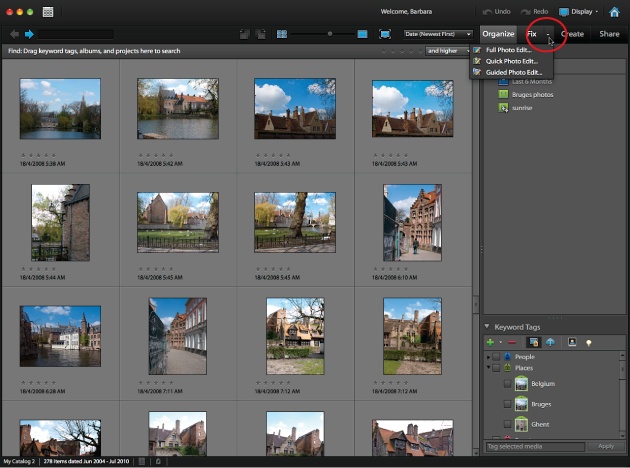
Figure 1-3. Adobeâs Photo Downloader is yet another program you get when you install Elements. Its job is to pull photos from your camera (or other storage device) into the Organizer. In Windows, to use the Downloader, just click âOrganize and Edit using Adobe Elements Organizer 9.0â (circled) in Windows 7âs or Vistaâs AutoPlay dialog box. (If you use Windows XP, youâll see a dialog box with similar options.) After the Downloader does its thing, you end up in the Organizer.
On a Mac, you launch the Downloader from the Organizer by going to FileââGet Photos and VideosâââFrom Camera or Card Readerâ. Thereâs no way to make the Downloader run automatically on a Macâyou have to go through the Organizer to start it.
You can read more about the Downloader in Chapter 2. If you plan to use the Organizer to catalog photos and assign keywords to them, then reading the section on the Downloader (The Photo Downloader) can help you avoid hair-pulling moments.
Adobe also gives you easy access to its Photoshop.com service as part of Elements. A basic account is free, and itâs nicely integrated into Elements, making it super simple to use. With a Photoshop.com account, you can:
Create your own website. You can make beautiful online albums that display your photos in elaborate slideshowsâall accessible via your own personal Photoshop.com URL (web address). Itâs great for dazzling friends and family. They can even download your photos or order prints, if you choose to let them (see Online Albums).
Figure 1-4. The Media Browser is your main Organizer workspace. Click the Create tab in the upper right and you can choose to start all kinds of new projects with your photos, or click the Share tab for ways to let other people view your images. Click the arrow to the right of the Fix tab (circled) for a menu that gives you a choice of going to Quick Fix, Guided Edit, or Full Edit. The Fix tab gives you access to some quick fixes right in the Organizer, too. The Organizer also gives you another way to look at your photos, Date view, which is explained in Chapter 2.
Automatically back up and sync your photos. Worrywarts and travelers, prepare to be amazed: You can set Elements to sync the photos from your computer to storage space on Photoshop.com, providing you with a backup, just in case. Whatâs more, you can upload photos to your albums from other computers, and they automatically appear in the Organizer the next time you start Elements. See Online Syncing and Backups for more about how to use this nifty feature.
Access your photos from other computers. When youâre not at home, pop over to your Photoshop.com account to see and even organize your photos. That way, when you visit friends, you donât need to lug your computer alongâjust log into your account from their computers.
Download lots of extra goodies. The Content panel (Working with the Content and Favorites Panels) displays thumbnails for additional backgrounds, frames, graphics, and so on, that you can download right from Photoshop.com.
Get lots of great free advice. Call up the Photoshop Inspiration Browser (The Inspiration Browser), and you can choose from a whole range of helpful tutorials for all sorts of Elements tasks and projects.
Note
These Photoshop.com features are available only in the United States, though Adobe says it plans to expand these offerings worldwide. As of this writing, folks outside the United States can get some of the same features, like the ability to create online albums and galleries, at Adobeâs Photoshop Showcase site http://photoshopshowcase.com. (See Sharing a New Album for more about the regional differences.)
You automatically get your Photoshop.com account when you register Elements. If you created an Adobe ID the first time you launched Elements (Windows) or when you installed Elements (Mac), or entered an existing Adobe ID, youâre all set.
If you didnât create an account or log in, hereâs how to sign up for a free account:
Tell Adobe you want an account.
Just click the Create New Adobe ID button on the Welcome screen (The Welcome Screen) or at the top of either the Organizer or the Editorâs main window. (FYI, this also registers Elementsâsee Beyond This Book).
In the window that opens, fill in your information to create your Adobe ID.
You need to enter the usualâaddress, phone, email, and so onâand pick what youâd like as your unique Adobe web address. (Hint: something like http://johnspictures.photoshop.com is probably already taken, so you may need to try a few alternatives. When you click Create Account, you get a message if the web address you chose is already in use.) Turn on the checkbox that says you agree to Adobeâs terms and conditions. Finally, for security purposes, you need to enter the text you see in a box on the sign-up screen.
Create your account.
Click the Create Account button. Adobe tells you if it finds any errors in what you submitted and gives you a chance to go back and fix them.
Confirm your account.
Youâll get an email from Adobe that contains a link. Just click the link to confirm that you want to create an account, and youâre all set. (You need to click the link within 24 hours of creating your account, or you may have to start the whole process again.)
Once you have an account, you can get to it by clicking Sign In at the top of the Editor or Organizer. After you sign in, you see âWelcome <your name>â instead of âSign Inâ, and you can click that to go to your account settings. (You can also look at the bottom of the Welcome screen to see how much free space you have left, as shown in Figure 1-5.)
Note
If you already have an Adobe ID (maybe youâve created one for another Adobe program or you have a Mac and you created one while installing Elements 9), you claim your Photoshop.com space by logging into your Adobe account from Elements. Youâll see a screen where you can choose a web address and tell Adobe whether you want a free or paid account.

Figure 1-5. Once you sign into your Photoshop.com account, the bottom of the Welcome screen tells you how much of your online storage space youâre currently using and includes a link for managing backups and syncing. You also see a link to your personalized web address (a helpful reminder).
A free Photoshop.com account is a pretty nice deal. It includes 2 GB of space on Adobeâs servers for backing up and storing your photos. You can also upgrade to a paid account (called Plus), which gives you more of everything: more template designs for Online Albums, more downloads from the Content panel, more tutorials, and more storage space (20â100 GB depending on what level membership you choose). However, the Plus account costs $49.99 per year for 20 GB, and more storage costs more than that, so you might want to try the free account first to see whether youâll really use it enough to justify the expense. Because this service has been available for a few years now, you can also investigate Adobeâs Photoshop.com support forum (http://forums.adobe.com/community/photoshopdotcom) as well as the independent forum sites (Beyond This Book) to see what people think about it.
Tip
If you havenât bought Elements yet, Adobe tends to promote the combination of Elements and a Plus account on their website. You have to hunt around a bit to find where to purchase Elements with just the free account, so look carefully before you buy if you donât want to start off with the paid version.
Once you sign into your account, Elements logs you in automatically every time you launch the program. If you donât want that to happen, just click your name at the top of the Elements window (in either the Organizer or Editor), and then, in the window that opens, choose Sign Out.
The Editor (Figure 1-6) is the other main component of Elements. This is the fun part of the program, where you get to edit, adjust, transform, and generally glamorize your photos, and where you can create original artwork from scratch with the drawing tools and shapes.
Figure 1-6. The main Elements editing window, which Adobe calls Full Edit. In some previous versions of Elements it was known as the Standard Editor, so keep that in mind if you ever try any tutorials written for Elements 3 or 4.
You can operate the Editor in any of three different modes:
Full Edit. The Full Edit window gives you access to Elementsâ most sophisticated tools. You have far more ways to work on your photo in Full Edit than in Quick Fix, and if youâre fussy, itâs where youâll do most of your retouching work. Most of the Quick Fix commands are also available via menus in the Full Edit window.
Quick Fix. For many Elements beginners, Quick Fix (Figure 1-7) ends up being their main workspace. Itâs where Adobe has gathered together the basic tools you need to improve most photos. Itâs also one of the two places in Elements where you can choose to have a before-and-after view while you work (Guided Edit, described below, is the other). Chapter 4 gives you all the details on using Quick Fix.
Guided Edit. This window can be a big help if youâre a newcomer to Elements. It provides step-by-step walkthroughs of popular projects such as cropping your photos and removing blemishes from them. In Elements 9, it also hosts some fun special effects and workflows for more advanced users, too (see Special Effects in Guided Edit).
The rest of this chapter covers some of the Editorâs basic concepts and key tools.
Tip
If you leave a photo open in the Editor, then when you switch back to the Organizer, you see a red band with a padlock across the photoâs Organizer thumbnail as a reminder. To get rid of the lock and free up your image for Organizer projects, go back to the Editor and close the photo there.
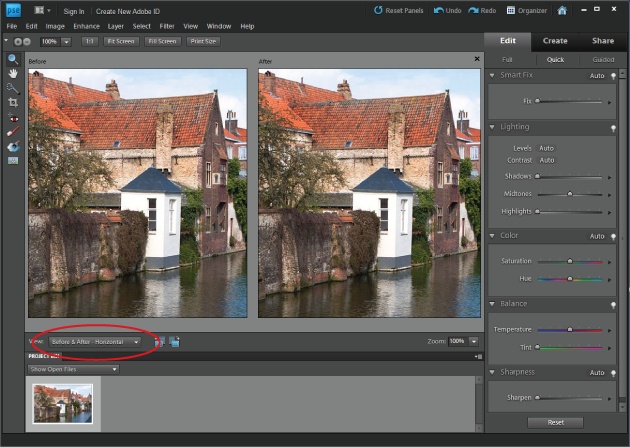
Figure 1-7. The Quick Fix window. Use the tabs at the top right of the screen to navigate from Full Edit to the Quick Fix window (and to Guided Edit, if you like) and back again. To compare your fixes with the original photo, fire up Before & After view, which you get to by clicking the View menu (circled).
When you first open the Editor, you may be dismayed at how cluttered it looks. Thereâs stuff everywhere, and maybe not a lot of room left for the photos youâre editing, especially if you have a small screen. Donât fret: One of Elementsâ best features is the way you can customize the Editorâs workspace. Thereâs practically no limit to how you can rearrange the Editor. You can leave everything the way it is if you like a cozy area with everything at hand. Or, if you want a Zen-like empty workspace with nothing visible but your photo, you can move, hide, and turn off almost everything. Figure 1-8 shows two different views of the same workspace.
Whatâs more, you can hide everything in your workspace except for your images and the menu bar: no tools, panels, or Options bar. This is handy when you want a good, undistracted look at what youâve just done to your photo. To do that, just press the Tab key; to bring everything back into view, press Tab again.
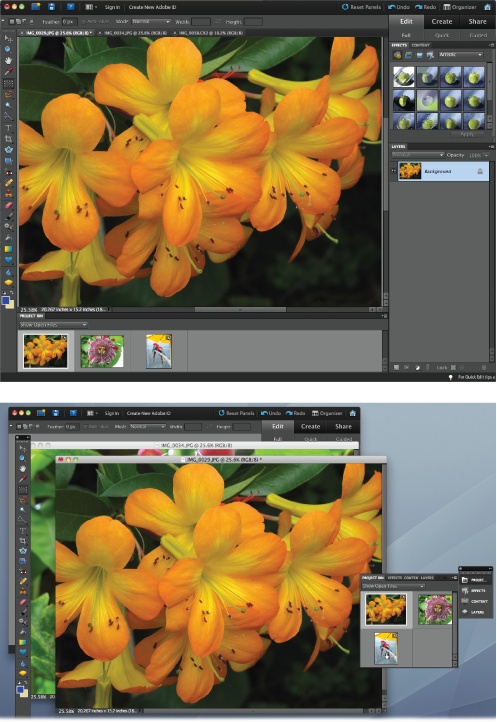
Figure 1-8. Two different ways of working with the same images, panels, and tools. You can use any arrangement that suits you. Top: The panels in the standard Elements arrangement, with the images in the regular tabbed view (page 101). Bottom: This image shows how you can customize your panels. Here, the Project bin has been combined with other floating panels and the whole group is collapsed to icons. Click a panelâs icon and that panel pops out so you can work with it, like the Project bin here. The images here are in floating windows (page 101).
Note
You may notice that in Elements 9 for Windows, the menu bar at the very top of the programâs window changes a little depending on the size of your monitor and whether youâve got the Elements window maximized to fill your screen. Youâll either see a single row above the Options bar (Elementsâ Tools) with the PSE logo at the left and the Arrange menu (Image Views) and the Photoshop.com login area at the middle of the screen (as in Figure 1-7), or these items may be in a separate row above the menus that say File, Edit, Image, and so on (as in Figure 1-8). Both are perfectly normal, and youâll see both arrangements in this bookâs illustrations, as well as seeing the Mac version, where the menu bar (the one that says File, Edit, Image, etc.) is at the top of the screen instead of being attached to the main Elements window.
When youâre in Full Edit, the right side of the Elements window displays the Panel bin. Panels let you do things like keep track of what youâve done to your photo (with the Undo History panel) and apply special effects to your images (with the Effects and Content panels). Youâll learn about the various panels in detail throughout this book.
Note
In older versions of Elements and Photoshop, panels were called âpalettes.â If you run across a tutorial that talks about the âContent palette,â for example, thatâs exactly the same thing as the Content panel.
You might like the Panel bin, but many people donât. If you have a small monitor, you may find it wastes too much desktop acreage, and in Elements you need all the working room you can get. Fortunately, you donât have to keep your panels in the bin; you can close the bin and just keep your panels floating around on your desktop, or you can minimize them.
Unlike in previous versions of Elements, you canât close the Panel bin completely in Elements 9, but you can pull the panels out of the bin and put them someplace else to give yourself more working space. If you use tabbed image windows (Zooming and Repositioning Your View), you canât expand the image area to include the empty bin space, thoughâyou have to switch to floating windows (Zooming and Repositioning Your View) to make use of that space.
Tip
While you canât collapse the Panel bin the way you could in previous versions of Elements, you can reclaim its space by pulling your panels out of the bin and going to WindowâPanel Bin to turn it off. The downside of this technique is that you lose the ability to switch from Full to Quick to Guided Edit if you do this. You have to go back to the menu and turn the Panel bin on again to get those navigation buttons back.
To pull a panel out of the bin, drag the panelâs top tab; youâve now got yourself a floating panel. (You can float panels even if you havenât turned on floating image windows.) Figure 1-9 shows how to make panels even smaller once theyâre out of the bin by collapsing them in one of two ways. You can also combine panels with each other, as shown in Figure 1-10; this works with both panels in the bin and freestanding panels.
When you launch Elements for the first time, the Panel bin contains three panels: Layers, Content, and Effects. To see how many more panels Elements actually gives you, check out the Editorâs Window menu (the one at the top of your screen): Everything listed in the menuâs middle sectionâfrom Adjustments to Undo Historyâis a panel you can put in the Panel bin.
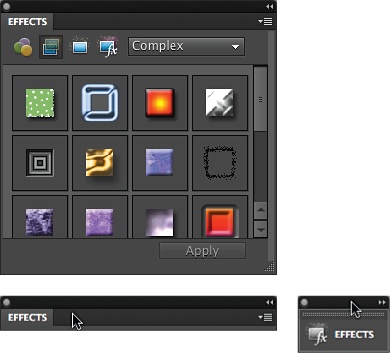
Figure 1-9. You can free up even more space by collapsing panels accordion-style once theyâre out of the bin. Top: A full-sized panel. Bottom left: A panel collapsed by double-clicking where the cursor is. Bottom right: The same panel collapsed to an icon by double-clicking the very top of it (where the cursor is here) once. Double-click the top bar again to expand it.
When you select a new panel from the Window menu, it appears in the Panel bin if youâre using the bin, or floating on the desktop. In addition to combining panels as shown in Figure 1-10, you can also collapse any group of panels into icons (see Figure 1-9). Then, to use a panel, click its icon and it jumps out to the side of the group, full size. To shrink it back to an icon, click its icon again. You can combine panels in the bin by dragging their icons onto each other. Then those panels open as a combined group, like the panels in Figure 1-10. Clicking one of the icons in the group collapses the opened, grouped panel back to icons. (Combined panel icons donât show a dark gray line between them in the group the way separate icons do.) You can also separate combined panels in icon view by dragging the icons away from each other.
Adobe sometimes refers to floating panels as âtabsâ in Elementsâ menus. To close a floating tab, click its Close button (in Windows, the X at its upper right; or on a Mac, the dot at its upper left) or click the little white square made of four horizontal lines in the panelâs upper right, and then choose Close from the menu that appears. If you want to put a panel back in the Panel bin, drag it over the bin and let go when you see a blue line, or drag it onto the tab of a panel thatâs already in the bin to create a combined panel within the bin.
In the Editor, the long narrow photo tray at the bottom of your screen is called the Project bin (Figure 1-11). It shows you what photos you have open, but it also does a lot more than that. The bin has two drop-down menus:
Show Open Files. This menu at the binâs upper left lets you determine what the Project bin displays: the photos currently open in the Editor, selected photos from the Organizer, or any of the albums (Online Albums) youâve made. If you send a bunch of photos over from the Organizer at once, you may think something went awry because no photo appears on your desktop or in the Project bin. If you switch this menu over to âShow Files from Elements Organizerâ, then youâll see the photos waiting for you in the bin.
Bin Actions. This is where the Project bin gets really useful, but itâs not easy to spot this menu. You get here by clicking the little four-lined square in the binâs upper right. You can choose to use the photos in the bin in a project (via the Create tab), share them by any of the means listed under the Task panelâs Share tab, print them, or make an album right there in the Project bin without ever going to the Organizer. (You can also use this menu to reset the style source images you use in the new Style Match feature, explained on Merging Styles.)
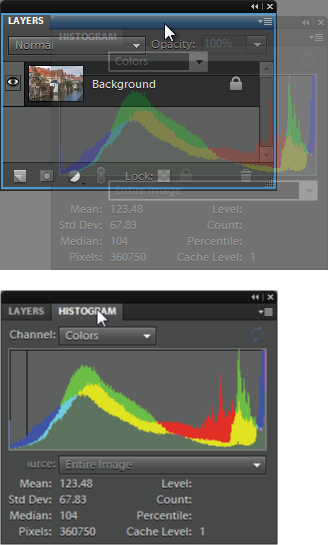
Figure 1-10. You can combine two or more panels once youâve dragged them out of the Panel bin. Top: Here, the Histogram panel is being pulled into, and combined with, the Layers panel. To combine panels, drag one of them (by clicking on the panelâs name tab) onto the other panel. When the moving panel becomes ghosted and you see the blue outline shown here, theyâll combine as soon as you let go of your mouse button. (You can also make a vertical panel group where one panel appears above another by letting go when you see a blue line at the bottom of the of the host panel, instead of an outline all the way around it like you see here.) Bottom: To switch from one panel to another after theyâre grouped, just click the tab of the one you want to use. To remove a panel from a group, simply drag it out of the group. If you want to return everything to how it looked when you first launched Elements, click Reset Panels (not visible here) at the top of your screen.
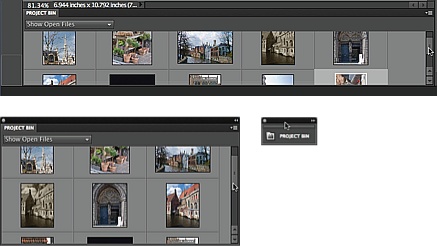
Figure 1-11. The Project bin runs across the bottom of the Editorâs screen. It holds a thumbnail of every photo you have open, as well as photos youâve sent over from the Organizer that are waiting to be opened. Here you see the bin three ways: as it normally appears (top), as a floating panel (bottom left), and collapsed to an icon (bottom right). You can also click the Close button (in Windows, thatâs the X at its upper right; on a Mac, itâs the dot at its upper left), or right-click its tab and then choose Close to hide it completely. To bring it back, go to WindowâProject bin.
Tip
If you donât use the Organizer, then the Project bin is a particularly great feature because it lets you create groups of photos you can call up together: Just put them in an album (Albums and Smart Albums), and then, from the binâs Show Open Files menu, select the albumâs name to see that group again.
You can drag your photosâ thumbnails in the bin to rearrange them if you want to use the images in a project.
The Project bin is useful, but if you have a small monitor, you may prefer to use the space it takes up for your editing work. The Project bin behaves just like any of the other panels, so you can rip it loose from the bottom of the screen and combine it with the other panels. You can even collapse it to an icon or drag it into the Panel bin. (If you combine it with other panels, the combined panel may be a little wider than it would be without the Project bin, although you can still collapse the combined group to icons.) If youâve used older versions of Elements, you know this is a great improvement over the old, fixed Project bin.
You also get to choose how you want to view the images youâre working on. Older versions of Elements used floating windows, where each image appears in a separate window that you could drag around. Elements 9 starts you out with a tabbed view, which uses something like the tabs in a web browser, or the tabs youâd find on paper file folders, but you can still put your images into floating windows, if you prefer (Zooming and Repositioning Your View explains how).The advantage of tabbed view is that it gives you plenty of workspace around your image, which is handy when youâre working near the edges of an image, or using a tool that requires you to be able to get outside the imageâs boundaries. Many people switch back and forth between floating and tabbed windows as they work, depending on which is most convenient at the moment. All the things you can do with image windowsâincluding how to switch between tabbed view and floating windowsâare explained on Zooming and Repositioning Your View. (Incidentally, clicking Reset Panels doesnât do anything to your image windows or tabs; it only resets your panels.)
Elements gives you an amazing array of tools to use when working on your photos. You get almost two dozen primary tools to help select, paint on, and otherwise manipulate images, and some of the tools have as many as six subtools hiding beneath them (see Figure 1-12). Bob Vilaâs workshop probably isnât any better stocked than Elementsâ virtual toolbox.
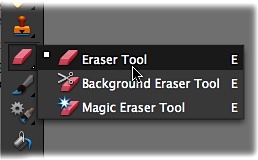
Figure 1-12. Like any good toolbox, Elementsâ Tools panel has lots of hidden drawers tucked away in it. Many Elements tools are actually groups of tools, which are represented by tiny black triangles on the lower-right side of the toolâs icon (you can see several of these triangles here). Right-clicking or holding the mouse button down when you click the icon brings out the hidden subtools. The little white square to the left of the regular Eraser tool here indicates that itâs the active tool right now.
Tip
To explore every cranny of Elements, you need to open a photo (in the Editor, choose FileâOpen). Lots of the menus are grayed out if you donât have a file open.
The long, skinny strip on the left side of the Full Edit window (shown back in Figure 1-6 on page 24) is the Tools panel. It stays perfectly organized so you can always find what you want without ever having to lift a finger to tidy it up. If you forget what a particular tool does, just hover your cursor over the toolâs icon, and a label (called a tooltip) appears telling you the toolâs name. To activate a tool, click its icon. Any tool that you select comes with its own collection of options, as shown in Figure 1-13.
As the box on Doubling Up explains, you can have either a single or double-columned Tools panel. Other windows in Elements, like Quick Fix and the Raw Converter, also have toolboxes, but none is as complete as the one in Full Edit.

Figure 1-13. When a tool is active, the Options bar changes to show settings specific to that tool. Elementsâ tools are highly customizable, letting you do things like adjust a brushâs size and shape. Here you see the Brush toolâs options. (The caterpillar-like thingy at the left is a sample of the brushstroke youâd get using the toolâs current settings.)
Note
If youâve used Elements 5 or earlier, youâll notice an important difference in getting to subtools in Elements 9: You canât switch from one tool in a subgroup to another by using the Options bar anymore. Now you can choose a tool from a group only by using the toolâs pop-out menu in the Tools panel, or by pressing its shortcut key repeatedly to cycle through the toolâs subgroup. Stop tapping the key when you see the icon for the tool you want.
Donât worry about learning the names of every tool right now, but if you want to see them all, theyâre on display in Figure 1-14. Itâs easier to remember what a tool is once youâve used it. And donât be overwhelmed by all of Elementsâ tools. You probably have a bunch of Allen wrenches in your garage that you only use every year or so. Likewise, youâll find that you tend to use certain Elements tools more than others.

Figure 1-14. The mighty Tools panel. Because some tools are grouped together in the same slot (indicated by the little black triangles next to the tool icons), you canât ever see all the tools at once. For grouped tools, the icon you see is the one for the last tool in the group you used. (This Tools panel has two columns; the box on page 32 explains how to switch from one column to two. In Elements 9, a double-columned panel doesnât save you any space, though, since the Tools panel is just as longâit simply has a lot of empty space at the bottom.)
Tip
You can save a ton of time by activating tools with their keyboard shortcuts, since you donât have to interrupt what youâre doing to trek over to the Tools panel. To see a toolâs shortcut key, hover your cursor over its icon. A label pops up indicating the shortcut key (itâs the letter to the right of the toolâs name). To activate the tool, just press the appropriate key. If the tool you want is part of a group, all the tools in that group have the same keyboard shortcut, so just keep pressing that key to cycle through the group until you get to the tool you want.
Wherever Adobe found a stray corner in Elements, they stuck some help into it. You canât move anywhere in this program without being offered some kind of guidance. Here are a few of the ways you can summon assistance if you need it:
Help menu. Choose HelpâPhotoshop Elements Help or press F1/â-?. When you do, Elements launches your web browser, which displays Elementsâ Help files, where you can search or browse a topic list and glossary. The Help menu also contains links to online video tutorials and Adobeâs support forum for Elements.
Tooltips. When you see a tooltip (Elementsâ Tools) pop up under your cursor as you move around Elements, if the tooltipâs text is blue, that means itâs linked to the appropriate section in Elementsâ Help. You can click blue-text tooltips for more information about whatever your cursor is hovering over.
Dialog box links. Most dialog boxes have a few words of bright blue text somewhere in them. That text is actually a link to Elements Help. If you get confused about what the Remove Color Cast feature does, for instance, then, in the Remove Color Cast dialog box, click the blue words âcolor castâ for a reminder.
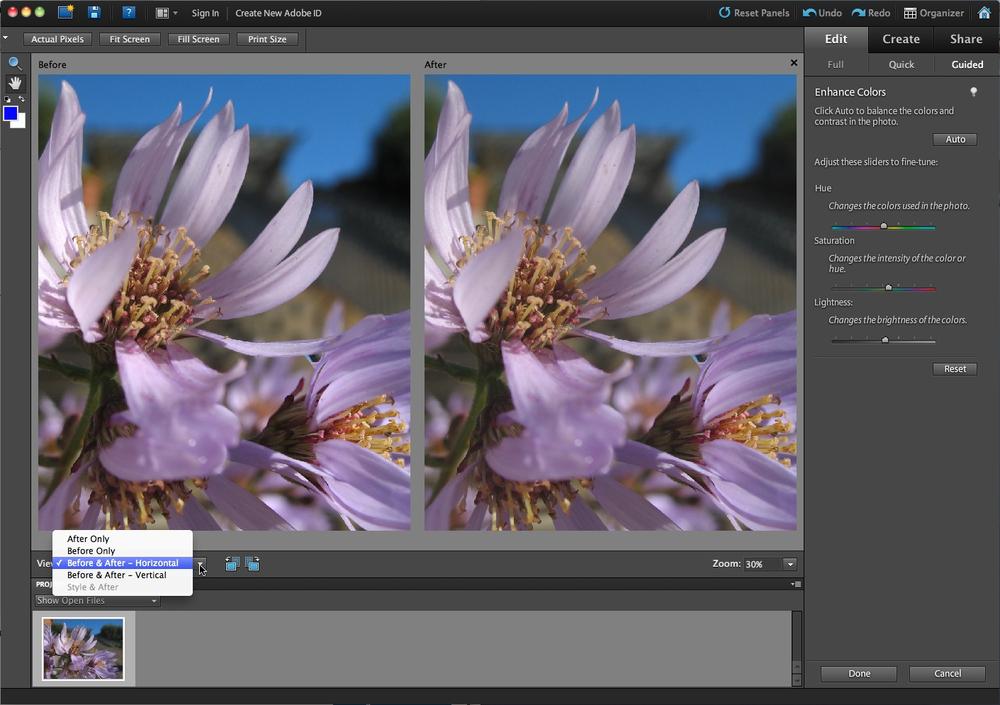
If youâre a beginner, Guided Edit, shown in Figure 1-15, can be a big help. It walks you through a variety of popular editing tasks, like cropping, sharpening, correcting colors, and removing blemishes. It also includes some features that are useful even if youâre an old Elements hand, like the Action Player (Using Actions) and the new Fun Edits (Special Effects in Guided Edit). Guided edit is really easy to use:
In the Editor, click the Edit tabâGuided.
Open a photo.
Press Ctrl+O/â-O, and then, in the window that appears, choose your photo. If you already have an image open, it appears in the Guided Edit window automatically. If you have several photos in the Project bin, then you can switch images by double-clicking the thumbnail of the one you want to work on.
Figure 1-15. Guided Edit gives you step-by-step help with basic photo editing. Just use the tools that appear in the right-hand panel once you choose an activity, like the ones shown here. As with the Quick Fix, you can change the view to Before & After; simply use this pop-out menu (where the cursor is) to select the view you want.
Your options are grouped into major categories like Basic Photo Edits and Color Correction, with a variety of specific projects under each heading. Just click the task you want in the list on the right side of the window, and the panel displays the relevant buttons and/or sliders for the task you selected.
Make your adjustments.
Simply move the panelâs sliders and click its buttons till you like what you see. If several steps are involved, then Elements shows you only the buttons and sliders you need to use for the current step, and then switches to a new set of choices for the next step as you go along. If you need to adjust your view of your photo while you work on it, Guided Edit has a little toolbox with the Hand (The Hand Tool) and Zoom (The Zoom Tool) tools to help you out.
If you want to start over, click Reset. If you change your mind about the whole project, click Cancel.
Click Done to finish.
If there are more steps, then you may see another set of instructions. If you see the main list of topics again, youâre all through. Donât forget to save your changes (Saving Your Work). To close your photo, press Ctrl+W/â-W, or leave it open and switch to another tab to share it or use it in a project.
Tip
Guided Edit shows you quick and easy ways to change your image, but you donât always get the best possible results. Itâs a great tool for starting out; just remember that what you see here isnât necessarily the best you can possibly make your images look. Once youâre more comfortable in Elements, Quick Fix (Chapter 4) is a good next step. Youâll find that most of the tools there are already familiar to you if youâve been using Guided Edit.
Youâve probably noticed the little text alerts that zip in and out at the bottom of both the Editor and the Organizer windows. If you click one, up pops the Adobe Elements Inspiration Browser, a mini-program that lets you watch tutorials, as you can see in Figure 1-16. You need a Photoshop.com account (available only to U.S. residents; see Photo Downloader) to use the Browser. (If you call up the Browser and you change your mind about using it, or if you donât have an account, press the Esc key to close it.) Itâs well worth checking out, because the Browser is a direct connection to a slew of tutorials about things you might want to do with Photoshop Elements or Premiere Elements (Adobeâs movie-editing program).

Figure 1-16. The Inspiration Browser offers a wealth of tutorials on many different Elements-related topics. Some are videos, and others are in PDF format.
The first time you start the Inspiration Browser, you may see a license agreement for yet another program: Adobe AIR, which lets other programs show you content stored online without you having to launch a web browser and navigate to a website. (Adobe AIR got installed automatically along with Elements.)
This process may seem like a lot of work, but itâs well worth the effort, since you can find tutorials on everything from beginner topics like creating albums to advanced subjects like working with Displacement Maps (a sophisticated technique used for things like making your photo look like itâs painted on a brick wall, or making a page of text look like a crumpled newspaper). The tutorials are all in either PDF or video format. Youâll see tutorials from well-known Elements gurus here, but anyone can submit a tutorial for the Inspiration Browser. So if you figure out how to do a project you think might be useful to others, you can create a tutorial and send it in for approval by clicking the âSubmit a Tutorialâ button and entering the requested information in the window that appears. (You need to create your tutorial as either a PDF or, for a video, in the Flash FLV format.)
You can search for tutorials using the box on the Browserâs left, or click All Tutorials and then filter them by category or product (so you donât see Premiere Elements topics if you have only Photoshop Elements, for example). You can also click on one of the column headings to see the available tutorials arranged by title, author, difficulty, date posted, category, type (video or PDF), or the average star rating people have given it. Use the buttons at the windowâs upper right to change the view from a list to thumbnails (info about each tutorial appears below its thumbnail).
The Inspiration Browser is a wonderful resource and may well give you most of the Elements help you need beyond this book.
Tip
If the author of a tutorial has a website, then the tutorialâs page has a link to it. Exploring these links can help you find lots of useful Elements-related resources, as well as useful add-on tools that extend Elementsâ capabilities (see Chapter 19).
Elements has a couple of really wonderful features to help you avoid making permanent mistakes: the Undo command and the Undo History panel. After youâve gotten used to them, youâll probably wish it were possible to use these tools in all aspects of your life, not just Elements.
No matter where you are in Elements, you can almost always change your mind about what you just did. Press Ctrl+Z/â-Z, and the last change you made goes away. Pressing Ctrl+Z/â-Z works even if youâve just saved your photo, but only while the image is still openâif you close the file, your changes are permanent. Keep pressing Ctrl+Z/â-Z and you keep undoing your work, step by step.
If you want to redo what you just undid, press Ctrl+Y/â-Y. These keyboard shortcuts are great for toggling changes on and off while you decide whether you want to keep them. The Undo/Redo keystroke combinations work in both the Organizer and the Editor.
Note
If you donât like Ctrl+Z/â-Z and Ctrl+Y/â-Y, you have a bit of control over the key combination you use for Undo/Redo. Go to EditâPreferencesâGeneral/Photoshop ElementsâPreferencesâGeneral, where Elements gives you two other choices, both of which involve pressing the Z key in combination with the Control, Alt, and Shift keys in Windows, and with the, Option, and Shift keys on a Mac.
In the Full Edit window, you get even more control over the actions you can undo, thanks to the Undo History panel (Figure 1-17), which you open by choosing WindowâUndo History.
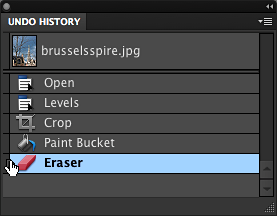
Figure 1-17. For a little time travel, just slide the pointer on the left (itâs below the cursor here) up and watch your changes disappear. You can only go back sequentially. Here, for instance, you canât go back to the Crop tool without first undoing what you did with the Paint Bucket and the Eraser. Slide the pointer down to redo your work. You can also hop to a given spot in the list by clicking the place where you want to go instead of using the slider.
This panel holds a list of the changes youâve made since you opened your image. Just drag the slider up and watch your changes disappear one by one as you go. Like the Undo command, Undo History even works if youâve saved your file: As long as you havenât closed the file, the panel tracks every action you take. You can also slide the pointer the other way to redo changes that youâve undone.
Be careful, though: You can back up only as many steps as Elements is set to remember. The program is initially set up to record 50 steps, but you can change that number by going to EditâPreferencesâPerformanceâHistory & Cache/Photoshop ElementsâPreferencesâPerformanceâHistory & Cache and adjusting the History States setting. You can set it as high as 1,000, but remembering even 100 steps may slow your computer to a crawl if you donât have a superpowered processor, plenty of memory, and loads of disk space. If Elements runs slowly on your machine, then reducing the number of history states it remembers (try 20) may speed things up a bit.
As youâre beginning to see, Elements lets you work in lots of different ways. Whatâs more, most people who use Elements approach projects in different ways. What works for your neighbor with her pictures may be quite different from how youâd work on the very same shots. But youâll hear one suggestion from almost every Elements veteran, and itâs an important one: Never, ever work on your original. Always, always, always make a copy of your image and work on that instead.
The good news is that if you store your photos in the Organizer, you donât need to worry about accidentally trashing your original. If you save your files as version sets (Saving Your Work), Elements automatically creates a copy when you edit a photo thatâs cataloged in the Organizer, so that you can always revert to your original. Other image-management programs, like iPhoto and Adobeâs Lightroom, also make versions for you if you set up Elements as your external editor (Opening Stored Images).
If youâre determined not to use the Organizer or version sets, then follow these steps to make a copy of your image in the Editor:
Go to FileâDuplicate.
The Duplicate Image dialog box appears.
Name the duplicate and then click OK in the dialog box.
Elements opens the new, duplicate image in the main image window.
Find the original image and click its Close button (the X or the red dot).
If you have floating windows (Zooming and Repositioning Your View), the Close button is the standard Windows or Mac Close button youâd see in any window. If you have tabs, the close X is on the right side of the imageâs tab in Windows, and on the left side on a Mac. Now the original is safely tucked out of harmâs way.
Save the duplicate by pressing Ctrl+S/â-S.
Choose Photoshop (.psd) as the file format when you save it. (You may want to choose another format after youâve read Chapter 3 and understand more about your different format options.)
Now you donât have to worry about making a mistake or changing your mind, because you can always start over.
Note
Elements doesnât have an autosave feature, so you should get into the habit of saving frequently as you work. Saving Your Work has more about saving.
If youâre the impatient type and youâre starting to squirm because you want to be up and doing something to your photos, hereâs the quickest way to get started in Elements: Adjust an imageâs brightness and color balance all in one step.
In the Editor, open a photo.
Press Ctrl+O/â-O and navigate to the image you want, and then click Open.
Press Alt+Ctrl+M/Option-â-M.
Youâve just applied Elementsâ Auto Smart Fix tool (Figure 1-18).
Voilà ! You should see quite a difference in your photo, unless the exposure, lighting, and contrast were almost perfect before. The Auto Smart Fix tool is one of Elementsâ many easy-to-use features. (Of course, if you donât like what just happened to your photo, no problemâsimply press Ctrl+Z/â-Z to undo it.)
If youâre really raring to go, jump ahead to Chapter 4 to learn about using the Quick Fix commands. But itâs worth taking the time to read the next two chapters so you understand which file formats to choose and how to make some basic adjustments to your images, like rotating and cropping them.
Donât forget to give Guided Edit a try if you see what you want to do in its list of topics. Guided Edit (Getting Help) can be a big help while youâre learning your way around.

Figure 1-18. Auto Smart Fix is the quickest, easiest way to improve the quality of your photos. Top left: The original, unedited picture. Top right: Auto Smart Fix makes quite a difference, but the colors are still slightly off. Bottom: By using some of the other tools youâll learn about in this book (like Auto Contrast and Adjust Sharpness), you can make things look even better.
Get Photoshop Elements 9: The Missing Manual now with the O’Reilly learning platform.
O’Reilly members experience books, live events, courses curated by job role, and more from O’Reilly and nearly 200 top publishers.

