Colorizing a Black-and-White Photo
So far, you've read about ways to keep color in an image while you make part of it black and white. But what about when you've got a black-and-white photo to begin with and you want to add color to it? It's very easy to color your black-and-white photos with Elements. For instance, you can give an old photo the sort of hand-tinted effect you sometimes see in antique prints, as shown in Figure 9-20.
You can easily color things with Elements. Before you start tinting your photo, you should first make any repairs. See Section 9.4.2 for repair strategies, and for fixes to the exposure, see Section 7.1.1.
Make sure your photo is in RGB mode.
Go to Image â Mode â RGB. Your photo must be in RGB mode or you can't color it.
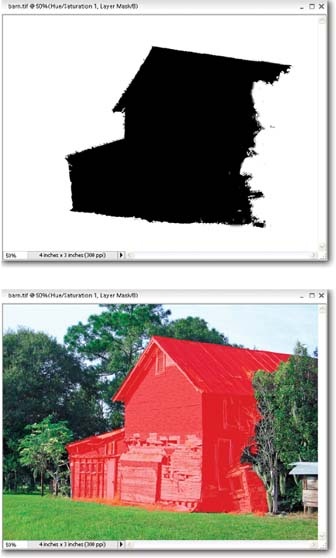
Figure 9-18. Elements not only lets you edit your layer mask, but gives you two different ways to see it. Top: To see the masked area in black, Alt+click the right thumbnail for the layer in the Layers palette. Bottom: To see the masked area in red, Alt+Shift+click the layer's thumbnail.
Create a new layer in Color mode.
Go to Layer â New â Layer and select Color as the layer mode. By choosing Color as your mode, you can paint on the layer and the image details still show through.
Paint on the layer.
Use the Brush tool (Section 11.1) and choose a color in the Toolbox's Foreground color square (Section 7.5). Keep changing the foreground ...
Get Photoshop Elements 4: The Missing Manual now with the O’Reilly learning platform.
O’Reilly members experience books, live events, courses curated by job role, and more from O’Reilly and nearly 200 top publishers.

