What’s so great about selections, anyway? Lots. After you make a selection, you can do all kinds of neat things with the selection itself, as well as the pixels that live inside it:
Move it around. To move the pixels in part of an image, you need to select them first. You can even move selections from one document to another, as discussed on Moving Selections. For example, a little head swapping is great fun after breakups—you can stick your ex’s head onto a ballerina’s body using selections (see Saving a Selection). You can even scoot your selection around while you’re making it, in case you didn’t get it in the right spot at first (see the Tip on Tip).
Resize or transform it. Need to change the size or shape of a selection before you manipulate the pixels inside it? No problem: Once you’ve made the selection, you can transform it into whatever size or shape you need (Creating a Border Selection). With this maneuver, Photoshop won’t reshape any pixels that are inside the selected area; it just changes the shape of the selection itself. This trick is handy when you’re trying to select part of an image that’s in perspective, as shown on Transforming a Selection. Likewise, you can also transform the pixels you’ve selected, which is helpful when you’re resizing or slimming your subject (Slimming with Free Transform).
Fill it with color, a repeating pattern, or nearby pixels. Normally, the Edit→Fill command or a fill layer floods an entire layer with color, but by creating a selection first, you can color just that area (handy when fixing animal white-eye, as described on Fixing Red-Eye in Camera Raw). You can also use selections in conjunction with Photoshop’s content-aware tools to remove a person or object from a photo as if they were never there (Content-Aware Fill).
Add an outline. You can add a stroke (Photoshop’s term for an outline) to any selection. For instance, you can use selections to give a photo a classy, thin black border or to circle yourself in a group photo (Stroking (Outlining) a Selection). You can also add a stroke to shapes and paths; you’ll learn all about that on Aligning and Rearranging Paths.
Use it as a mask. When you create a selection, Photoshop protects the area outside it, so anything you do to the image affects only the selected area. For example, if you paint with the Brush tool across the edge of a selection, it paints only the area inside the selection (helpful when adding color to an image that doesn’t have any). Likewise, if you create a selection before adding a layer mask (Layer Blending), Photoshop automatically loads the selected area into the mask, letting you adjust only that area. Selections are crucial when you need to swap backgrounds, correct color or lighting in just one area (Chapter 9), or change the color of an object (Changing Color).
This chapter discusses all these options and more. But first you need to understand how Photoshop indicates a selection.
When you create a selection, Photoshop calls up a lively army of animated “marching ants” (shown in Figure 4-1). These tiny soldiers dutifully march around the edge of the selected area, awaiting your command. Whenever you have an active selection (that is, whenever you see marching ants), Photoshop has eyes only for that portion of the document—any tool you use (except the Type, Pen, and shape tools) will affect only the area inside the selection.
Here are the commands you’ll use most often when making selections:
Select All. This command selects the entirety of the currently active layer and places marching ants around the perimeter of your document, which is helpful when you want to copy and paste an image from one document into another or create a border around a photo (see Stroking (Outlining) a Selection). To run this command, choose Select→All or press ⌘-A (Ctrl+A).
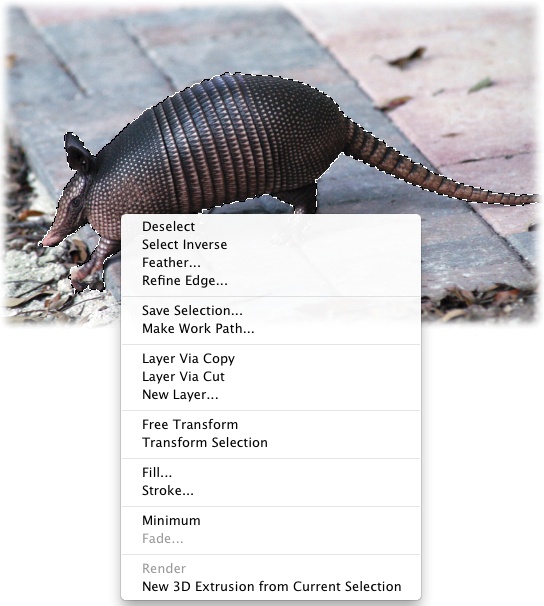
Figure 4-1. To let you know an area is selected, Photoshop surrounds it with tiny, moving dashes that look like marching ants. Here you can see the ants running around this armadillo. If you Control-click (right-click) inside the selection, you see the shortcut menu shown here, which gives you super quick access to frequently used, selection-related commands. Selections don’t hang around forever—when you click somewhere outside the selection with a selection tool, the original selection disappears, forcing you to recreate it. However, you can summon the last selection you made by choosing Select→Reselect. Page 197 explains how to save a selection so you can use it again later. (FYI, the nine-banded armadillo is the state animal of Texas. Didn’t think you’d learn that from this book, did ya?)
Deselect. To get rid of the marching ants after you’ve finished working with a selection, choose Select→Deselect or press ⌘-D (Ctrl+D). Alternatively, if one of the selection tools described in the next section is active, you can click once outside the selection to get rid of it.
Reselect. To resurrect your last selection, choose Select→Reselect or press Shift-⌘-D (Shift+Ctrl+D). This command reactivates the last selection you made, even if it was five filters and 20 brushstrokes ago (unless you’ve used the Crop or Type tools since then, which render this command powerless). Reselecting is helpful if you accidentally deselect a selection that took you a long time to create. (The Undo command [⌘-Z/Ctrl+Z] can also help in that situation.)
Inverse. This command, which you run by choosing Select→Inverse or pressing Shift-⌘-I (Shift-Ctrl+I), flip-flops a selection to select everything that wasn’t selected before. You’ll often find it easier to select what you don’t want and then inverse the selection to get what you do want. The box on Selecting the Opposite has more on this useful technique.
Load a layer as a selection. When talking to people about Photoshop, you’ll often hear the phrase “load as a selection,” which is Photoshop-speak for activating a layer that contains the object you want to work with and then summoning the marching ants so they run around that object; that way, whatever you do next affects only that object. To load everything that lives on a single layer as a selection, mouse over to the Layers panel and ⌘-click (Ctrl-click) the layer’s thumbnail. Photoshop responds by putting marching ants around everything on that layer. Alternatively, you can Control-click (right-click) the layer’s thumbnail, and then choose Select Pixels from the resulting shortcut menu.
Tip
Although you can find most of the commands in this list in the Select menu at the top of your screen (except for loading a layer as a selection), if you want to be smokin’ fast in Photoshop, you should memorize their keyboard shortcuts.
Now it’s time to discuss the tools you can use to make selections. Photoshop has a ton of ’em, so in the next several pages, you’ll find them grouped according to which kind of selections they’re best at making: by shape, color, and so on. That way, you’ll know which tool to start with the next time you need to select something.
Get Photoshop CC: The Missing Manual, 2nd Edition now with the O’Reilly learning platform.
O’Reilly members experience books, live events, courses curated by job role, and more from O’Reilly and nearly 200 top publishers.

