Installing and Removing a SIMM
- To install a SIMM
Locate a free SIMM socket of the proper type (30- or 72-pin). One side of the SIMM has a notch that aligns with a matching post on the SIMM slot support bracket, which prevents the SIMM from being installed backward. Align the notch and then slide the contact edge of the SIMM into the SIMM slot at about a 45-degree angle, as shown in Figure 5-3.
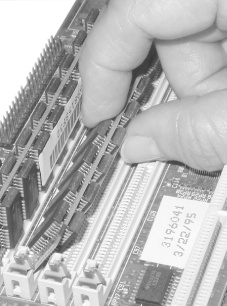
Figure 5-3. Inserting the SIMM at a 45-degree angle
Once you have the SIMM aligned properly, maintain slight pressure toward the slot and pivot the SIMM upward toward the vertical until it snaps into place, as shown in Figure 5-4. Verify that the spring connectors on each side of the SIMM slot bracket have both snapped into the matching holes on the SIMM.
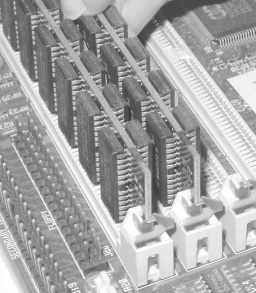
Figure 5-4. Rotating the SIMM to vertical and making sure the locking tabs snap into place
- To remove a SIMM
Locate the spring connectors at the top of each side of the SIMM slot bracket and press both of them lightly at the same time while simultaneously pressing the SIMM gently away from the vertical. After the spring connectors release their grip on the SIMM, pivot the SIMM gently downward to about a 45-degree angle and then pull it gently out of the slot. Locking tabs sometimes exert considerable force, so you may find it easier to press the ...
Get PC Hardware in a Nutshell, 3rd Edition now with the O’Reilly learning platform.
O’Reilly members experience books, live events, courses curated by job role, and more from O’Reilly and nearly 200 top publishers.

