Chapter 4. Payment Buttons
Introduction: Hacks #28-44
The most common question of PayPalâs merchant support staff might be, âHow do I start using PayPal as a seller?â
For a buyer, PayPal is straightforward: sign up for an account and start using it to pay for goods and services on the Internet. But for merchants, PayPal offers so many options to fit each sellerâs needs that it can seem overwhelming when you first endeavor to sell online. Unless you plan to sell only on eBay (in which case you should see eBay Hacks by David A. Karp), here is the basic information you need to get started.
PayPal is an online payment processor; it allows buyers and sellers to make monetary transactions easily and securely. PayPal is not, however, a credit card gateway; to accept payments with PayPal you do not have to pass a rigorous credit check, install any equipment or special software, make agreements with a bank, or send in signed documents. You also do not need to gather credit card numbers from your buyers or subsequently safeguard such sensitive financial information.
Buyers using PayPal can either open PayPal accounts (which is recommended, especially if you use PayPal often) or just enter their credit cards for each purchase. Sellers who accept PayPal must have PayPal accounts, and merchants who are doing serious business with PayPal will want to have a Business account, which allows acceptance of payments funded by credit cards. There is no fee for opening or holding a Business accountâonly a per-transaction fee of 2.9% plus $0.30 on each payment received.
Non-U.S. account holders, and those doing business with non-U.S. account holders, might be subject to additional fees or a different fee rate.
The best way to start using PayPal to sell merchandise online is to add one or more PayPal buttons to your web site. You can do this by logging into your PayPal account (create one now [Hack #1] if you donât have one yet), generating a button with the Merchant Tools PayPal provides, and copying it to a page on your site. You can literally start offering items for sale in 10 minutes.
PayPal buttons are nothing more than HTML forms. They live on your web pages, but they direct your customers to PayPal for processing payments. All the software and complexity of processing those payments is done for you.
PayPal offers four types of payment buttons to meet the various needs of online enterprises, all at no additional charge:
- Buy Now
The most basic payment button is the Buy Now button. It lets your customers easily buy a single item from your site. One click directs a buyer to the PayPal system, where they can make their payment. See [Hack #28] to start hacking Buy Now buttons.
- Add To Cart
The Add To Cart button lets a buyer accumulate a group of items in a shopping basket and then pay for them all at once. You should add an individual Add To Cart button for each item you sell. When they are ready, customers click the Checkout button (also on your site) to go PayPal and complete their payment. See [Hack #45] and all of Chapter 5 to get started.
- Subscribe
A PayPal subscription button lets your customer easily set up a subscription (a recurring payment) from the customerâs PayPal account to yours. You can set the terms of the subscription to fit your business model, and you or your customer can cancel the subscription at any time without further obligation. See Chapter 6 for more details on subscription buttons.
- Donate Now
The PayPal donation button is nearly identical to a Buy Now button. The wording of the payment screens, however, indicates the processing of a donation rather than the purchase of a product or service. See [Hack #40] for an introduction and [Hack #79] and [Hack #80] for ways to take donation buttons further.
PayPal is a flexible system. With your own software, you can use it to accommodate just about any business process, such as delivering digital goods instantly, collecting conference registration fees, or cooperating with an extant shopping cart system. If you are just getting started, PayPalâs buttons are the way to do it. The rest of this book should fire your imagination with ideas of where to go from there.
Create a Buy Now Button
Accept payments on your web site with a simple button that sends the customer, along with all necessary payment information, to PayPal.
The most basic way to accept payments on your web site is to deploy a Buy Now button, which essentially consists of an HTML form.
In order to use the Buy Now system, you need to have a Business or Premier account at PayPal.
Use the Merchant Tools section of the PayPal web site to generate the necessary code to sell goods from your web site. Once you have the code for one item, you can modify that code for any of your other products by changing a few variable values.
The Code
To generate a simple block of button code, follow these steps:
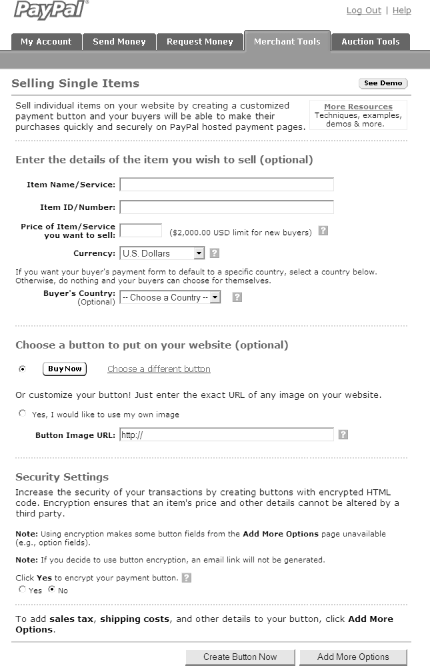
Go to http://www.paypal.com, log into your account, and click the Merchant Tools tab.
Click the Buy Now link under the Website Payments section to open the PayPal Button Factory, as shown in Figure 4-1.
Create a basic button by entering the item name and item number. Leave the Buyer Country as is, and enter
1for the amount. Skip the rest of the settings, but make sure to change the Encrypt Button option to No.When youâre done, click Create Button Now to generate the code.
The resulting code should look like this:
<form action="https://www.paypal.com/cgi-bin/webscr" method="post">
    <input type="hidden" name="cmd" value="_xclick">
    <input type="hidden" name="business" value="sales@payloadz.com">
1.  <input type="hidden" name="item_name" value="Widget">
2.  <input type="hidden" name="item_number" value="Wid-001">
3.  <input type="hidden" name="amount" value="1.00">
    <input type="hidden" name="no_note" value="1">
    <input type="hidden" name="currency_code" value="USD">
   <input type="image" src=
"https://www.paypal.com/en_US/i/btn/x-click-but23.gif" border="0"
                name="submit">
</form>
Most of the variables will not change, regardless of the item youâre selling. The variables on lines 1 ,2 , and 3 are the only ones youâll need to customize for each particular product.
Modifications to the variables are straightforward and can be
done directly in the HTML. For instance, to specify a price, replace
1.00 with the price of your item,
in dollars and cents (but no dollar sign). Likewise, set the
item_name variable
to the name of the product, and set the item_number variable
to a unique product number or SKU code that makes sense for your
store.
Hacking the Hack
In addition to the aforementioned variables, there are also
other PayPal-supported options you can add to your purchase buttons.
For example, the return and
cancel_return
variables define the addresses of web pages to which the user should
be taken after the payment process has been completed or if the
process is cancelled, respectively:
<input type="hidden" name="return" value="http://yoursite.com/thankyou.html">
<input type="hidden" name="cancel_return" value=
                "http://yoursite.com/cancel.html">
Simply insert additional variables anywhere in your button code,
so long as they appear between the opening <form> and closing </form> tags. Other variables
include:
cnThe text label to appear above the note field (maximum of 40 characters).
csSets the background color of your payment pages to black (
1); the default is white (0).currency_codeThe three-digit code indicating the currency in which the payment is to be made.
customandinvoiceBoth
customandinvoiceare pass-through variables, never shown to customers, to be returned to you when the payment process is complete.handlingThe shipping surcharge, applied regardless of the number of items ordered.
image_urlThe address (URL) of your company logo. The image can be up to 150x50 pixels. If this variable is omitted, the customer will see your business name if you have a Business account or your email address if you have a Premier account.
no_noteIf this variable is set to
1, the customer will not be allowed to include a note. Itâs probably best to specify theno_noteoption (as in the example earlier in this hack) if youâll be automating your operation and are unlikely to see any notes your customers would enter here.no_shippingSee [Hack #34] for more information on this setting.
on0,on1,os0, andos1See [Hack #33] for more information on these four settings.
page_styleSets the Custom Payment Page style for payment pages. This variable should be the name of one of the styles listed on the Custom Payment Page Styles page. To add or edit custom payment pages, click the My Account tab, click Profile, and click the Custom Payment Pages link. See [Hack #51] for further details.
returnThe URL of the page on your web site to which the customer will be sent when the transaction is complete.
rmSpecifies the behavior of the return URL (see the
returnoption). If this variable is set to1, the buyer will be sent back to the return URL using a GET method, and no transaction variables will be submitted. Ifrmis set to2, the buyer will be sent back to the return URL using aPOSTmethod, to which all available transaction variables will also be posted. Ifrmis omitted or set to0,GETmethods will be used for all Shopping Cart transactions in which IPN is not enabled andPOSTmethods with variables will be used for the rest.shipping,shipping2The amount to charge the customer for shipping, per item. If you specify an amount for
shipping2, theshippingamount will be charged only for the first item ordered andshipping2amount will be charged for each additional item (all of which applies only if the customer orders a quantity of more than one).taxIf this variable is omitted, the sales tax specified in your account preferences will take effect. Otherwise, use
taxto specify a flat tax (in dollars and cents, rather than a percentage) to apply to the order.
Use a Custom Button Image
Customize the appearance of the Buy Now button with a few changes to the Button Factory code
The PayPal Button Factory generates HTML code that you insert into your payment pages to facilitate sales. The code you initially get depends on the values you type into the form, but you can subsequently edit it manually before you install it onto your site. This simple hack walks you through the modification of your button code to use your own custom Buy Now button images.
Preparing the Image and Code
First, youâll need to prepare another button image for use in the form. It can be either a GIF or JPG image file, but it must be located somewhere on your web site or elsewhere on the Internet so that you can reference its location in your code. See the next section for button design tips.
Start by generating the code for an ordinary Buy Now button [Hack #28] . Copy the HTML code and paste it into your favorite HTML editor, such as Dreamweaver, FrontPage, or any plain-text editor (e.g., Notepad). Find the piece of code that references the image:
<input type="image" src="https://www.paypal.com/images/x-click-but23.gif"
                border="0" name="submit" alt="Make payments with PayPal - it's
                fast, free  and secure!">
The src parameter contains
the location (URL) of the image to be used:
src="https://www.paypal.com/images/x-click-but23.gif"
Simply change this source to the address (URL) of your button image:
src="http://www.anothersite.com/yournewimage.gif"
Or, if the image is located on the same site as your button code, it could be as simple as this:
src="/images/ournewimage.gif"
So, the final code should look like this:
<input type="image" ="http://www.anothersite.com/ournewimage.gif"
                border="0" name="submit" alt="Make payments with PayPal - it's
                fast, free and secure!">
Button Design 101
The PayPal Button Factory provides some options for button appearance, though most of the supplied images are branded with the PayPal look and might not integrate cleanly with your web siteâs design. The previous section shows how to use any image you like, provided that you have one at the ready. With a simple web search, you can find images of buttons at web sites that specialize in shopping cart buttons. But for even more seamless integration, you can create your own image in an image-editing program, such as Photoshop or Paint Shop Pro.
The ideal sizes for your buttons, based on the sizes PayPal uses for their buttons, are 68x23 pixels for Buy Now buttons and 87x23 pixels for Shopping Cart buttons. You do not have to use these exact sizes for your own buttons, but do use them as guidelines when choosing appropriate sizes for your buttons.
You can also add interaction to your buttons by providing different variations of your images so that they look lit up or pushed in when your customers click them or move over them with their mice. This visual feedback and interactivity makes your buttons look and act more clickable, and it is a good way to get more customers to click them. To give your image a slightly different appearance on mouseover or when clicked, you need to have two button images: one to act as the normal, unactivated state and another to replace the original image with activated. Figure 4-2 shows two such images.
The images in Figure 4-2 are identical, except that the activated image has been tinted gray. You might prefer a little more color or perhaps a highlighted border; to make the image look pushed in, replace the shadow pixels with the button foreground color (in this case, white).
Simply include this JavaScript code to swap one image for another upon mouseover:
<input type="image" name="submit" src="yourbutton_up.gif" onmouseover=
                "this.src='yourbutton_over.gif'" onmouseout=
                "this.src='yourbutton_up.gif'">
The two images for normal and activated states are yourbutton_up.gif and yourbutton_over.gif, respectively, in the
preceding code. To have the button change when it is clicked (as
opposed to responding to a mouseover), use this code instead:
<input type="image" name="submit" src="yourbutton_up.gif" onMouseDown=
                "this.src='yourbutton_over.gif'">
This just scratches the surface of what you can do. The more you do to polish the appearance and behavior of your buttons, the more customized (and hopefully professional) your site will appear to your customers.
Create a Purchase Button for Services
Streamline your purchase buttons for selling intangible goods and services by removing unnecessary fields. By removing certain shipping requirements, you can accept payments from all buyers, regardless of whether they can provide confirmed addresses.
PayPal allows you to accept payment for almost any kind of tangible product or intangible service. When youâre selling services, much of the information PayPal gathers is superfluous. You might not always need the customerâs address, for instance, and you most likely will not need to charge any shipping or handling fees. By eliminating these options in your purchase buttons, you can simplify the checkout process for your customers, thus making it easier to sell your services.
Hereâs the code for a service button, adapted from [Hack #28] :
<form action="https://www.paypal.com/cgi-bin/webscr" method="post">
    <input type="hidden" name="cmd" value="_xclick">
    <input type="hidden" name="business" value="sales@payloadz.com">
    <input type="hidden" name="item_name" value="Service">
    <input type="hidden" name="item_number" value="Serv-001">
    <input type="hidden" name="amount" value="1.00">
1.  <input type="hidden" name="shipping" value="0.00">
2.  <input type="hidden" name="handling" value="0.00">
3.  <input type="hidden" name="no_shipping" value="1">
4.  <input type="hidden" name="no_note" value="1">
    <input type="hidden" name="currency_code" value="USD">
    <input type="image" src=
        "https://www.paypal.com/en_US/i/btn/x-click-but23.gif"
        border="0" name="submit">
</form>
The difference between this code and an ordinary Buy Now button is the addition of two variables, shipping and handling (lines 1 and 2, respectively), both
of which are set to 0.00. This trumps
any shipping charges you might have in your PayPal profile. Also, the
no_shipping variable
(line 3) instructs PayPal not to ask for a shipping address, and the
no_note variable (line
4) turns off the note field during checkout. All of this makes a simple
and streamlined checkout process.
Create an Auction Payment Button
Create payment buttons for auctions, such that the completed transaction updates the payment status on the auction web site automatically.
Merchants that sell using auction sites such as eBay often have to collect payment for their goods after the auction has ended. Sometimes, it can be confusing to the winning bidder how to complete payment, and youâll want to make it as easy as possible for your customers to send you money. Using some simple HTML, you can construct a payment button much like the payment buttons generated by PayPal for Shopping Cart and Web Accept purchases. You then present this button to the winning bidder in an email or on your web site to supplement the payment buttons already on the auction site.
The Easy Way
Since PayPal is an eBay company, it shouldnât be surprising that PayPal is well integrated with the eBay web site. For instance, if you indicate that you accept PayPal payments when constructing an eBay listing, a PayPal button will automatically appear for the winning bidder when the listing ends. Hereâs how to build the link between your eBay account and your PayPal account:
Go to the eBay web site and log into your eBay account.
Go to My eBay and click the eBay Preferences link under the My Account heading.
Click the Change link next to the Payment Preferences heading, and turn on all the PayPal-related settings here.
When you sell your next item, check the PayPal option in the âSeller-accepted payment methodsâ section and enter the email address of the PayPal account to which youâd like auction payments to be sent.
Thatâs it! When your auction ends, a PayPal payment button will automatically appear at the top of the auction page, but for the winning bidder only.
Furthermore, you can configure PayPal to automatically insert a Pay Now button into each of your running auctions:
Log into your PayPal account.
Click the Profile tab and then click Auctions.
If your eBay account isnât listed here, click Add, and then enter your eBay user ID and password.
Otherwise, simply turn on the features youâd like to employ. The changes will take effect immediately.
The PayPal Auction options include the following:
- Automatic Logo Insertion
PayPal automatically inserts a PayPal logo into the description of each of your running auctions (using eBayâs Add to Description feature). This not only advertises the fact that you accept PayPal, it also gives your winning bidder a shortcut to the payment process.
- Winning Buyer Notification
This instructs PayPal to automatically send an email to all your winning bidders, complete with payment instructions and a Pay Now button. This email is sent independently of eBayâs âCongratulations! You are the buyer for...â email.
- PayPal Preferred on eBay
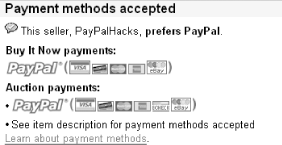
This inserts the PayPal logo into the âPayment methods acceptedâ section of your auction page, as shown in Figure 4-3. The PayPal logo appears in addition to the logo that might already be there and suggests to your customers that you not only accept PayPal, but you whole-heartedly prefer it as a means of payment.
Making Your Own Button
Although eBay provides payment buttons for high bidders, you might want to supplement these buttons with your own. Plus, you might want to add eBay-like functionality to other auction sites, such as Yahoo!, uBid, Amazon.com, MSN, and Bidville auctions.
This code displays a simple Pay Now button that sends your customers to the PayPal web site and guides them through the payment process. The system automatically tracks the payment for this particular auction, so your customer will not have to enter any additional auction-related information. Plus, the auction site, provided that itâs linked up with PayPal, will be notified automatically so that it can update the payment status of the auction for you and your bidder.
The goal of providing an extra payment button like this one is to reduce the chances that your customer (bidder) will use PayPalâs Send Money function to pay for an auction; in that case, you would receive a payment not linked to its corresponding auction.
Warning
Among other difficulties, PayPalâs Send Money tab makes it possible for your customer to âforgetâ to include the shipping charge or sales tax, you might have to process the order manually (or simply refund the payment), and the auction site might not reflect that the customer has paid. To automatically reject all payments sent this way, configure your PayPal account to âBlock Payments from users who initiate payments from the Pay Anyone subtab of the Send Money tab,â as described in Chapter 3.
Here is the HTML code for an auction payment button, linked to a particular auction:
<form method="get" action="https://www.paypal.com/cgi-bin/webscr">
<input type="hidden" name="cmd" value=_cart>
<input type="hidden" name="business" value="youremail@paypalhacks.com">
<input type="hidden" name="item_name_1" value="Widget">
<input type="hidden" name="amount_1" value="1.00">
<input type="hidden" name="quantity_1" value="1">
<input type="hidden" name="site_1" value="eBay">
<input type="hidden" name="ai_1" value="2540252652">
<input type="hidden" name="ab_1" value="your_ebay_id">
<input type="submit" name="upload" value="Pay Now">
</form>
This code is similar to the code used in [Hack
#50] , with the exception of a few new variables:
site_
n, ai_
n, and ab_ n, where
n is a number representing the item in
multiple item payments, starting with 1 (for example, include ab_1, ab_2, and ab_3 if youâre requesting payment for three
different auctions).
The site_
n variable defines the site on which the
auction was listed, and it should be set to eBay for eBay auctions or Yahoo for Yahoo! Auctions. This value is
case sensitive, so for other auction sites, youâd type uBid, Amazon, MSN, or Bidville. The second variable, ai_ n, should be
set to the auction (or listing) number at the auction site. Finally,
ab_ n,
is your user ID at the auction site
(your_ebay_id in this example). Naturally,
youâll need to replace all italicized text in the code with the
details of your transaction.
The other variables, such as item_name_ n and
amount_
n, can be modified as described in [Hack
#28] .
Hacking the Hack
This hack demonstrates how you can create buttons that
facilitate auction-specific payments. Naturally, creating a button for
each auction manually would be a time-consuming process, but you can
use the eBay API to automate this process. Start by sending a query to
obtain the information for each of your completed auctions using a
GetTransactionDetails call, and
then assemble your buttons and email them to the high bidders. The
technical procedures involved with implementing this type of system go
beyond the scope of this book, but extensive information can be found
in David A. Karpâs eBay Hacks
(OâReilly).
If you use an off-site listing tool or a third-party listing service to build your auctions, you might be able to tie your application into the applicationâs local database. However, you will also need a means of obtaining completed-item details (such as the final price and high-bidder contact information). For an example that shows how to build payment buttons dynamically, see [Hack #54] .
Provide Purchase Options with Drop-Down Listboxes
Change a few lines of the PayPal Button Factory code to restrict purchase options to a distinct list of choices.
By default, the item_name variable
created by the PayPal Button Factory [Hack
#28] is a hidden field containing a single string of
text, which means that a single payment button corresponds to a single
product. So, if you sell three products, youâll need three payment
buttons, right?
Not so, thanks to drop-down listboxes.
Since many of the products youâre selling probably come in a
combination of styles or sizes, you can merge those variations into a
single purchase button. For instance, if youâre selling clothing,
a Size option might contain three choices: Small, Medium, and Large.
Fortunately, PayPal doesnât distinguish between text strings sent from
text boxes and list elements selected from drop-down listboxes, so you
can easily replace any <input>
field with a <select> drop-down
list. For instance, take:
<input type="hidden" name="item_name" value="T-Shirt">
and replace it with:
<select name="item_name" id="item_name">
  <option>T-Shirt</option>
</select>
The problem here is that we still provide the customer with only
one option. To add more options, simply insert additional <option> tags, one for each variation,
like this:
<select name="item_name" id="item_name">
  <option>T-Shirt, Small</option>
  <option>T-Shirt, Medium</option>
  <option>T-Shirt, Large</option>
</select>
Figure 4-4 shows the completed drop-down listbox.
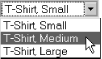
With this simple change, your customers choose a size, click the Buy Now button, and pay for your item. PayPal then sends the customerâs selection back to you in the âYouâve got cashâ email.
If you need to provide your customers with more than one option, you can include up to two additional option fields [Hack #33] and convert both of them to drop-down lists with this same procedure. Thus, you can have up to three different options with a single payment button.
Hacking the Hack
You can take this hack a step further by changing the values of other fields based on selection. For instance, you can change the price based on the shirt size your customer chooses and send the correct price to PayPal along with the corresponding options. You need to add a few pieces of code to your payment button form for this to work.
First, place this JavaScript code in the section of your page between the
<head> and </head> tags:
<script type="text/javascript">
<!-- Update Price Change
function UpdateForm (object1) {             // process change selects
var i,item_amt,object,position,val;
  item_amt = object1.amount.value;          // default amount
  for (i=0; i<object1.length; i++) {        // check options
    object = object1.elements[i];
    if (object.type == "select-one" &&
        object.name == "cng") {             // must be named cng
      position = object.selectedIndex;      // option selected
      val = object.options[position].value; // selected value
      position  = val.indexOf ("$");        // set new price
      if (position >= 0) item_amt = val.substring (position + 1)*1.0;
    }
  }
  object1.amount.value = item_amt;
  if (object1.item_total) object1.item_total.value = "$" + item_amt;
}
//-->
</script>
Next, change the <form>
tag for your payment button code so the JavaScript function is
executed when the form is submitted, like this:
<form action="https://www.paypal.com/cgi-bin/webscr" method="post"
onsubmit="this.target='paypal';UpdateForm(this);">
Finally, modify the <select> tag so that it, too, is
linked to the JavaScript code:
<select name="cng" onchange="UpdateForm(this.form);">
 <option value="Small $1.00">Size: Small $1.00</option>
 <option value="Medium $2.00">Size: Medium $2.00</option>
 <option value="Large $3.00">Size: Large $3.00</option>
</select>
You can edit the amount charged to your customer by changing the
value="Small $1.00" section of the
form field. You can also change the text displayed to your customer by
changing the value between the <option> and </option> sections.
Make sure the amount tag in
your form is set to the same value as the default
value of the drop-down menu. That way, if the form is submitted
without changing the values, the amount has the correct default
value.
When this code is in place, the price is updated automatically whenever a new size is selected.
Warning
Since this solution relies on JavaScript to update the price according to a customer action, it will fail if the customer has disabled JavaScript. Although PayPal doesnât do price checking, you can effectively prevent this problem by checking for JavaScript before displaying order pages to your customers.
Include More Than Two Option Fields
Give your customers a large selection of options when purchasing their items, despite the limitations of payment buttons.
PayPal buttons enable you to easily offer fixed products to your customers. Although some flexibility is provided in the form of option fields [Hack #32] , PayPal currently supports only two such fields. If your product has more than two options (e.g., Size, Color, and Material), you can employ a little JavaScript code and a hidden field to create as many option fields as you need.
Start with the basic Buy Now button code [Hack #28] for a single item, although this works with Shopping Cart, Subscription, and Donation buttons as well:
<form action="https://www.paypal.com/cgi-bin/youbscr" method="post">
<input type="hidden" name="cmd" value="_xclick">
<input type="hidden" name="business" value="sales@payloadz.com">
<input type="hidden" name="item_name" value="Widget One">
<input type="hidden" name="item_number" value="Wid-001">
<input type="hidden" name="amount" value="1.00">
<input type="hidden" name="no_note" value="1">
<input type="hidden" name="currency_code" value="USD">
<input type="image" src=
                "https://www.paypal.com/en_US/i/btn/x-click-but23.gif"
                border="0" name="submit>
</form>
Suppose the item youâre selling has three options: Color, Size,
and Material. You can provide three drop-down lists [Hack
#32] , one for each option, with which your customers
can customize their purchases. To keep things simple, name your
drop-down elements custom1, custom2, and custom3.
This code joins all three of the selected options into a single
variable, custom, to be
passed to PayPal. Youâll need to add the custom form element to your
button as a hidden variable with no value specified. The value will be
populated by the JavaScript code when the form is submitted. Hereâs an
HTML form with form options and the custom field:
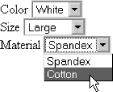
Color
<select name="custom1">
    <option value="White" selected>White</option>
    <option value="Grey">Grey</option>
    <option value="Black">Black</option>
</select>
<br>
Size
<select name="custom2">
    <option value="Small">Small</option>
    <option value="Medium">Medium</option>
    <option value="Large" selected>Large</option>
    <option value="X-Large">X-Large</option>
</select>
<br>
Material
<select name="custom3">
    <option value="Spandex" selected>Spandex</option>
    <option value="Cotton">Cotton</option>
</select>
<input type="hidden" name="custom" value="">
Figure 4-5 shows the additional custom fields in action. You can include as many option fields as you can fit on your page.
You can continue adding as many option fields as you need,
provided that you use the same custom
# naming format. Just be sure that the total
character count for the labels and their possible
variable values does not exceed 256 characters, the size limit of
PayPalâs custom variable.
Add the HTML code to your PayPal button form between the opening
and closing <form> tags. Then
add the following JavaScript code to the head of the web page:
<script language="JavaScript">
<!--
  function joinFields( ){
    fmBuy.custom.value = 'Color:' + fmBuy.custom1.value + ' Size:' +
              fmBuy.custom2.value + ' Material:' + fmBuy.custom3.value
  }
// -->
</script>
If you add additional fields, youâll need to modify this code to accommodate them.
Finally, add a call to the joinFields routine by inserting the name and onSubmit attributes to the existing <form> tag (the values for the action and method attributes remain unchanged):
<form action="https://www.paypal.com/cgi-bin/youbscr" method="post"
name="fmBuy" onSubmit="joinFields( )">
Here is the final code for the example form:
<form action="https://www.paypal.com/cgi-bin/youbscr" method="post" name="fmBuy"
onSubmit="joinFields( )">
<input type="hidden" name="cmd" value="_xclick">
<input type="hidden" name="business" value="sales@payloadz.com">
<input type="hidden" name="item_name" value="Widget One">
<input type="hidden" name="item_number" value="Wid-001">
<input type="hidden" name="amount" value="1.00">
<input type="hidden" name="no_note" value="1">
<input type="hidden" name="currency_code" value="USD">
  Color
  <select name="custom1">
    <option value="White" selected>White</option>
    <option value="Grey">Grey</option>
    <option value="Black">Black</option>
  </select>
<br>
Size
<select name="custom2">
    <option value="Small">Small</option>
    <option value="Medium">Medium</option>
    <option value="Large" selected>Large</option>
    <option value="X-Large">X-Large</option>
  </select>
<br>
Material
<select name="custom3">
    <option value="Spandex" selected>Spandex</option>
    <option value="Cotton">Cotton</option>
  </select>
  <input type="hidden" name="custom" value="">

<input type="image" src="https://www.paypal.com/en_US/i/btn/x-click-but23.gif"
                border="0" name="submit">
</form>
When the complete page is loaded (with the button code in the page
body and the JavaScript in the page head), the customer-selected option
fields will be concatenated into one string and passed through to PayPal
in the custom variable. For instance, if the form is submitted with its
default values, the custom variable will be set to Color:White Size:Large Material:Spandex. The
string will appear in details of the transaction in your PayPal account;
your customers will never see it. If necessary, you can also parse this field out
in the IPN page [Hack #65] .
Override Shipping and Handling Preferences
Modify purchase buttons to override your Profile settings, allowing you to set shipping and handling fees to zero for digital goods.
Certain goods, such as software or other downloadable products, should not incur any shipping charges. By default, PayPal calculates the applicable shipping fees and applies them to every order. To configure your shipping calculation preferences, log into PayPal, click Profile, and then click Shipping Calculations.
The problem is that PayPal applies your shipping preferences to all purchases placed through your PayPal buttons. If you sell both tangible and digital products, you might need to charge different shipping amounts for different products.
To override your shipping and handling preferences, turn on the âAllow transaction-based shipping values to override the profile shipping settingsâ options in your Shipping Calculations profile page. Then, add two additional variables to applicable buttons and set each of them to zero (or any values you wish) for digital goods purchases, like this:
<input type="hidden" name="shipping" value="0.00">
<input type="hidden" name="handling" value="0.00">
If you were to omit these two new variables, the shipping fees
applied to that product would default to the values in your PayPal
profile. You can add these two new form variables anywhere in your
button code, as long as they appear between the opening <form> and closing </form> tags.
When you override your Profileâs Shipping Preferences for a single item in your PayPal Shopping Cart, the override applies only to that item. All other items are charged shipping according to your Profileâs Shipping Preferences.
Build Notification Tracking
Track how your PayPal applications are used by including the Build Notification (BN) tag with all your payment buttons and resulting transactions.
PayPal originally introduced the Build Notification (BN) tag as a way to track developersâ projects, allowing them to, for example, include version numbers to gauge application performance. The BN tag is a field for your payment buttons into which you place an identifier string you choose.
An unexpected benefit of the BN tag is that, by demonstrating that your site or application generates a significant amount of transactions, you can receive the benefits of a high-volume merchant. While there is no official disclosure of any specific application rewards, developers can often expect to receive specialized technical support if they ever have problems that affect their applications or sites. High-volume merchants are also invited to participate in testing new features of the PayPal system and receive advance notice of upcoming releases of new product features.
To use the BN system, PayPal suggests assigning a unique, readable
value to the BN tag, including the version (and build) number of your
application as well as your company name. The suggested format of the BN
value is company.product.version,
like this:
<input type="hidden" name="bn" value="GeekSoft.Cart.1.0">
Insert the bn variable into
your PayPal form buttons just as you would any other values [Hack
#28] :
<form action="https://www.paypal.com/cgi-bin/webscr" method="post">
<input type="hidden" name="bn" value="GeekSoft.Cart.1.0">
<input type="hidden" name="cmd" value="_xclick">
<input type="hidden" name="business" value="bn@paypalhacks.com">
<input type="hidden" name="item_name" value="Widget">
<input type="hidden" name="amount" value="1">
<input type="image" src=http://images.paypal.com/images/x-click-butcc.gif
                border="0" name="submit">
</form>
Once you deploy the BN tag in
your form buttons, make sure you register your application with PayPal
so that they can begin tracking your usage. Send an email to
developer@paypal.com with the BN ID text you use in each of your solutions,
along with the name of your company, the title of your application or
web site, and your contact information. For further information, see
http://www.paypal.com/pdn-submit.
Hacking the Hack
The BN tag only allows PayPal to track your sales internally; you wonât have access to any usage statistics connected with your use of the BN tag on your web site.
However, you can track your sales by including the custom variable in your purchase buttons. Set the value of the
custom variable to some unique
identifier for the application or web site in which the button
appears:
<input type="hidden" name="custom" value="GeekSoft.Cart.1.3">Every time a payment is made with this button, PayPal records
the custom value in your
transaction history. Next, use the Download My History feature to generate a tab- or
comma-delimited text file, as shown in Figure 4-6. Finally, import the
file into your spreadsheet or database and use the tools at your
disposal to plot sales trends, run reports, or perform statistical
analysis.
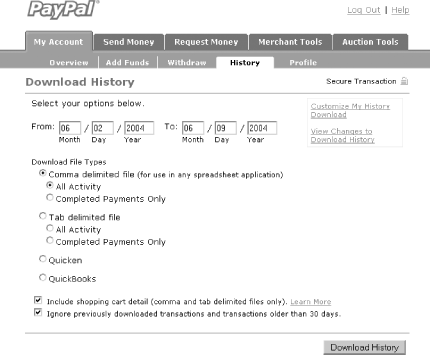
You can also export your PayPal history into files that Quicken and Quickbooks can understand, allowing you to integrate PayPal sales with your accounting software.
See Also
[Hack #77] shows another way to track sales through your PayPal payment buttons.
Hack-Proof Your Payment
Prevent code-tampering and price-spoofing with a hidden form post.
When deploying PayPal buttons on your web site, you should consider the risk of spoofed payments. PayPal buttons are normally created in plain HTML, with the variables and their values available for anyone to see (select ViewâSource in your browser to see for yourself). This means that anyone can view your button source code, copy the HTML to her own system, make changes to the variables (such as the price), and make a payment with the modified button. You can manually review purchases to make sure no tampering has taken place, but in high-volume or automated systems, this might be a difficult or even impossible task.
Tip
PayPal offers a button encryption system that allows you to encrypt your purchase buttons, provided that youâre not using buttons modified with custom variables. Button encryption is also not supported with Shopping Cart buttons.
This hack uses techniques covered in some of the other hacks in this book to create a hidden form post that sends the button information to PayPal without allowing the customer to see it. To use this technique to its fullest, you should already have deployed [Hack #54] .
The Code
The hack consists of two pages: link.asp and jump.asp. First, link.asp contains the product and selling information, as well as a link to the second page:
<html>
<body>
Widget<br>
<a href="jump.asp?id=123">Click here to buy</a>
</body>
</html>
This first page mimics the Buy Now button, but instead of sending the customer to PayPal, it links to the jump page. Next, jump.asp queries your database for the product info and sends the purchase information to PayPal. This code is written in ASP:
<%
'Connect to database and create recordset
1.  connStore = "DRIVER={Microsoft Access Driver (*.mdb)};DBQ="C:/InetPub/wwwroot/database/
dbPayPal.mdb")
set rsJump= Server.CreateObject("ADODB.Recordset")
rsJump.ActiveConnection = connStore
2.  rsJump.Source = "SELECT tblProducts FROM tblProducts WHERE Id = " & Request("id")
3.  rsJump.Open( )
%>
<html>
4.  <body onLoad="document.fmPost.submit( )">
<form action="https://www.paypal.com/cgi-bin/webscr" method="post" name="fmPost">
  <input type="hidden" name="cmd" value="_xclick">
  <input type="hidden" name="business" value="youremail@yourisp.com">
  <input type="hidden" name="item_name" value=
                "<%=(rsJump("ItemName").Value)%>">
  <input type="hidden" name="item_number" value=
                "<%=(rsJump("ItemID").Value)%>">
  <input type="hidden" name="amount" value=
                "<%=(rsJump("ItemPrice").Value)%>">
</form>
</body>
</html>
<%
rsJump.Close( )
%>
The jump page queries the database (line 2) for the
requested product information (based on the URL embedded in the link
page) and then dynamically builds a PayPal form from this information.
Finally, the page uses an onLoad
function (line 4) to automatically submit the form as
soon as the page loads, without the customer ever seeing the
page.
Hacking the Hack
You donât necessarily have to use the database method described here. Instead, you can simply create a static jump page for each product, complete with all of the product information (name, price, etc.) embedded right in the code. Although this approach wouldnât make any sense for an online store that sells hundreds or thousands of items, it would ultimately be easier to implement than a full database if you sell only one or two products on your site.
Plan B: Obfuscate Your Button Code
If all this seems like too much trouble to guard against a remote possibility, there is an easier way to keep casual observers from seeing exactly what your button code contains and spoofing your button. (Isnât it handy that the word obfuscate is, itself, a rather cryptic term?)
Create a Buy Now, Add to Cart, Subscription, or Donation button using PayPalâs Merchant Tools.
Go to http://www.dynamicdrive.com/dynamicindex9/encrypter.htm. Copy and paste your button code into the text area window.
Click Encrypt. The HTML will be replaced with encoded text that is much harder for mere mortals to read, but the encoded text will easily be parsed and displayed by your customersâ browsers.
Copy and paste this scrambled code into your web page.
This quick and easy obfuscator makes it harder for casual viewers to see how your button is coded and thus helps protect it from tampering. Additionally, it foils most web spiders looking for fresh email addresses to spam.
Warning
This trick is no substitute for real encryption [Hack #37] . The material is all there, just in a form that is hard for a person to read. Anyone with some time, patience, and an understanding of common encoding methods (or anyone with access to this book) will crack the obfuscation in no time. Also, even if the HTML is not obvious, all the information critical to the consumersâ buying decision will be echoed by PayPal once your customer clicks the button.
To illustrate, hereâs an ordinary payment button:
<h1>Plain button</h1>

<form action="https://www.paypal.com/cgi-bin/webscr" method="post">
<input type="hidden" name="cmd" value="_xclick">
<input type="hidden" name="business" value="sales@wwjcd.biz">
<input type="hidden" name="item_name" value="Jackie Chan bobble head">
<input type="hidden" name="item_number" value="jc-bh">
<input type="hidden" name="amount" value="9.99">
<input type="hidden" name="currency_code" value="USD">
<input type="image" src=
                "https://www.paypal.com/en_US/i/btn/x-click-but23.gif"
                border="0" name="submit" alt="Make payments with PayPal - it's
                fast, free and secure!">
</form>
And hereâs the obfuscated version of the same code:
<h1>Button obfuscated</h1>

<script>
<!--
document.write(unescape("%3Cform%20action%3D%22https%3A//www.paypal.com/cgi-bin/webscr%22%
20method%3D%22post%22%3E%0D%0A%3Cinput%20type%3D%22hidden%22%20
name%3D%22cmd%22%20value%3D%22_xclick%22%3E%0D%0A%3Cinput%20type%3D%22hidden
%22%20name%3D%22business%22%20value%3D%22sales@wwjcd.biz%22%3E%0D%0A%3Cinpu
%20type%3D%22hidden%22%20name%3D%22item_name%22%20value%3D%22Jackie%20Chan
%20bobble%20head%22%3E%0D%0A%3Cinput%20type%3D%22hidden%22%20name%3D%22item_number%22
%20value%3D%22jc-bh%22%3E%0D%0A%3Cinput%20type%3D%22hidden%22%20name
%3D%22amount%22%20value%3D%229.99%22%3E%0D%0A%3Cinput%20type%3D%22hidden
%22%20name%3D%22currency_code%22%20value%3D%22USD%22%3E%0D%0A%3Cinput
%20type%3D%22image%22%20src%3D%22https%3A//www.paypal.com/en_US/i/btn/x-click-but23.gif%22
%20border%3D%220%22%20name%3D%22submit%22%20alt%3D%22Make%20
payments%20with%20PayPal%20-%20it%27s%20fast%2C%20free%20and%20secure%21%22%
3E%0D%0A%3C/form%3E"));
//-->
</script>
While this hack can indeed be applied to an already-encrypted button (as detailed in [Hack #37] , encrypted buttons hardly need the added protection of obfuscation.
Hack-Proof Your Buttons with Encryption
Add yet another layer of security to a Buy Now Button by encrypting its contents with OpenSSL and C/C++.
Now that youâve created a complete Buy Now button [Hack #28] , how can you prevent potential hackers from seeing (and possibly changing) the information youâre passing to PayPal? PayPalâs button encryption enables you to hide the exact contents of your HTML form in a PKCS7-encrypted blob.
While it is not necessary to integrate button encryption into every web site, it does allow you to provide another layer of security without affecting your customersâ buying experience.
Tip
This hack shows how to secure the contents of a button using OpenSSL and C/C++. For a simpler solution, see [Hack #36] .
OpenSSL and Keys
Button encryption is done using a cryptography library, such as OpenSSL, and a pair of cryptographic keys. OpenSSL is nice, because it allows you to both sign and envelope the message in one action. The first thing to do is install OpenSSL, which is available for download at http://www.openssl.org.
Note that some knowledge of compiling programs is required for the installation of OpenSSL on Unix. Instructions for compiling and installation on various platforms can be found in the OpenSSL download. A precompiled Windows version is available at http://www.slproweb.com/products/Win32OpenSSL.html. Simply follow the installation instructions for your particular environment.
Cryptographic keys must be exchanged in order for button encryption to work. Youâll need to contact PayPal to obtain PayPalâs public key, and you must provide your public key to PayPal. You should generate your keys in PEM format; consult the OpenSSL documentation (http://www.openssl.org/docs/HOWTO/keys.txt) for details.
Basic Button Encryption Using OpenSSL
Start with an unencrypted HTML form tag in your HTML page:
<form method="post" action="https://www. paypal.com/cgi-bin/webscr">
<input type="hidden" name="cmd" value="_xclick">
<input type="hidden" name="business" value="sales@company.com">
<input type="hidden" name="amount" value="1.00">
<input type="hidden" name="currency_code" value="USD">
<input type="image" src="https://www.paypal.com/en_US/i/btn/x-click-but23.gif"
                name="submit" alt="Make payments with PayPal - it's fast, free
                and secure!">
</form>
The first thing you need to do is convert all the hidden field name/value pairs from this form into a single string, like this:
cmd=_xclick
business=sales@company.com
amount=1.00
currency_code=USD
Warning
Keep in mind that the line feeds required are Unix line feeds
(\n), not Windows line feeds
(\r\n). Ensure that your program
is creating the string correctly or you will get decryption errors
when posting your encrypted form.
Next, load the PayPal public key from the paypal_cert.pem file:
BIO *bio;
X509 *gPPx509;
char* payPalCertPath = "/opt/keys/paypal_cert.pem";
if ((bio = BIO_new_file(payPalCertPath, "rt")) == NULL) {
        printf("Fatal Error: Failed to open (%s)\n", payPalCertPath);
        goto end;
}

if ((gPPx509 = PEM_read_bio_X509(bio, NULL, NULL, NULL)) == NULL) {
        printf("Fatal Error: Failed to read Paypal certificate from
                (%s)\n", payPalCertPath);
        return "";
}

BIO_free(bio);
Then, load your public and private keys:
X509 *x509 = NULL;
RSA *rsa = NULL;

char* certPath = "/opt/keys/my_cert.pem";
char* keyPath = "/opt/keys/my_key.pem";

if ((bio = BIO_new_file(certPath, "rt")) == NULL) {
        printf("Fatal Error: Failed to open (%s)\n", certPath);
        goto end;
}

if ((x509 = PEM_read_bio_X509(bio, NULL, NULL, NULL)) == NULL) {
        printf("Fatal Error: Failed to read certificate from (%s)\n", certPath);
        goto end;
}

BIO_free(bio);

if ((bio = BIO_new_file(keyPath, "rt")) == NULL) {
        printf("Fatal Error: Failed to open (%s)\n", keyPath);
        goto end;
}

if ((rsa = PEM_read_bio_RSAPrivateKey(bio, NULL, NULL, NULL)) == NULL) {
        printf("Fatal Error: Unable to read RSA key (%s).\n", keyPath);
        goto end;
}

BIO_free(bio);

' Create an EVP_PKEY instance from the private key you just loaded:
EVP_PKEY *pkey = EVP_PKEY_new( );

if (EVP_PKEY_set1_RSA(pkey, rsa) == 0) {
        printf("Fatal Error: Unable to create EVP_KEY from RSA key\n");
        goto end;
}

' create the PKCS7 instance so you can create the PKCS7 Blob:
PKCS7 *p7 = PKCS7_new( );
PKCS7_set_type(p7, NID_pkcs7_signedAndEnveloped);

PKCS7_SIGNER_INFO* si = PKCS7_add_signature(p7, x509, pkey, EVP_sha1( ));

if (si) {
        if (PKCS7_add_signed_attribute(si, NID_pkcs9_contentType, V_ASN1_OBJECT,
                                OBJ_nid2obj(NID_pkcs7_data)) <= 0) {
                printf("OpenSSL Error: %s\n", ERR_error_string(ERR_get_error( ), NULL));
                goto end;
        }
} else {
        printf("Fatal Error: Failed to sign PKCS7\n");
        goto end;
}

//Encryption
if (PKCS7_set_cipher(p7, EVP_des_ede3_cbc( )) <= 0) {
        printf("OpenSSL Error: %s\n", ERR_error_string(ERR_get_error( ), NULL));
        goto end;
}

if (PKCS7_add_recipient(p7, gPPx509) <= 0) {
        printf("OpenSSL Error: %s\n", ERR_error_string(ERR_get_error( ), NULL));
        goto end;
}

if (PKCS7_add_certificate(p7, x509) <= 0) {
        printf("OpenSSL Error: %s\n", ERR_error_string(ERR_get_error( ), NULL));
        goto end;
}

BIO *p7bio = PKCS7_dataInit(p7, NULL);

if (!p7bio) {
        printf("OpenSSL Error: %s\n", ERR_error_string(ERR_get_error( ), NULL));
        goto end;
}

//Pump data to special PKCS7 BIO. This encrypts and signs it.
BIO_write(p7bio, data, strlen(data));
BIO_flush(p7bio);
PKCS7_dataFinal(p7, p7bio);

//Write PEM encoded PKCS7
BIO *bio = BIO_new(BIO_s_mem( ));

if (!bio || (PEM_write_bio_PKCS7(bio, p7) == 0)) {
        printf("Fatal Error: Failed to create PKCS7 PEM\n");
}

BIO_flush(bio);

char *str;
int len = BIO_get_mem_data(bio, &str);

char *ret = new char [len + 1];
memcpy(ret, str, len);
ret[len] = 0;

' free the resources:
PKCS7_free(p7);
BIO_free_all(bio);
BIO_free_all(p7bio);
The
last step to enable
button encryption is to change the value of the cmd form tag to _s-xclick and add the PKCS7 blob as a form
value of encrypted..
When youâre done, youâll end up with something like this:
<form method="post" action="https://www.sandbox.paypal.com/cgi-bin/webscr">
<input type="image" src="https://www.paypal.com/en_US/i/btn/x-click-but23.gif"
name="submit" alt="Make payments with PayPal - it's fast, free and secure!">
<input type="hidden" name="cmd" value="_s-xclick">
<input type="hidden" id="encrypted" name="encrypted" value="-----BEGIN PKCS7-----
MIIEvQYJKoZIhvcNAQcEoIIErjCCBKoCAQExggE0MIIBMAIBADCBmDCBkjELMAkG
A1UEBhMCVVMxCzAJBgNVBAgTAkNBMRYwFAYDVQQHEw1Nb3VudGFpbiBWaWV3MRQw
EgYDVQQKEwtQYXlQYWwgSW5jLjEVMBMGA1UECxQMc3RhZ2UyX2NlcnRzMRMwEQYD
VQQDFApzdGFnZTJfYXBpMRwwGgYJKoZIhvcNAQkBFg1yZUBwYXlwYWwuY29tAgEA
MA0GCSqGSIb3DQEBAQUABIGACgshgqbB147NFGZlK23kRLaQ3EkGnFmnRWn8euqN
Ecm12daiK57CaU/L36dhc4PtkigXI2TQ/alWglyerZkOhl+qb6ZRTqEq2+7fhvsB
T32Yph/usVQEj5j0njtFmo9smOyEJuHcNYY5bn3gUsiM6FxIZq8qRlI5W9yh7hTc
1/kxCzAJBgUrDgMCGgUAMGsGCSqGSIb3DQEHATAUBggqhkiG9w0DBwQINNLmCVHP
OUWASIMAdhSkOjW5qKb98fpT1yLCByYMjvE0U39fuG3pSOXv8tKzKEz3v1sKDUOR
PRy0ekPFI6nEdp+dDJLBy3acM3DGrHk7KdYSLqCCAdIwggHOMIIBN6ADAgECAgEC
MA0GCSqGSIb3DQEBBQUAMBExDzANBgNVBAMTBlBheXBhbDAeFw0wNDAzMjkyMTU3
NDdaFw0xNDAzMjcyMTU3NDdaMBExDzANBgNVBAMTBlBheXBhbDCBnzANBgkqhkiG
9w0BAQEFAAOBjQAwgYkCgYEArdX6/kaw/9JWyxedVUBf1hLQ0nE3Z8HZTOAb8tTj
tH3anE8lxoA84NBKgsnAfsWSivWZA149NcpNrVgk7aPiCpIlxxLD7dv30zSqrXUA
kzVZ3xDfxILN42Xe8JZiM7MieixlKL/2RlnqHv6RyfAJyXH7cMlbLQJCBR3g4XnF
7I0CAwEAAaM2MDQwDgYDVR0PAQH/BAQDAgGmMA8GA1UdEwEB/wQFMAMBAf8wEQYJ
YIZIAYb4QgEBBAQDAgIEMA0GCSqGSIb3DQEBBQUAA4GBAD0CbksayWCC0yqZSn3c
6J65Yvmi/KrObGX7EzHcB1N0/YbfYkisw5qvZnGUhMj00DL3cvNOnPxXNBIUdHT3
UF1O8MzLlv8fTAjnS8Zd83vZfSyi6TMSPJlXbx8p+P2IbRNKdQaIHz2tR6tCnUNC
JYYKim3Nkz48sk0/jGtjiJPVMYIBGzCCARcCAQEwFjARMQ8wDQYDVQQDEwZQYXlw
YWwCAQIwCQYFKw4DAhoFAKBdMBgGCSqGSIb3DQEJAzELBgkqhkiG9w0BBwEwHAYJ
KoZIhvcNAQkFMQ8XDTA0MDQyMjIxMDkyMVowIwYJKoZIhvcNAQkEMRYEFO1Oou9z
6VXvxn6wow7yZXlP6vqeMA0GCSqGSIb3DQEBAQUABIGAoNU5uAeD+pp2bROOfhHh
6oTPZDjhUvKLrhVaHmpHzz1aZTtIdqYcwZ6vEVai6fGG43hqoZYAh97xWDiwW9Ie
X/RtAzc38Yk2vch6ocPF8MjsEMVne3J9iy0rN6A0Cby5IgkKFrrYee9eWNIec/6d
3koVvLSCBZvZV+RFYCKhA/0=
-----END PKCS7-----
">
</form>
Obviously, this code is nearly impossible to decipher or tamper with, making it sufficiently obfuscated.
âMichael Blanton
Include Payment Buttons in Email Messages
Use the PayPal Payment Request Wizard to send Pay Now buttons from Microsoft Outlook.
Sending invoices via email with PayPalâs Request Money feature [Hack #17] is a quick and effective way to ask someone to pay you. The Pay Now buttons PayPal includes in the resulting email make it easy for your customers to pay you; after two clicks and a login, customers with PayPal accounts can send you money in less than a minute.
But the Request Money feature has its limitations. While the email appears to come from you, itâs actually sent from PayPal, which means that you wonât be able to customize it fully. If you need to include pictures, files, hyperlinks, custom HTML, or multiple purchase buttons, youâll have to send the email yourself.
Creating PayPal Payment Hyperlinks
Adding a PayPal payment hyperlink to your own email involves nothing more than typing a simple URL [Hack #18] . The required parameters to create a basic hyperlink are email address, payment amount, and item name.
However, there are many optional parameters you can include in the hyperlink to help you provide a more complete payment record, such as the currency, item number, quantity, shipping, and request for shipping address. For example:
https://www.paypal.com/cgi-bin/webscr?cmd=_xclick&business= email%40paypalhacks%2Ecom&amount=10%2E00¤cy_code=USD&item_name= jersey&item_number=1001&quantity=1&shipping=3%2E00&no_shipping=0
As you can see, the hyperlink begins to become unwieldy. Hyperlinks this long or longer cause problems because email programs chop them up into smaller pieces when they wrap the text. More than likely, only the first piece will be hyperlinked and a customer will not think twice about clicking it and attempting to complete the transaction with incomplete information.
The simplest solution is to run the address through TinyURL[1] (http://tinyurl.com), which will convert it to something that looks like this:
http://tinyurl.com/2tqz8
The resulting link is always short enough to be spared the
aforementioned word wrap. Unfortunately, the https://www.paypal.com/ prefix will be lost,
and your more diligent customers might avoid it.
Tip
See [Hack #39] for another, more official way to get shortened payment URLs, and protect your email from spammers in the process.
Using the PayPal Payment Wizard
Want something more professional-looking than a bare URL in your emails? Nearly all modern email programs support HTML (much to the bane of the minimalists among us), which means that you can replace ordinary URLs with hyperlinked, graphical buttons right in your email messages.
Simply use your email softwareâs formatting tools to insert an image and then link it to a payment URL you construct. In fact, URLs in hyperlinks can be as long as 1024 bytes (characters), which is plenty for PayPalâs payment URLs. Of course, thereâs a cost: these payment buttons can be time-consuming to create...until now.
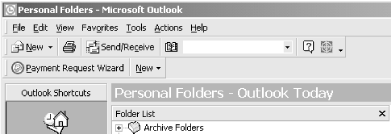
Enter the PayPal Payment Wizard, a free add-in toolbar for Microsoft Outlook and Microsoft Outlook Express that allows you to painlessly insert payment buttons into your emails.
You can create five different types of PayPal payment buttons, each with six different button designs:
- Payment Button (Basic)
This type of button is easiest to use, because it requires only your email address and payment amount, but it offers the fewest options.
- Product Button
This type allows you to enter product details and request a shipping address [Hack #28] .
- Service Button
This type allows you to enter a service description [Hack #30] .
- Auction Payment Button
Use this to request payment for an auction item [Hack #31] .
- Donate Button
Use this to allow the donor to specify the donation amount [Hack #40] .
To use the Payment Wizard toolbar, start by downloading it from http://www.paypal.com/outlook and installing it on your computer. You might be asked to close Microsoft Outlook if itâs open.
Warning
The PayPal Payment Wizard currently supports only Microsoft Outlook and Outlook Express on Windows. If youâre using Eudora or some other email software, or if you are using a Mac or Linux, youâll have to create payment buttons manually.
To insert a button with the Payment Wizard, follow these steps:
Open Outlook or Outlook Express.
Click the Payment Request Wizard icon on the toolbar (shown in Figure 4-7).
When you see the first page of the wizard, click Next.
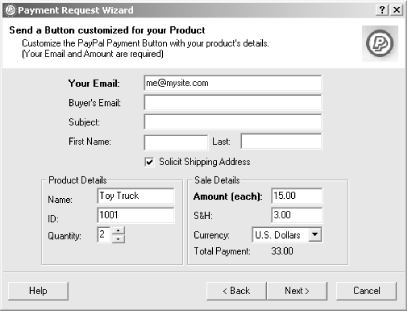
On the Payment Button Type screen, choose one of the five aforementioned payment button types. For this example, select the second option, Product Button, and click Next.
The Product Button requires only the email address to which payment should be sent, and the payment amount, as shown in Figure 4-8.
There are several optional fields. You can specify the subject of the payment email youâll receive if the recipient pays. The First Name and Last Name fields are not currently used, so you can leave them blank. You can leave the Buyerâs Email, Subject, First Name, and Last Name empty, because they are not required.
If your product requires shipping, turn on the Solicit Shipping Address option. PayPal will ask the buyer to specify a shipping address.
In the Product Details area, enter the name of the product and its ID number, if you have it.
In the Sale Details area, enter the price of the product. If you are selling multiple identical products, change the quantity to the reflect the quantity you are going to sell. If you are selling two toy trucks for the same price of $15 each, enter $15 and change the quantity to 2. You will see the Total Payment update to $30.
In the S&H field, enter the amount to charge for shipping and handling. If you change this field, you will see the Total Payment update to reflect the new amount.
Select the currency, confirm that the Total Payment is correct, and click Next when youâre done.
On the Button screen, select the button you would like to put into your email. The wizard provides six payment button images, all hosted on the PayPal web site (they might not appear if you or your recipient are not connected to the Internet).
If you would like to use another image for your button, select the URL option and enter the URL of your image file (presumably hosted on your own site). The button must be on a web server that can be accessed by anyone via the Internet. You can also choose the Text option to put the PayPal payment URL behind a text link instead of an image.
Click Next to view the Youâre Almost Done screen, where youâll see a summary of the values selected for your Payment Button. Verify that the information is correct and press the Test button to see the button in action.
If you are planning on sending many similar buttons, check the Save settings box. The wizard will save your settings for the next time.
Click Insert, and the fully configured button will be inserted into a blank email. (You wonât be able to click on the button, because youâre in edit mode.)
At this point, complete the email. Type one or more email addresses into the To field, enter a subject, and include a note or instructions to accompany the button, as illustrated in Figure 4-9.
Click Send when youâre finished.
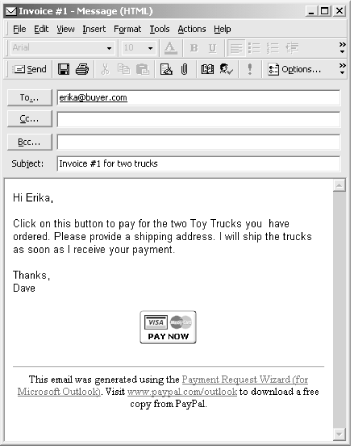
When your customer opens the email, he will be able to click the button and pay you after logging into his PayPal account. To test this experience firsthand, send the email to your own email address.
Including More than One Button in an Email
Since the PayPal Payment Wizard creates a new email message with each button, there is no way to use it to insert more than one button into a single email message. However, overcoming this limitation is easy enough:
Insert a payment button with the Payment Wizard, as described in the previous section.
Using your mouse, select the area around the new button, making sure to include the lines above and below the new button, as shown in Figure 4-10.
Copy the selection to the clipboard by pressing Ctrl-C or by selecting Copy from Outlookâs Edit menu.
Click to place the insertion point (text cursor) where youâd like the new button to appear, and paste the button into the existing email by pressing Ctrl-V or by selecting Paste from Outlookâs Edit menu. You can paste the button into any email, including one that already contains a payment button.

Repeat the process for each additional payment button you would like to insert. To verify that the image and corresponding hyperlink have been pasted correctly, as well as to make any changes to the URL, right-click the button and select Properties.
Hide Your Email Address from Spammers
Use your PayPal referral ID to prevent your email address from being harvested by spammers.
Spam (unsolicited bulk email) is a growing problem for Internet users, especially for those who have web sites that can be spidered by spambots looking for email addresses. The HTML generated by the PayPal Button Factory contains the email address listed in your PayPal account, making it available to address harvesters. Prevent this potential misuse by replacing your email address with your referral ID (also known as the affiliate ID).
Warning
This hack does not work with the HTML code generated for the PayPal Shopping Cart [Hack #45] . It also doesnât support encrypted buttons [Hack #37] , although buttons protected by encryption are already well-protected from spammers.
To implement this fix, you need to obtain your referral ID from the PayPal web site and then edit your HTML button code, substituting the referral ID for your email address.
To obtain your referral ID from PayPal, click the Referrals link
at the bottom of any PayPal page. You will see a text box with a
URL in it, which will look something like https://www.paypal.com/mrb/pal=
ABC1DEF2GHIJK. Your referral ID is the part
of the URL after pal=; in this case,
the referral ID is ABC1DEF2GHIJK.
To put the referral ID in place of your email address, open the web page that contains the button in a text or HTML editor and find the all sections of code that look like this:
<input type="hidden" name="business" value="youremail@yourisp.com">Replace your email address with your referral ID, like this:
<input type="hidden" name="business" value="ABC1DEF2GHIJK">You will need to do this for each button on your site. Your buttons will operate normally, and your customers wonât know the difference.
Accept Donations
Accept PayPal donations to fill your nonprofitâs coffers, and tweak the Donate Now button to suit your needs.
The Internet has long been a tool for bringing together like-minded activists in a common cause. After Howard Deanâs campaign for the 2004 Democratic presidential nomination, however, fundraisers working in the mainstream learned that the power of the Net could not only get out the word, but bring in the green as well.
PayPal has long understood the value of making donations quick and easy. The Make a Donation button lets you start accepting contributions immediately. To create a button follow these steps:
Log into your PayPal account.
Click the Merchant Tools tab, and then click Donations (under Website Payments).
Fill in a name and ID number, if you wish. A Donate Now buttonâs name and ID number, like the Item Name/Service and Item ID/Number in a Buy Now button, let you and your contributors identify payments. By using different numbers and descriptions, you can place a number of buttons on your site, each soliciting donations to different programs.
Enter an amount or leave blank if you want your donors to enter an amount themselves. Either way, youâll need to select a currency in which donations will be made.
Choose from the selection of PayPal donation buttons, or specify the URL of your own button image.
Choose the encrypted or unencrypted version of the button. If youâre not sure which one to use, choose the unencrypted version; you can replace it later with an encrypted one once your button is functioning. Unencrypted buttons are plain HTML formsâeasy to read, understand, and modify. An encrypted button, on the other hand, is inscrutable to anyone but the PayPal system and impossible to modify or customize. While unencrypted buttons can be created with any software tool, encrypted buttons can, at the time of this writing, be created only with the PayPal systemâs Merchant Tools. Encrypted buttons can be useful in some situations, such as to protect your email address from spammers. Openness, however, is usually best. See [Hack #36] to learn more about button encryption.
Click Create Button Now when youâre done.
The HTML code generated for your button is found in a textarea box on the next page. Just select its
contents, press Ctrl-C to copy the text to the clipboard, and then paste
the text into your web page.
Establishing Suggested Giving Levels
Your donors might be more comfortable giving at one of several suggested donation levels than having to fill in a blank box with a dollar amount.
Tip
Include a catchy name for each donation level. For instance, the California State Railroad Museum Foundation (http://www.csrmf.org) offers six suggested donation levels: become a Brakeman for $25, a Fireman for $35, a Conductor for $50, an Engineer for $100, a Trainmaster for $250, or a Silver Spike/Railroad Patron for $1,000.
Provide a drop-down list (shown here) or a radio button group to allow your donors to easily choose an amount:
<blockquote>
<form action="https://www.paypal.com/cgi-bin/webscr" method="post">
        <p>Please contribute to XHTML Promotion Society, "Diamond" Dave Burchell,
        DocBook Outreach Officer.</p>
<input type="hidden" name="cmd" value="_xclick"/>
<input type="hidden" name="business" value="burchell@inebraska.com"/>
<input type="hidden" name="item_name" value="General Fund Contribution"/>
<input type="hidden" name="item_number" value="GF-1"/>
<!-- <input type="hidden" name="amount" value="3.00"/> -->
<p>Contribution amount:
<select name="amount">
        <option value="200"/>$200
        <option selected value="100"/>$100
        <option value="75"/>$75
        <option value="50"/>$50
        <option value="25"/>$25
</select>
</p>
<input type="hidden" name="no_note" value="1"/>
<input type="hidden" name="currency_code" value="USD"/>
<input type="hidden" name="tax" value="0"/>
<input type="image" src="https://www.paypal.com/en_US/i/btn/x-click-but21.gif"
                border="0" name="submit" alt="Make payments with PayPal - it's fast,
                free and secure!"/>
</form>
</blockquote>
Among other things, a page like the one shown in Figure 4-11 will give your donors some idea how much others might be donating.
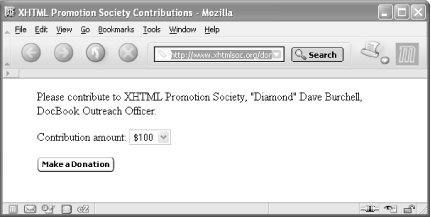
Tip
Youâll collect more money by setting the default donation
level (marked with the selected
parameter in the code)one notch higher than the
amount most donors actually give. This will encourage your more
generous supporters to stretch just a bit, while raising the bar for
those who might otherwise choose the lowest level.
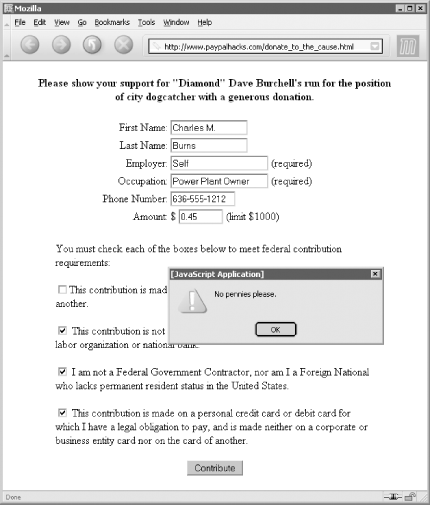
Requiring Information from Your Donors
In some situations, such as the collecting of contributions to a political campaign, youâll require information about your donors. For example, your local election laws might require you to record the occupation and employer of each contributor.
You could simply ask contributors to include this information in the note field (answer Yes to the Collect Additional Information From Your Customers question on the Add More Options page), but when was the last time you saw a customer ever follow directions? Instead, include a little JavaScript to virtually insure that your donors provide the information you need:
<script language="javascript">
<!--
function noEntry( ) {
if (document.contribution_form.os0.value.length<1) {
  alert("Please fill in your Employer.");
  return false; }
else if (document.contribution_form.os1.value.length<1) {
  alert("Please fill in your Occupation.");
  return false; }
if (document.contribution_form.amount.value.length<1) {
  alert("Please fill in the amount to donate.");
  return false; }
else if (document.contribution_form.amount.value<1) {
  alert("No pennies please.");
  return false; }
else if ((document.contribution_form.q1.checked==false) ||
  (document.contribution_form.q2.checked==false) ||
  (document.contribution_form.q3.checked==false) ||
  (document.contribution_form.q4.checked==false)) {
  alert("You must agree to all four certifications.");
  return false; }
else { return true; }
}
// -->
</script>

<blockquote>
        <h4 align="center">Please show your support for "Diamond" Dave Burchell's
                run for the position of city dogcatcher with a generous donation.</h4>

<form name="contribution_form" onsubmit="return noEntry( )" action=
                "https://www.paypal.com/cgi-bin/webscr" method="post" target="_blank">
        <input type="hidden" value="Occupation" name="on1"/>
        <input type="hidden" value="Employer" name="on0"/>
        <input type="hidden" value="Dogcatcher Campaign Contribution" name=
                "item_name"/>
        <input type="hidden" value="PayPalTech" name="bn"/>
        <!-- enter the email address on your PayPal account below -->
        <input type="hidden" value="burchell@paypalhacks.com" name="business"/>
        <input type="hidden" value="_xclick" name="redirect_cmd"/>
        <input type="hidden" value="_ext-enter" name="cmd"/>
  <center>
        <table border="0" width="100%">
          <tbody>
            <tr>
              <td width="37%" align="right">First Name: </td>
              <td width="63%"><input name="first_name" size="15"/> </td>
            </tr>
            <tr>
              <td width="37%" align="right">Last Name: </td>
              <td width="63%"><input name="last_name" size="15"/> </td>
            </tr>
            <tr>
              <td width="37%" align="right">Employer:</td>
              <td width="63%"><input name="os0"/> (required)</td>
            </tr>
            <tr>
              <td width="37%" align="right">Occupation: </td>
              <td width="63%"><input name="os1"/> (required)</td>
            </tr>
            <tr>
              <td width="37%" align="right">Phone Number: </td>
              <td width="63%"><input name="item_number" size="12"/> </td>
            </tr>
            <tr>
              <td width="37%" align="right">Amount: </td>
              <td width="63%">$ <input name="amount" size="7"/> (limit
$1000)</td>
            </tr>
          </tbody>
        </table>
        <table border="0" width="90%">
          <tbody>
            <tr>
              <td width="305"><br/>
You must check each of the boxes below to meet federal contribution
requirements:<br/>
              <br/>
              <input type="checkbox" value="1" name="q1"/>This
contribution is made from my own funds, and not from those of another.<br/>
              <br/>
              <input type="checkbox" value="1" name="q2"/>
This contribution is not made from general treasury fund of a
corporation, labor organization, or national bank.<br/>
              <br/>
              <input type="checkbox" value="1" name="q3"/>
I am not a Federal Government Contractor, nor am I a Foreign National
who lacks permanent resident status in the United States.<br/>
              <br/>
              <input type="checkbox" value="1" name="q4"/>
This contribution is made on a personal credit card or debit card for
which I have a legal obligation to pay, and is made neither on a
corporate or business entity card nor on the card of another.
              </td>
            </tr>
          </tbody>
        </table>
        <p align="center"><input type="submit" value="Contribute" name="button"/></p>
        </center>
</form>
Here, the noEntry()
JavaScript routine, executed when the contributor
submits the form, displays an error if the Employer or Occupation fields are blank, or if the donor
enters a donation thatâs too low, as shown in Figure 4-12.
PayPal-Enable Your Flash
Add PayPal Buy Now or Subscription functionality to your Flash-powered online store using the WebAssist PayPal eCommerce Snap-ins.
Increasingly, Flash has been putting the sizzle in the online shopping experience by adding cool interactivity and fancy special effects to otherwise bland web pages. Over the last couple years, Macromedia has added several full-fledged software architectures to support Flash-based transactions. Flash forms take advantage of the enhanced interactive capabilities of the vector-based client and allow all manner of special effects, including visual sorting and drag-and-drop shopping options. The latest versions of Flash also provide standard components for commonly used form elements, such as text fields, checkboxes, radio buttons, and lists, which means that you can accept PayPal payments from within Flash elements on your web site.
Snap in the PayPal Connection
So, what does it take to make the Flash connection to PayPal? In truth, the back-end ActionScript required to make the necessary PayPal connection is extremely complex. The good news, however, is that a Flash extension, developed by PayPal and WebAssist, provides the core functionality while leaving a great deal of room for programmatic customization.
Get the extensionâknown as the WA PayPal eCommerce Snap-ins for Flash MXâfrom http://webassist.com/Products/ProductDetails.asp?PID=24. The extension is free; you just need to register with WebAssist. Install the extension into Flash MX by double-clicking the downloaded file, or into Flash MX 2004 via Macromediaâs Extension Manager. If you have Flash open, youâll need to quit and relaunch the program for the snap-in to appear.
Once the extension is installed, you can straightforwardly handle the basics for adding a Buy Now or Subscription button to your page. If the item youâre selling has no options or other complications, you donât even have to touch the ActionScript.
Start by building your basic product page. Make sure there is at least one clickable element (such as a button) on the Flash stage, and give it a name in the Property inspector.
Tip
Typically, Flash buttons are used for such an interactive event. If youâre design-challenged, the installed extension includes a number of Buy Now or Subscription buttons, located in the PayPal Buttons folder of the Common Libraries window. You can drag these to any location on the stage.
Open the Components panel and look in the WA PayPal eCommerce category. Drag either the Buy Now or Subscription object (these are the actual snap-ins) anywhere onto the stage.
Tip
Although the snap-in appears as a visual element at design-time, you wonât see it when the movie is published. All of its power is behind the scenes.
To complete the simple Flash PayPal configuration, youâll need to establish the details to be sent. While you can set these values in ActionScript, as explained later in this hack, you can also use the snap-inâs Component inspector. Select the snap-in and, in the Property inspector, click the Launch Component Inspector button.
In the Parameters tab of the Component Inspector panel, youâll see a custom dialog box for the snap-ins, as shown in Figure 4-13. Each of the snap-in parameter dialogs is a specialized multitabbed affair.
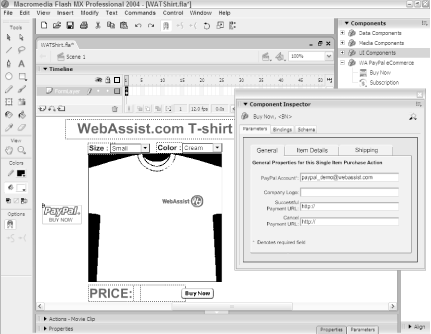
Take a look at the Component Inspector for the Buy Now snap-in, in which the following parameters are separated into three tabs (General, Item Details, and Shipping):
- General tab
- PayPal Account
The PayPal recipientâs email address (required)
- Company Logo
The web address (URL) of your logo graphic (such as a .jpg file), which will be incorporated into the PayPal page
- Success URL
A fully formed URL to the web page you want your customers to see after a successful PayPal transaction
- Cancel URL
The web address of the page to which customers who cancel are sent
- Item Details tab
- Item Name/Service
The name of the item being sold
- Item ID Number
The product SKU or other ID number passed through to you (not seen by the customer)
- Price
The base price of the item
- Currency
The type of currency to be used (choices are U.S. dollars, Canadian dollars, euros, British pounds and Japanese yen)
- Multiple Units Option
A checkbox that controls whether customers can order a quantity of more than one
- Shipping tab
- Base Shipping
The shipping cost for a single item
- Extra Shipping
Shipping charges added, per additional item, if more than one unit is ordered
- Handling
The handling charge, over and above the aforementioned shipping charges, applied to the entire order
- Shipping Information Option
A checkbox that determines whether PayPal will request the customerâs shipping information
- Note Option
An option that allows customers to add a note with their PayPal order
Tip
The Subscription Component Inspector parameter dialog is similar to the one for the Buy Now snap-in, but it offers special fields for specifying one-time or recurring billing, as well as trial offers.
For items with properties that are completely covered by the options in the Component Inspector panel, no additional ActionScript is required to complete the PayPal order. All you need do is publish the .swf file and put it in an HTML page on the Web; the rest is automatic. But, of course, you want more, donât you?
Hacking the Hack
So, whatâs underneath the hood of the WebAssist PayPal eCommerce Snap-ins for Flash MX? Quite a bit, as it turns out. There are 31 different methods embedded in the Buy Now snap-in and 38 in the Subscribe snap-in. Of these, about half are used to set values, and the other half are used to pass those values to PayPal. The setting methods are of prime interest to the Flash/PayPal hacker.
Take a look at a typical example that ties additional options (and their related prices) to a PayPal item. Imagine a fictional online T-shirt emporium that offers a fancy-dancy item available in five different colors and four different sizes. Thereâs no difference in price for the various colors available. However, Flash can represent the different colors quite easily, thus adding a nice visual flair to our product page. T-shirt size, on the other hand, goes up with price: $10.99 for small, $13.99 for medium, $15.99 for large, and $18.99 for extra large.
Again, representing this in the .swf is
trivial for Flash MX or Flash MX 2004. The values in the drop-down
size list are displayed in a dynamic text variable as the current
price. But how do you send the correct item cost and order details to
PayPal? Short answer: use the set
methods. Hereâs the longer, code-oriented answerâjust place this
ActionScript code into your project:
function setPrice( )  {
  // Get the price (based on size list)
  var newPrice = sizeList.getValue( );
1.  BN.setAmount(newPrice);
2.  BN.setItemName(sizeList.getSelectedItem( ).label+" "+colorList.getSelectedItem( ).
label+" WebAssist.com T-Shirt");
3.  BN.setItemNumber(String(sizeList.getSelectedIndex( )) + String
(colorList.getSelectedIndex( )));
}
The function setPrice() is called
when the page is first loaded and each time any option changes. Both
options (color and size) are selected from drop-down lists, colorList and sizeList, respectively. The first line of
the code picks up the price from the sizeList. The user sees the labels in the
list (Small, Medium, Large, and X-Large), but the values are set to
prices of 10.99, 13.99, 15.99, and 18.99. The current item price is established
as amount to send to PayPal on line 1.
The Buy Now snap-in instance placed on the stage is named BN, and any methods that relate to that instance are named with the BN prefix. Two more functions are used to set the item name (which is what the customer sees on the Payment For line of the PayPal page) and the item number (a SKU number that is sent to the online store owner for order processing) on lines 2 and 3, respectively.
Any value that you can set in the Component Parameter dialog can be set programmatically in ActionScript. Table 4-1 shows all Buy Now methods that set values.
Buy Now method | Argument | Description |
Boolean; | Sets whether the buyer can include a note with
the payment. If set to | |
String | Sets the base amount of the item. | |
String | Specifies the PayPal ID, or email address, where payments will be sent. This email address must be confirmed and linked to your verified Business or Premier account. | |
String; fully formed URL | Sets the URL of the page viewed when the Cancel button is clicked. This item is optional; if omitted, users will be taken to the PayPal site. | |
String; valid values are | Sets the currency to be used for payment. For
example, to use the euro instead of the U.S. dollar, change
the currency from | |
String | Sets the extra shipping cost per item after the first item. If this optional value is omitted, and your Profile-based shipping is enabled, your customer will be charged the amount or percentage defined in your Profile. | |
String | Sets the handling charge. This is not quantity-specific. The same handling will be charged regardless of the number of items purchased. | |
String | Specifies the name or description of the item (maximum 127 characters). | |
String | Sets the item number, SKU, or unique key; this is the pass-through variable with which you can track payments. It will not be displayed to your customer but will get passed back to you at the completion of payment (maximum 127 characters). | |
String; fully formed URL | Sets the URL to your company logo, an image up to 150 by 50 pixels. This is optional; if omitted, your customer will see your business name (if you have a Business account) or email address (if you have a Premier account). | |
Boolean; | Sets whether shipping information is necessary
for checkout. If set to | |
String | Sets the shipping charge. If shipping is used and
| |
String; fully formed URL | Sets the URL of the page to which the customer is sent when the order is complete. This item is optional, if omitted, customers will be taken to the PayPal site. | |
String; default value is | Sets the target window where the payment
processing information will be displayed. The constant
| |
Boolean; | Sets whether the buyer can change the quantity on
the PayPal site. If set to |
The Subscription methods are, for the most part, the same as
the methods that set values; all methods listed in Table 4-1, with the exception of
setAmount, setExtraShipping, setHandling, setShipping, and setUpdateableQuery, can also be used with an
instance of a Subscription snap-in. Table 4-2 lists the additional
Subscription set methods available.
Subscription method | Argument | Description |
Boolean; | Specifies whether this is a recurring payment. If
set to | |
String | Sets the price of the purchase at the standard rate. | |
String | Specifies the length of the billing cycle. The
number is modified by the regular billing cycle units, set by
| |
String; valid values are | Sets the unit of time that the billing period is
measured in ( | |
Boolean; either | Sets whether to reattempt billing if the payment
is declined. If set to | |
String | Specifies the number of payments to occur at the regular rate. If omitted, payment will recur at the regular rate until the subscription is cancelled. | |
String | Sets the trial price. For a free trial, use a
value of | |
String | Sets the length of the trial period. This number
is modified by the trial period units, set by | |
String: valid values are | Sets the unit of time in which the trial is
measured ( |
Combine Flashâs interactive flair with the ActionScript methods to put your customers in the driverâs seat and still get all the information you need to process your PayPal order correctly.
âJoe Lowery
Get More Out of Dreamweaver and PayPal
Use the WebAssist PayPal eCommerce Toolkit to enable fast, easy, and flexible PayPal transactions with Dreamweaver.
If you use Macromedia Dreamweaver to design and produce web pages, you can use the WebAssist PayPal eCommerce Toolkit (an extension to Dreamweaver) to integrate PayPal with your web site. Naturally, you can use Dreamweaverâs code editor to insert any PayPal transaction you want, but why hand-code when you can point and click? The results are the same as hand-coding; itâs just quicker, less error prone, and requires almost no technical savvy: whatâs not to love?
Drag and Drop eCommerce
With WebAssist PayPal eCommerce Toolkit (available for free at http://www.webassist.com), you can insert Add to Cart, View Cart, Subscription, and Buy Now buttons. Insert any of these objects and a multistep wizard walks you through the particulars of the process. Each wizard offers a nice library of button designs to choose from, so you donât have to create any artwork from scratch. However, if you do have your own button, you can enter the URL of its web-based location and that button will be used.
Other available options depend on which button type is being inserted. The Buy Now button, for example, lets you specify the base shipping, any extra shipping to be added for each additional item ordered, and overall handling charges. If you enter these additional values, they override your general account settings on a per-item basis. Adding a Subscription button, on the other hand, gives you the ability to establish periodic billing values (i.e., how much for how long) and trial-offer settings, such as the length of the trial offer. You can even determine a setup fee for a subscription.
Hacking the Hack
By itself, the WebAssist PayPal eCommerce Toolkit is great for items with no options or variations. However, by doing a little work on the form that contains the PayPal buttons, you can greatly extend the toolkitâs functionality. Most of the following techniques center on two concepts: naming form elements properly and using hidden form fields. These concepts work together to pass the correct information to PayPal when the transaction is initiated.
Say your your item is available in several sizes or configurations at varying prices. You can pass the right price to PayPal in two ways: using drop-down lists or radio buttons. To offer multiple prices with a list, follow these steps:
Insert a list/menu form element from Dreamweaverâs Insert bar, found in the Forms category.
Select the list element and, in the Property inspector, enter
amountin the (ironically unlabeled) name field on the top left.Choose List Values to open the List Values dialog box.
In the dialog, enter the first item you want the user to see in the Label column.
Press Tab and, in the Value column, enter the corresponding amount you want passed to PayPal when this item is chosen. Enter just the raw number without dollar signs. For the first item, itâs common to use a directive like âChoose From This Listâ rather than an item. If you use basic text like this, be sure to leave the corresponding Value empty.
Press Tab again to enter another Label/Value pair.
When youâre done, click OK.
When the user makes a selection from the list, the related value is assigned as the amount and sent to PayPal at transaction time. If youâd prefer to display all options on-screen rather than contain them in a list, use radio buttons to vary the price. Hereâs how:
Insert a radio button from the Insert bar, in the Forms category.
In the Property inspector, enter
amountin the name field.In the Checked Value field, enter the number value you want to send to PayPal when this option is selected.
Repeat steps 1-3 for each additional option and price point youâd like.
Keep the name of each button in the radio group the same
(amount) and vary the Checked Value
numbers. You can use as many radio buttons as needed.
What about other types of options? PayPal allows two additional
options per item. Using the following technique, you can pass two
pairs of name and associated information to be included in the order
sent to the store owner for fulfillment. If this technique is used to
pass color choices, for example, the string passed to PayPal (and on
to the owner) might be color="Creamâ.
Letâs say that you have a list of colors for the customer to
choose from in your product page. Set up the color list with
name/value pairs as described in the previous steps for establishing
the amount. This time, however, name the list/menu form object
os0 , which stands for Object String 0,
the first of the two PayPal option values allowed.
Of course, you canât send a value without identifying it. To
tell PayPal and, eventually, the fulfillment folks, what this value is
for, insert a hidden form field from Dreamweaverâs Insert bar, in the
Forms category. With the hidden form field selected, enter its name in
the Property inspector: on0 (short
for Object Name 0). Complete the operation by
entering color in the Value field
of the Property inspector. Your first option is ready to go. You can
enter another option (perhaps setting the itemâs size) by following
same procedure and substituting os1
and on1 for the new optionâs value
and name, respectively.
âJoe Lowery
Provide Options with ASP.NET Web Controls
Create custom web controls in ASP.NET to allow customers to specify product options with their orders.
As described in [Hack #28] , you can send option information to PayPal so that it appears as part of the transaction along with other item details, such as quantity and price. This information is vital to order fulfillment and also allows customers to review fully what they are buying.
Sending this information to PayPal is simple. You can do it in one of two ways:
Send the information through the URL as parameters.
Send the information through form submission using HTTP
POST.
PayPal looks for four parameters when information is passed to it by its payment controls: option name one, option value one, option name two, and option value two. Geeks came up with the naming here, and to us geeks (you might be one and find comfort in this), traditional base-10 numeric series start with the number 0 and end with the number 9.[2] So, the first option is called option 0 and the second is called option 1, and when you pass this information to PayPal, it looks something like this:
on0="Size"
os0="Large"
on1="Color"
os1="Blue"
This information can be passed to PayPal through a URL, like this:
http://please.include.a/complete/url?on0=Size&os0=Large
or through an HTTP form POST:
<input type=hidden name="on0" value="Size">
<input type=hidden name="os0" value="Large">
PayPal will include this information in the description section of the item, so your user can view it at the time of the sale.
Using the .NET Payment Controls
Collecting order details is fairly straightforward with traditional scripting languages (e.g., ASP or PERL). Simply display the information for each product, with relevant options, in a single form for each product (this example uses Active Server Pages with VBScript):
<% while not rs.eof%>
<form action="https://www.paypal.com/cgi-bin/webscr" method=POST>

<!-- The product name and description go here -->

<input type=hidden name="on0" value="Size">
<select name=os0>
  <option value="Large">Large</option>
  <option value="Medium"> Medium </option>
  <option value="Small">Small </option>
</select>
<input type=hidden name="on1" value="Color">
<select name=os1>
  <option value="Yellow"> Yellow </option>
  <option value="Blue"> Blue </option>
  <option value="Gold"> Gold </option>
</select>

<input type=submit value="Add To Basket">

<form>
<%
rs.movenext
wend
%>
Tip
This code provides purchase options with drop-down listboxes [Hack #32] to restrict the inputs on the form.
Using product options with the .NET payment controls, however,
offers a bit of a challenge, given that an ASP.NET page only lets you
have one <form> tag per
ASP.NET web page, thus allowing it to maintain page state
properly.
To get around the single-form limitation, you can use the
Click event of the
Payment Controls to add the option controls at runtime. The first
thing you must do is set the control to use the postback routine (UseFormGet=false) and disallow the pop-up
command (UsePopUp=false), so that
PayPal can glean the options from the postback.
This is a delicate process, especially when using the
.NET-native data controls (e.g., DataList, Repeater, or DataGrid). You
need to understand which events fire and in what order, because this
can affect how your option controls are populated. You will be dealing
with the Click event of the PayPal
control, not one of the events of the data controls, which can get a
little confusing. Thus, itâs best to skip ahead to the good part: how
to do it!
Creating Your Own PayPal Control
If you are a serious geek, youâve probably already created your own Custom Server Control to handle the intricacies of gathering option information from the ViewState. Or, at the very least, you have something mapped out in your head. However, there might be something simpler in the following approach, and I appeal to you to quell your ADD for another five minutes. Custom Server Controls can be useful, but they can also (and often do) add a layer of complication (a.k.a. lots of code) to an otherwise simple task.
This approach starts with a user control and then populates its options from the product information you pass to it. User controls allow you to encapsulate functionality for individual UI components, which this is, so you donât need to write the same code twice or create spaghetti code in order to find the control you want hidden within your page.
Tip
This example uses PayPalâs Shopping Cart and the Add to Cart Button, and it is written in C# using ASP.NET.
Create a user control called
AddToCartOptions.ascx, and add the PayPal
AddToCart server control, along
with a RadioButtonList called
radColors and a DropDownList called ddSize:
<table>
  <tr>
    <td><asp:dropdownlist id="ddSize" runat="server">
      <asp:ListItem Value="Small" Selected="True">Small</asp:ListItem>
      <asp:ListItem Value="Medium">Medium</asp:ListItem>
      <asp:ListItem Value="Large">Large</asp:ListItem>
      </asp:dropdownlist>
    </td>
    <td width="290">
      <asp:radiobuttonlist id="radColors"
                 runat="server" RepeatDirection="Horizontal" Width="280px"
                                        Height="24px">
      <asp:ListItem Value="Black">Black</asp:ListItem>
      <asp:ListItem Value="Blue">Blue</asp:ListItem>
      <asp:ListItem Value="Paisley">Paisley</asp:ListItem>
      <asp:ListItem Value="Polka Dots">Polka Dots</asp:ListItem>
      </asp:radiobuttonlist>
    </td>
    <td>
      <cc1:addtocartbutton id="AddToCartButton1" runat="server"
             BusinessEmail="mybusinessemail" ItemNumber="xxxx" ItemName="Small Army Men"
             Amount="1.02" ReturnUrl="http://myserver/myhandler.aspx"
             CancelPurchaseUrl="http://myserver/mycancelhandler.aspx"
             Shipping=".01" Tax=".01" UsePopup="false" UseFormGet="false"
      </cc1:addtocartbutton>
    </td>
  </tr>
</table>
Make sure to set the UseFormGet and UsePopup values to false, which will force a postback to the
server. Next, in the code behind the page, add the properties or
fields that will be set by the calling page:
public string ItemName;
public string ItemNumber;
public string Amount;
In the Page_Load event of the ASP.NET page, populate these values, as
well as those of your options (in case you need to populate the option
controls from the database):
//expose the properties as needed
AddToCartButton1.ItemName=ItemName;
AddToCartButton1.ItemNumber=ItemNumber;
try{
  AddToCartButton1.Amount=Convert.ToDouble(Amount);
}catch{
  throw new Exception("Invalid value for a double: "   +Amount.ToString( ));
}
Add the event handler for the button Click event in the InitializeComponent() method:
this.AddToCartButton1.Click+=new System.EventHandler(this.AddClicked);
Finally, add the method to handle the PayPal button Click event, which reads the values of the
controls and populates the AddToCartButton1 options accordingly:
private void AddClicked(object sender, System.EventArgs e) {
  AddToCartButton1.Option1FieldName="Size";
  AddToCartButton1.Option1Values=ddSize.SelectedValue;
  AddToCartButton1.Option2FieldName="Color";
  AddToCartButton1.Option2Values=radColors.SelectedValue;
}
This method populates the control just before the output is rendered to the browser, which redirects the user to PayPal for the purchase.
Warning
It should be noted at this point that the geeks who created
this control appear not to be the same geeks who created the
aforementioned naming convention at PayPal: the geeks who created
this control are not Zeroians but nonbelievers in the primary status
of the Almighty Zero. Thus, Option1FieldName represents option number
1, which, in turn, corresponds to
on0.
To reward those of you who are patient enough to have made it this far, here is a final piece of wisdom: .NET is notoriously tricky when it comes to marrying the concept of events to a stateless medium such as a web page. There is a mess of events that goes into every request and every object; adding more objects to a page only complicates matters, especially when those objects have event sets of their own.
If you have ever tried to run logic using the events in a user
controlâwhich is, itself, part of a DataList or Repeaterâyou have
undoubtedly run into the Event Freak
ShowTM, wherein you cannot get your events
to work properly or fire in the correct order, despite using all the
Page.Postback tests in existence.
If not done properly, the options selected by your customer will be
overwritten by the initialization routine of the page, and the same
meaningless information will be passed to PayPal.
The solution to this problem lies in setting the DataSource property, not the DataBind(
) method, of your Repeater or DataList. Consider that the
user control, discussed earlier in this hack, is in a Repeater called
MyRepeater:
<asp:Repeater id=MyRepeater Runat="server">
  <ItemTemplate>
  <uc1:_AddToCartOptions'
  id=_AddToCartOptions1
  runat="server"   ItemName='<%#DataBinder.Eval(Container.DataItem, "ModelName")%>'
  ItemNumber='<%#DataBinder.Eval(Container.DataItem,   "ModelNumber")%>'   Amount=
'<%#DataBinder.Eval(Container.DataItem, "UnitCost")%>'   >
  </uc1:_AddToCartOptions>
  </ItemTemplate>
</asp:Repeater>
To preserve the ViewState of the user control, be sure to DataBind the Repeater:
MyRepeater.DataSource = MyDataSource;
if(!Page.IsPostBack){
  MyRepeater.DataBind( );
}
The DataBind() method overwrites whatever state the user control was
in when submitted by the customer, so you need to handle the
population of this control and test for the postback. Setting the
DataSource at runtime apparently helps the control remember the
ViewState of its child controls.
Thus, your Repeater (or DataList) and all of its controls will maintain their ViewState, and your customerâs option selections will be passed properly.
âRob Conery
Try Accepting Payments in a Bogus Currency
Weird out your pals and amuse your customers with PayPalâs devilishly clever error message.
PayPal allows you to send and receive payments in five
currencies: U.S. dollars (USD),
Canadian dollars (CAD), pounds
sterling (GBP), euros (EUR), and Japanese yen (JPY). If you are creating your own PayPal
buttons, youâll need to indicate one of these five currencies in the
buttonâs markup. If you make a mistake here, your prospective buyers
will be greeted with a confusing error message.
However, you might want to turn this error on its ear by working it into the storyline of your web site. If you offer products to Harry Potter fans, for example, you might want to put up a button like this:
<form action="https://www.paypal.com/cgi-bin/webscr" method="post">
<input type="hidden" name="cmd" value="_xclick">
<input type="hidden" name="business" value="burchell@inebraska.com">
<input type="hidden" name="item_name" value="The Monster Book of Monsters">
<input type="hidden" name="item_number" value="MboM">
<input type="hidden" name="amount" value="49.00">
<input type="hidden" name="no_note" value="1">
<input type="hidden" name="currency_code"
 value="sickles">
<input type="image" src="https://www.paypal.com/en_US/i/btn/x-click-but23.gif" border="0"
 name="submit" alt="Make payments with PayPal - it's fast, free and secure!">
</form>
Your customers will see this message:
This recipient does not accept payments denominated in sickles. Please contact the seller and ask him to update his payment receiving preferences to accept this currency.
The useful lesson: if your customers contact you asking you to
change your payment preferences to accept CAN, CND,
or YEN (none of which are valid),
check your button code.
[1] SnipURL (http://snipurl.com) also works and takes it a bit further with tracking features. For a similar, yet far less useful URL-processing tool, try HugeURL (http://hugeurl.com).
[2] Actually, there are many numeric patterns that start at zero, such as the way we track the minutes in an hour.
Get PayPal Hacks now with the O’Reilly learning platform.
O’Reilly members experience books, live events, courses curated by job role, and more from O’Reilly and nearly 200 top publishers.

