If you’ve been taking the chapter-by-chapter approach to this book, you’ve now learned how to implement a traditional Express Checkout payment flow as well as an Express Checkout for Digital Goods payment flow. Make no mistake that these two payment flows are great ways to implement a checkout and provide a first-class payment experience that your customers will recognize and appreciate as they make online purchases on your site. Historically, Express Checkout has been the online payment experience that most consumers have expected, and the enhancements that have enabled seamless mobile experiences and in-context payment flows for digital goods scenarios have been crucial. However, the enhancements to Express Checkout have been evolutionary steps forward and offer fairly narrow possibilities in comparison to what the Adaptive Payments product offers.
Note
PayPal’s official documentation on Adaptive Payments is available online: Adaptive Payments Developer Guide.
In comparison to Express Checkout, Website Payments Pro, and other disparate PayPal products that you may have considered as part of a checkout flow in which there is a single buyer and single seller, Adaptive Payments provides a single comprehensive framework for third parties (who are often neither the buyer nor the seller) to build payment processing systems of just about any variety you can imagine—including transactions that involve multiple recipients. For example, in addition to implementing a simple payment in which a single sender sends money to a single receiver, Adaptive Payments trivially allows you to use the very same API to move money from one sender to multiple receivers using what are called chained payments and parallel payments. Handling payment preapprovals, refunds, currency conversions, and other advanced scenarios are also possible through the same flexible fabric exposed through the Adaptive Payments APIs.
Excited? The remainder of this chapter provides some of the fundamentals and then transitions into an exercise in which we’ll augment Tweet Relevance to take advantage of Adaptive Payments.
The adaptive Payments product allows a developer to write software that facilitates payments between a sender and one or more receivers of that payment. Unlike products such as Express Checkout where the seller is necessarily the API caller, the application (on behalf of the developer) is the caller of the Adaptive Payments API operations, so the seller and the application owner need not be the same party. The application owner must have a PayPal business-level account with the appropriate permissions levels approved by PayPal, but senders and receivers can have a PayPal account of any type or even no PayPal account since they can elect to use a “guest checkout.”
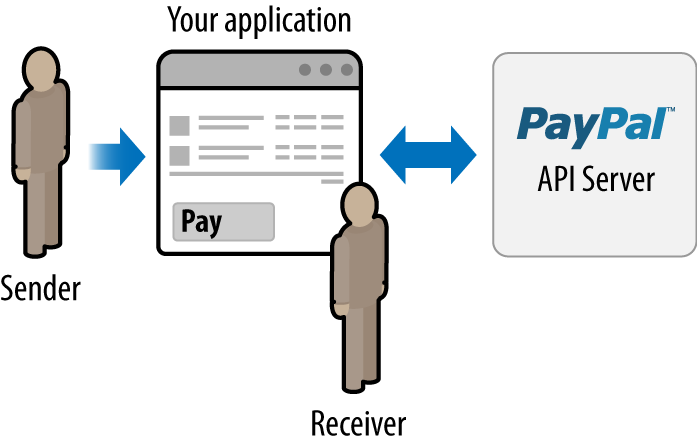
Outlined in Figure 4-1, this is referred to as a simple payment, where a sender makes a payment to a single recipient. This type of payment is equivalent to what is done with Express Checkout except that the receiver of the payment is not necessarily the application developer. If you’re used to the Express Checkout paradigm in which the receiver and the application owner are the same, this approach may seem a but curious. However, after some reflection, it hopefully becomes apparent that there’s much to be gained by allowing a third-party developer to write applications that process payments on behalf of one or more sellers. It’s not uncommon at all that a seller may want to leverage a third-party application that already exists or have a custom application built that can process payments with as little involvement in the technical development process as possible.
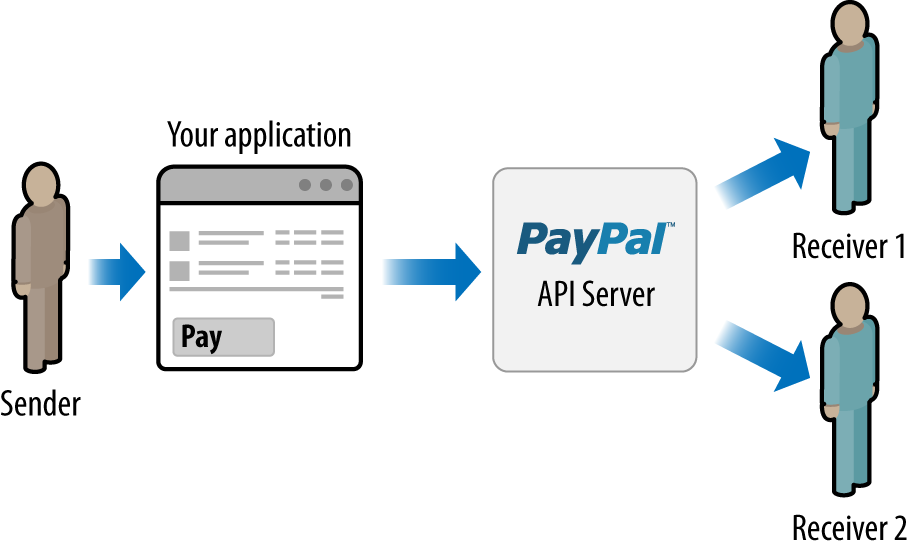
The Adaptive Payments API allows you and your application to act as an intermediary that facilitates payments for others, without you as the application developer being a recipient of the funds. As outlined in Figure 4-2, one possible scenario in which this could be the case is referred to as a parallel payment, in which the sender intentionally transmits a single payment to multiple recipients and has insight into how the payment is disbursed among those multiple recipients. Parallel payments are commonly used in aggregated shopping and allow a customer to order from multiple vendors with a single shopping cart.
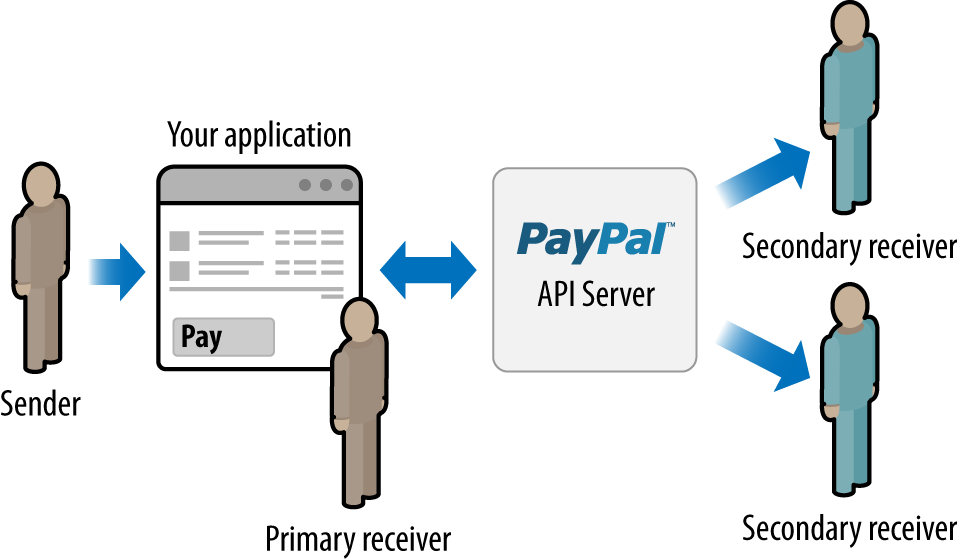
Another way in which your application can function as an intermediary to multiple recipients with Adaptive Payments is through a chained payment as outlined in Figure 4-3. In a chained transaction, your application receives the payment, and the funds are then split between multiple recipients on the backend. In other words, the sender transmits funds to a single receiver and the receiver who then passes on some portion of the funds to multiple recipients. In a chained setup, your application or any other receiver could take a percentage of the payment and then disperse the remaining funds to the other recipients. For example, you might purchase an “all inclusive” vacation package from a travel site that collects a nominal fee before passing through portions of the payment to various parties involved in your vacation experience. It is even possible to set up a delayed chained payment that allows for a delay in the secondary receivers collecting payment. One scenario in which delayed chained payments can be handy involves secondary receivers needing to ship goods before they receive their payment for the transaction.
Given the flexible nature of Adaptive Payments, you may very well be wondering whose responsibility it is to pay the fees for a transaction involving multiple receivers. The short answer is that there are four primary configurations that are available to distribute the fees for an Adaptive Payment transaction:
Sender pays the fee, regardless of payment type (simple, parallel, or chained)
All receivers pay the fee in a parallel payment
All receivers pay the fee in a chained payment
Only the primary receiver pays the fee in a chained payment
If you consider the various payment situations described so far in this chapter, these four possibilities really do cover the bases. In any payment scenario, it makes sense that the sender could pick up the tab for the fees on behalf of all of the receivers in the transaction just as easily as each receiver could pick up the tab for only their portion of the fees, regardless of whether the payment is simple, parallel, or chained. In any of these scenarios, there is no fundamental difference in how fees are calculated, so PayPal takes the same cut either way. However, with a chained payment, it seems reasonable that the primary receiver should be able to pick up the tab for all of the fees on behalf of the secondary receivers, so that’s a possibility as well. From an implementation standpoint, the application developer is able to very easily configure who pays the fees according to a configuration parameter that’s passed in when setting up the payment transaction.
Note
Although this chapter doesn’t revisit the notion of digital goods, it’s also certainly possible to utilize Adaptive Payments for processing digital goods transactions, which opens up the possibility for the more cost-effective micropayments scheme for eligible transaction types.
As you are now surely realizing, the flexibility of Adaptive Payments facilitates a vast number of payment possibilities. With a high-level overview now established, let’s dig a little deeper into the APIs.
When a payment transaction via an Adaptive Payments application has been submitted, one of four different payment approval types is involved. The remainder of this section reviews these approval types: Explicit Payments, Preapproved Payments, Implicit Payments, and Guest Payments. Although we won’t use all of the approaches for payment integration with Tweet Relevance in this chapter, it’s important to know that these fundamental possibilities exist.
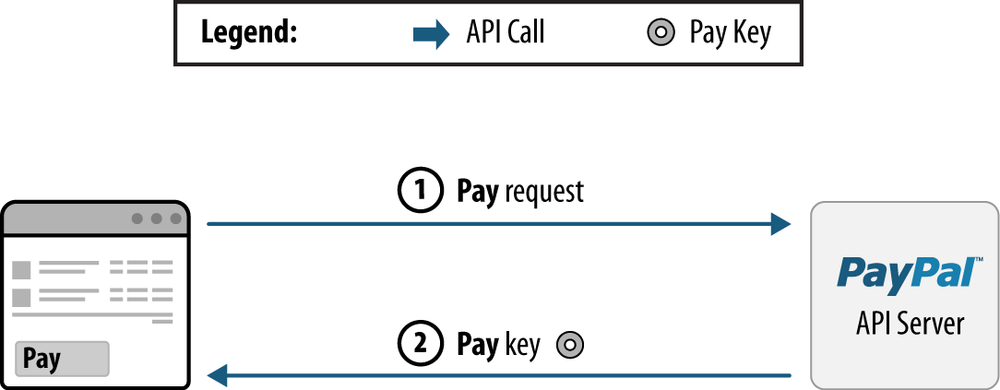
Explicit Payments require the sender to log into PayPal.com and approve each individual payment just like in an Express Checkout payment experience. This is the traditional method for paying via PayPal and is the only option a sender has for executing a payment, unless a preapproval agreement has been established (a Preapproved Payment), or unless the sender is also the application provider (an Implicit Payment). The interaction between your application and PayPal can be controlled during the transaction process by providing URLs for redirecting the sender, depending on the situation. Figure 4-4 outlines an Explicit Payment flow, which consists of the following steps:
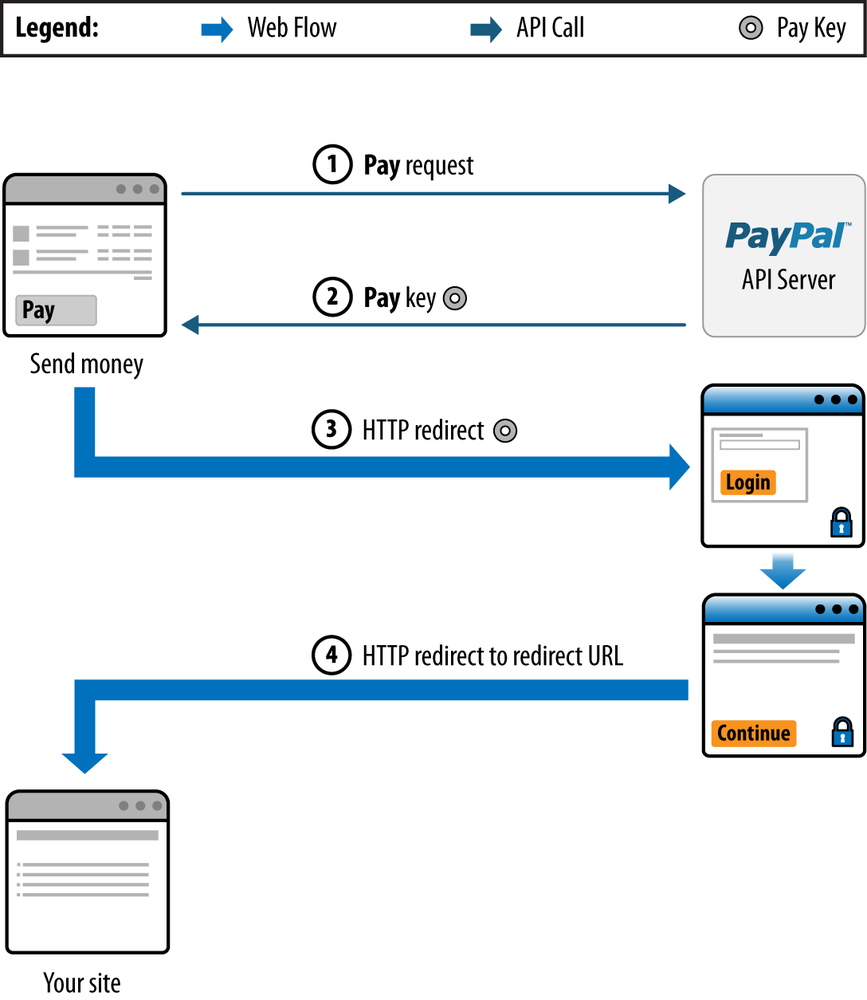
Your application sends a
Payrequest to PayPal.PayPal responds with a payment key that you use to redirect the sender to PayPal.
You redirect the sender to PayPal.com.
The sender approves the transfer of the payment, and PayPal redirects the sender to a return URL.
PayPal sends both the receiver and the sender an email summarizing the payment that was made.
Warning
Although not explicitly listed as a step in Figure 4-4, applications should be careful to verify the status of a payment immediately after the redirect of Step 4 before taking any actions such as crediting a user account. Usually, this is accomplished by using the same key that was returned in Step 2. For example, if PayPal redirects back to http://example.com/successful_payment?user=Bob&item=123 and your application blindly ships Bob Item #123 without first confirming the payment status referenced by the Pay key from Step 2, you’d be wide open to easy hacking exploits.
Preapproved Payments allow senders to log into PayPal.com and set up preapprovals for future payments so that explicit payments are not required for every single transaction. Once the preapproval is established for certain constraints such as amount or time duration, payments are automatically considered approved, and the sender will not have to log in to approve payments to that vendor in the future until one of the preapproved conditions expires. During the preapproval setup process, the sender can specify the following constraints:
Duration of the preapproval, including the start date and end date
The maximum amount being approved at one time
The maximum number of payments allowed for the vendor
Figure 4-5 outlines a Preapproved Payment flow, which consists of the following steps:
An application sends a preapproval request to PayPal.
PayPal responds with a preapproval key that you use in redirecting the sender to PayPal.
The application redirects the sender to PayPal.
After the sender approves the preapproval, PayPal redirects the sender to a return URL.
PayPal sends both the receiver and the sender an email summarizing the payment that was made.
Once the sender approves the preapproval setup, an application can make payments on behalf of the sender directly, as outlined in Figure 4-6.
Your application sends a
Payrequest to PayPal that includes a preapproval key identifying the payment agreement.PayPal responds with a payment key that is used for other API functions.


Implicit Payments are payments sent directly by an application whose owner is also API caller. In the case of an Implicit Payment, no approval is necessary for the payment transaction since the parties are one and the same. Figure 4-7 outlines an Implicit Payment.
Your application sends a
Payrequest to PayPal.PayPal responds with a key to use for other API operations.
The Adaptive Payments product also supports Guest Payments, in which the sender can pay without a PayPal account by using a credit card. Guest Payments are handled in the same manner as Explicit Payments, except that the sender provides credit card information directly on the PayPal payment screen. The recipient of a Guest Payment must have either a business- or premier-level PayPal account in order for an application to process a Guest Payment.
Before demonstrating an Adaptive Payments integration with the
Tweet Relevance sample code from Appendix A, let’s take a closer look at the
Adaptive Payments Pay[2] and PaymentDetails[3] APIs, which are integral to our implementation details. A
complete and more comprehensive list of all of the Adaptive Payments API
operations can be found at Adaptive
Payments API documentation on X.com. This section focuses on two
of the most essential APIs and relevant options for Tweet Relevance
payment integration along with some sample code to quickly get you up
and running.
If you come from an Express Checkout background or have been following along in the book chapter by chapter, an important distinction to make up front between Adaptive Payments and Express Checkout is the nature of the request parameters. Whereas Express Checkout involves sending in 3-Token credentials along with Name-Value pairs through the request body, Adaptive Payments require 3-Token credentials along with a mandatory application identifier and additional configuration information to be passed in as headers; the POST request payload identifies the API operation and its parameters. Let’s now turn to the Pay API and execute some sample API calls to see how it all works.
All payments made via the Pay API have the same
essential fields and are outlined in Table 4-1. If thinking about
Adaptive Payments from an Express Checkout mindset, you might consider
the Pay API to be similar to the
SetExpressCheckout API in that it sets up a transaction
and returns a value called a “pay key” that can be used to redirect a
sender to PayPal for approval.
Table 4-1. Common fields for the Pay API encoded in NVP format
| Field | Description |
|---|---|
actionType | Will be one of three possible values:
|
receiverList
.receiver(
n ).email | One or more receivers’ email addresses, where n can take on values between 0 and 5. For parallel payments, up to 6 receivers may be identified, and for chained payments, 1 primary receiver and 5 secondary receivers may be identified. |
receiverList
.receiver(
n ) .amount | The amount to be credited to each receiver’s account. |
receiverList.receiver(
n ).primary | (Optional) Set this value to true to indicate that this is a
chained payment. Only one receiver can be the primary
receiver. |
currencyCode | The code for the currency in which the payment is made. You can specify only one currency, regardless of the number of receivers. A complete list of supported currency codes is available online. |
cancelUrl | The URL for sender redirection if the sender cancels the payment approval. This value is required, but used only for explicit payments. |
returnUrl | The URL for sender redirection after completion of the payment. This value is required, but used only for explicit payments. |
requestEnvelope.errorLanguage | The requestEnvelope is required
information common to each API operation and includes members
such as errorLanguage, the language in which
error messages are displayed, and the level of detail that
should be returned for error messages. At the current time,
the only supported error language is US English
(en_US). |
feesPayer | (Optional) The payer of PayPal fees. Allowable values
are:
|
It’s a fine detail, but do note that part of the request
includes a mandatory “request envelope.” It’s a subtle but important
point that the existence of a dot separator in field names for the
Adaptive Payments APIs indicates a notion of hierarchy. For example,
requestEnvelope.errorLanguage connotes that there’s a
requestEnvelope field with a sub-field
errorLanguage. As you’ll see later in this chapter, a
JSON object expressing this same field would be
{'requestEnvelope' : {'errorLanguage' : 'en_US'}}.
Additional parameters are possible to include as part of the request
envelope and are specific to particular Adaptive Payments API
operations and indicated in the more comprehensive online
documentation.
For readers familiar with a Linux or Unix shell, a trivial Bash
script that uses the curl command to execute a request
might look like Example 4-1. Readers
unfamiliar with Bash or command-line utilities should simply focus on
the structure of the curl command
that is being executed. A brief explanation follows, and subsequent
examples for this chapter are written in Python as GAE web
applications, so there’s no need to fret if learning Bash syntax
wasn’t part of your expectations for this chapter.
Example 4-1. Bash script demonstrating execution of the Pay API
#!/bin/bash USERID="XXX" PASSWORD="XXX" SIGNATURE="XXX" APPID="APP-80W284485P519543T" RECEIVER="XXX" AMOUNT="1.00" CANCELURL="http://example.com/cancel" RETURNURL="http://example.com/return" RESULT=$(curl -s --insecure \ -H "X-PAYPAL-SECURITY-USERID: $USERID" \ -H "X-PAYPAL-SECURITY-PASSWORD: $PASSWORD" \ -H "X-PAYPAL-SECURITY-SIGNATURE: $SIGNATURE" \ -H "X-PAYPAL-REQUEST-DATA-FORMAT: NV" \ -H "X-PAYPAL-RESPONSE-DATA-FORMAT: JSON" \ -H "X-PAYPAL-APPLICATION-ID: $APPID" \ https://svcs.sandbox.paypal.com/AdaptivePayments/Pay -d "requestEnvelope.errorLanguage=en_US\ &actionType=PAY\ &receiverList.receiver(0).email=$RECEIVER\ &receiverList.receiver(0).amount=$AMOUNT\ ¤cyCode=USD\ &feesPayer=EACHRECEIVER\ &memo=Simple payment example.\ &cancelUrl=$CANCELURL\ &returnUrl=$RETURNURL\ ;) echo $RESULT
In short, the script sets up a few variables, executes a
curl command using those variables along with some other
parameters, and displays the results. Although it’s just a trivial
script, there’s a lot that can be gleaned. The following observations
may be helpful in solidifying your understanding of how an Adaptive
Payments Pay API operation takes place:
The
USERID,PASSWORD, andSIGNATUREare the 3-Token credentials associated with the PayPal developer account for the application making this request.The
APPIDshown in the script is the global and shared application identifier for development purposes. (You’d request an application identifier for production use separately from PayPal when your application is ready to go live.)The remaining variables should look familiar: there’s a receiver (who may or may not be the same as the application owner), a purchase amount, and URLs that PayPal uses to redirect the sender back to your site depending on whether or not the purchase was completed or cancelled. The sender is not identified in this request, but the sender’s identify will become known once the sender logs into PayPal to approve the request.
3-Token credentials, request and response formats, and the application identifier are passed in as headers via
curl’s-Hoption.The request format is in NVP format, as indicated by
NVThe response format is returned in JSON format as indicated by
JSON
The Pay request is routed to
https://svcs.sandbox.paypal.com/AdaptivePayments/Pay, which is the Sandbox URL for thePayoperation, and the POST request payload as encoded in name-value pairs follows the-doption.There’s a single recipient (as identified by the
receiverList.receiver(0)values) that indicates that this Adaptive Payments transaction is a simple payment and this single recipient is footing the fees for the transaction as indicated by theEACHRECEIVERvalue.
A sample response from executing the previous Pay
API operation follows:
{ "payKey" : "AP-54G358058T2731358",
  "paymentExecStatus" : "CREATED",
  "responseEnvelope" : { "ack" : "Success",
      "build" : "2428464",
      "correlationId" : "7ca7e3aa6a999",
      "timestamp" : "2012-01-14T15:36:31.515-08:00"
    }
}
In short, the response is formatted as JSON as requested by the
X-PAYPAL-RESPONSE-DATA-FORMAT header, a response envelope
returns an acknowledgment that the request is successful, and the
response indicates that a payment request has been created and
includes a payKey value that can be used to redirect a
sender to PayPal for approval. To initiate the approval process for a
Sandbox application, an application must redirect the sender back to
https://www.sandbox.paypal.com/cgi-bin/webscr?cmd=_ap-payment&paykey=value.
Note
Although not germane to the Tweet Relevance integration, it’s
worthwhile to note that if the API caller and the sender are one and
the same (an Implicit Payment), a senderEmail field can be specified, and
PayPal will implicitly approve the payment without redirecting to
PayPal for explicit approval. You can also use a preapproval to
execute the payment and avoid explicit approval. The required
preapproval fields include a preapproval key and personal
identification number (PIN).
The PaymentDetails API is used to obtain
information about a payment. You can identify the payment by your
tracking ID, the PayPal transaction ID in an IPN message, or the pay
key associated with the payment. Table 4-2 summarizes the common
request parameters.
Table 4-2. Common PaymentDetails request fields
| Field | Descriptions |
|---|---|
payKey | This field identifies the payment for which you
wish to set up payment options. This is the key that is
returned in the |
requestEnvelope.errorLanguage | The requestEnvelope is required
information common to each API operation and includes members
such as errorLanguage, the language in which
error messages are displayed, and the level of detail that
should be returned for error messages. |
transactionId | (Optional) The PayPal transaction ID associated with the payment. The IPN message associated with the payment contains the transaction ID. |
trackingId | (Optional) The tracking ID that was specified for this payment in the PayRequest message. Maximum length: 127 characters. |
In short, you pass in one of several possible values that
identifies a payment to PaymentDetails, and it returns
relevant status information about the payment. Example 4-2 illustrates a trivial Bash
script that makes a PaymentDetails API request using a
payKey value returned from Example 4-1. Example usage for the script is to
simply pass in the pay key as a command-line parameter to the
script.
Example 4-2. Bash script illustrating usage of the PaymentDetails API
#!/bin/bash

PAYKEY="${1}"

USERID="XXX"
PASSWORD="XXX"
SIGNATURE="XXX"

APPID="APP-80W284485P519543T"

RESULT=$(curl -s --insecure \
-H "X-PAYPAL-SECURITY-USERID: $USERID" \
-H "X-PAYPAL-SECURITY-PASSWORD: $PASSWORD" \
-H "X-PAYPAL-SECURITY-SIGNATURE: $SIGNATURE" \
-H "X-PAYPAL-REQUEST-DATA-FORMAT: NV" \
-H "X-PAYPAL-RESPONSE-DATA-FORMAT: JSON" \
-H "X-PAYPAL-APPLICATION-ID: $APPID" \
https://svcs.sandbox.paypal.com/AdaptivePayments/PaymentDetails -d "requestEnvelope.errorLanguage=en_US\
&payKey=$PAYKEY"\
;)

echo $RESULT
Sample results from the script follow and illustrate the basic
format of a PaymentDetails response:
{ "actionType" : "PAY",
  "cancelUrl" : "http://example.com/cancel",
  "currencyCode" : "USD",
  "feesPayer" : "EACHRECEIVER",
  "ipnNotificationUrl" : "http://example.com/ipn",
  "memo" : "Simple payment example.",
  "payKey" : "AP-4U527241GF1114245",
  "paymentInfoList" : { "paymentInfo" : [ { "pendingRefund" : "false",
            "receiver" : { "amount" : "1.00",
                "email" : "XXX",
                "paymentType" : "SERVICE",
                "primary" : "false"
              }
          } ] },
  "responseEnvelope" : { "ack" : "Success",
      "build" : "2428464",
      "correlationId" : "4808cadb5297e",
      "timestamp" : "2012-01-14T17:58:11.358-08:00"
    },
  "returnUrl" : "http://example.com/return",
  "reverseAllParallelPaymentsOnError" : "false",
  "sender" : { "useCredentials" : "false" },
  "status" : "CREATED"
}
Of particular interest in the response for
PaymentDetails is the status field that
indicates that the payment
request has been created but not yet completed; however, should you
visit
https://www.sandbox.paypal.com/cgi-bin/webscr?cmd=_ap-payment&paykey=AP-4U527241GF1114245
and successfully approve the payment, invoking
PaymentDetails again should return a status
of COMPLETED. However, a status of
COMPLETED does not necessarily mean that the payment was
successfully processed and that payment was rendered—it only means
that the request, regardless of its ultimate outcome—was completed
successfully. If the status were COMPLETED,
additional information would be included regarding the specific
details as they relate to the payment(s). For example, the following
sample results show a PaymentDetails response where
status is COMPLETED and the
paymentInfoList field provides definitive information
about the ultimate outcome of the payment. (In the case of an eCheck
payment, the transactionStatus would have been
PENDING.)
{
  "status": "COMPLETED",
  "responseEnvelope": {
    "ack": "Success",
    "timestamp": "2012-01-31T22:47:32.121-08:00",
    "build": "2486531",
    "correlationId": "e28c831c96f87"
  },
  "returnUrl": "http://example.com",
  "payKey": "AP-72S344750E3616459",
  "senderEmail": "XXX",
  "actionType": "PAY",
  "sender": {
    "email": "matthe_1325995267_per@zaffra.com",
    "useCredentials": "false"
  },
  "paymentInfoList": {
    "paymentInfo": [
      {
        "refundedAmount": "0.00",
        "receiver": {
          "paymentType": "SERVICE",
          "amount": "9.99",
          "email": "XXX",
          "primary": "false"
        },
        "transactionId": "2NB983427X665902U",
        "senderTransactionStatus": "COMPLETED",
        "senderTransactionId": "11411689C90721011",
        "pendingRefund": "false",
        "transactionStatus": "COMPLETED"
      }
    ]
  },
  "currencyCode": "USD",
  "cancelUrl": "http://example.com/cancel",
  "feesPayer": "EACHRECEIVER",
  "reverseAllParallelPaymentsOnError": "false"
}
If you’re comfortable working in a Linux or Unix environment or
can comfortably execute curl commands in a Windows
environment, it’s worthwhile to try manually executing these scripts
to ensure that you understand the fundamentals. Regardless, in the
next section, we’ll implement the same logic as a GAE project.
Let’s now take the concepts concerning Pay and
PaymentDetails API requests from the previous sections
and consolidate them into an austere GAE application. If you’ve been
following along closely, Example 4-3 should seem
fairly straightforward. It’s a web app that processes requests for two
URLs: 1) a request on the root context of the application that
triggers a Pay request and displays the response, and 2)
a /status request that executes a
PaymentDetails request for the original Pay
request and displays the response. Since native Python list and
dictionary objects are so close to a JSON representation, it makes
sense to use JSON as both the request and response format, so you’ll
notice a new import statement that makes available a JSON
module for easily converting between the JSON string representation
and the native Python objects. You’ll also see an import
statement that brings in the memcache module that’s used
to minimally mimic a session implementation, which the app uses to
store and later look up the payKey returned from the
Pay request and pass it through to the
PaymentDetails request that is executed when
/status is requested. Go ahead and take a look at the
code; afterward, a play-by-play synopsis is provided that breaks down
the action as a series of coarsely grained steps.
Example 4-3. A sample GAE application that executes a Simple Adaptive Payment—main.py
#!/usr/bin/env python

"""
A minimal GAE application that makes an Adaptive API request to PayPal
and parses the result. Fill in your own 3 Token Credentials and sample
account information from your own sandbox account
"""

import random

from google.appengine.ext import webapp
from google.appengine.ext.webapp import util
from google.appengine.api import urlfetch
from google.appengine.api import memcache
from django.utils import simplejson as json


# Replace these values with your own 3-Token credentials and a sample "seller"
# who is the receiver of funds to run this sample code in the developer sandbox

user_id = "XXX"
password = "XXX"
signature = "XXX"
receiver = "XXX"

class MainHandler(webapp.RequestHandler):

    # Helper function to execute requests with appropriate headers
    def _request(self, url, params):

        # standard Adaptive Payments headers
        headers = {
            'X-PAYPAL-SECURITY-USERID' : user_id,
            'X-PAYPAL-SECURITY-PASSWORD' : password,
            'X-PAYPAL-SECURITY-SIGNATURE' : signature,
            'X-PAYPAL-REQUEST-DATA-FORMAT' : 'JSON',
            'X-PAYPAL-RESPONSE-DATA-FORMAT' : 'JSON',
            'X-PAYPAL-APPLICATION-ID' : 'APP-80W284485P519543T'
        }

        return urlfetch.fetch(
                url,
                payload = json.dumps(params),
                method=urlfetch.POST,
                validate_certificate=False,
                headers=headers
               )

    def get(self, mode=""):

        # /status - executes PaymentDetails when PayPal redirects back to this app after payment approval

        if mode == "status":

            payKey = memcache.get(self.request.get('sid'))

            params = {
                'requestEnvelope' : {'errorLanguage' : 'en_US', 'detailLevel' : 'ReturnAll'},
                'payKey' : payKey
            }

            result = self._request('https://svcs.sandbox.paypal.com/AdaptivePayments/PaymentDetails', params)

            response = json.loads(result.content)

            if result.status_code == 200: # OK

                # Convert back to indented JSON and display it

                pretty_json = json.dumps(response,indent=2)
                self.response.out.write('<pre>%s</pre>' % (pretty_json,))
            else:
                self.response.out.write('<pre>%s</pre>' % (json.dumps(response,indent=2),))

        else: # / (application root) - executed when app loads and initiates a Pay request

            amount = 10.00

            # A cheap session implementation that's leveraged in order to lookup the payKey
            # from the Pay API and execute PaymentDetails when PayPal redirects back to /status

            sid = str(random.random())[5:] + str(random.random())[5:] + str(random.random())[5:]

            return_url = self.request.host_url + "/status" + "?sid=" + sid
            cancel_url = return_url

            redirect_url = "https://www.sandbox.paypal.com/cgi-bin/webscr?cmd=_ap-payment&paykey="

            params = {
                    'requestEnvelope' : {'errorLanguage' : 'en_US', 'detailLevel' : 'ReturnAll'},
                    'actionType' : 'PAY',
                    'receiverList' : {
                            'receiver' : [
                                {'email' : receiver, 'amount' : amount}
                            ],
                    },
                'currencyCode' : 'USD',
                'memo' : 'Simple payment example.',
                'cancelUrl' : cancel_url,
                'returnUrl' : return_url,
            }

            result = self._request('https://svcs.sandbox.paypal.com/AdaptivePayments/Pay', params)

            response = json.loads(result.content)

            if result.status_code == 200: # OK

                # Convert back to indented JSON and inject a hyperlink to kick off payment approval

                pretty_json = json.dumps(response,indent=2)
                pretty_json = pretty_json.replace(response['payKey'], '<a href="%s%s" target="_blank">%s</a>' % (redirect_url, response['payKey'], response['payKey'],))
                memcache.set(sid, response['payKey'], time=60*10) # seconds

                self.response.out.write('<pre>%s</pre>' % (pretty_json,))
            else:
                self.response.out.write('<pre>%s</pre>' % (json.dumps(response,indent=2),))

def main():
    application = webapp.WSGIApplication([('/', MainHandler),
                                          ('/(status)', MainHandler)],
                                         debug=True)
    util.run_wsgi_app(application)

if __name__ == '__main__':
    main()
In terms of the overall application flow, here’s how it all breaks down:
The user requests the root context of the application.
A session identifier is created by concatenating some random numbers together.
A
Payrequest is executed that requires return and cancel URLs to be provided so that PayPal knows where to redirect the user after payment approval.Details: We’d like for the return URL passed in with the
Payrequest to check the status of the payment associated with thePayrequest through a subsequentPaymentDetailsrequest after the user has had an opportunity to approve the payment; however, we won’t have thepayKeyvalue that’s needed forPaymentDetailsuntil thePayrequest completes, and it hasn’t even been executed yet! Thus, we’ll use the session identifier and specify a return URL of the form/status?sid=123on thePayrequest and usememcacheto associate thesidvalue with thepayKeyvalue that’s returned from thePayrequest after thePayrequest completes.
Results for the
Payrequest are displayed as JSON with thepayKeyhyperlinked such that the user can click on it and approve the payment, ultimately changing its status fromCREATEDtoCOMPLETED.Details: The hyperlink simply involves passing in the
payKeyas a query string parameter to a standard URL of the formhttps://www.sandbox.paypal.com/cgi-bin/webscr?cmd=_ap-payment&paykey=AP-808742956V333525E.
After the user approves payment, PayPal redirects back to the application at its return URL, which for this sample application is of the form
/status?sid=123.In
/status, the application uses the session identifier included in the URL to look up thepayKeyassociated with the transaction and uses it to execute aPaymentDetailsrequest. The response, whosestatusfield should now beCOMPLETED, is displayed. Recall that additional details in the response object provide definitive information regarding the ultimate outcome of the payment itself.Because no value for
feesPayeris specified to override the default value ofEACHRECEIVER, the receiver pays the fees for this transaction.
Another key point to take away from the application is that the owner of the application need not necessarily be the receiver of the payment. It could certainly be the case that the same owner of the application whose 3-Token credentials are supplied to run the application could also be on the receiving end, but it could just as easily be the case that the owner of the application is a third party who built the application as a fixed-price contract job and maintains the application on behalf of the receiver as part of a business arrangement. However, it’s just as easily the case that perhaps the third party developer could have developed the application for free or at a deep discount in exchange for a cut of the payment. The next section illustrates how a chained payment could be used to accommodate exactly this kind of situation.
If you understand the flow of Example 4-3, the good news is that executing a chained (or parallel payment) literally just requires a couple of additional lines of code. Recall that in a chained payment scenario, the sender perceives that a payment is being sent to a primary receiver; however, the primary receiver essentially acts as a “middle man” who takes a cut and passes on potentially variable portions of the payment to up to five additional receivers. A realistic scenario involving a chained payment could be that the developer of an application takes a cut of a payment and passes on the remaining portion to additional parties such as investors who may be stakeholders in the business venture. While a parallel payment could conceivably be used to get the money into the very same hands, a chained payment allows the additional receivers to remain anonymous so far as the sender is concerned. From the sender’s point of view, there is only a single receiver.
As just mentioned, the changes to Example 4-3 that result
in a chained payment are absolutely minimal. Instead of a single
receiver and amount being specified and passed into the
Pay request, multiple receivers can be passed. For
example, consider the following receiver configuration:
params = {
        'requestEnvelope' : {'errorLanguage' : 'en_US', 'detailLevel' : 'ReturnAll'},
        'actionType' : 'PAY',
        'receiverList' : {
                'receiver' : [
                    {'email' : receiver1, 'amount' : amount1, 'primary' : True },
                    {'email' : receiver2, 'amount' : amount2, 'primary' : False},
                    {'email' : receiver3, 'amount' : amount2, 'primary' : False}
                ],
        },
    'currencyCode' : 'USD',
    'memo' : 'Chained payment example.',
    'cancelUrl' : cancel_url,
    'returnUrl' : return_url,
}
This configuration specifies that there is one primary receiver
and two secondary receivers. If amount1 were $10.00,
amount2 were $5.00, and amount3 were $2.00,
the primary receiver would be accepting a $10.00 payment but passing
on $7.00 of it to secondary
receivers—effectively taking a $3.00 cut. An important detail to also
note is that because no value for
feesPayer is specified to override the default value of
EACHRECEIVER, all receivers, including
the primary receiver, pay the fees for this
transaction.
Modifications to Example 4-3 that result
in parallel payment are quite similar to those for a chained payment
except that there is no designated primary receiver and the party who
was the primary receiver takes an explicit cut of the payment in the
parameters. Using the same configuration parameters as with the
chained payment, the only code change required is that
receiver1 no longer be designated as the primary
receiver. However, in order for the same payment amounts to go to the
receivers in the same manner as the chained payment scenario,
amount1 would be an explicit $3.00 instead of $10.00.
From the sender’s point of view, there are three receivers involved
with the parallel payment, and the sender has visibility into how much
of the payment is given to each of the receivers.
params = {
        'requestEnvelope' : {'errorLanguage' : 'en_US', 'detailLevel' : 'ReturnAll'},
        'actionType' : 'PAY',
        'receiverList' : {
                'receiver' : [
                    {'email' : receiver1, 'amount' : amount1, 'primary' : False},
                    {'email' : receiver2, 'amount' : amount2, 'primary' : False},
                    {'email' : receiver3, 'amount' : amount2, 'primary' : False}
                ],
        },
    'currencyCode' : 'USD',
    'memo' : 'Parallel payment example.',
    'cancelUrl' : cancel_url,
    'returnUrl' : return_url,
}
As with the prior examples, all receivers pay their own portion
of the fees since no value for feesPayer has been
provided to override the default value of
EACHRECEIVER.
If you’ve followed along thus far, integrating Adaptive Payments into Tweet Relevance should seem like a fairly melodramatic exercise. The goal of the integration is the same as that of previous chapters: to implement a payment mechanism so that users of the service can be charged for using it. In the interest of getting up and running, let’s integrate a Simple Adaptive Payment in order to implement a basic subscription model in which a customer purchases 30 days of access for a nominal fee. The previous GAE examples have worked through most of the nuts and bolts as related to the Adaptive Payments portion of the exercise, so there’s actually just a very little bit of software engineering involved to perform the integration and smooth out a few rough edges. The remainder of this section assumes that you have familiarity with the baseline Tweet Relevance project code from Appendix A and an appreciation for some of the payment models as described in Implementing a Checkout Experience for Tweet Relevance. Changes to the baseline project structure in order to implement a subscription payment model are addressed on a file-by-file basis.
Note
It may be helpful to review Implementing a Checkout Experience for Tweet Relevance and refresh your memory on the various payment mechanisms that could be viable for a service like Tweet Relevance. The remainder of this chapter assumes familiarity with the options as presented in that section and implements the “subscription model.”
- main.py
The overall architecture for the finished web application involving Adaptive Payments mimics the same operations for ExpressCheckout, but we’ll name them a little differently so as not to confuse the two products. Thus, the
PaymentHanderexposes/pay,/completed_payment, and/cancelled_paymentoperations that will be mapped by the main application. Thus,main()looks like this:def main(): application = webapp.WSGIApplication([ # PaymentHandler URLs ('/(pay)', PaymentHandler), ('/(completed_payment)', PaymentHandler), ('/(cancelled_payment)', PaymentHandler), # AppHandler URLs ('/(app)', AppHandler), ('/(data)', AppHandler), ('/(login)', AppHandler), ('/', AppHandler) ], debug=True) util.run_wsgi_app(application)- handlers/PaymentHandler.py
Most of the action for the integration happens in
PaymentHandler, which interacts with PayPal and interfaces with theAppHandlerto update to credit the account with 30 days of access after a successful payment. ThePaymentHandlerclass in Example 4-5 illustrates how to make it happen. Theimportand reference for the trivialProductclass is shown in Example 4-4. The basic control flow is essentially the same as that involving an Express Checkout: a transaction is set up with/pay, Tweet Relevance redirects to PayPal to approve the transaction, and PayPal redirects back to/completed_paymentonce the user has approved the payment. The application then confirms with PayPal that the transaction has indeed been completed before handing back control to theApplicationHandlerso as to avoid a fundamental security flaw in which a malicious attacker may be able to gain account credits without actually approving a payment. The samememcachemechanism for associating apayKeyvalue with a user’s session identifier after PayPal redirects back to the application, as described in Example 4-3, is also employed inPaymentHandler.Finally, although it’s not displayed as example code below, note that the
/payURL is triggered by templates/checkout.html in the project code—the same kind of page shown in Figure 2-7 that displays a yellow “Checkout with PayPal” button.Example 4-4. Product.py
# The Product class provides product details.
# A more flexible product line could be managed in a database

class Product(object):

  @staticmethod
  def getProduct():

    return {'price' : 9.99, 'quantity' : 30, 'units' : 'days'}
Example 4-5. handlers/PaymentHandler.py
import os from google.appengine.ext import webapp from google.appengine.api import memcache from google.appengine.ext.webapp import template from django.utils import simplejson as json import logging from paypal.products import AdaptivePayment as AP from paypal.paypal_config import seller_email as SELLER_EMAIL from Product import Product from handlers.AppHandler import AppHandler class PaymentHandler(webapp.RequestHandler): def post(self, mode=""): if mode == "pay": sid = self.request.get("sid") returnUrl = self.request.host_url+"/completed_payment?sid="+sid, cancelUrl = self.request.host_url+"/cancelled_payment?sid="+sid product = Product.getProduct() seller = {'email' : SELLER_EMAIL, 'amount' : product['price']} response = AP.pay(receiver=[seller], cancelUrl=cancelUrl, returnUrl=returnUrl) result = json.loads(response.content) logging.info(result) if result['responseEnvelope']['ack'] == 'Failure': logging.error("Failure for Pay") template_values = { 'title' : 'Error', 'operation' : 'Pay' } path = os.path.join(os.path.dirname(__file__), '..', 'templates', 'unknown_error.html') return self.response.out.write(template.render(path, template_values)) # Stash away the payKey for later use user_info = memcache.get(sid) user_info['payKey'] = result['payKey'] memcache.set(sid, user_info, time=60*10) # seconds # Redirect to PayPal and allow user to confirm payment details. redirect_url = AP.generate_adaptive_payment_redirect_url(result['payKey']) return self.redirect(redirect_url) else: logging.error("Unknown mode for POST request!") def get(self, mode=""): if mode == "completed_payment": if memcache.get(self.request.get("sid")) is not None: # Without an account reference, we can't credit the purchase user_info = memcache.get(self.request.get("sid")) payKey = user_info["payKey"] response = AP.get_payment_details(payKey) result = json.loads(response.content) logging.info(result) if result['responseEnvelope']['ack'] == 'Failure' or \ result['status'] != 'COMPLETED': # Something went wrong! logging.error("Failure for PaymentDetails") template_values = { 'title' : 'Error', 'operation' : 'ExecutePayment' } path = os.path.join(os.path.dirname(__file__), '..', 'templates', 'unknown_error.html') return self.response.out.write(template.render(path, template_values)) if result['paymentInfoList']['paymentInfo'][0]['transactionStatus'] != 'COMPLETED': # An eCheck? logging.error("Payment transaction status is not complete!") template_values = { 'title' : 'Error', 'details' : 'Sorry, eChecks are not accepted. Please send an instant payment.' } path = os.path.join(os.path.dirname(__file__), '..', 'templates', 'unsuccessful_payment.html') return self.response.out.write(template.render(path, template_values)) # Credit the user's account twitter_username = user_info['username'] product = Product.getProduct() AppHandler.creditUserAccount(twitter_username, product['quantity']) template_values = { 'title' : 'Successful Payment', 'quantity' : product['quantity'], 'units' : product['units'] } path = os.path.join(os.path.dirname(__file__), '..', 'templates', 'successful_payment.html') self.response.out.write(template.render(path, template_values)) else: logging.error("Invalid/expired session in /completed_payment") template_values = { 'title' : 'Session Expired', } path = os.path.join(os.path.dirname(__file__), '..', 'templates', 'session_expired.html') self.response.out.write(template.render(path, template_values)) elif mode == "cancelled_payment": template_values = { 'title' : 'Cancel Purchase', } path = os.path.join(os.path.dirname(__file__), '..', 'templates', 'cancel_purchase.html') self.response.out.write(template.render(path, template_values))- paypal/products.py
The addition of an
AdaptivePaymentclass (imported asAPto save some typing inPaymentHandler) to thepaypal.productsmodule, along with a few minor additions to thepaypal.paypal_configto encapsulate configuration information such as the required Adaptive Payments headers and 3-Token credentials, are about all that it takes to round out the remainder of the substantive changes to Tweet Relevance. TheAdaptivePaymentclass follows and is little more than a wrapper around aPayandPaymentDetailsrequest:from google.appengine.api import urlfetch from django.utils import simplejson as json import urllib import cgi import paypal_config class AdaptivePayment(object): @staticmethod def _api_call(url, params): response = urlfetch.fetch( url, payload=json.dumps(params), method=urlfetch.POST, validate_certificate=True, deadline=10, # seconds headers=paypal_config.adaptive_headers ) if response.status_code != 200: result = json.loads(response.content) logging.error(json.dumps(response.content, indent=2)) raise Exception(str(response.status_code)) return response # Lists out some of the most common parameters as keyword args. Other keyword args can be added through kw as needed # Template for an item in the receiver list: {'email' : me@example.com, 'amount' : 1.00, 'primary' : False} @staticmethod def pay(sender=None, receiver=[], feesPayer='EACHRECEIVER', memo='', cancelUrl='', returnUrl='', **kw ): params = { 'requestEnvelope' : {'errorLanguage' : 'en_US', 'detailLevel' : 'ReturnAll'}, 'actionType' : 'PAY', 'currencyCode' : 'USD', 'senderEmail' : sender, 'receiverList' : { 'receiver' : receiver }, 'feesPayer' : feesPayer, 'memo' : memo, 'cancelUrl' : cancelUrl, 'returnUrl' : returnUrl } if sender is None: params.pop('senderEmail') if memo == "": params.pop('memo') params.update(kw) return AdaptivePayment._api_call(paypal_config.adaptive_sandbox_api_pay_url, params) @staticmethod def get_payment_details(payKey): params = { 'requestEnvelope' : {'errorLanguage' : 'en_US', 'detailLevel' : 'ReturnAll'}, 'payKey' : payKey } return AdaptivePayment._api_call(paypal_config.adaptive_sandbox_api_payment_details_url, params) @staticmethod def generate_adaptive_payment_redirect_url(payKey, embedded=False): if embedded: return "https://www.sandbox.paypal.com/webapps/adaptivepayment/flow/pay?payKey=%s" % (payKey,) else: return "https://www.sandbox.paypal.com/cgi-bin/webscr?cmd=_ap-payment&paykey=%s" % (payKey,)
If the Adaptive Payments integration details into Tweet Relevance really do seem melodramatic, it’s an indicator that your learning is well on track and that you should have little trouble using Adaptive Payments for your own application. If you haven’t already, however, please take a moment to peruse the final project code as a final exercise.
Like every other chapter in this book, this chapter was designed to get you up and running—not to provide you with a comprehensive overview of Adaptive Payments. Frankly, Adaptive Payments is a such a broad, comprehensive, and exciting product that covering it in its entirety would take several hundred pages of dedicated coverage and entail writing a “definitive guide” to cover the possibilities. Using Adaptive Payments, you can quite literally handle just about any reasonable payment flow that you can imagine. At the moment, the more definitive coverage available is PayPal’s Adaptive Payments Developer Guide that you can freely access online. It includes some of the same fundamentals that were introduced in this chapter but also contains examples on using embedded payment flows, preapprovals, currency conversion, issuing refunds, and more. Definitely take a little bit of time to at least peruse its table of contents.
Although we didn’t cover it in this chapter, be advised that the same kinds of sophisticated payment mechanisms involved with digital goods purchases using Express Checkout are also available with Adaptive Payments. A recommended exercise for this chapter is to modify the same code for this chapter to implement an embedded payment flow.
Some recommended exercises for furthering your knowledge of Adaptive Payments include:
Use a tool such as
diffto compare the baseline Tweet Relevance project to the modified project from this chapter. On a Linux system, for example, the following options fordiffproduce a convenient side-by-side display on a terminal with 237 columns when executed from the root of the source tree:$ diff --recursive --side-by-side --suppress-common-lines --width=237 --exclude=*.pyc appa ch04As always, read the
manpage or documentation for the utility you’re using to ensure that you’re taking advantage of all of the features that you have available to you.Modify the example code to implement a parallel payment such that a portion of every payment is donated to a list of prepopulated charities. Why is a parallel payment arguably a more appropriate choice for this situation than a simple or chained payment? (Implementation hint: recall that donating money to a charity with PayPal is as simple as sending money to an email address, so this is essentially as easy as specifying a receiver from a simple HTML control such as a
SELECTbox.)Modify the example code to implement an embedded adaptive payment, mimicking the payment flow as implemented with Express Checkout for Digital Goods.
Note
All sample code for this book is available online at GitHub and is conveniently organized by chapter. Although much of the code is included in the text of this book so that it’s as instructional as possible, always reference the latest bug-fixed code on GitHub as the definitive reference for sample code. Bug tickets and patches are welcome!
Get PayPal APIs: Up and Running, 2nd Edition now with the O’Reilly learning platform.
O’Reilly members experience books, live events, courses curated by job role, and more from O’Reilly and nearly 200 top publishers.

