You can use a Dialog widget to create a modal view for almost any
purpose. A custom dialog is a conventional dialog,
but it requires a widget assistant and an HTML template file. The Dialog
widget is dynamically instantiated within a scene assistant, so there is a
bit of overhead in using it both for you as a developer and at runtime.
For errors, you should use the Error dialog. For presenting some simple options, use an
Alert dialog. The simple built-in dialogs will be presented
first, followed by a discussion of how to build custom dialogs with
showDialog.
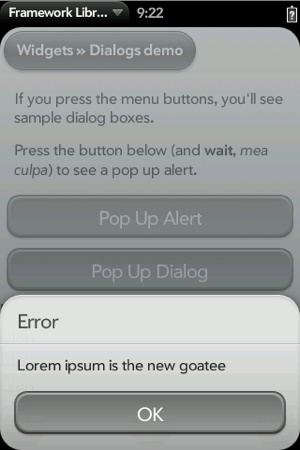
You can post error messages in a modal dialog box with a fixed title of âError,â a customizable message, and a confirmation button. The Error dialog must be used only with errors, since you canât change the title; an example is shown in Figure 4-1.
You can post an Error dialog box with a single call:
Mojo.Controller.errorDialog(âInvalid Feedâ, this.controller.window);
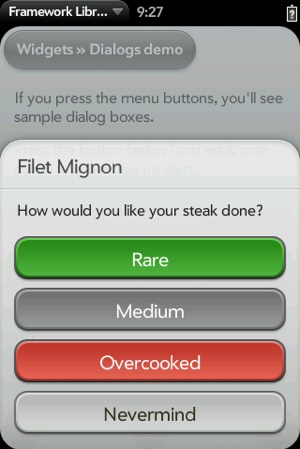
You can display a short message using an Alert dialog, with one or more HTML buttons presenting the selection options. This is the best option if you have either a message for the user, other than an error message, or want to present options that can be selected in the form of button selections:
this.controller.showAlertDialog({
    onChoose: function(value) {
        this.outputDisplay.innerHTML = "Alert result = " + value;
    },
    title: "Filet Mignon",
    message: "How would you like your steak done?",
    choices:[
      {label: "Rare", value: "rare", type: "affirmative"},
      {label: "Medium", value: "medium"},
      {label: "Overcooked", value: "overcooked", type: "negative"},
      {label: "Nevermind", value: "cancel", type: "dismiss"}
    ]});
This example presents four choices, as shown in Figure 4-2. Each button is labeled, with an
optional button type corresponding to a palm-button class, and returns a value
string.
If the two simple dialogs donât meet your needs, you can use the
showDialog function,
which can display any type of content to the user in the form of a modal
dialog box. You can put anything into a custom dialog that youâd put
into a scene, meaning almost any web content or Mojo UI content.
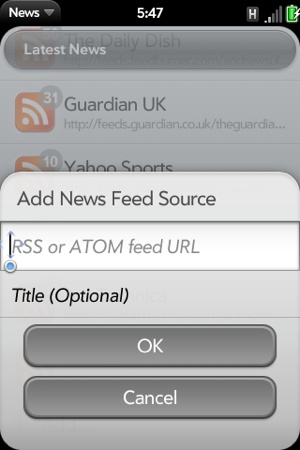
In the previous chapter, we added a Drawer in the FeedListAssistant to support the Add Feed
feature. It would be better to put this type of feature in a dialog;
we will create an Add Feed dialog with the showDialog function and move the code used
in the Drawer into the dialog.
Begin by replacing the addNewFeed method in feedlist-assistant.js with a call to
showDialog():
//  addNewFeed - triggered by "Add..." item in feed list
FeedListAssistant.prototype.addNewFeed = function() {

   this.controller.showDialog({
      template: 'feedList/addFeed-dialog',
      assistant: new AddDialogAssistant(this, this.feeds)
   });
};
The arguments specify the dialog template and a reference to the
assistant that handles the dialog. We create a new instance of the
AddDialogAssistant, passing a
reference to the FeedListAssistant
and this.feeds, the feed object,
and pass that in along with a reference to our addFeed-dialog.html template. The dialog
template is simply an HTML template, but you should make use of some
of the standard dialog box styles such as palm-dialog-content, palm-dialog-title, palm-dialog-separator, and palm-dialog-buttons to format and style your
dialog boxes to fit in with webOS UI guidelines.
Create the HTML for the addFeed-dialog template by moving the code
used in the previous chapter
from feedList-scene.html to a new
file, views/feedList/addFeed-dialog.html:
<div id="palm-dialog-content" class="palm-dialog-content">
    <div id="add-feed-title" class="palm-dialog-title">
        Add Feed
    </div>
    <div class="palm-dialog-separator"></div>
    <div class="textfield-group" x-mojo-focus-highlight="true">
        <div class="title">
           <div x-mojo-element="TextField" id="newFeedURL"></div>
        </div>
    </div>
    <div class="textfield-group" x-mojo-focus-highlight="true">
        <div class="title">
           <div x-mojo-element="TextField" id="newFeedName"></div>
        </div>
    </div>

    <div class="palm-dialog-buttons">
        <div x-mojo-element="Button" id="okButton"></div>
        <div x-mojo-element="Button" id="cancelButton"></div>
    </div>
</div>
The changes from the HTML used previously include the removal of
the Drawer and the addition of the various palm-dialog styles and replacing the
palm-list styling with the textfield-group.
The dialog assistant should be defined like a scene assistant with a creator function and the standard scene methods: setup, activate, deactivate, and cleanup.
Within a dialog assistant, you can set up widgets, push scenes,
and generally do anything that you can do within a scene assistant.
There is one major difference: the dialog assistantâs controller is a
widget controller so it doesnât have direct access to scene controller
methods; instead the dialog assistant must use the calling scene
assistantâs scene controller methods such as setupWidget. To facilitate this, the
assistant property in
the showDialog argument object
passes the keyword this as an
argument when calling the dialogâs creator function.
To create the AddDialogAssistant, weâll move the code we
used in the last chapter to generate the small form in the Drawer
widget. Here that code is presented with some modifications in the
AddDialogAssistant:
// ------------------------------------------------------------------------
// AddDialogAssistant - simple controller for adding new feeds to the list
//   when the "Add..." is selected on the feedlist. The dialog will
//   allow the user to enter the feed's url and optionally a name. When
//   the "Ok" button is tapped, the new feed will be loaded. If no errors
//   are encountered, the dialog will close otherwise the error will be
//   posted and the user encouraged to try again.
//
function AddDialogAssistant(sceneAssistant, feeds) {
    this.feeds = feeds;
    this.sceneAssistant = sceneAssistant;

    this.title = "";
    this.url = "";
    this.feedIndex = null;
    this.dialogTitle = "Add News Feed Source";
}

AddDialogAssistant.prototype.setup = function(widget) {
        this.widget = widget;

        // Set the dialog title to either Edit or Add Feed
// ** These next two lines are wrapped for book formatting only **
        var addFeedTitleElement =
          this.sceneAssistant.controller.get("add-feed-title");
        addFeedTitleElement.innerHTML = this.dialogTitle;

        // Setup text field for the new feed's URL
        this.sceneAssistant.controller.setupWidget(
            "newFeedURL",
            {
                  hintText: "RSS or ATOM feed URL",
                  autoFocus: true,
                  autoReplace: false,
                  textCase: Mojo.Widget.steModeLowerCase,
                  enterSubmits: false
            },
            this.urlModel = {value : this.url});

        // Setup text field for the new feed's name
        this.sceneAssistant.controller.setupWidget(
            "newFeedName",
            {
                    hintText: "Title (Optional)",
                    autoReplace: false,
                    textCase: Mojo.Widget.steModeTitleCase,
                    enterSubmits: false
            },
            this.nameModel = {value : this.title});

        // Setup OK  & Cancel buttons
        //   OK button is an activity button which will be active
        //   while processing and adding feed. Cancel will just
        //   close the scene
        this.okButtonModel = {label: "OK", disabled: false};
        this.sceneAssistant.controller.setupWidget("okButton",
          {type: Mojo.Widget.activityButton},
            this.okButtonModel);
        this.okButtonActive = false;
        this.okButton = this.sceneAssistant.controller.get("okButton");
        this.checkFeedHandler = this.checkFeed.bindAsEventListener(this);
        this.sceneAssistant.controller.listen("okButton", Mojo.Event.tap,
          this.checkFeedHandler);

        this.cancelButtonModel = {label: "Cancel", disabled: false};
        this.sceneAssistant.controller.setupWidget("cancelButton",
          {type: Mojo.Widget.defaultButton},
          this.cancelButtonModel);
        this.sceneAssistant.controller.listen("cancelButton", Mojo.Event.tap,
          this.widget.mojo.close);
};

// checkFeed  - called when OK button is clicked
AddDialogAssistant.prototype.checkFeed = function() {

        if (this.okButtonActive === true)  {
            // Shouldn't happen, but log event if it does and exit
            Mojo.Log.info("Multiple Check Feed requests");
            return;
        }

        // Check entered URL and name to confirm that it is a valid feedlist
        Mojo.Log.info("New Feed URL Request: ", this.urlModel.value);

        // Check for "http://" on front or other legal prefix; any string of
        // 1 to 5 alpha characters followed by ":" is ok, else
             prepend "http://"
        var    url = this.urlModel.value;
        if (/^[a-z]{1,5}:/.test(url) === false)    {
            // Strip any leading slashes
            url = url.replace(/^\/{1,2}/,"");
            url = "http://"+url;
        }

        // Update the entered URL & model
        this.urlModel.value = url;
        this.sceneAssistant.controller.modelChanged(this.urlModel);

        this.okButton.mojo.activate();
        this.okButtonActive = true;
        this.okButtonModel.label = "Updating Feed";
        this.okButtonModel.disabled = true;
        this.sceneAssistant.controller.modelChanged(this.okButtonModel);

        var request = new Ajax.Request(url, {
            method: "get",
            evalJSON: "false",
            onSuccess: this.checkSuccess.bind(this),
            onFailure: this.checkFailure.bind(this)
        });

};

// checkSuccess - Ajax request failure
AddDialogAssistant.prototype.checkSuccess = function(transport) {
        Mojo.Log.info("Valid URL - HTTP Status", transport.status);

        // DEBUG - Work around due occasion Ajax XML error in response.
        if (transport.responseXML === null && transport.responseText !== null) {
                Mojo.Log.info("Request not in XML format - manually converting");
// ** These next two lines are wrapped for book formatting only **
                transport.responseXML = new    DOMParser().
                  parseFromString(transport.responseText, "text/xml");
         }

        var feedError = News.errorNone;

        //  If a new feed, push the entered feed data on to the feedlist and
        //  call processFeed to evaluate it.
        if (this.feedIndex === null) {
            this.feeds.list.push({title:this.nameModel.value,
                url:this.urlModel.value, type:"", value:false, numUnRead:0,
                stories:[]});
            // processFeed - index defaults to last entry
            feedError = this.feeds.processFeed(transport);
        }
        else    {
            this.feeds.list[this.feedIndex] = {title:this.nameModel.value,
                url:this.urlModel.value, type:"", value:false, numUnRead:0,
                stories:[]};
            feedError = this.feeds.processFeed(transport, this.feedIndex);
        }

        // If successful processFeed returns errorNone
        if (feedError === News.errorNone)    {
            // update the widget, save the DB and exit
            this.sceneAssistant.feedWgtModel.items = this.feeds.list;
// ** These next two lines are wrapped for book formatting only **
            this.sceneAssistant.controller.modelChanged(
              this.sceneAssistant.feedWgtModel);
            this.widget.mojo.close();
        }
        else    {
            // Feed can't be processed - remove it but keep the dialog open
            this.feeds.list.pop();
            if (feedError == News.invalidFeedError)    {
                Mojo.Log.warn("Feed ",
                    this.urlModel.value, " isn't a supported feed type.");
                var addFeedTitleElement = this.controller.get("add-feed-title");
                addFeedTitleElement.innerHTML = "Invalid Feed Type - Please Retry";
            }

            this.okButton.mojo.deactivate();
            this.okButtonActive = false;
            this.okButtonModel.label = "OK";
            this.okButtonModel.disabled = false;
            this.sceneAssistant.controller.modelChanged(this.okButtonModel);
        }
};

// checkFailure  - Ajax request failure
AddDialogAssistant.prototype.checkFailure = function(transport) {
        // Log error and put message in status area
        Mojo.Log.info("Invalid URL - HTTP Status", transport.status);
        var addFeedTitleElement = this.controller.get("add-feed-title");
        addFeedTitleElement.innerHTML = "Invalid Feed Type - Please Retry";
};

// cleanup  - close Dialog
AddDialogAssistant.prototype.cleanup = function() {
        // TODO - Cancel Ajax request or Feed operation if in progress
        this.sceneAssistant.controller.stopListening("okButton",
          Mojo.Event.tap, this.checkFeedHandler);
        this.sceneAssistant.controller.stopListening("cancelButton",
          Mojo.Event.tap, this.widget.mojo.close);
};
There were several changes made to the previous version with the Drawer widget to create this version in a dialog:
- Scene Assistant Methods
Change
this.controller.*references tothis.sceneAssistant.controller.*references, because theAddDialogAssistantmust use the passed reference to the scene assistant for any scene controller methods.- Close
Add
this.widget.mojo.close()after successfully adding the feed incheckOk. You will have to directly close the dialog by calling theclose()method on the dialog widget. Notice that the widget element is passed as an argument to the dialog assistantâs setup method.- TextField Cleanup
Remove the code that explicitly cleared the text fields on exit; it isnât needed, as the dialog scene is removed from the DOM entirely.
Swiping back in a default dialog box will close the dialog box,
but a Cancel button is recommended for most dialog boxes to help
novice users who may be confused by its absence. You can set the
optional preventCancel to true in the showDialog call arguments to stop the back gesture from
canceling the dialog box; by default, preventCancel is set to false. Figure 4-3 shows the results of these changes
and the Add Feed dialog.
Get Palm webOS now with the O’Reilly learning platform.
O’Reilly members experience books, live events, courses curated by job role, and more from O’Reilly and nearly 200 top publishers.

