Your document makes a first impression before anyone reads a word. The paper size, color, and borders give the reader an overall sense of the document’s theme and quality. Margins, the text layout, and perhaps a watermark send further visual clues. When your reader looks closer, the typeface, its size and style also communicate a message. Your choices about your document help to determine whether your readers are receptive to your message, or not.
This chapter shows you how to format all the elements of your document from the macro view (the document) to the micro view (individual characters). This chapter is divided into two parts. Word gives you lots of tools to format your document—some might complain that there are so many it’s hard to know which to use. This book divides those tools into two camps. The first half of this chapter, Let Word Format Your Document Automatically, focuses on the tools that are the easiest to use. You’ll learn how to use Templates, Themes and Styles. Then if you want to learn more, you can roll up your sleeves and dig into the details about manually formatting your document, pages, paragraphs and fonts.
Not everyone has the skill, desire or luxury of time to be a page layout artist. You may be a college student cranking out a term paper, a concerned citizen sending a letter to the Board of Supervisors or a business exec working on a quarterly report. You want your work to look good, but you know you’ll be judged on the content and that’s where you want to spend your time. Word can help. You can use templates, themes, and Quick Styles that were predesigned by graphic artists to make your work look professional. When you go this route, you don’t have to spend time setting each margins, choosing matching fonts or deciding the point size for individual headers. Your brainpower can focus on your message.
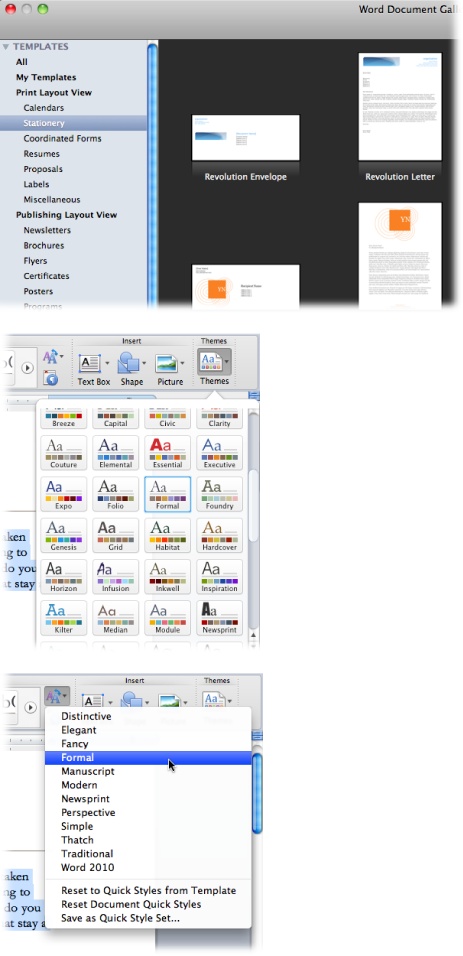
Figure 4-1. For the quickest route to a well-formatted document, use one or more of these tools. At the top, you have templates—prebuilt documents where you fill in the blanks. In the middle you have themes—coordinated fonts, colors, and effects at the click of a button. And at the bottom you have Quick Styles—choose one to automatically format all the paragraphs in your document.
All the formatting needed for your document can be handled with a few mouse clicks when you learn how to do three simple tasks:
Choose a template when you’re first creating your document. Templates contain both content and design elements. Go to File→New from Template (Shift-⌘-P) to open the Word Document Gallery and pick a Template that matches your project. Templates are available for letters, proposals, resumés, and term papers.
Choose a theme to change the appearance of your document. Themes are collections of matching colors, fonts, and effects. You can apply a theme when you start your document or you can change the theme midstream. All it takes is a click of your mouse.
Choose a Quick Style to format a specific element on the page. Quick Styles are used to format paragraphs and they work hand in hand with templates and themes. When you use a Quick Style, word applies attractive, matching formats to the headings and body of your document. Like themes, you can choose a Quick Style when you begin or you can easily change to a different quick style at any time.
When you use a template, you’re taking advantage of the work and wisdom of those who have gone before you. As the saying goes, “Why reinvent the wheel?” Microsoft must adhere to this philosophy because, in Word, they keep adding templates with each new version of Word. Just look at the Gallery (press Shift-⌘-P or click the Template Gallery button). You’ll find Microsoft’s supplied templates in three major categories that correspond to the Word view used to work with them:
Print Layout view. These are probably the templates that you’ll use most of the time, they include documents like proposals, resumés, labels and forms.
Publishing Layout view. Use these templates for more design-intensive projects like brochures, newsletters, catalogs, and business cards. As the name indicates, you use Word’s publishing tools in Publishing Layout view.
Notebook Layout view. The templates in this category work with Word’s Notebook Layout view. They’re designed to help you organize notes and random thoughts during lectures or when you’re brainstorming.
Note
If you create your own templates as explained on Modifying, Saving, and Installing Templates, Word stores them in the My Templates category.
Don’t see the template you want in those groups? Don’t worry. As they say in the infomercials: Wait. There’s more! Scroll down to the bottom of the list and click Online Templates. The gallery connects to the Microsoft website and dozens of new categories appear in the alphabetized list. Here’s a random sampling to give you an idea of what you’ll find:
You get the idea. However, if that’s not enough, with typical Microsoftian overkill there’s even a category called More Templates, where, believe it or not, you find hundreds of uncategorized templates. Now you know why there’s a search box in the upper-right corner of the Gallery.
When you use a template, you’re not opening a template file, you’re opening a copy of it, sort of like pulling the top sheet off a pad of forms. The original template file remains untouched. Here are some of the goodies you’ll find in a new document you’ve opened from a template:
Graphics. Templates for brochures, business cards, greeting cards, and newsletters almost always include drawing, clip art, lines, and borders. Frequently, you’ll find templates that include photos (Figure 4-2).
Formatting. Setting up the page formats, indents, and line spacing, and positioning every single bit of text on the page can be a big job. For projects like forms, purchase orders, and invoices, you may end up tearing your hair out. Fortunately, using a template is a lot easier on your scalp.
Boilerplate text. Often in templates the text is just there for position. You replace the text with your own words. However, some templates include boilerplate text that you want to leave in place. Contracts, fax cover pages, forms, and even resumés may include body text or headings that you want to keep.
AutoText entries. Sophisticated templates sometimes add automated features like AutoText entries (AutoText: Abbreviation Expanders). A template designed to handle a common complaint may include a lengthy AutoText entry that begins, “We are so very sorry that the widget didn’t live up to your expectations.” To insert the diatribe, all you have to do is type sorry, and then go to Insert→AutoText and choose from the list.
Content controls. Some templates include widgets, like text boxes and dropdown menus, that let you create electronic forms in Word, just like the forms you fill out on websites.

Figure 4-2. When you use a template, you get a professionally designed preformatted document. Many templates include impressive graphics and high quality photos. All you need to do is fill in your message. More complex templates like this one for a daycare flyer use the page layout tools provided by Word’s Publishing Layout view (page 225).
Whether it’s installed on your computer or stored online at Microsoft, it’s easy to start using a template. After you open the Gallery (Shift-⌘-P), click one of the template thumbnails and you see a preview in the gallery’s right panel. (If you don’t see a preview, click the expand button shown in Figure 4-3.) If you’re happy with the template, click the Choose button to open it in Word, or you can double-click a template thumbnail. At that point you can start typing your text and headlines. As for pictures and other graphics, you may be able to use those that come with the template, or you may have some of your own that are better suited.
Make sure you replace all that fake Latin text, or you’re likely to get some chuckles from your readers. Better yet, have someone else look over your document. Surprisingly, the body text almost always gets swapped just fine, it’s the odd heading, caption or even address block that slips everyone’s notice.
Note
Many of the Online Templates were designed and uploaded by “the Microsoft Community.” When you first open one of these templates, you see a warning from Microsoft mentioning that point and absolving the company from any virus or hacker-type problems that may arise. It’s unlikely that you’ll run into a problem, but if you stay awake at night worrying about such things, stick to the installed templates and avoid the ones online.
Templates bring consistency to your work, which means you can use them as a tool to promote your company image or brand. Suppose you run an office and you want all your letters, memos and reports to present the same image. Choose some templates that have the look you want. In some cases you may want to add your own boilerplate text. If you make changes to the original template, you can always save the new improved version as a template:
Choose File→Save As.
The Save File panel opens.
Set the Format menu to “Word Template (.dotx)” and click Save.
Word automatically saves the template on your computer in a special folder for templates. So the next time you need the template, it appears in the gallery’s My Templates category. Templates that include macros must be saved in the .dotm file format. For the details see the explanation on Absolute vs. Relative Cell References.
If you’re a Word power user, you may be in charge of designing templates for your office and making sure they’re available to everyone. You’ve followed the steps above to tweak a template for use in your office and now you need to share them in an office that includes both Macs and PCs. See the box on Where Oh Where Are My Template Files? for details on Word’s template folders.
When you’re on deadline putting together, say, a business proposal, you don’t want to waste precious minutes worrying about fonts, heading colors, and the design of tables, charts, and graphs. Instead, simply choose a theme with a click of your mouse, and you’ve got a professional-looking document, with coordinated colors, fonts, and effects. Unlike templates, themes don’t mess around with page layout issues like margins or the positioning of a photograph. That means you can apply a theme to document that you’ve finished and it won’t change the content or layout; it just changes its look.
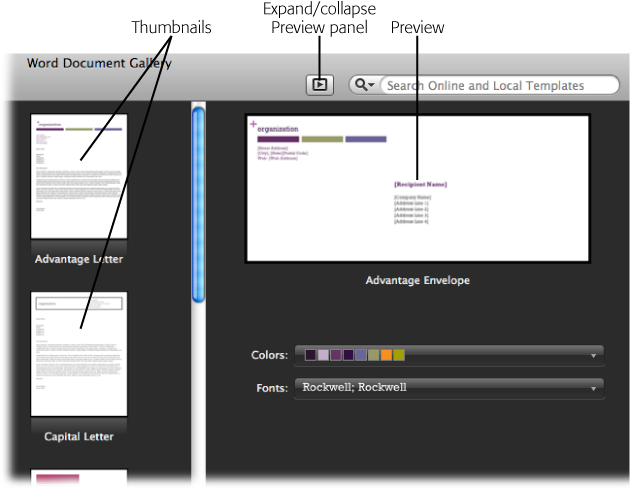
Figure 4-3. Click the Expand button to open the template preview pane in the Gallery. Some templates, like this envelope, give you the option to change the colors and fonts for your document. Actually, what you’re doing is choosing a theme. You’ll learn about themes in the next section.
Themes are made up of three parts:
Colors. Each theme contains twelve colors, each of which is assigned to a specific document part. One color (usually black) is used for body text. Another color (dark blue, say) is used for Heading 1 paragraphs. Lesser headings—like Heading 2 and Heading 3—may use a lighter shade of the same color. Other complementary colors are used for accent and hyperlinks (links to the Internet).
Fonts. Each theme specifies one or two fonts—one for the body text and one for headings. Also known as typefaces, fonts define the actual shape of the letters on the screen and on the page. They have a subtle but significant effect on the appearance and feeling of a document. Some typefaces don’t always play well with others, but fortunately, you don’t have to worry about that when you choose themes, since their typeface combinations are always compatible.
Effects. Each theme uses one of Word’s built-in graphic effects. These effects include design touches like shadows, line styles, 3-D, and so on. Most of these effects have more of an impact in PowerPoint presentations than in Word documents, but they come with the theme’s package.
Tip
It you regularly make presentations in PowerPoint, it’s good to know that Word and PowerPoint share the same themes. That means after you’ve wowed them at the projector you can leave matching takeaway pieces printed in Word.
When you choose a theme, you’re applying color, font, and effect formatting to the elements in your document (Figure 4-4).
Here are examples of the parts of your document that take their formatting cues from the selected theme:
Body text. Font, size, style, and color.
Headings. Font, size, style, and color.
Tables. Font specs (same as above), border and line styles, and colors.
Charts. Font specs, borders, lines, chart graphic styles, and colors.
Picture. Border colors.
SmartArt. Font specs and graphic colors.
Clip art. Major outline and border colors.
Drop caps. Font specs and color.
WordArt. Font colors change, but the actual type style remains the same.
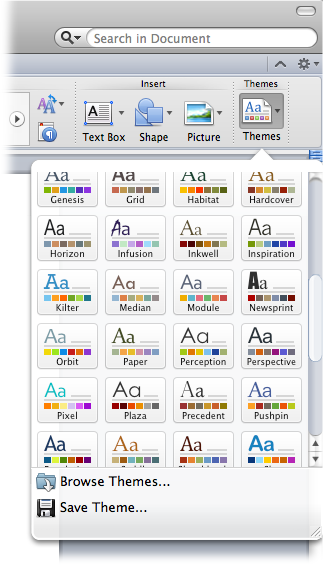
Figure 4-4. Word’s themes are prepackaged collections of colors, fonts and effects that work together to create attractive pages. To apply a theme, go to Home | Themes→Theme and click on one of the themes in the menu shown here. Not what you wanted? No problem; just click on another or press ⌘-Z to undo the theme.
Word comes with more than 50 built-in themes, but you may still find yourself looking for more. Perhaps you work in an office on a computer that was set up by your employer, and someone has created official company themes that you need to use. If that’s the case, then you need to know where to look for those themes on your computer, especially if you (or someone you love) has inadvertently moved them. You can also look beyond your computer: Creative types are constantly coming up with new, exciting themes and sharing them on the Web.
Open the Themes menu (Home→Themes), and you may find custom themes at the top of the list. Custom themes are ones that you or someone else created. In the middle of the themes menu you see the predesigned themes that come with Word. At the very bottom, there are two options for the I-wanna-do-it-myself crowd: Browse Themes and Save Theme.
The process for sharing a theme with your coworkers is similar to the process for sharing templates, you need to find and copy the theme from your computer and to theirs. To open the folder where your custom themes are stored, go to Home→Themes→Browse Themes. A Finder window opens displaying the folder and any custom themes you may have already created. It may also contain folders for separate Theme Fonts, Theme Colors, and Theme Effects.
If themes are stored (or moved) somewhere else on your computer, then they won’t show up on the Themes menu, but you can search for them. To search for themes stored anywhere on your computer, type thmx in the Spotlight and click This Mac button, as shown in Figure 4-5.
You use styles to apply formatting to specific paragraphs. You want the title and headings to stand out from the text that makes up the body of your document. A paragraph style does just that by specifying the font, its size, color, and style (regular, bold, or italic). Styles also set spacing before and after a paragraph, indents from the margins, tabs and other special text-handling issues.
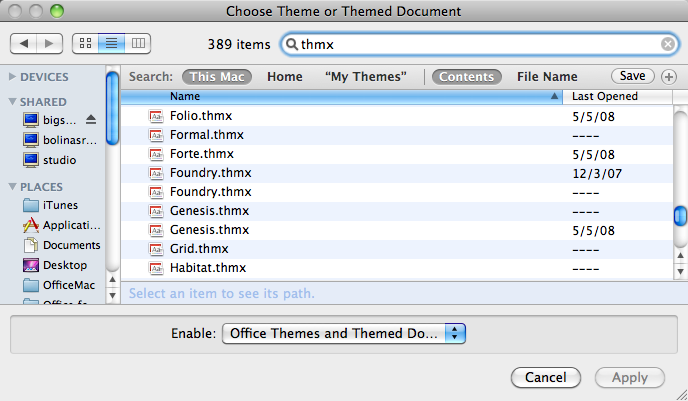
Figure 4-5. After you type thmx in the search box, you can choose to search your entire computer (This Mac), your user folder (Home) or in your themes folder (My Themes).
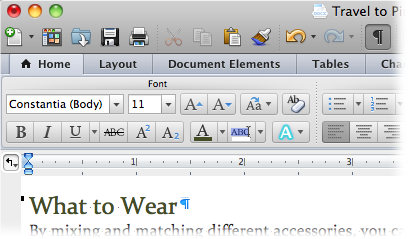
Suppose you’re creating a guide for business travelers. First you type the title for you document: Business Travel to Pirate’s Cove. Because this is the title for the document, you want it bigger and bolder than anything else on the page. You could manually format the paragraph, but why go to all that trouble when Word has a Title style that’s perfectly suited for the job? You can use the ribbon to apply that style. First make sure the insertion point is still in the title paragraph. Then, go to Home | Styles and in the scrolling list of styles, choose Title. Immediately, your title takes on a new big, bold look. Appropriately, the Title is at the top of your document, and may even be centered. When you press Return, Word gives you a new paragraph and automatically it uses the Normal style—the perfect format for body of your document. You can now add your introductory text for traveling to Pirate’s Cove.
Getting into the meat of the subject, you add a major heading: “What to Wear.” Again, instead of formatting the text manually, you use Word’s Heading 1 style. This is a major topic, but it’s not quite as important as the title, so by using the Heading 1 style, Word formats it smaller and less boldly than the title. A little more body text, and you’re ready for a not-so-major heading: “Day Wear”, which you style with Heading 2. You go on to describe appropriate clothing for a trip to Pirate’s Cove. When you’re finished, your document may look like Figure 4-6. Without having to sweat the details, you’ve created a good-looking document. You didn’t have to delve into layer after layer of dialog boxes to make sure the spacing before a major heading is greater than the spacing before a minor heading.
As you can tell from the above experiment, a single style performs several formatting feats at once. Each paragraph style defines all the font and paragraph settings. When you apply a style you don’t have to manually choose a font size or color. You don’t have to dig into the dialog boxes where you set indents, tabs, and the distance between lines and paragraphs. After you’ve applied style names to the paragraphs in your document, you can use Quick Styles to try out different looks.
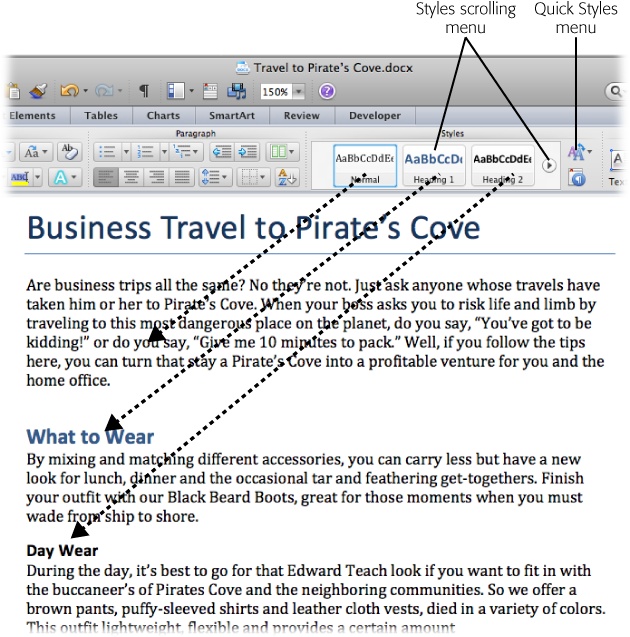
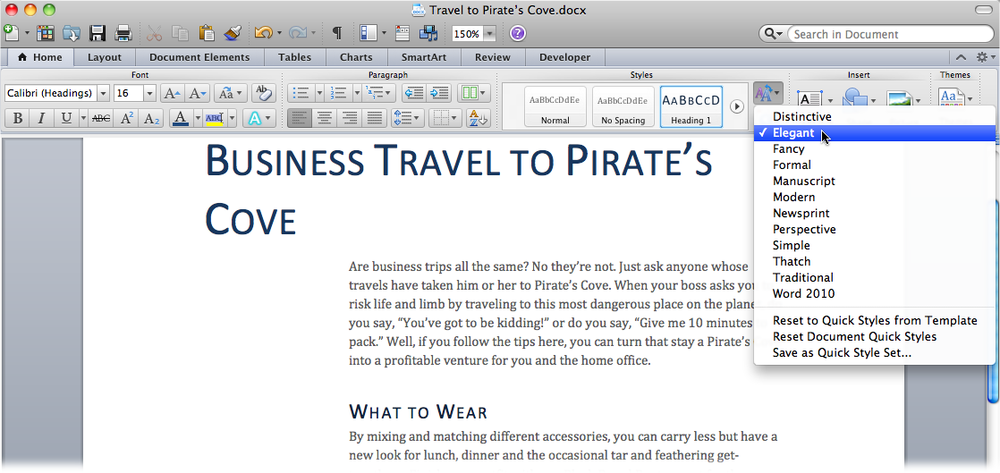
Want to change the look of your document with a single mouse click? You can do that from the Quick Styles menu. Go to Home | Styles and then choose Elegant from the Quick Styles menu. Suddenly, your document has a hanging title, new margins, and new font specifications all around. As you can see in Figure 4-7, when you choose a Quick Style, you change the settings for several paragraph styles all at once. The Title, Normal, Heading 1, and Heading 2 styles are quite different from the example in Figure 4-6. Go ahead and try out some of the different Quick Styles. You know you want to.
Later in this chapter, you’ll learn how to manually modify a single style (Modifying an Existing Style).
It’s easiest to let Word format your document automatically, using templates, themes, and Quick Styles described in the first part of this chapter. With these tools, you can dress up your documents with surprising variety. If you can’t find anything that suits you, the rest of this chapter explains how to manually format all the elements in your document. Perhaps you want to tweak a single element in one of the built-in styles or maybe you have plans for an entirely new look you want to develop from scratch.
When it comes to formatting, Word attaches formatting details to three separate elements. Working from the outside toward the center, as if your document is an onion, the elements are:
Section formatting determines the page size, orientation, color, and graphics (like watermarks). Many documents are a single section, so you might think of these settings as document formatting. That’s not how Word sees it. These formatting options are applied to sections, so you can use different formatting for different chapters or individual pages or paragraphs in your document. Perhaps you want a couple of pages that show charts to use landscape orientation. Or maybe although most of your document uses a single column, there’s one topic that lends itself to a two-column format.
Paragraph formatting is handled by Word’s styles. For example, you use different styles to format headings, body text or photo captions. The power of styles and Word’s Quick Styles were seen earlier in this chapter. In this section, you learn how to customize paragraph settings and create your own styles.
Character formatting changes the font, size and style of individual characters within a paragraph. Perhaps you want to emphasize a single word, so you apply italics or boldface to the type.
This section gives you all the details you need to manually format your document and, like the onion, it starts at the outer layer.
When you edit a document in Word, what you see on your computer looks almost exactly like the final printed page. To get that preview, Word needs to know some details about the paper you’re using, like the page size and orientation. As usual, Word gives you more than one way to change these settings. The most visual method is to use the Layout tab ribbon (Figure 4-8). If you like the old-fashioned way, your mouse may already remember File→Page Setup leads to the Page Setup dialog box (Figure 4-9).
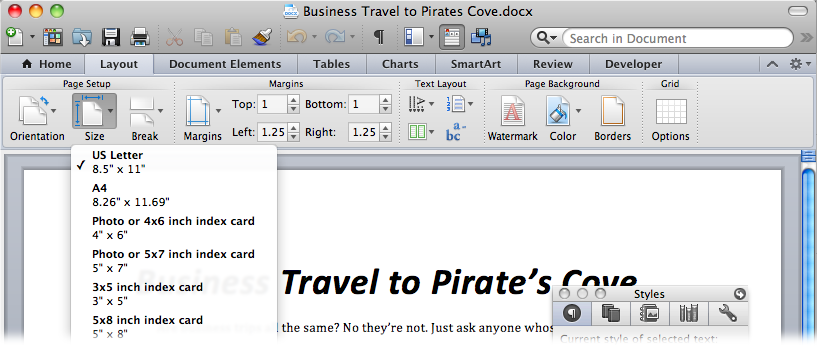
Figure 4-8. Use the ribbon’s Layout tab to choose page size, orientation and color. Here the page size menu is open, showing the variety of page options.
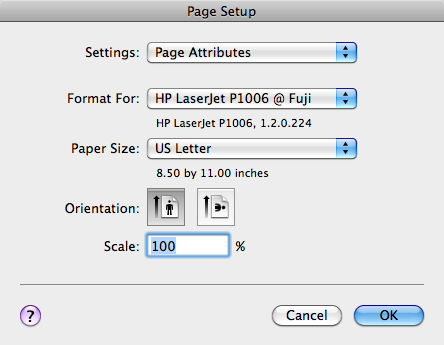
Figure 4-9. The Page Setup box provides the same options as the ribbon, it’s just not as flashy. Use the menu at the top to toggle between Page Attributes and the Microsoft Word panels.
If you want to quickly change the page size to a standard paper size like letter, legal, or tabloid, then Layout→Page Setup→Size is the way to go (Figure 4-8). With one quick click, you change your document’s size. If there’s text in your document, Word reshapes it to fit the page. Say you change a 10-page document from letter size to the longer legal-size page. Word spreads out your text over the extra space, and you’ll have fewer pages overall.
Suppose your company offers a gift card, and the size doesn’t match any of the ones in Word’s list. You can define a custom page size, but you’ll need to use the Page Setup dialog box to do it.
Go to File→Page Setup.
The Page Setup box opens.
Click the Paper Size menu and scroll down to the bottom. Then choose Manage Custom sizes.
The Custom Paper Sizes box opens as shown in Figure 4-10.
Click the + button to add a new custom size.
A new custom paper size item appears in the box on the left with the name “untitled.” Numbers appear in the dimensions and margins, which you change in the next few steps.
Type a new name for your custom paper size, such as Gift Card.
In the future, you’ll use this name to choose this custom paper size.
Set the width, height and margins.
You can use decimals, such as 6.5 inches in your sizes.
From now on, your new custom paper size appears at the bottom of the Paper Size menu in the Page Setup dialog box. It doesn’t appear in the ribbon’s paper size list.

Most business documents, school papers, and letters use a portrait page orientation, meaning the page is taller than it is wide. But sometimes you want a short, wide page—landscape page orientation—to accommodate a table, chart, or photo, or just for artistic effect. Whatever the reason, using the Orientation menu (Layout→Page Setup→Orientation) is the easiest way to make the change (Figure 4-11). Just click one of the two options: Portrait or Landscape.
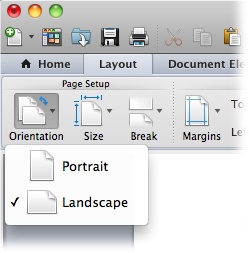
Figure 4-11. Click portrait or landscape to change the page orientation for your document. If you want to change the orientation for just a couple pages in the middle of a document, you need to divide your document into sections as described on page 196.
If you’ve already got the Page Setup box open (File→Page Setup), you’ll find the Orientation options on the Page Attributes panel.
Page margins are more than just empty space. The correct page margins make your document more readable. Generous page margins make text look inviting and give reviewers room for notes and comments. With narrower margins, you can squeeze more words on the page; however, having too many words per line makes your document difficult to read. With really long lines it’s a challenge for readers to track from the end of one line back to the beginning of the next. Margins become even more important for complex documents, such as books or magazines with facing pages. With Word’s margins and page setup tools, you can tackle a whole range of projects.
Your first stop for margins should be the Preset margin menu on the ribbon Layout | Margins menu, where Word provides some standard, socially acceptable settings. The preset margins are a mixed bag of settings from a half inch to one and a quarter inches. For most documents, you can choose one of these preset margins and never look back (Figure 4-12). To select one of the preset margins, go to Layout | Margins, and then click one of the options.
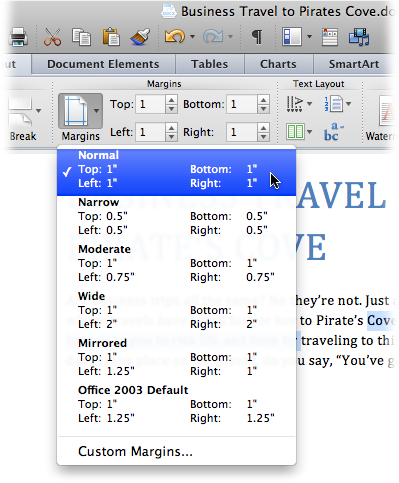
Figure 4-12. The Margins menu provides some standard settings such as the ever popular one inch all the way around. Word calls this favorite of businesses and schools the Normal margin. If you’ve customized your margins, your most recent settings appear at the top of the menu.
For each of the preset margin options, you see dimensions and an icon that hints at the look of the page.
Normal gives you one inch on all sides of the page.
Narrow margins work well with multicolumn documents, giving you a little more room for each column.
Moderate margins with three-quarter inches left and right let you squeeze a few more words in each line.
The Wide preset gives you more room for marginal notes when you’re proofing a manuscript.
Use Mirrored margins when you’re binding a document and want the outside page margins to be different from the inner margins at the binding.
The Office 2003 Default margins match the standard margins for an earlier version of the Word. Use this if you want your new docs to be consistent with ghosts of Word docs past.
Note
Word measures margins from the edge of the page to the edge of the body text. Any headers and footers that you add (The Easy Way to Add Headers and Footers) appear in the margin areas.
What if none of the preset margins on the menu suits your needs? Say your company’s style guide insists on one-and-a-half-inch margins for all press releases. You need to change the Margins in the Document dialog box (Figure 4-13). Here are two ways to get there:
On the ribbon, go to Layout | Margins→Custom Margins to open the Document box to the Margins tab.
Using menus, go to File→Page Setup and then in the box, choose Microsoft Word→Margins.
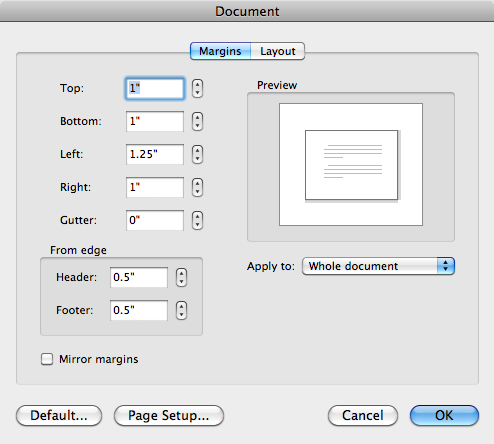
Figure 4-13. Enter your custom margins in the boxes labeled, top, bottom, left and right. If you’re binding your document, click the Mirror margins box and you can set different inside and outside margins. Margins can be applied to an entire document or, if you divide your document into sections, you can use different margins in each section.
The boxes in the Margins section already contain your document’s current settings. To change the Top margin to one and a half inches, select the current setting, and then type 1.5, or you can click the arrows on the right side of the box to change the margin number. Make the same change in the Bottom, Left, and Right margin text boxes.
Tip
If inches isn’t your preferred unit of measure you can use something different in most of the measurement boxes. Just type unit of measure after the number. For example, if you’re a graphic artist you may prefer points, so you type 12 pt. If you’re of the metric persuasion, you can type 20 mm.
Use the Gutter setting to account for the edge of your page that is hidden by a binding. As you change this setting, notice the cross hatch in the preview window that represents the gutter.
While you’re here in the Page Setup box, double-check the page Orientation setting. Margins and page orientation have a combined effect. In other words, if you want a quarter-inch top margin, make sure the orientation is set correctly depending on whether you want the “top” of the page to be on the long side or the short side of the paper.
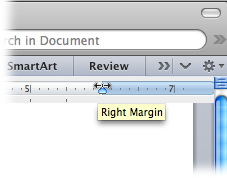
For a quick and easy way to change your margins, use the ruler. To permanently display the rulers, go to View→Ruler. To temporarily display the ruler, just move your mouse a bit beyond the left or top edge of your page and the ruler slides into view. To change the margin, position your mouse on the ruler at the point where the blue area that represents the margin meets the white area that represents the text area. When you hit the sweet spot, the cursor changes to a double arrow as shown in Figure 4-14. Drag to change the margin. This technique works on both the horizontal and vertical margins. You can also use the ruler to set indents (Managing Tab Settings with the Ruler) and tabs (Using the Ruler to Set Margins).
These days, you’re not limited to printing on a single page and holding everything together with a staple. Many fancy printers and copy machines can print both sides of a page and there are all sorts of ways to bind your documents like a pro. If your office doesn’t have the tools, there’s a copy shop not far away that will do it for a price. Word has some special settings to make booklets and bound documents look sharp.
When you have a document with facing pages, click the Mirror margins box shown in Figure 4-13. The preview changes to show facing pages and the Left and Right margin boxes are renamed Inside and Outside. Notice that the gutter representation in the preview window moves to the inside of the two displayed pages.
Every document has a paper size, orientation and margins, you’re probably less likely to want to change the page color, add a border or a watermark. However, if the need arises, you can use these tools to get fancy.
The Page Color option applies more to web pages than to printed pages, and as mentioned before, Word isn’t your best option for creating web pages. When you’re working with paper, you’ll usually print on a different colored paper rather than printing a colored background on white paper. However, with heavy stock, you can use this feature on occasion to create postcards, colored covers, and so on.
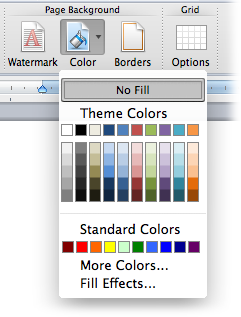
Using the ribbon go to Layout | Page Background→Color to open the Page Color menu. You’ll see two groups of colors: ones that are part of the documents Theme and standard colors such as red, blue, yellow, and so forth. Choosing a color is as simple as clicking on a color swatch.
If none of the options tickle your design fancy, click the More Colors option to open your Mac’s standard color-choosing tools. For more details on using the Mac’s color picker, see Fill Color: More Colors.
A tasteful, properly-applied border can add a certain flare to your document. However, an inappropriate border can make your document look cheesy. Enough said.
Okay, now that you’ve been warned, here’s how to add page borders:
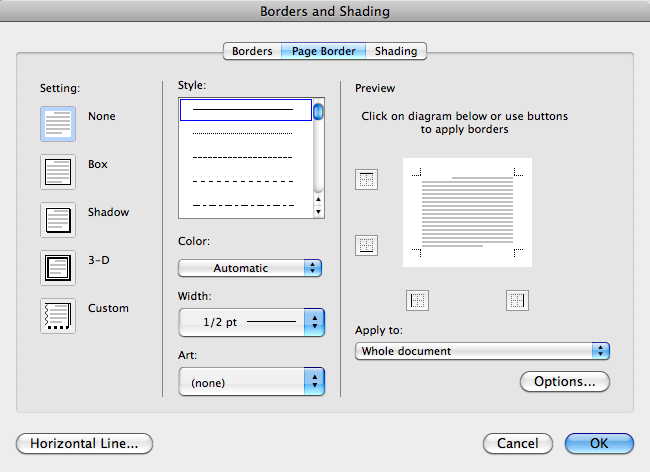
Choose Layout | Page Background→Borders to open the Borders and Shading box (Figure 4-16).
The Borders and Shading box has three tabs. Make sure you’re using the Page Border tab. (The first Borders tab puts borders around paragraphs, pictures, and other objects on the page.)
In the left, choose a setting to define the border.
Start with the five settings on the left, to define the border in broad strokes ranging from no border to drop shadows. You can select only one of these settings.
Choose a line style, color, and width, or choose an art border.
Decide whether your border will be a line or an art border—trees, hearts, pieces of cake, and so on. If you’re going with a line border, choose a style from the drop-down menu. You can choose from more than two dozen lines, including solid, dotted, double, and wavy. Then use the drop-down menus to choose a line color and width.
Figure 4-16. The Borders and Shading box lets you apply borders to paragraphs, pictures, or pages. Make sure you’re on the Page Border tab if you’re applying page borders. You can use lines or artwork to form your borders.
If you want an art border, select your design from the menu. Note that some of the art styles use different patterns for different sides of the page and for the corner design.
Preview the border, and then select the sides of the page that will have borders.
The Preview on the right side of the Borders and Shading box shows what sides of your page will have borders. Click the borders to toggle them on or off. Using this technique, you can choose to show a border on a single side of the page or on any combination of sides.
In the lower-right corner of the box, use the “Apply to” control to set the pages that will have borders.
Maybe you want your first page to have a different border from the rest of the document. If the first page of your document uses letterhead, you may want a first page with no border at all, so select “This section – all except first page”. Or, to put a border around the cover page but no other pages, choose the “This section – first page only” setting. As with paper size and other page layout settings, Word lets you apply borders differently in different sections of your document.
Click OK to accept the settings and to close the Borders and Shading box.
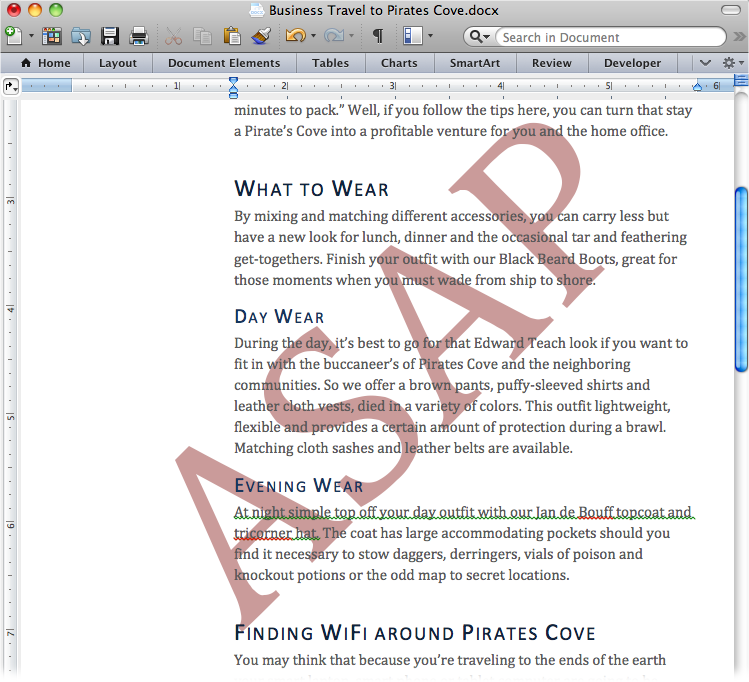
A true watermark is created in a process where a water-coated metal stamp imprints a design into the paper’s surface during manufacture. The design is usually a paper company’s logo. The presence of a watermark can also indicate a document’s authenticity. Word can’t create a real watermark, but it can replicate the effect by printing one faintly on the page, seemingly beneath the text (Figure 4-17). A watermark could be your company logo, or it could be words like CONFIDENTIAL, DRAFT, or DO NOT COPY, emblazoned diagonally across the page.
Suppose you’d like to have your company logo appear as a classy watermark on your document. Using your logo picture file as a watermark takes just a few steps:
Go to Layout | Page Background→Watermark.
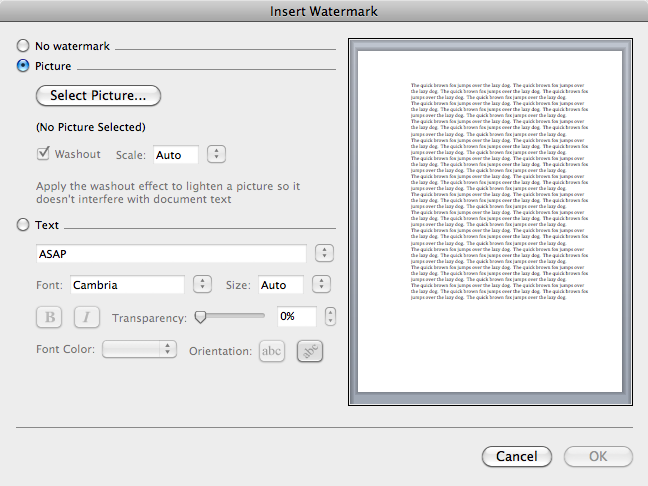
The Insert Watermark box appears. It has three main radio button options: “No watermark”, Picture, and Text.
Select the Picture radio button.
When you click one of these buttons, the appropriate fine-tuning options become available and the others fade to gray. For example, when you choose “Picture watermark,” the Text watermark options are grayed out.
Click the Select Picture button (shown in Figure 4-18) to open the Choose a Picture box.
A window opens where you can navigate to the folder with your logo’s picture file.
Double-click the picture file to use it for your watermark, or, as an alternative, select your picture, and then click Insert.
The Choose a Picture box closes, and you see your picture displayed in the preview.
Set the Scale and Washout options.
Now that you’ve chosen your picture file, you can use two more settings to make your watermark look spiffy. Use the Scale drop-down menu to adjust the size of your image so that it looks good on the page. You can choose from preset sizes of 50%, 100%, 150%, 200%, or 500%. Or you can choose the Auto setting, which scales your image to fit comfortably on the page. The Washout checkbox fades your image, making it easier to read text over the watermark.
Click OK.
The Insert Watermark box closes and you see your company logo displayed behind the text in your document. Your new watermark appears on every page, but you won’t see it in Draft or Outline view.
Headers and footers are where Word puts the bits of information that appear at the top or bottom of every page (Figure 4-19). For multipage documents, they remind you of the page number, chapter title, and so on, as you read along. For business memos and reports, headers are a great place to repeat the document’s subject and publication date. (If you’re the author of the report and want your boss to know, consider adding your name under the title.)
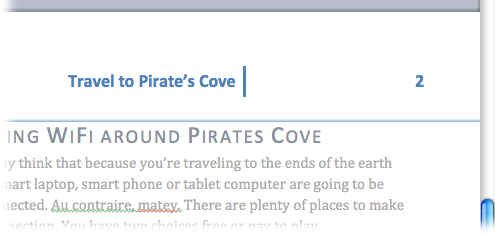
Figure 4-19. Document headers give the reader additional information that’s not found in the text. This example shows the documents title and page number. A business memo might also include the date in the header.
The most common and most helpful element that appears in headers and footers is probably the page number. So Word gives you a special tool to insert that single element. On the ribbon, go to Document Elements | Header and Footer→Page # or use the menu Insert→Page Numbers to open the box shown at the top of Figure 4-20.
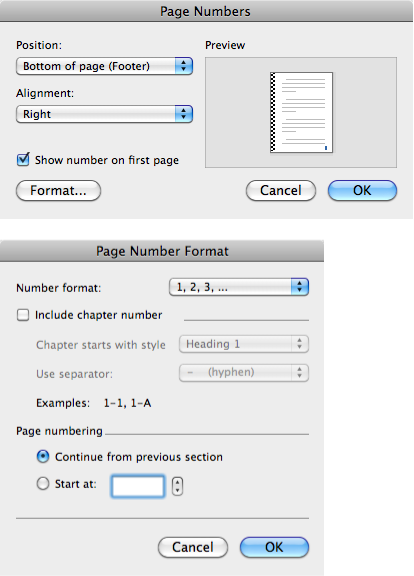
Figure 4-20. Top: Use the Page Numbers box (View→Page Numbers) to position the numbers on the page. If you want to change the format for the number, click the Format button to open the box shown at the bottom.
Use the Position menu to select the top or bottom of your pages for the number. Then, use the Alignment to place the number left, right or center. If you’re binding your document so that it has facing pages, you can choose to have page numbers on the outside or inside. Outside is the most common option for bound documents because it’s easier for readers to find a page. Often documents forego a page number on the first page; however, if you want, check the “Show number on first page” box. A thumbnail size preview shows you the results of your page number settings, but for the best view, click the OK button to check out your document in Print Layout view. Naturally, Word automatically updates the numbers for each page.
You may not get your page numbers right the first time. Perhaps you need to start the page numbering for this document on a number other than 1, or maybe you just want to change the way the numbers look. To make these kinds of changes, open the Page Numbers box again, and then click the Format button to open the box shown at the bottom of Figure 4-20.
The Number format menu at the top lets you choose between numerical or alphabetical numbering. Initially, Word uses 1, 2, 3, but for an introductory chapter you may prefer i, ii, iii, iv. In some cases you may want to use A, B, C.
Click Include chapter number and you can display the chapter number along with the page number. Use the Chapter starts with style menu to let Word know what type of heading begins each chapter. Then, with the “Use separator” menu, you can choose the character (dash, period, colon) that separates the chapter number from the page number.
The Page numbering section lets you start numbering pages with any number you choose. If you want to make a change, click the Start at button and type a number in the box.
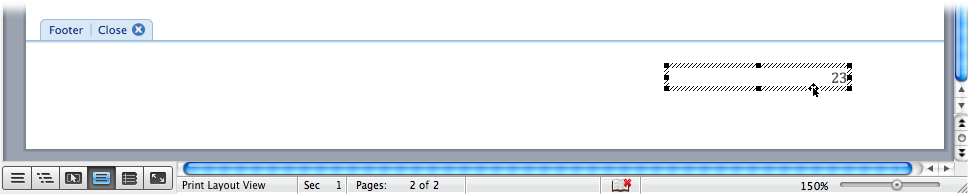
What if you want to get rid of page numbers? Maybe you decided to go with a more complete header or footer. First make sure that you’re in Print Layout view and then double-click on the header or footer area with the unneeded page numbers. When you’re editing headers and footers, the rest of your document is faded out. Position the cursor over the page number, and you see a box around the number as shown in Figure 4-21. Select and delete the page number from one page and it removes the page number from all the others.
When you need more than a simple page number in the header or footer, it makes sense to try the easy route first. That means going to the Layout ribbon and clicking on the Header or Footer menu and checking to see if one of Microsoft’s designs can do the job. As you see in Figure 4-22, some headers are simple text-only affairs, while others include lines and blocks of color. If you’re lucky, you can click on one of these options and Word automatically adds the header or footer to your document. Some of the header options insert words like “[Type text]” or “[Type the document title].” Consider those subtle hints that you should replace the text with your own words. For most of the headers and footers, you won’t have to worry about the page number because Word includes an automatically-updating field. For details about the fields and properties used in headers and footers see the box on Inspecting Your Document’s Properties and Fields.
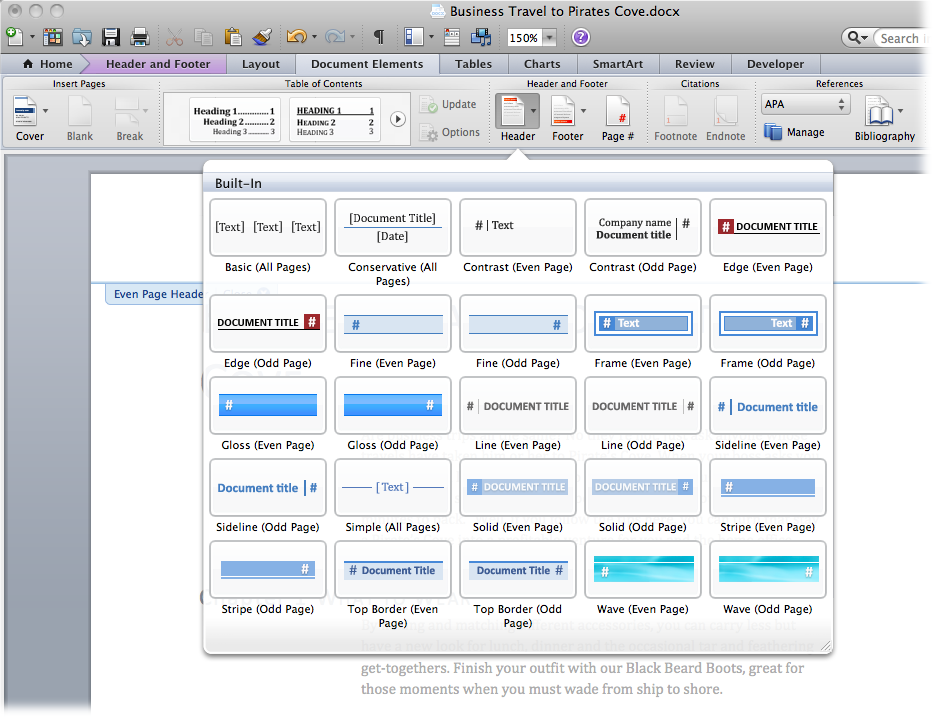
Figure 4-22. For a quick and easy review of the different header and footer styles, use the ribbon. Go to Document Elements→Header and Footer and click one of the menus. The Header menu is shown here. To apply the style and its contents, just click one of the options.
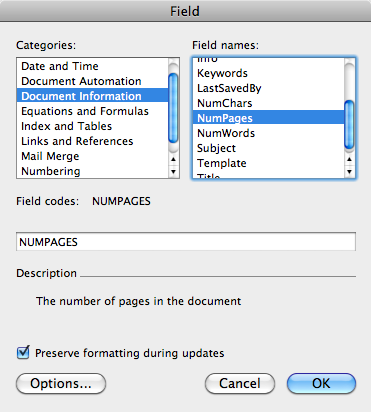
Figure 4-23. Go to Insert→Field to display this box that’s chock-full of different fields. Fields are placeholder codes that Word uses to represent changing information. For example, a page number is a field that tracks the number of pages up to that point in your document. There’s also a field that keeps track of the total number of pages in your document.
Microsoft provides a lot of competently-designed headers and footers with Word, but you’re free to create your own. Maybe you have to follow company guidelines for your documents. It’s not difficult to create your own headers in Word. Here’s how to create a custom header with a company name on the left and page numbers on the right:
Using the menus, go to View→Header and Footer.
Word automatically changes to Print Layout view and moves the insertion point into the Header.
Type your company name, press Return, and then type your city and country.
Pressing Enter puts the city and country on a new line below the company name. Text that you type directly into the footer appears on every page unless you make changes to the header and footer options.
Press Tab twice to move the insertion point to the right side of the footer.
The first time you press Tab, the insertion point moves to the center of the page. If you enter text at that point, Word centers the text in the footer. The second time you press Tab, the insertion point moves to the right margin. Text that you enter there is aligned on the right margin.
Type Page, and then press the space bar.
As you type, the insertion point remains on the right margin and your text flows to the left.
Using the menus, go to Insert→Fields.
The Fields menu appears with two scrolling lists: Categories and Field names.
Scroll down in the Categories list to select Numbering. Then in the Field names list double-click Page.
Word pops the field that displays page numbers into your header.
When you’re done, your header should look something like Figure 4-24. You can continue to develop your header, if you want to add more text or placeholder fields. You can also format the header using the character formatting techniques described later in this chapter starting on Managing Line and Page Breaks.
All the manual formatting elements discussed up to this point are applied to sections of your document. If your document is a single section, you’re likely to think of these elements as document formatting. However, if you need to make some major changes to your document midstream, you’ll appreciate sections. Consider these situations:
Change page orientation. You’re working away with the standard portrait page orientation, but you need to insert some table, charts and graphs that will look better if they’re in landscape orientation.
Change page size. Similar to the previous situation, you realize your graphs will be bigger and more readable if you bump the page size up to legal.
Change the number of columns. Perhaps you’re inserting an extended quote from a newspaper or magazine article. Changing from a single column to two columns will emphasize the fact that this section is from a different source.
Change page margins. You want to change the margins for an extended section. You could use a paragraph style with indents, but in many cases it may be easier to use a section break.
Restart automatic numbering for a new chapter. Word uses automatic numbering for figures and other items. If you have a multichapter document, you may restart the numbering with each section break.
Inserting a section break is almost as easy as entering a page break, described on Line Break. In fact the commands are stashed in the same place, on the Insert menu or the Layout tab. If you’re working with the ribbon visible, that’s the easiest method. Go to Layout | Page Setup→Break and choose one of the four section break options shown in Figure 4-25. Why so many options? Word lets you choose whether or not you want to start a new page at the section break. So, if you’re using section breaks to divide a long document into chapters, you probably want to start each new section on a page of it’s own. If you’re printing on both sides of the page and binding your document, you may have a preference about whether chapters start on the left page or the right page. Here’s some guidance for choosing section break options:
To insert a section break and start a new page, choose Next Page.
To insert a section break without starting a new page, choose Continuous.
To insert a section break and start text on the next page with an even page number, choose Even Page. You’ll need to do your own calculations if, for example, you want to make sure that is a right hand page.
To insert a section break and start text on the next page with an odd page number, choose Odd Page.
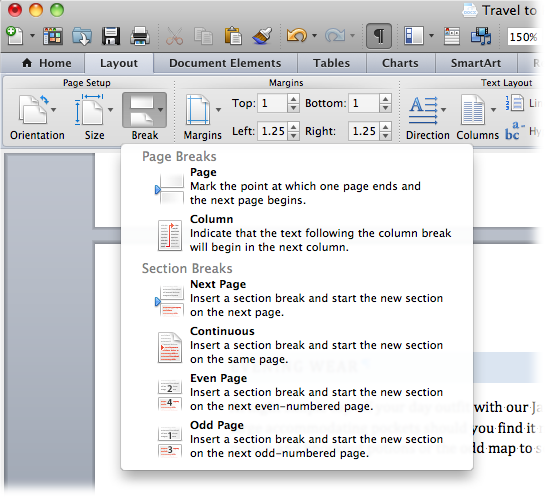
Figure 4-25. The bottom of the Break menu on the Layout tab has four options for inserting a section break into your documents.
Insert the first section break into a document and you divide it into two pieces: Section 1 and Section 2. A glance at the status bar tells you which section you’re working in, as shown in Figure 4-26. At this point any formatting changes you make, such as page orientation, apply to the current section and won’t affect the other sections.
As explained on Finding More Themes, when you apply a style to a paragraph, you perform several formatting chores at once. For example, the Normal style, used for body text, selects a font, size, and color and determines the spacing between lines and paragraphs. Your document may use other styles for headings and photo captions. Each element is likely to have a different look. The Normal style may spec a serif font with a size between 10 and 12 points, while the Heading 1 Style uses a sans-serif font and a 16-point size. (This book uses a similar design.) To set photo captions off from the other elements, you may use italics and perhaps center or right paragraph alignment.
Note
Serifs are the pointy lines at the end of the strokes used in some typefaces. Serif fonts are often used for the body text because they make large blocks of small type more readable. That’s one of the reasons, serif type is used for most of the text in this book. Sans-serif (used in this note and the section heading) works well for headings.
There are several advantages to developing and using styles to format your paragraphs. First of all if you’ve defined a style for your Normal paragraph or your major heading, you don’t have to remember and apply manual settings for each paragraph. You can be sure that when you apply Heading 1 to a paragraph, it will have the same font, size and color as all the other Heading 1s. If you decide to change the look of Heading 1, you can change the style and you don’t have to jump all over your document, making manual changes to every heading.
In this section, you’ll learn how to:
Modify an existing style, so that it changes every paragraph in the document that uses that style.
Override one or more of a style’s format settings. You use this method when you want to tweak one paragraph to change its appearance, without changing the other paragraphs that use the style
Create a new style with a new name. Perhaps you’re developing a Word template that’s going to be used by everyone in your office.
Your 672-page quarterly sales report looks just the way you want it, except for one thing. You’ve come to the conclusion that the Papyrus Condensed font used for the Normal paragraph causes eyestrain and headaches. To change all those paragraphs formatted with the pain-inducing font, you change the Normal style and Word handles the rest for you. Here are the steps:
Choose Format→Style.
The Style dialog box opens as shown in Figure 4-27. In the upper-right corner, you see a list of styles. Use the menu below the list to filter the styles shown in the list. Your options are:
Scroll through the Styles list and click Normal.
To the right there’s a preview window that shows the Normal paragraph formatting and below one that shows the Normal character formatting. At the bottom, there’s a test description of the settings used for the style. For example, you’ll see the font name, the size and details about the spacing and alignment.
With Normal selected, click the Modify button.
The Modify Style box opens as shown in Figure 4-28.
In the Formatting section, choose a new, easier on the eyes font, such as Cambria.
Cambria is one of the standard fonts that’s installed with Office. It’s frequently used for body text. Other fonts often chosen for the Normal style are: Georgia, Times or Times Roman.
In the Modify Style box, click OK. Then, in the Style box click Apply.
The font change you specified is applied to every Normal-style paragraph.
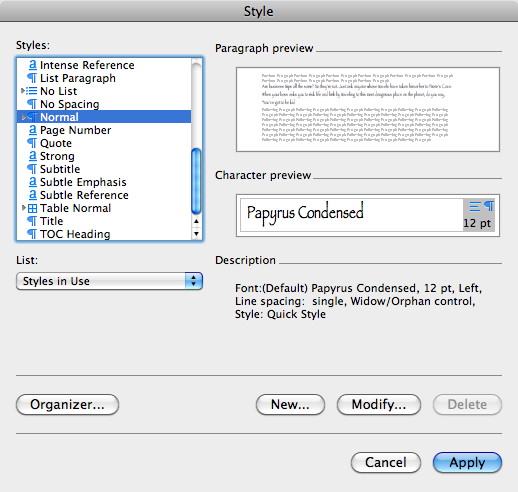
Figure 4-27. The Style box displays a list of fonts. Select one of the fonts in the list and previews of the paragraph and character appear on the right. Buttons at the bottom of the box let you create new styles, modify existing styles, or delete styles from the list.
It’s just as easy to change any other paragraph formatting element. You could change the first line indent, the space between paragraphs, the tabs, bullets and numbering or the borders, to name a few of the available options. You have all the tools to make these changes at your fingertips in the Modify Style box, so it’s worth taking a little closer look.
Figure 4-28. You use the Modify Style box to make changes to an existing style. Changes you make to the Style definition will be applied to all the paragraphs in your document that use the style.
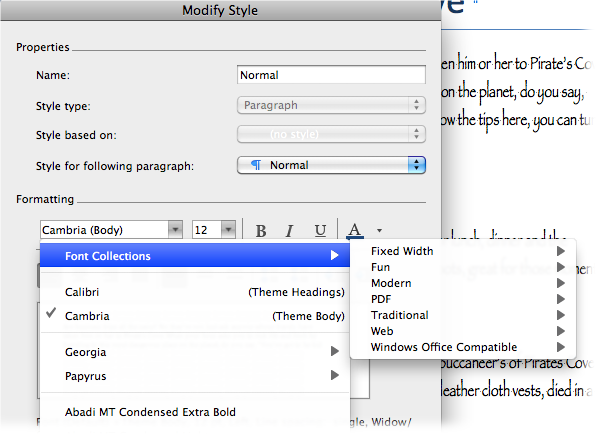
Figure 4-29. To see a list of Windows-friendly fonts in the Modify Style box, open the Font menu and then click the Collections submenu. At the bottom of the list, you’ll see the Windows Office Compatible list. Open this submenu to choose your Windows-friendly font.
The Modify Style box puts everything you need to format a paragraph in one place. Initially, it displays the settings you’re most likely to tweak: fonts, alignment, and spacing options. Dig a little deeper and you find that it offers much more. Here’s the complete tour of this feature-filled dialog box, starting at the top and moving to the bottom:
Name. Every style has a name. Out of the box, Word comes with dozens of named styles. When you create your own styles, you get to name them.
Style type. When you create your own custom styles, you can choose its type. Your choices are paragraph, character, table or list.
Style based on. A style can borrow all the formatting from another style, but change just one or two format settings. For example, a Heading 2 style may be based on Heading 1, except that it specifies a smaller font size. If that’s the case, the font, color, and paragraph spacing would be the same for both. The size would be the only difference. Then later, if you change the font for Heading 1 from Papyrus to Calibri, that would change Heading 2 to Calibri, but it would still use the smaller font size.
This feature saves time when you’re developing new styles and, equally important, it gives your document consistency in appearance.
Style for following paragraph. Use this setting to specify the style that’s used on the next paragraph after this style. An earlier example in this chapter demonstrated the most common use for this setting. When you press Return after typing a heading, Word automatically applies the Normal style to the new paragraph. The assumption being that, after a heading, you’re likely to have some Normal body text. You often have more than one Normal paragraph in a row, so for the Normal style, you probably want another Normal paragraph to follow. Naturally, it’s always easy to use the ribbon’s Styles menu (Home | Styles) to make changes as needed.
Formatting. This section shows the Formatting options you’re most likely to change: fonts, size, paragraph alignment, and so on. If you don’t find what you need already shown here, use the Format menu below.
Add to template. If you want to add a new or modified style to the template so it’s available to future documents created from this template, check this box.
Add to Quick Style list. You can add a new or modified style to the list of Quick Styles that appear in the ribbon.
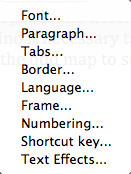
Format menu. Use this menu to open additional formatting dialog boxes. As you see in Figure 4-30, your choices include: Font, Paragraphs, Tabs, Border, Language, Frame, Numbering, Shortcut Keys and Text Effects.
There may be times when you want to make a change to a single heading, but you don’t want to change the other 95 headings that use the same style. Fortunately, it’s easy to do. Simply select the paragraph by double-clicking in the margin on the left. Then, make any formatting changes you want. You can use the Font or Paragraph settings in the Home tab to do the job, or you can use Word’s menus and dialog boxes to tweak the settings. The changes you make only affect the selected paragraph.
If you’ve overridden style formatting here and there throughout your document, there will come the day when you need to reset one of those paragraphs to its original style definition. This is a good job for the Styles panel on the toolbox. In the standard toolbar, click the Toolbox button. The Toolbox appears as a floating palette. At the top, click the button that looks like a paragraph mark to display the Styles panel (Figure 4-31). With your cursor in the paragraph you want to revert, click the style name in the Toolbox. The paragraph changes back to the original style settings. The Styles panel in the toolbox can perform quite a few formatting chores, as described in the next few sections.
If you decide you don’t like the way you changed a paragraph, you can always press ⌘-Z to undo changes immediately after the fact. But what if you come back much, much later and want to revert the paragraph back to the originally-defined style? The Clear Formatting option appears in the Toolbox Style’s panel and on the ribbon (Home | Font→Clear Formatting. (The button is in the upper-right corner of the Font group.) Use this option when you want to change selected paragraphs back to the Normal style and remove any extra character formatting such as bold or italics. Just select the text you want to strip down and choose Clear Formatting in the ribbon or the Toolbox. If the results weren’t what you intended, you can always Undo (⌘-Z).
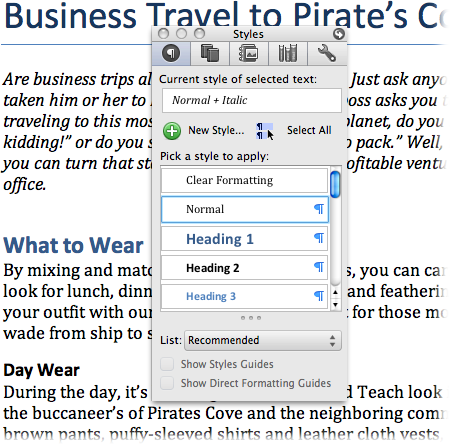
After you’ve applied several different styles to your document, it’s easy to get a bit lost. If you need a visual guide to understand which paragraphs are formatted with which styles, turn to the Styles panel in the toolbox. At the bottom, click Show Styles Guides, and Word displays a multicolored border to the left of the page (see Figure 4-32). Each color and number corresponds to a paragraph style.
If you want to identify all the paragraphs using a particular style, there’s another Toolbox tool that does just that. First, in the scrolling list click the style you want to find. Then above the list click Select All. In your document, Word selects all the paragraphs that use the selected style.
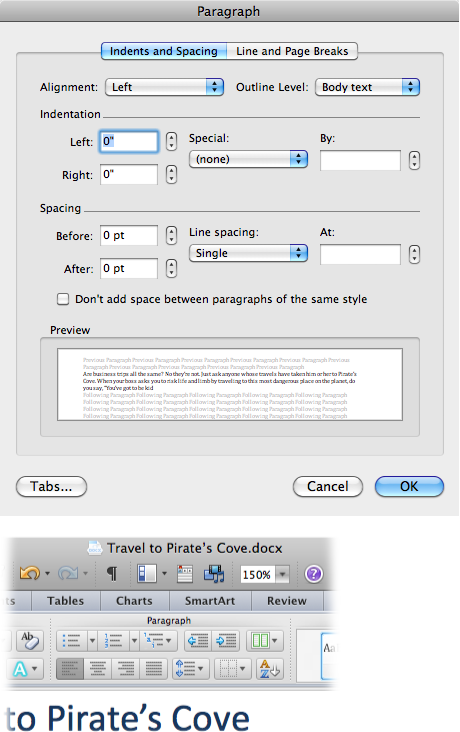
The styles described in the previous section change several formatting options at one time. If you want to roll up your sleeves and tweak individual paragraph settings you’ll find the options in the Paragraph dialog box (Format→Paragraph or Option-⌘-M) shown in Figure 4-33. Use the tabs at the top to switch between the Indents and Spacing panel and the Line and Page Breaks panel.
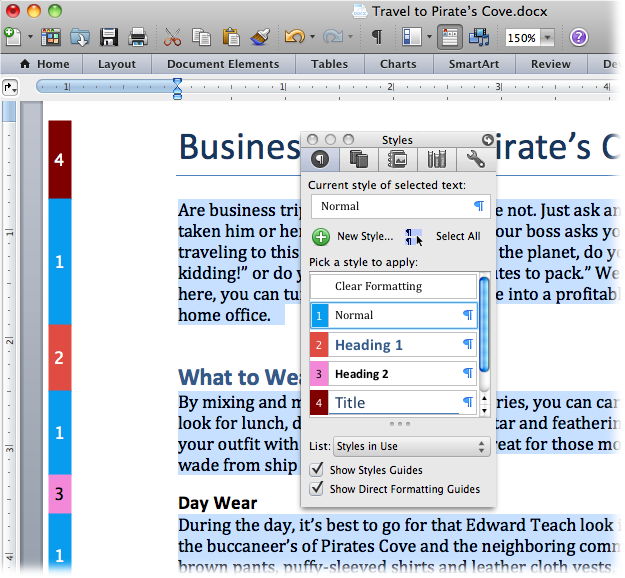
Figure 4-32. The bar on the right is a guide to the styles applied to each paragraph. You can match the colors and numbers with the styles listed in the Styles panel of the Toolbox. To display the guide, select the Show Styles Guide at the bottom of the panel.
To change the alignment of text in a paragraph, make sure the insertion point is in the paragraph then choose an option from the ribbon (Home | Paragraph) or the dialog box (Format→Paragraph).
Left. Aligns the lines in the paragraph flush on the left side and ragged on the right. Left alignment is standard for letters, reports, and many business documents.
Centered. Centers each line in the paragraph, leaving both left and right margins ragged. This setting is appropriate for headings and short chunks of text, as in invitations and advertisements. Avoid using centered text for long paragraphs, since it’s hard for readers’ eyes to track from the end of one line to the beginning of the next when the left margin is uneven.
Right. Aligns the lines in the paragraph flush on the right side and ragged on the left. This unusual alignment is most often used for setting captions or quotations apart from the main text.
Justified. Adds space between letters and words so that both the left and right sides of the paragraph are straight and flush with the margins. Justified margins give text a more formal look suitable for textbooks or scholarly documents. If your justified text looks odd because big gaps appear between the letters or words, try using a long line—that is, putting more characters per line. You can do this by extending the margins (Layout | Margins) or by changing the size of your font (Home | Font→Font Size).
One of the most common reasons for indenting a paragraph is to set off quoted text from the rest of the document. Usually, you move the paragraph’s left edge in about a half inch from the left margin. Novels, short stories, and other manuscripts often indent the first line of a paragraph instead of adding extra space between each paragraph. Hanging indents, where the first line extends past the body text into the left margin, are a less common, but work well for glossaries, bibliographies and such.
The easiest way to indent is to use the buttons on the ribbon (Home | Paragraph→Increase Indent or Home | Paragraph→Decrease Indent. The change takes place immediately and if you don’t like the look, just press ⌘-Z. If you want to set indents with more precision, use the Paragraph dialog box (Format→Paragraph) and make sure you’re on the Indents and Spacing panel.
To indent from either margin, type a distance in the Left or Right box.
To indent the first line of a paragraph, choose First line from the Special menu and then type a distance in the By box.
To create a hanging indent, chose Hanging from the Special menu and then type a distance in the By box.

Figure 4-34. Initially, Word expects you to use inches for the indent settings. If you prefer to specify your distance in another format just include the units of measure as in 8 pt or 5 mm.
Using the ruler to adjust indentation is similar to changing margins (described on Using the Ruler to Set Margins). It’s just a matter of clicking and dragging. Indents are a bit more complicated because you have a few more options, and that means more tools and widgets.
It can take awhile to get used to adjusting paragraph indents with the ruler (Figure 4-35). For one thing, you need a steady hand and accurate clicking to zero in on those little triangle buttons. The top triangle sets the first line indent and moves independently. The bottom triangle creates a hanging indent, and you can move it independently too, as long as you grab only that triangle. That little box below the triangle is your left indent, and if you drag it, both it and the top (first line) indent marker move together.
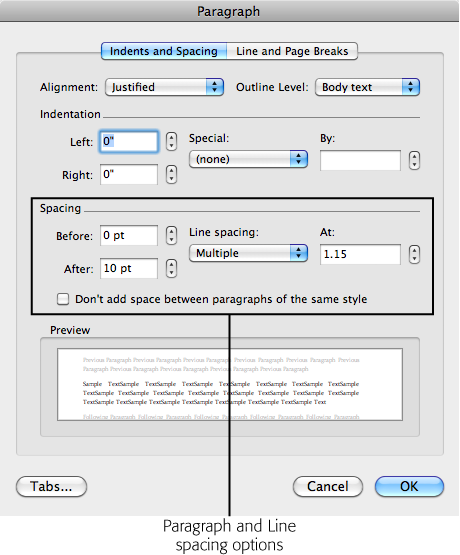
For documents like business letters or reports that use block-style paragraphs, there’s usually a little space between each. You can adjust this spacing between paragraphs to set off some blocks of text from the rest.
Use the Paragraph dialog box (Option-⌘-M) to adjust the distance between paragraphs. As you can see in Figure 4-36, on the left, you enter numbers to set the space before the paragraph and the space after. With body text paragraphs, it’s good to set the same, relatively small distance before and after—say, three points. For headers, you may want to put a little extra space before the header to distance it from the preceding text. That space makes it clear that the header is related to the text beneath it. Generally speaking, the more significant the header, the larger the type and the greater the spacing around it.
In the Paragraph box, to the right of the paragraph spacing controls, you find the “Line spacing” tools. Use these controls to set the distance between lines within paragraphs. You have three presets and three custom settings:
Single keeps the lines close together, with a minimum amount of space between. Single spacing is usually easy to read, and it sure saves paper.
1.5 lines gives your text a little more breathing room, and still offers a nice professional look.
Double is the option preferred by teachers and editors, so there’s plenty of room for their helpful comments.
At least is a good option if you have a mix of font sizes or include inline graphics with your text. This option ensures that everything fits.
Exactly puts you in control. Type a number in the At box, and Word won’t mess with that setting.
Multiple is the oddball of the bunch. Think of Multiple as a percentage of a single line space: 1=100 percent; .8=80 percent; 1.2=120 percent; and so on.
The lowly Tab key contains more power than you may think. Sure, you can use the Tab key to scoot the insertion point across the page in half-inch increments. But Word’s tab tool is capable of much loftier feats: You can use it to design a dinner menu, create a playbill, or develop a series of consistently formatted reports.
Tab stops are all about precision alignment, giving you control over the way you present text and numbers to your readers. For example, on your dinner menu you can use tab leaders (dotted lines like the ones in this book’s table of contents) so that your reader’s eye tracks from Wild Salmon to the exceptionally reasonable price you’re asking. Once you have settings you like, you can save and reuse them. (How’s that for efficiency?)
Before you start working with tabs, you need to know a few basic terms:
Tabs. Technically considered tab characters, tabs are hidden formatting characters, similar to space characters. Tabs are embedded in your document’s text.
Tab stops. These paragraph settings define the position and characteristics of tabs in your document. Think of tab stops as definitions, describing your tabs. To define them, you use Word tools, like the Ruler or the Tabs dialog box.
Tab key. The key on your computer keyboard that inserts tabs into your text.
Press the Tab key, and Word inserts a tab in the text at that point. The tab character makes the insertion point jump left to right and stop at the first tab stop it reaches. If you haven’t set any new tab stops, Word uses the built-in set of tab stops—one every half inch across the width—that every new, blank document starts out with.
Tab stop settings apply to paragraphs. If a paragraph has several lines, the tab stops are the same for all the lines within that paragraph. If you haven’t deliberately set tab stops, Word provides built-in tab stops at half-inch intervals. These stops are left tab stops, meaning the text aligns on the left side. You can see all tab stops on the horizontal ruler—they show as small vertical tick marks in the gray area below the number scale (Figure 4-37).
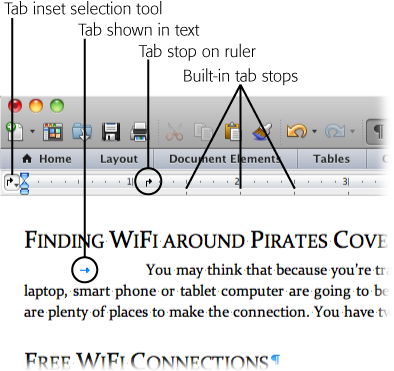
Tabs are invisible on the printed page, like spaces or paragraph marks. Sometimes, when your document behaves unexpectedly, it helps to reveal the hidden characters so you can see if tabs are the culprit. After all, when they’re hidden, all you see is white space on the page; however, spaces, tabs, and indents each behave quite differently. To view tabs within your text, click the paragraph mark (¶) on the standard toolbar.
Because tabs are characters within your document, you can delete, copy, and paste them just as you would any other character or text fragment. Maybe you want to delete a tab: just click immediately after a tab character, and then press the Backspace key. If you want to copy and move a tab, click the paragraph mark (¶) on the standard toolbar, to make the non-printing characters visible while you work in Word. Then you can cut (⌘-X) and paste (⌘-V) tab marks, which show up as small arrows in your text.

Five types of tabs are available in Word—one of which isn’t a true tab but works well with the others:
Left tab. The most common type of tab, it aligns text at the left side; text flows from the tab stop to the right. When you start a new, blank document, Word provides left tabs every half inch.
Center tab. Keeps text centered at the tab stop. Text extends evenly left and right with the tab stop in the middle.
Right tab. Aligns text to the right. Text flows backwards from the tab stop, from right to left.
Decimal tab. Used to align numbers, whether or not they have decimals. Numbers align with the decimal point centered on the tab stop. Numbers without decimal points align similar to a right tab.
Bar tab. The Bar tab is the oddball of the group and, no, it has nothing to do with your local watering hole. It also has nothing to do with aligning text. It inserts a vertical bar in your text as a divider. The bar appears in every line in the paragraph. This tab stop ignores tabs inserted in your text and behaves in the same manner whether or not tab characters are present.
Note
There may be a certain Microsoftian logic in grouping the bar tab with the tab feature, but Word provides other ways to place vertical lines on your pages that you may find more intuitive. You can use borders for paragraphs or tables or you can open the Media Browser from the standard Toolbar. Then, click the Shapes button and select Lines and Connectors from the menu.
Tab leaders help readers connect the dots by providing a trail from one tabbed item to the next. They’re ideal for creating professional-looking menus, playbills, and more.
Here are some examples:
Hamlet, Prince of Denmark..............Sir Laurence Olivier
Ophelia, daughter to Polonius..........Julia Louis-Dreyfus
Four Leader options can be used with each type of tab stop except the bar tab:
|
None |
No leader here | |
|
Dotted |
................................................... |
You’ve seen this before |
|
Dashed |
-------------------------------- |
For a different, intermittent look |
|
Underline |
____________________ |
When only a solid line will do |
As visual aids, leaders are quite helpful, and they work equally well for text and numbers.
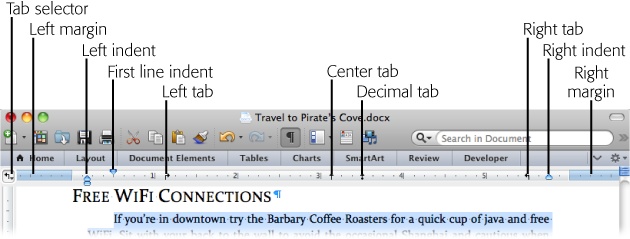
Figure 4-39. Word’s ruler provides lots of information about the formatting of the current paragraph, that is, the paragraph that contains the insertion point. Use the button just above the scroll bar for a quick way to show and hide your ruler. If the ruler isn’t displayed, move the cursor to the top of your document and the ruler pops up temporarily.
In Figure 4-39, the ruler measures the page in inches. The grayed areas at both ends of the ruler indicate the page margins. The numbers on the ruler mark the distance from the left margin in both directions, left and right. Note the number 1, at the left edge of the ruler in Figure 4-39.
Word’s every-half-inch tab stops can work for many of your documents, but sooner or later, you may need to put a tab stop in a different place or change its style. No problem—it’s easy enough to do with the ruler.
Setting a new tab stop from the ruler is a two-step process:
Click the button on the left of the ruler to open the menu and choose the kind of tab you’re about to apply—Left, Center, Right, Decimal, or Bar.
Click the point on the ruler where you want to place the tab stop. An icon appears on the ruler showing the position and the type of tab stop.
If a tab stop isn’t exactly where you want it, you don’t have to delete it—just drag it to a new position on the ruler. If you wish to remove a tab stop, drag it up or down off the ruler, and it disappears. When you make these changes, your document shows the consequences. Any tabs in your text shift over to the next readily available tab stop, which can be a built-in tab stop or one that you’ve set.
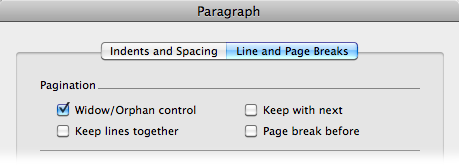
Some things just look wrong, such as a heading at the bottom of a page with no text beneath it. That heading should be at the top of the next page. Sure, you could force it over there with a page break, but that can cause trouble if you edit your text and things move around. You could end up with a page break in some weird spot. The solution is to adjust your Line and Page Break settings so that headings and paragraphs behave the way you want them to.
Open the Paragraph box (Option-⌘-M) and, at the top, click Line and Page Breaks (Figure 4-40). The line and page break behavior becomes part of the paragraph’s formatting and travels with the text no matter where you move the text or breaks.
Widow/Orphan control. Single lines abandoned at the top (widows) or bottom (orphans) of the page look out of place. Turn on this checkbox, and Word keeps the whole family, er, paragraph together.
Keep with next. Certain paragraphs, like headings, need to stay attached to the paragraph that comes immediately after them. Choose the “Keep with next” option for your headings, and they always appear above the following paragraph.
Keep lines together. Sometimes you have a paragraph that shouldn’t be split between two pages, like a one-paragraph quote or disclaimer. Use this option to keep the paragraph as one unit.
Page break before. Use this command with major headings to make sure new sections of your document start on a new page.
Every character in your document is formatted. The formatting describes the typeface, the size of the character, the color, and whether or not the character is underlined, bold, or capitalized. It’s easy to change the formatting, and Word gives you quite a few different ways to do it. The easiest and most visual way is with the ribbon (Home | Font). You can further fine-tune the font formatting using the Font dialog box (⌘-D).
Whichever method you use, formatting is a two-step process. First, tell Word which text you want to format by selecting it. Then format away. Or, you can set up your formatting options first, and then begin to type. Your letters and words will be beautifully formatted from the get-go.
One of the most common ways to apply bold or italics to words is to use shortcut keys. You’re typing along and know that you want the next word to be italicized, so you hit ⌘-I before you type the word to turn italics on. You type the word and then hit ⌘-I again to toggle off the italics. This method works for bold (⌘-B), italics (⌘-I) and underline (⌘-U).
Here’s a list of some more keyboard shortcuts that come in handy:
Table 4-1. Common formatting shortcut keys and their uses
|
Command |
Keyboard Shortcut |
Description |
|---|---|---|
|
Font |
⌘-D, ⌘-Shift-F |
Opens Font box. |
|
Bold |
⌘-B |
Toggle bold on and off. |
|
Italic |
⌘-I |
Toggles italics on and off. |
|
Underline |
⌘-U |
Toggles underline on and off. |
|
Double Underline |
⌘-Shift-D |
Toggles double underline on and off. |
|
Strikethrough |
⌘-Shift-X |
Toggles strikethrough on and off. |
|
All Caps |
⌘-Shift-A |
Toggles all caps on and off. |
|
Small Caps |
⌘-Shift-K |
Toggles small caps on and off. |
|
Change Case |
⌘-Option-C |
Toggles between upper, lower and sentence case. |
|
Grow Font |
⌘-Shift-. |
Increases font size. |
|
Shrink Font |
⌘-Shift-, |
Decreases font size |
|
Subscript |
⌘-= |
Toggles subscript on and off. |
|
Superscript |
⌘-Shift-= |
Toggles superscript on and off. |
Since character formatting is one of the most often used Word features, Microsoft put the most popular settings right on the Home tab. If you don’t see what you’re looking for there, then you must open the Font dialog box. The good thing about the dialog box is that it puts all your character formatting options in one place so you can quickly make multiple changes. It’s one-stop shopping if you want to change the typeface and the size, and add that pink double-underline.
Here are the steps:
Select a group of characters, as shown in Figure 4-41.
You can use any of the selection methods described on Natural (and Un-Natural) Selection. You can drag to select a single character. You can double-click to select a word. Or you can move the mouse cursor to the left side of a paragraph, and then double-click to select the whole paragraph.
Of course, if you haven’t typed anything yet, you can always go right to the ribbon and make your formatting choices first. Then type away.
Figure 4-41. The Font group on the Home tab holds most of the common character formatting commands. Choices you make here apply to text you’ve selected (like the word “sights” in this example). If you don’t see the command you need, in the lower-right corner, click the dialog box launcher to open the Font dialog box (Figure 3-42).
Go to Home | Font or the Font box (⌘-D) and make your formatting choices.
Many of the buttons in the Font group act like toggles. So, when you select text and click the underline button, Word underlines all the characters in the selection. When you click the underline button again, the underline goes away.
If you can’t find the command you want on the ribbon, or if you want to make several character formatting changes at once, then open the Font box (Figure 4-42).
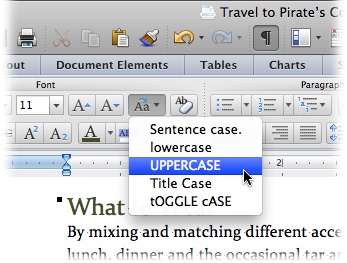
Any letter can be uppercase or lowercase, but when you get to words and sentences, you find some variations on the theme. It’s not unusual to have a heading or a company name where all the letters are capitalized. Sentences start with an initial cap on the first word only, and titles usually have the major words capped. In an effort to automate anything that can possibly be automated, Microsoft provides the Change Case menu (Home | Font→Change Case) on the ribbon (Figure 4-43).
The Change Case command defies the usual rules about selecting before you apply character formatting. If you don’t select anything, Word assumes you want to apply the Change Case command to an entire word, so the program selects the word at the insertion point. If you’ve selected text, the command works, as you’d expect, only on the selection.
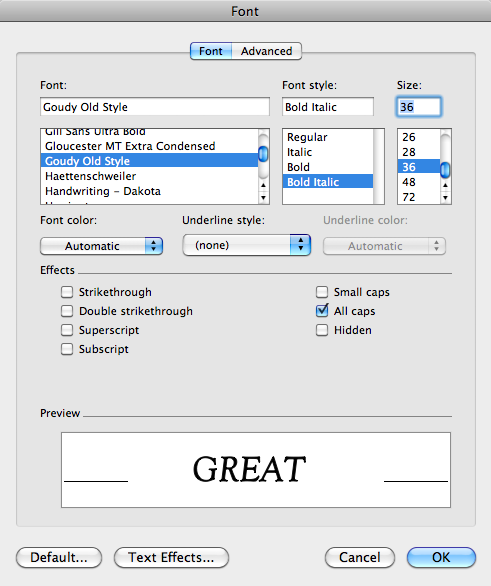
Small caps (Figure 4-44) are another variation on the capitalization theme. You won’t find this option on the Change Case button; for small caps you have to use the Font dialog box, which you find on the right side under Effects (where underline or strike-through are). Small caps are great for headings and letterhead (especially if you’re a lawyer or an accountant), but you wouldn’t want to use them for body text. It’s difficult to read all capitalized text for an entire paragraph.
If you really want to dig deep into typographic topics, open the Fonts box (⌘-D) and click the Advanced tab. Using the settings in this panel you can adjust character spacing and kerning. You can add ligatures to your type and choose old style number forms.
Character Spacing is often called tracking by typographers. You can set the spacing to Condensed or Expanded and then enter a measurement in points in the By box. Dramatic changes make body text hard to read, but used moderately, it can make your text more attractive. Character spacing is sometimes used to give headings, logos and other design elements distinctive appeal.
Character Position, otherwise known as baseline shift, sets the vertical character position. This adjustment comes in handy when writing chemical formulas or using the trademark (™) symbol. Use the up- and down-arrow button on the Position line to adjust the amount of shift while you watch the Preview panel.
Kerning fine-tunes the distance between two specific characters and it’s usually reserved font sizes. If you turn on the “Kerning for fonts” checkbox and set the “Points and above” box for the size of text you want to affect, Office subtly adjusts the character spacing between each pair of letters for an even appearance. For example, applying kerning to the word TAP reduces the space between the T and the A, making the letter spacing appear more consistent.
Ligatures are pairs of letters that share common components when printed next to each other. Scribes writing with pen and ink in the Middle Ages originally created ligatures to save space on the parchment and increase writing speed—just like when you cross two “t’s” in a word at once.
Number spacing controls how much horizontal space each number takes. When set to tabular, all numbers use the same amount of space, making it easier to line up columns of numbers. When set to Proportional, the number 1 takes up less space than the number 9—just as some text characters take more horizontal space than others.
Number forms makes subtle changes to the vertical position of numbers. Set to lining, the bottoms of all numbers sit on the baseline. Set to Old Style, some numbers drop below the baseline.
Stylistic sets are a feature of some advanced font sets such as calligraphic style swashes and flourishes. This menu lets you choose stylistic sets when they’re available.
Get Office 2011 for Macintosh: The Missing Manual now with the O’Reilly learning platform.
O’Reilly members experience books, live events, courses curated by job role, and more from O’Reilly and nearly 200 top publishers.

