Notebook Layout View
From its binder-like appearance to its ability to take “dictation,” Notebook Layout view is Microsoft’s attempt to let your computer work as you do. To that end, they designed something where you can take notes quickly and rearrange them as you wish.
Opening Your Notebook
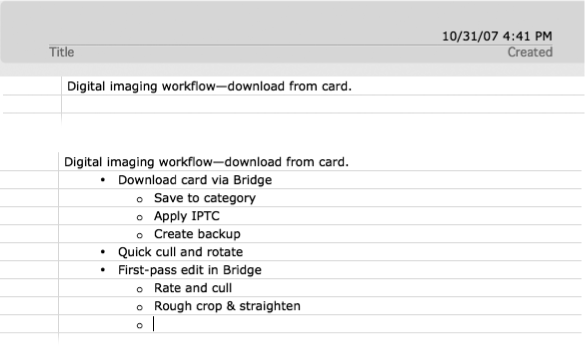
Choose File → Project Gallery, click the Word Notebook icon, and begin typing. Each new block of text starts out as Note Level 1, as you can see by a quick glance at the Formatting Palette. By hitting Tab, you can indent text under a heading to indicate that it applies to, and should be grouped with, that header, as shown in Figure 6-1. This is great stuff when taking notes in class, at a meeting, or just capturing concepts from your head. Additionally, you can click the little button to the left of each block of text and move it wherever you want on the page.

Figure 6-1. Top: As you type into a freshly created Notebook document, text flows onto the page automatically set to Note Level 1. Bottom: After you finish the sentence or thought, press Return, and then Tab, to indent the next section of text, shown at center. Pressing Shift-Tab moves the indent back toward the left—promoting the line to a higher level of importance.
If you already have a non-Notebook Word document in front of you, select View → Notebook Layout to open Notebook Layout view. Alternately, you can click the Notebook Layout view ...
Get Office 2008 for Macintosh: The Missing Manual now with the O’Reilly learning platform.
O’Reilly members experience books, live events, courses curated by job role, and more from O’Reilly and nearly 200 top publishers.

