The first thing to do with a completed document—or even a document you’ve just started—is to save it onto your hard drive, preserving it in case of an unforeseen system crash or accidental surge-suppressor power-switch toe-press. However, if you’re still not in the habit of pressing ⌘-S every few sentences, paragraphs, or minutes, Word’s AutoRecovery feature may save your hide.
Tip
If you have more than one Word document open at a time, press the Shift key as you choose File → Save. The Save command becomes Save All, which saves the changes to all open documents one by one. When you press Shift, you’ll also notice that Close becomes Close All.
At preset intervals, Word saves the current document into a separate AutoRecover file. If your Mac freezes, crashes, or blacks out in a power failure, the AutoRecover file opens automatically. Once you’ve recovered, if you’re satisfied that the Recovered file is the most recent and the one you want to keep, save it under a new name and continue working. (The file under the old name is the document as it was when you last carried out a real Save.)
Although AutoRecover runs in the background as you work, it produces a momentary and detectable slowdown. In other words, you want Word to save often, but not too often. To set the AutoRecover interval, choose Word → Preferences, and then click the Save button. Under “Save options,” turn on the Save AutoRecover checkbox and enter a preferred number of minutes in the adjoining box.
The first time you save a document, or anytime you choose File → Save As, you open the Save dialog box (see Figure 1-10). The first thing to do is choose a folder for storing your newly created document. Next, click in the Save As box (or press Tab so that it’s highlighted) and then name your document. (You certainly can do better than Document1.) Use the Format pop-up menu below to save your document into a different word processing file format, if you like.
Tip
If you frequently save documents in the same format, you can change the preferred format setting so that you don’t have to choose your document format every time the Save As box appears. Click the Options button in the Save As dialog box, which is a shortcut to the Word → Preferences → Save panel. There you’ll find a pop-up menu called “Save Word files as,” which lets you specify the format you prefer.
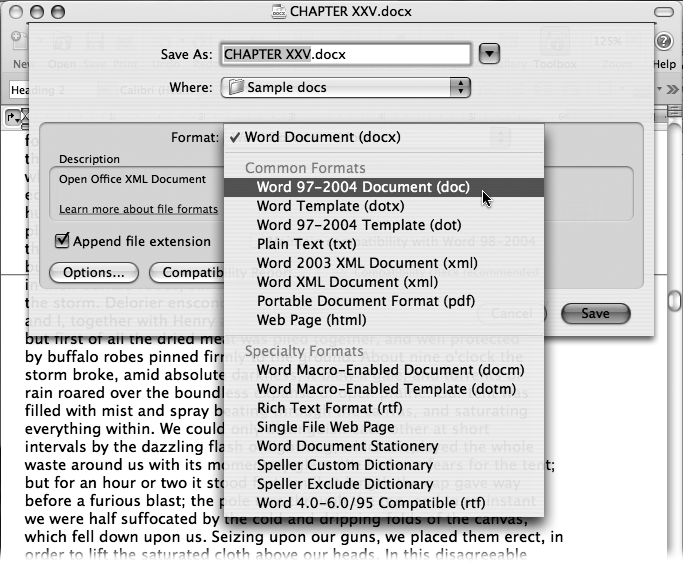
Figure 1-10. Word can convert your document into many formats. If you save it as a “Word document (docx)” (the proposed choice), then only the most recent versions of Microsoft Word—specifically Word 2008 (on the Mac), or Word 2007 (Windows)—can open it without any conversion or translation. If you’re exchanging documents with others, and you’re not certain they have the latest version of Word, Word 97-2004 Document (doc) is the most likely to be readable in any version of Word on any computer.
Finally, you’ll generally want to leave the “Append file extension” checkbox turned on. It tacks a three-or four-letter extension (.docx for standard Word files, .doc for Word 97-2004 files, and so on) onto your file names. Although you don’t need to see these odd letters, they help computers identify the files. You can hide these suffixes, if you like, either globally in Mac OS X (choose Finder → Preferences) or on a file-by-file basis (highlight the file, choose File → Show Info, and choose Name & Extension from the pop-up menu). The appropriate extension-hiding controls appear before you.
Tip
It’s a good idea to run a compatibility report if you’re sending the document to people using a different version of Word. Do so by clicking the Compatibility Report button at the bottom of the Save As dialog box. Word runs a compatibility test and serves notice if it finds any issues. (You can do the same thing from the Compatibility tab of the Toolbox. For details, see Chapter 18.)
No discussion of saving would be complete without a word about backing up your work. Saving preserves your document in its current condition; backing up creates an additional, extra copy of the same file. For an extra measure of security, you can place this extra copy on a USB flash drive, an external hard drive, or even your electronic iDisk (see Mac OS X: The Missing Manual) in case something goes wrong with the copy on your Mac’s hard drive.
Word can create backup copies automatically. Here’s the process:
Choose File→ Save As and click Options.
You can also access this tab of Save options by choosing Word → Preferences → Save button.
Turn on the “Always create backup copy” checkbox and click OK. Click Save.
Word saves both the current document and an identical backup copy in the same folder; the duplicate has “Backup of” in front of its file name.
From now on, Word will automatically update the backup whenever you save the original document, providing a useful “last saved” version.
Get Office 2008 for Macintosh: The Missing Manual now with the O’Reilly learning platform.
O’Reilly members experience books, live events, courses curated by job role, and more from O’Reilly and nearly 200 top publishers.

