As shown throughout this book, WinAmp and other MP3 players can be “costumed” with alternate interfaces called “skins.” Because skins are merely collections of bitmap images with pre-specified names and sizes, skins are not tied specifically to WinAmp, or even to Windows. While WinAmp is by far the most common place to find WinAmp skins in use, you’ll also find MP3 players for Mac OS, BeOS and Linux that wear WinAmp skins. In addition, there other MP3 players out there with even more radical interfaces (such as Sonique and K-Jöfol) that also wear skins. Note, however, that these players don’t wear WinAmp skins; see their sites for availability of skins for those players.
There are a number of large skin repositories on the Internet. The definitive collection is on WinAmp’s own site, at http://www.winamp.com/skins/. There you’ll find nearly 3,000 downloadable skins made by WinAmp users like yourself, categorized into groups like “Computer,” “Game,” “Stereo,” “Anime,” and even “Ugly” (and believe me, some of them deserve their place in that category). You’ll probably find the highest quality skins in the “Best Skins” category, a group that has been selected by WinAmp employees for their finesse and professional look. There are (at this writing) three other notable skins sites out there: http://www.1001winampskins.com is a site run by WinAmp fans for other fans (not connected to NullSoft), while http://www.skinz.org and http://www.customize.org offer skins for dozens of products, not just WinAmp (though their WinAmp skins collection is smaller than that of the other two sites).
Each skin collection arrives as a single zip file, and becomes
accessible to WinAmp simply by living in the skins directory
specified in the WinAmp preferences (which by default is in
C:\PROGRAM FILES\WINAMP\SKINS). If you have an
older version of WinAmp, you’ll need to unzip each collection
into a subdirectory of the skins directory. For example, a skin
archive called “Evo” might need to be decompressed in
C:\PROGRAM FILES\WINAMP\SKINS\EVO. However, if
you’re using WinAmp 2.04 or higher, you don’t need to
unzip the archive at all, since WinAmp is smart enough to unarchive
the files it needs on the fly (there is no noticeable performance
penalty for doing this).
Warning
If you do choose to decompress your skins, note that many skin authors carelessly zip up their collections without also zipping the parent directory, which means you can easily overwrite skin components of the same name if you don’t manually create an appropriate subdirectory first. If you use WinZip, a good way to do this is to right-click the zip archive and select “Extract To...” from the Context menu.
Once installed, skins can be activated by right-clicking anywhere in WinAmp’s interface and choosing Skin Selector from the context menu (tapping Alt+S will also bring up the Skin Selector). A panel will appear listing all installed skins. Single-clicking an entry will cause WinAmp’s interface to instantly adopt the new look. After donning a new skin, try enabling the WinAmp playlist and equalizer functions. Depending on how the author created the skin, these modules may or may not also take on the theme of the new skin. If skin components for these modules were not provided, they’ll appear with the default WinAmp look and feel.
Please note that some skins are distributed as shareware, rather than
as freeware. You should find a file called
readme.txt in each skin’s directory. If
the skin is shareware, it will say so in this file. If you like the
skin and decide to keep it, pay the author his or her due.
Note
If you have multiple operating systems installed on your computer, there’s no need to store the same skins collections multiple times. For example, since both BeOS and Linux can read Windows partitions, you may want to store all of your skins on your Windows partition and just create a symlink in your BeOS or Linux MP3 player directory called “skins” pointing to the location of your Windows skins directory. Of course you’ll need to make sure your Windows partition is mounted automatically at boot time if you want this technique to work transparently.
If you really want to call yourself a WinAmp pro, using other people’s skins won’t cut it—you’ve got to create a few of your own. While creating original skins can become tedious, time-consuming work—especially when you get into customizing regions and colors—the payoff can make the effort worth it. The only software you need is a good image editor, such as Adobe Photoshop, Paint Shop Pro, the GIMP (Linux and BeOS only), or something similar. You can even create skins in Microsoft Paint, though you’ll probably find Paint underpowered for the job.
Next, you’ll need to understand the purpose of each of the
.bmp files in a skins directory. While you can
use any skin as a starting point, the definitive collection of
templates can be downloaded as
Base.<version>.zip from http://www.winamp.com/skins. You’ll also find
a skin-creation tutorial at that site. Unpack
base.zip and you’ll find three type of
files inside: .bmp files, which are the actual
graphics that will comprise your skin’s interface;
.cur files, which are standard Windows cursor
files to be activated when the user’s mouse hovers over
different parts of the interface (ignored when the skin is used by
another operating system); and .txt files, which
can be customized to specify the colors of non-graphical elements and
transparency behaviors.
Warning
You do not need to edit—or even include—a version of every single file in this directory. The behavior of elements for any files you don’t include will be supplied by WinAmp itself. In other words, the default WinAmp interface is always present behind your creation.
Open the various .bmp files in your image
editor, and the purpose of each will become immediately
obvious—you’ll see fragments of familiar interface
elements in each one, while each file’s purpose is also
declared by its file name (Figure 4.8). For
example, volume.bmp displays a column of colored
horizontal glowing strips, representing the colors of the volume
slider as you move it right and left.
Titlebar.bmp likewise shows all possible
incarnations of the WinAmp titlebar (e.g., as it appears when
maximized, when in zoom mode, and with and without the visualizer
enabled). All you have to do is edit these graphics to your liking,
taking care to preserve their dimensions and division lines
precisely. Because many of the elements, such as the fonts in
text.bmp, may appear very, very small,
you’ll probably want to get familiar with your image
editor’s zoom (magnifying glass) function.
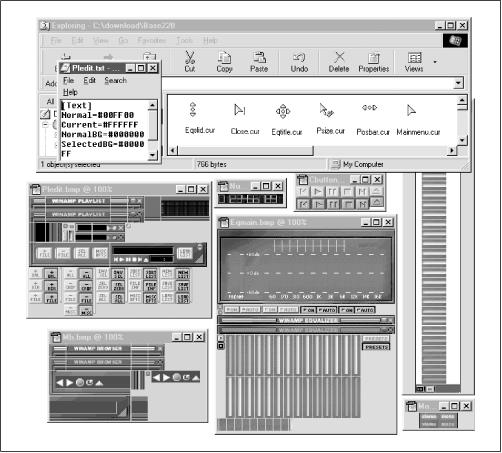
Figure 4-8. Bitmaps, base configuration files, and Windows cursors, all with specific filenames that must not change
Because just creating new bitmaps for every possible interface
element in WinAmp can be a huge job, most skin creators call it a day
after finishing the graphics portion. If you really feel like
gettin’ jiggy wid’ it though, you’ll want to dig
into the .cur and .txt
collections as well.
The .cur files used by WinAmp are standard
Windows cursor files, and can be generated in any number of Windows
shareware programs designed for the purpose. You may want to look
into the excellent Microangelo (http://www.impactsoft.com) for some serious cursor
customization action. You should be able to determine the purpose of
each cursor file by its filename; for example,
eqslid.cur is the cursor that goes into effect
when the mouse is using the equalizer’s sliders, while
volbar.cur takes hold when adjusting
WinAmp’s volume.
The most technical aspect of skin creation (and again, this is
totally optional) may be the configuration of specific aspects of
WinAmp appearance and behavior from the text-based configuration
files region.txt,
viscolor.txt, and
pledit.txt.
The easiest to edit of these files is
pledit.txt, which lets you control the fonts and
font colors used in the playlist panel. All values are expressed in
hexadecimal, a format that will be familiar to most web developers.
If you need a good reference of hexadecimal color values, search the
web for “netscape colors” or “hexadecimal
colors.” You’ll find both web pages and applications that
will help you look these up easily. The format of
pledit.txt is simply:
[Text]
Normal=#00FF00
Current=#FFFFFF
NormalBG=#000000
SelectedBG=#000080
Font=Arial
Where Normal is the font color of most song
entries, Current is the color of the selected
track, NormalBG is the color of the playlist
background, and SelectedBG is the background color
for the selected track. If you specify fonts here, keep in mind that
your users may not have this font on their system. If the specified
font is not found, the default font will be used.
viscolor.txt lets you control the colors being
used by the WinAmp visualization module. Unlike
pledit.txt, colors here are expressed as RGB
triplets (one value each for the red, green, and blue color values).
You can use Windows’ built-in color manager (right-click on the
Desktop, choose Properties, select the Appearance tab, and click
Colors → Other) to determine RGB triplets. There are 24 lines in
this file, each of which corresponds to an audio level threshold.
Experimenting with this file is probably the best way to get a feel
for which entries take effect at which audio thresholds. If you want
to keep track of your changes, you can succeed each line with a
comment:
24,33,41, // This corresponds to mid-volume signals
Perhaps one of the most interesting interface controls you have as a
skin developer is afforded by region.txt, which
lets you use masks to “carve out” regions of WinAmp to be
considered invisible. By using a system of X,Y coordinates, you can
tell WinAmp only to draw specific sections of the interface, and to
leave the rest transparent. The results can be dramatic. Working with
region.txt is somewhat more complex than working
with the other text files. The principle here is that you specify the
shapes of polygons by telling WinAmp how many points each polygon
has, followed by a series of X,Y coordinates for each polygon. Since
WinAmp’s dimensions are 275×116 pixels, the X coordinate
values can range from
to 274, and the Y values can range from
to 115. In order to determine the exact coordinate points you need,
you’ll want to find the tool in your image editor that reports
the exact coordinates beneath the mouse cursor. (In Photoshop, pull
down Window → Show Info.) WinAmp simply draws all regions that
fall within the polygons you’ve defined and leaves the rest
invisible. Open region.txt in the base skin
collection and you’ll see lines like this:
;NumPoints=4
;PointList=0,1, 275,1, 275,14, 0,14
Any line beginning with a ; is ignored, so to
enable any series of sample coordinates, just uncomment those lines,
save, and load the skin to see the effect. Of course, you’ll
probably want to define more than one polygon, but for ease of
development, just work on perfecting one polygon at a time (comment
out your perfected polygon and start a new one). Once all polygons
have been perfected, you’ll need to conjoin them all into a
single line, like this:
; NumPoints = 4, 4 ; In other words, define two squares
; PointList = 0,1, 275,1, 275,14, 0,14,   3,15, 272,15, 272,113, 3,113
; The space between the two sets makes the coordinate series easier to read.
See the comments in region.txt for further
details. If you don’t want any transparency in your skin, just
delete region.txt or make sure all of its lines
are commented out.
Note
Mac users! MACAST supports a skin format that is incompatible with WinAmp skins. Fortunately, this also means that MACAST users are not limited to the size and shape constraints of WinAmp skins. If you do want to use WinAmp skins with MACAST, you can download a tool called SkinConverter from http://www.solsticetechnologies.com/skinconverter/ that will do the job nicely. If you use SoundJam, you’ll find a copy of SkinConverter in the SoundJam installation directory—just drag WinAmp skins onto the SkinConverter icon and they’ll be transformed into SoundJam skins and placed automatically in SoundJam’s skins folder, ready for use.
Get MP3: The Definitive Guide now with the O’Reilly learning platform.
O’Reilly members experience books, live events, courses curated by job role, and more from O’Reilly and nearly 200 top publishers.

