Bill of Materials
Terminal (/Applications/Utilities)
Xcode Tools (/Developer)
icns Browser (/Developer/Applications/Utilities; installed as part of the Xcode Tools)
Image Composer (/Developer/Applications/Utilities; installed as part of the Xcode Tools)
Preview (/Applications)
iMovie (/Applications)
System Preferences (/Applications)
Calculator (/Applications)
TextEdit (/Applications)
Third-Party Software
Carbon Copy Cloner (http://www.bombich.com/software/ccc.html)
An image editor, such as Adobe Photoshop Elements (http://www.adobe.com)
Messing with icons is more than just a hobby; it’s a time-honored tradition on the Macintosh. From the earliest days of Mac OS, end users have altered, swapped, enhanced, and otherwise played with icons to give their applications, folders, and data files exactly the look they wanted.
Mac OS X continues the tradition of changeable icons, now with more photorealistic images. Large, full-color icons have replaced the tiny black-and-white Rorschach-like icons of OSes gone by, but the game remains the same: applications still define the look of their icons and the look of the documents they create and can open.
This chapter will show you the ins and outs of Mac OS X application and document icons. You’ll discover how the Finder selects which icon to display, how to associate applications with particular icons, and how to create your own custom icons.
As with past versions of Mac OS, each Mac OS X folder, file, and application has an intrinsic icon association. It’s the Finder’s job to use the file settings and its icon registry to select and display a particular icon. The Finder chooses icons based on a variety of factors, including the extension and creator (application) types. This section shows you how the Finder uses file extensions and creator codes to pick default icons.
Open a Finder window and take a look through the kinds of files found on your computer. You’ll probably see image files, documents, playlists, and programs. A quick peek is all it takes to distinguish one type of file from another. It doesn’t matter if you’re looking at the large images in the Finder’s Icon view, or smaller pictures in the List or Column view. The images reveal themselves at a glance.
Each file on your computer presents the world with visual clues. Bold, vivid icons often reveal a file’s type and its creator. Sometimes an icon offers a hint of a file’s contents. Even when files are essentially the same thing, such as text, they appear with distinct looks. In Mac OS X, the icons for plaintext files do not look like rich-text files, and both differ from Microsoft Word files.
The first and simplest factor for assigning icons is found in a file’s extension. Extensions such as .txt, .rtf, and .doc offer a basic distinction between file types. Extensions provide the most common way to differentiate file types for most computers. They’re used in Windows and Unix as well as on the Mac. The Finder uses these extensions when choosing icon representations.
It takes just a few seconds to see the Finder’s icon-association behavior in action. In these steps, you’ll build Desktop items via the command line and allow the Finder to select icons to display based on file extensions:
Launch the Terminal application (/Applications/Utilities) and size the window so you can see both the command line and the Desktop at the same time. If other application windows are open, Option-⌘-click on the Terminal’s Dock icon to hide all of the other applications. That way, you’ll have a clear view of the Terminal window and the Desktop beneath.
Move to your Desktop directory:
$
cd ~/DesktopYou’re about to create some new files. Creating them on the Desktop allows you to see each new item as it appears.
The
touchcommand allows you to create a new, empty file with a filename you specify. Usetouchto create the files foo.txt, foo.rtf, and foo.doc, as follows:$
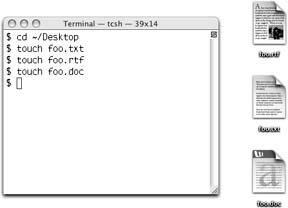
touch foo.txt$touch foo.rtf$touch foo.docThe three new files appear on the Desktop, each using an automatic icon association based on its extension.
Now take a look at the icons for the files you just created; they’ll look like those shown in Figure 4-1. (The icon for foo.doc may vary from the one shown if Microsoft Word isn’t installed on your computer.)
These three icons are associated with TextEdit (using plain text), TextEdit (using rich text), and Microsoft Word.
It would be all well and good if each file extension told you exactly which program created it and could edit or view it. In the real world, many file extensions are quite common, and many are associated with a wide array of applications. Take image files, for example. An application such as Photoshop can create standard Photoshop files (.psd), and can export image files in a variety of formats, including JPEG (.jpg), TIFF (.tif ), and PNG (.png). Extensions such as .jpg, .tiff, .aiff, .mp3, and .html may occur over and over again, and yet the Finder somehow figures out which application goes with which file and produces an icon to match.
The key lies in creator types. The Finder uses creator types to choose which icon to place on an otherwise indistinguishable file. Creator types are stored in each file’s metadata, the information stored by Mac OS X about each file. Among other things, creator types help the Finder know which application to launch when you double-click a file. As Figure 4-2 shows, a Safari JPEG file icon appears distinct from a JPEG file created in Photoshop Elements. Each automatically opens in a different application. The six images shown here will open in Safari, Preview, Adobe Photoshop Elements (top row), QuickTime, Microsoft Internet Explorer, and iPhoto (bottom row). The iPhoto JPEG defaults to a blank document because the application does not define a specific icon association for JPEGs.
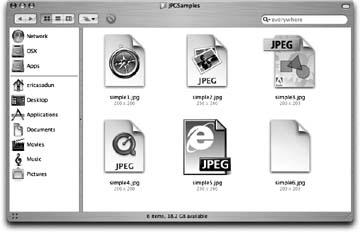
Figure 4-2. Icons indicate the application and file types associated with these otherwise identical JPEG images.
Creator types are defined by the application itself. Each application has a unique four-letter, case-sensitive code signature. This code is stored in the package bundle in two places. The first occurrence can be found in the PkgInfo
file, and is composed of the fifth through eighth letters of that eightcharacter file. The second is found in the Info.plist file, as the value associated with the CFBundleSignature key. For example, iTune’s code (rather sinisterly, in my opinion) is hook, Mail’s is emal, QuickTime’s is TVOD, and so forth. These codes are registered with Apple and are guaranteed (when registered properly) unique.
The Finder uses creator codes to build its icon registry. It then uses the registry and a file’s creator type to resolve overlapping extensions. When there’s a conflict, it matches a file’s creator type to its application and uses the icon assignments from that matching application bundle.
In the following steps, you’ll create a JPEG file and associate it with popular applications. This example allows you to see how you can assign files to specific applications.
Launch the Terminal application and change directories to your Desktop:
$
cd DesktopUse
touchto create a new, empty file with a JPEG extension:$
touch simple1.jpgA new file appears on your Desktop using the default icon for a JPEG file, which is probably Preview.
Use the
GetFileInfocommand to view the current creator code:$
GetFileInfo–c simple1.jpgGetFileInforeturns “”, indicating that there’s no intrinsic creator code. The-cflag tellsGetFileInfoto return the creator code, but since the JPEG file was created with thetouchcommand, there is no application of record associated with that file’s creation. (Remember, when a creator code is assigned, the code is a four-character string.)The
SetFilecommand (/Developer/Tools) can be used to add a creator code to a file. For example, we could useSetFileto turn the simple1.jpg file into a Safari document with the following command:$
SetFile–c sfri simple1.jpgThe icon changes, displaying the Safari compass. (You may need to click on the Desktop or on the icon itself to encourage the Finder to update the icon.)
Check the creator code again;
GetFileInforeads the updated file and returns its creator code:$
GetFileInfo–c simple1.jpg"sfri"Now change the creator code once more. Set the creator code to MSIE, the code used by Microsoft’s Internet Explorer:
$
SetFile–c MSIE simple1.jpgAgain, the file’s icon changes, this time to Internet Explorer’s gray document with a large white “e”.
Double-click the newly assigned icon. If Microsoft Internet Explorer is not already running, the program launches. The creator code tells the Finder which application to run, and Internet Explorer will attempt to load the JPEG file, but given that it’s an empty file, IE will just display an empty browser window.
Get Modding Mac OS X now with the O’Reilly learning platform.
O’Reilly members experience books, live events, courses curated by job role, and more from O’Reilly and nearly 200 top publishers.

