Next to using a different background for your Desktop or adding a new screensaver, one of the easiest changes you can make to your Mac is to update the appearance of your Finder windows. No matter what Finder view you’re using (Icon, List, or Column), you can set background colors or images to be used in the Finder views and apply them to individual Finder windows, or across the board to every Finder window you open.
These steps walk you through the process of setting a custom image.
Start by selecting a fairly desaturated image. A good image will have lots of white in it; this helps you see your icons and text over the picture. Pick an image that isn’t too big (say, up to 640 or 800 pixels at its largest dimension).
Open a Finder window and navigate to the folder whose background you want to change. Open that folder and display its contents using the icon view (View → As Icons, ⌘-1).
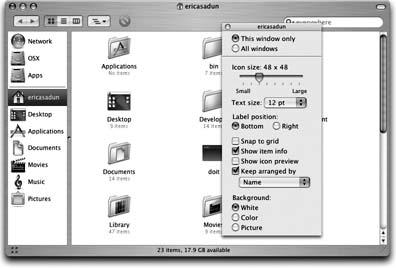
Select that Finder window and choose View → Show View Options (⌘-J). A small floating window appears, as shown in Figure 1-18.
Select the “This window only” radio button. For this example, you don’t want to add your picture to every Finder window. However, if you find that you like the change you’ve made, you can always come back here and change the setting so the picture gets applied to all Finder windows.
At the bottom of the floating window is the Background section. Here you’ll see three radio buttons: White, Color, and Picture. Select the radio button next to Picture. A “Select…” button appears to the right of this option. When you click on the Select button, the Select a Picture dialog window opens and takes you to your Pictures folder by default.
Figure 1-18. The floating window shown here lets you customize many of the features of the selected Finder window.
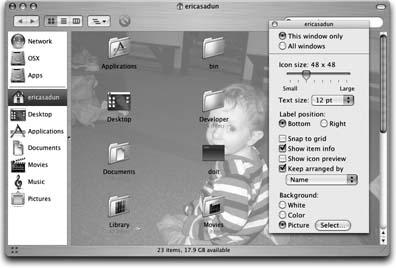
Using the Select a Picture dialog, navigate to the picture you want to use as the background for the Finder window, and click on the Select button. Wait a second or two until your selected picture appears in the window background (Figure 1-19).
Other available options in the View Options window include:
- Icon size
Use this slider to adjust the size of your icons from small (16 x 16) to large (128 x 128). Large icons are particularly useful for pictures because they provide a great preview for the files they represent.
- Text size
Use this selector to choose the font size for your file and folder labels.
- Label position
Labels can be placed below the icon (traditional) or to the right.
- Snap to grid
A favorite option of mine, this feature keeps your windows tidy. Folders and files snap automatically to an invisible grid. Icon size sets the spacing used.
- Show item info
This option adds an item count to folders, letting you know which are empty (0 items) and which are particularly full (128 items, for example).
- Show icon preview
Check this option to add small graphic overviews to image files that do not otherwise contain thumbnails. For example, if you enable this option on the Pictures folder, all of the icons for any image files within will change to reflect the actual image.
- Keep arranged by
Sets how the items in the Finder view are sorted. You can arrange by name, by date modified, by date created, by size, by kind, and (new to Panther) by label.
Get Modding Mac OS X now with the O’Reilly learning platform.
O’Reilly members experience books, live events, courses curated by job role, and more from O’Reilly and nearly 200 top publishers.

