Inserting Frame Members
The process for inserting frame members can be broken down into three basic steps. You select the frame member profile (this comes from Content Center), select the placement geometry for placing the frame members, and then adjust the orientation of the frame members.
Specifying a Structural Shape
The left side of the Insert dialog box, shown in Figure 15.5, has a series of drop-down fields for specifying the structural shape.
FIGURE 15.5: Frame Member Selection group
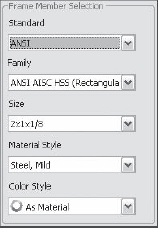
You use the Standard, Family, and Size fields to select the member from Content Center. These fields are progressive, and the update behavior varies. If you ...
Get Mastering Autodesk® Inventor® 2012 and Autodesk® Inventor LT™ 2012 now with the O’Reilly learning platform.
O’Reilly members experience books, live events, courses curated by job role, and more from O’Reilly and nearly 200 top publishers.

