Star Office is a freeware gem. It is an âoffice suiteâ of productivity applications, with file formats compatible with Microsoft Office applications. Star Office includes an email client, Star Mail, which supports IMAP. Star Office is free to private, non-commercial users and students. In addition to its native Windows 95/98/NT operating environment, Star Office is also available for other operating systems, including OS/2, Linux, and Solaris.
Star Mail is a component of the Star Office Suite and cannot be installed separatelyâif you want to use Star Mail, you have to install the whole Star Office Suite. That could be problematic if youâre low in disk spaceâthe Star Office download for Windows is 80 MB; installed, it requires around 160 MB of disk.
The interface is somewhat non-intuitive to those who are regular users of Microsoft products. While this is not necessarily a liability, expect some users to encounter a slight learning curve over the first few times they use the interface.
For more information or to download a free copy of Star Office, visit http://www.sun.com/products/staroffice/.
Star Mail is one of the few IMAP clients that, at the time of this writing, provides client-side filtering.
Remote address book feature allows you to search Bigfoot, WhoWhere, and Switchboard, but not your own siteâs LDAP directory.
In addition to standard searching of message headers, Star Mail permits searches through levels of nested folders.
To avoid wasting time downloading large messages, Star Mail allows the user to set a threshold on the size of messages and attachments. If the user attempts to open a message exceeding that threshold, he will be warned and asked whether to cancel the action or continue.
If you are running Star Office for the first time, it may come up in full-screen mode. If you prefer to run Star Office in a window, then press Alt-V to bring up the View menu and unselect âFull Screen.â
Star Mail works great with both Cyrus and UW servers and does not require any special configuration, such as specifying the folder path, to support the server namespace.
The configuration required to set up new IMAP accounts is somewhat more complicated than it should be. More steps are required to configure it than are needed to configure the other clients evaluated in this chapter. When we attempted to send mail for the first time after configuring the client, the send failed with an error message that was less than informative. We eventually found out that, in order to send mail out, you must first create an âoutboxââitâs not automatically created for you.
Follow these steps to set up your IMAP options in Star Mail:
Pull down the Tools menu and select the Options. On the Options menu, select Internet (click on the + sign to expand the list of Internet options).
Click on Mail/News. Youâll see the Mail/News configuration window, shown in Figure 4-1 .
Enter the full address of your outgoing SMTP host in the Outgoing Mail field.
Enter the full address of your IMAP server in the Incoming Mail field.
Enter your IMAP username and password in the User ID and Password fields.
The other information is optional to configure for IMAP. Click OK when youâre done entering the information.
At this point, youâve done the preliminary configuration, but thereâs still a bit of configuration to do before you can read your mail. Follow these steps to complete the configuration and read your IMAP mail:
Bring up the Star Mail client, which is located in the Star Explorer menu window. To bring up the Star Explorer menu window, pull down the View menu and select âExplorer.â If it is already selected (i.e., if it has a check mark next to it on the View menu) but you canât see the Explorer menu window, then the window is minimized. To expand the window, click on the small bar near the top lefthand side of the Star Office window.
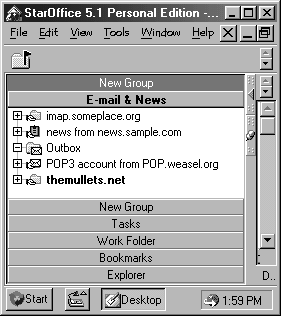
Next, bring up the Star Mail client by clicking on the E-mail & News bar, as shown in Figure 4-2 . The clientâs menu will be blank if youâve never used it before.
You will need to create a new IMAP Account. Begin by right-clicking on the blank background under E-mail & News to bring up the menu.
Under the New menu, select IMAP Account... to bring up a window titled Properties of IMAP Account.
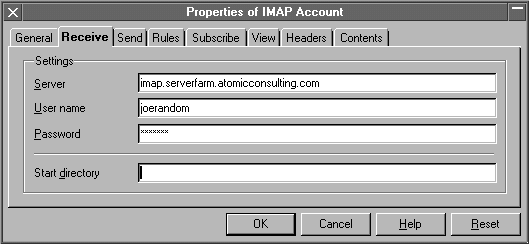
Click on the Receive tab. You will see a window that looks like Figure 4-3 . If you configured your mail options as described in the beginning of this section, then the values should already be filled in. You shouldnât have to change any of the valuesâjust click the OK button to create the IMAP account.
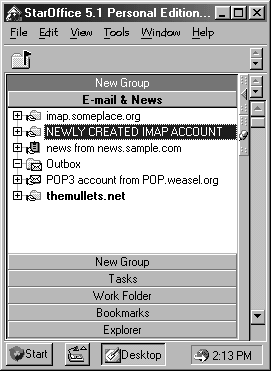
The new IMAP account will appear in the Star Explorer window, as in Figure 4-4 . Click on the + sign to connect to your IMAP server and retrieve your messages.
Get Managing IMAP now with the O’Reilly learning platform.
O’Reilly members experience books, live events, courses curated by job role, and more from O’Reilly and nearly 200 top publishers.

