Chapter 1. What’s New in Leopard?
Long before releasing Mac OS X Leopard, Apple offered a preview to developers and also posted some information about Leopard’s top features on the Mac OS X web site (http://www.apple.com/macosx/leopard). But just in case you missed the big list of features, here’s another rundown of what’s in store for you:
Time Machine provides a way for you to quickly, easily, and regularly back up all of the data on your Mac. Delete a file unintentionally? No worries—just launch Time Machine and you can get the file back from your last backup.
Mail boasts new features such as integration with iCal for to-do lists, and offers a set of email templates that you can use for the messages you send.
The new iChat features Photo Booth-like image and video features, which allow you to apply a filter to your image in video chat sessions.
Spaces adds a new dimension to your Mac by providing you with virtual desktop spaces for managing your applications and open windows.
Stacks lets you quickly look inside folders placed in the Dock.
Spotlight helps you find stuff quickly and easily by indexing and cataloging content in all of the files on your system. Spotlight’s search capabilities are built into the Finder, System Preferences, and many applications, including Mail and Address Book.
iCal has received a major facelift in Leopard, and has better integration with Mail for things like To-Dos and managing appointments.
Leopard’s Accessibility features continue to be refined with things like resolution independence, in which you can zoom in on something, and the image and text will look just as crisp as they did at normal size.
Core Animation is a new graphics programming layer that Apple provided for developers. Core Animation uses your Mac’s graphics processor (known as the GPU, similar to your computer’s CPU) to quickly render graphics in the user interface.
Some additional features you’re bound to find useful include:
Parental Controls lets you manage users and restrict their access to things (for example, by allowing them to view only administrator-approved web sites or controlling with whom they can chat over iChat).
VoiceOver provides powerful accessibility features for persons with physical disabilities.
Safari continues to improve, and with Leopard, it now supports RSS and Atom syndication protocols, automatically letting you know that a site has a news feed you can subscribe to. When you visit a web site with an RSS/Atom feed, a blue RSS icon pops up in Safari’s address bar; click the RSS icon to see the site’s feed.
.Mac Sync enables you to keep valuable data on Macs, portable devices, and .Mac accounts up to date.
Xcode 3.0 provides sweeping changes for the way programmers develop applications, allowing them to create apps more quickly and take advantage of new Apple technologies, such as Core Animation.
Tip
If you’re a developer and you’re interested in learning more about the new APIs for Leopard, you should visit the Apple Developer Connection (ADC) web site, at http://developer.apple.com.
More power to Unix with an improved kernel for more speed, 64-bit enhancements for Macs with Core 2 Duo and Quad Core processors.
Changes to old standby apps like Address Book, iCal, iSync, iChat, etc.
Lots of little enhancements and lots of big improvements, including a major overhaul to the Finder.
Whew! And that’s just for starters! In total, Apple boasts more than 150 new features have been added to Mac OS X Leopard, and while some might not be so evident from the surface, you’ll definitely find little gems along the way. Whether it’s a vast speed improvement in Leopard’s startup time or some seemingly minor new feature for your favorite application, Leopard has something to make all Mac users purr.
Cool New Features in Leopard
Here’s a quick look at some of the new features added to Mac OS X Leopard.
A New Finder
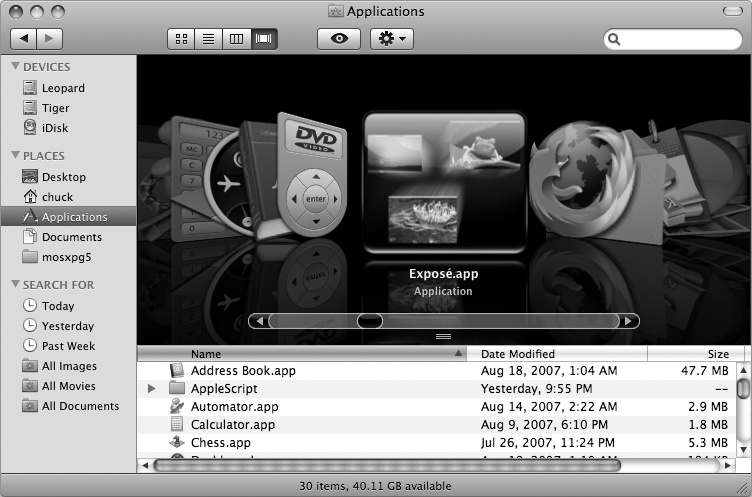
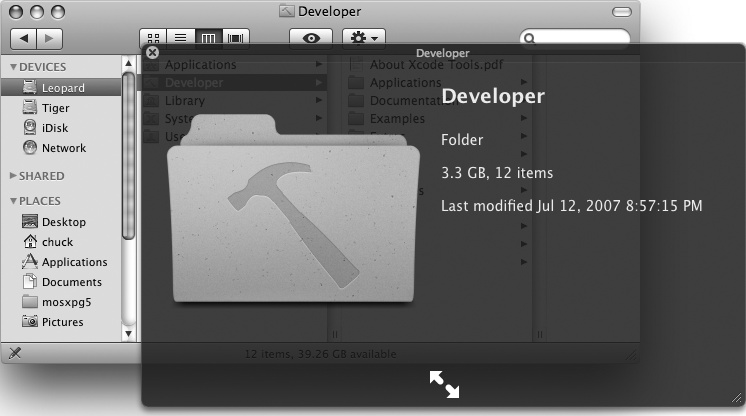
So, let’s get right down to it: we finally get a new, improved Finder. The Finder saw some minor changes in Mac OS X Tiger, but with Leopard, it takes on a whole new look and feel. The Sidebar has changed (as shown in Figure 1-1), Spotlight searching has been integrated better than in the past, and new features such as Quick Look and Cover Flow have been added.
The new Finder is lighter, faster, better, and it totally rocks compared to the Finder in earlier versions of Mac OS X. For more information on the Finder, Quick Look, Cover Flow, and searching with Spotlight, see Chapter 3.
Time Machine
If you’ve been following the Mac OS X Leopard hype, you’ve no doubt heard lots about Time Machine, which lets you back up your Mac and retrieve files that once might have been lost. Time Machine keeps hourly backups for the last 24 hours, daily backups for the past month, and weekly backups until your backup disk is full. When your backup disk is full, Time Machine drops the oldest backup to free up space for a new one.
Warning
You shouldn’t back up to another partition on an internal drive. If that drive fails, all of your data—and your backup from Time Machine—is lost.
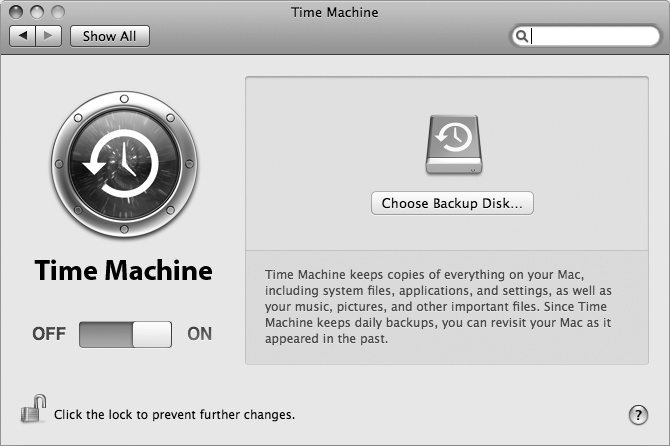
To use Time Machine, first you need to turn it on and configure the settings for where your backups will be stored, and for what you would like to have backed up from your Mac. To do this, click the Time Machine icon in the Dock, or go to System Preferences → Time Machine and move the slider from Off to On, as shown in Figure 1-2.
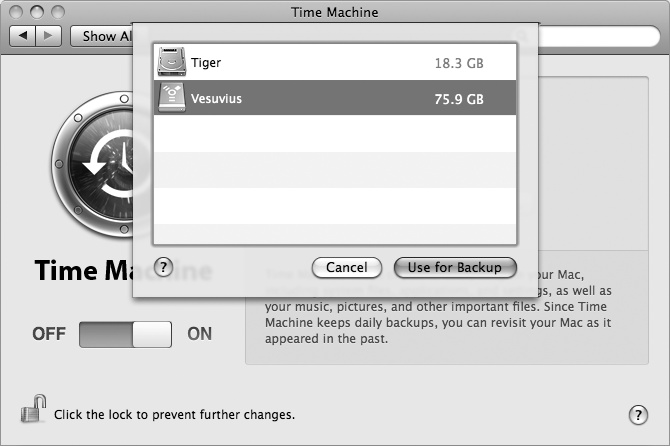
The next step in the process is to click the Choose Backup Disk button and select an external drive that you’ll back up your data to, as shown in Figure 1-3.
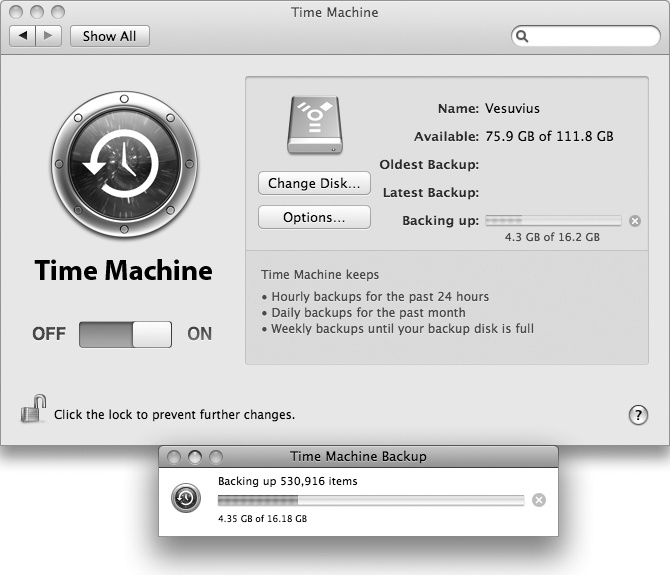
The first backup (shown in Figure 1-4) will take longer than future backups, mainly because Time Machine backs up everything at first, and then only the files that have changed, or have been added or deleted in future backups.
Once the data on your Mac has been backed up to an external or networked drive, you can search for files from previous backups by clicking Time Machine’s icon in the Dock. When you click this, your Desktop disappears and you’re taken into space as Time Machine comes to the front (shown in Figure 1-5).
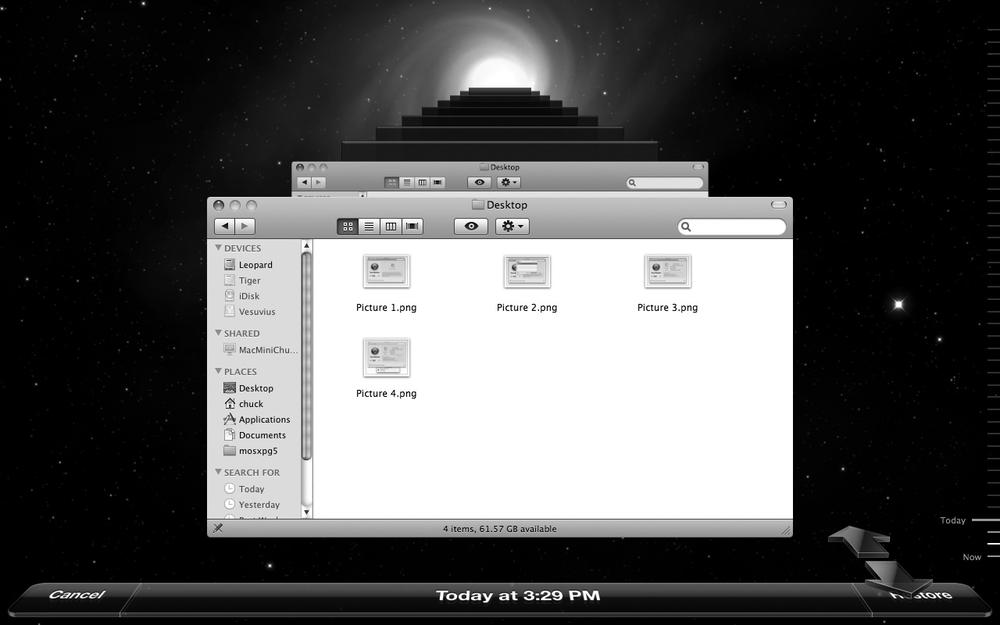
If there is a file you want to restore, simply locate the file in one of your backups by clicking on the arrows to the right. Once you’ve found the file, select it with the mouse and then click Time Machine’s Restore button (to the far right along the bottom of the screen), and the file will be restored to that location on your hard drive.
Time Machine makes it really simple for you to back up the data on your Mac. You just let Time Machine run in the background, or whenever you connect your MacBook or MacBook Pro to an external drive, and it does all the work of backing up your data. And while you hope it never happens, if your hard drive does fail and needs to be replaced, you can restore all of your data to the new drive with the help of Time Machine.
Screen Sharing
How many times have you been on iChat with someone who’s having a problem with his Mac, and you’re trying to walk him through a fix? Countless, right? And every time you’re trying to diagnose the problem, you’re pulling your hair out because you’re thinking, “Man, if I could just access his system, I’d have this done in seconds!”, right? Right. Well, you can send that thank-you note to sjobs@apple.com, because Apple has finally built some of Apple Remote Desktop’s features into Leopard—and at no extra cost!
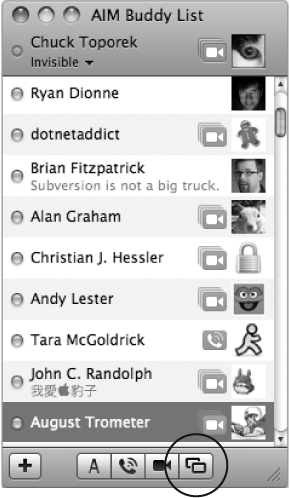
When you’re in iChat, you’ll notice a series of buttons along the bottom of your Buddy List window, as shown in Figure 1-6. The button at the far right, the one that looks like two overlapping displays (similar to the symbols you see on the F7 key) lets you share your computer with the person you’re chatting with.
Tip
For this to work, though, you’ll both need to be running Mac OS X Leopard. If you select a Buddy’s name and the Desktop Sharing button is grayed out and unclickable, that means the person isn’t running Leopard on his Mac.
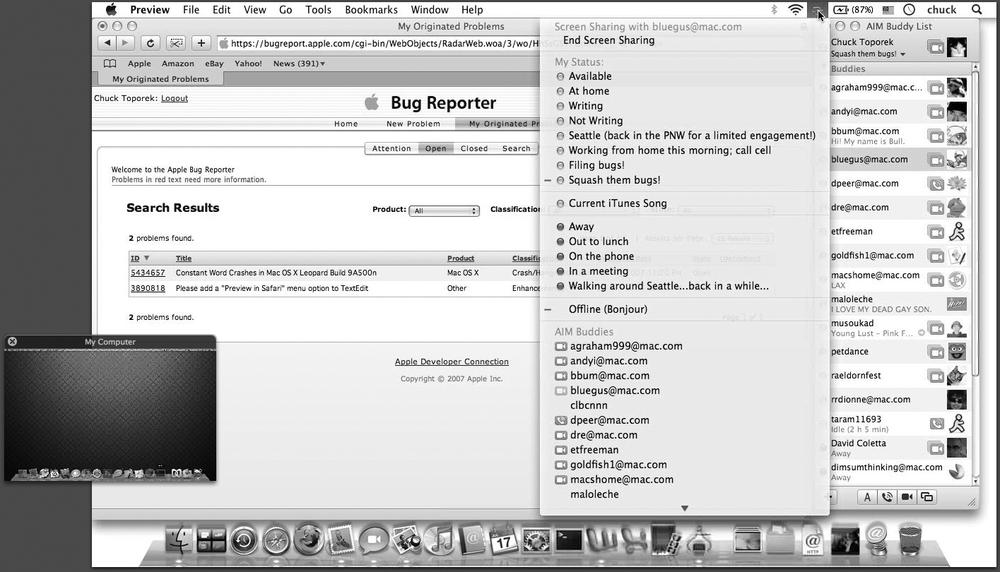
When someone shares his desktop with you, you have total and complete control over his system. When you move the mouse on your end, the mouse moves on his system, which means you can open windows, launch applications, even read his email (but you wouldn’t do that, would you?). Figure 1-7 shows what it looks like when someone else is viewing your desktop. If you look closely, you’ll see a smaller window, labeled My Computer, which is a miniature version of your own screen.
To switch back to using your own Mac, click that window and the other user’s desktop rotates out of the way so you can get back to work.
For additional control over Screen Sharing, visit the Sharing preference panel (System Preferences → Sharing). You can specify which users on the system, and even friends in your Address Book, you can share your screen with.
Quick Look
Quick Look does exactly what its name implies: it lets you quickly take a look inside any file or folder on your Mac.
All you need to do to use Quick Look is select a file and either hit the icon in the Finder’s toolbar that looks like an eyeball, or use File → Quick Look (![]() -Y). The file you’ve selected opens in a preview window above all other windows on the system, as shown in Figure 1-8.
-Y). The file you’ve selected opens in a preview window above all other windows on the system, as shown in Figure 1-8.
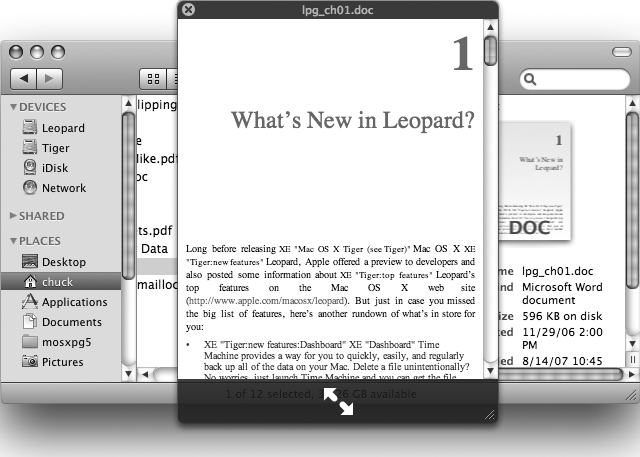
As you can see from Figure 1-8, Quick Look opens this Microsoft Word file in a mini viewer, which lets you scroll through the entire document. If you click on the double arrows along the bottom of the Quick Look window, the file expands into a full-screen view. If you have iPhoto installed on your Mac, any image file you view with Quick Look will have an icon next to the double arrows so you can quickly add the image to your iPhoto Library.
If you use Quick Look on a folder (as shown in Figure 1-9), you won’t see the contents of the folder, but instead will see how many files are in the folder, how much space those files take up on your hard drive, and the date and time the contents of that folder were last modified.
Quick Look is simple to use (just select a file and hit ![]() -Y), and it makes it super easy for you to quickly examine a file on your Mac.
-Y), and it makes it super easy for you to quickly examine a file on your Mac.
Spaces
You know how cluttered your screen can get when you have a few applications open at the same time. You have Mail open for email, iCal and Address Book for your appointments and contacts, Word for writing, iChat for staying in contact with your friends, Safari for browsing the Web, and so on. It doesn’t take long for your desktop to get cluttered with windows, and even though Exposé is there to help you separate them, you find yourself needing something, well, better. And that’s where Spaces comes in.
Spaces takes your Mac’s desktop to a new dimension by giving you the option to add additional desktop “spaces” for managing application windows. You configure Spaces in the Exposé & Spaces preference panel (System Preferences → Exposé & Spaces), as shown in Figure 1-10.
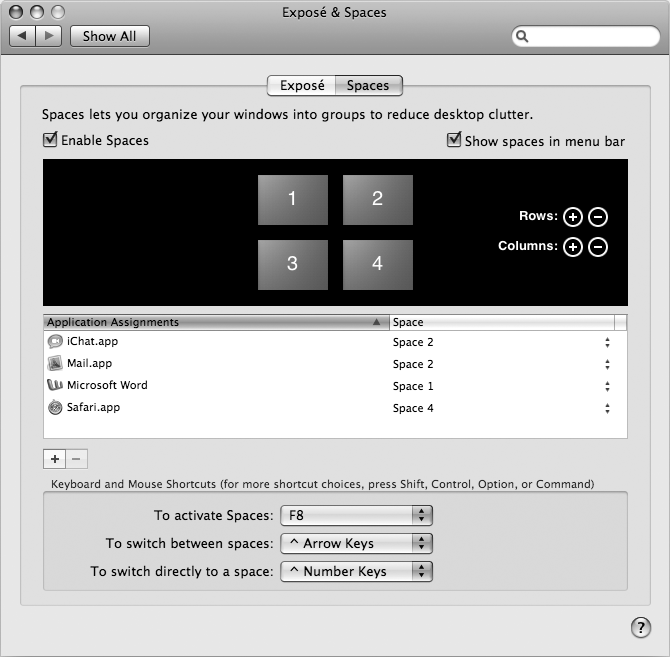
By default, Spaces isn’t enabled, so if you want to take advantage of it, just turn on the checkbox next to Enable Spaces. Next, use the window in the middle to set the number of rows and columns (you can have up to 16 Spaces on your Mac).
You can also configure Spaces to have a certain application open in a particular Space. As shown in Figure 1-10, my Mac has been configured to have Microsoft Word open in Space 1, iChat and Mail in Space 2, and Safari in Space 4, but you can configure these any way you’d like. Just click the Add button (the one that looks like the plus sign, +), choose the application or utility, choose a Space, and you’re all set.
To quickly switch between Spaces, you can use the Control key with the Left or Right Arrow keys on your keyboard, or you can use ![]() -Tab, which brings up the application switcher; select the application you want to use and you’re instantly taken to its Space.
-Tab, which brings up the application switcher; select the application you want to use and you’re instantly taken to its Space.
To see all of your Spaces, you can either click the Spaces icon in the Dock or hit the F8 key, as shown in Figure 1-11. Once in the Spaces view, you can drag application windows from one Space to another, or click in a Space to quickly go there.
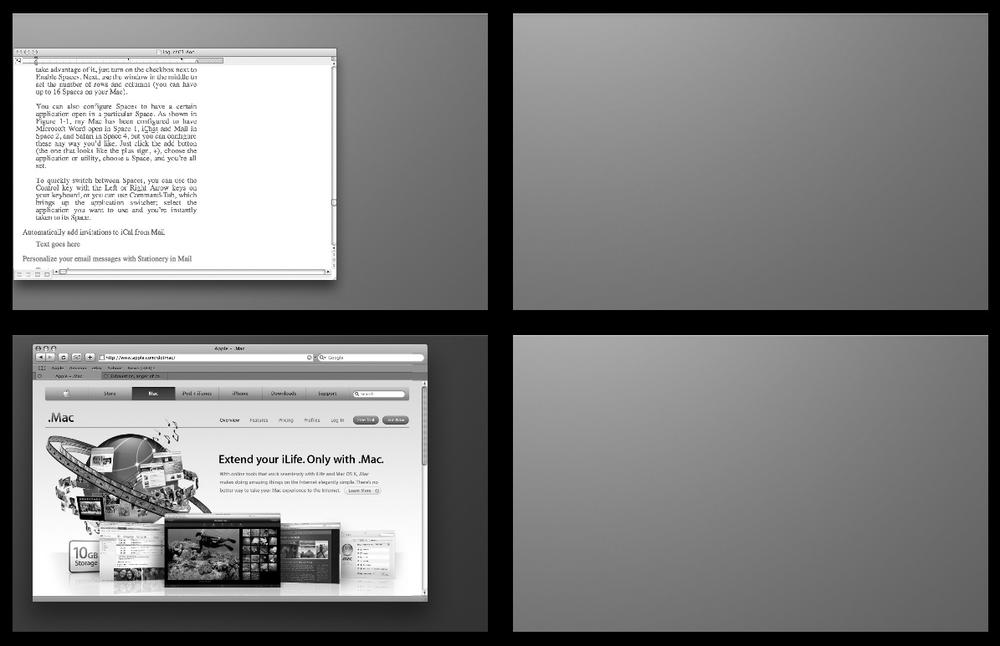
If you’re like me, you’ll quickly find that Spaces is one of the best new features of Mac OS X Leopard, and it won’t take long for you to wonder how you ever lived without it.
Stacks
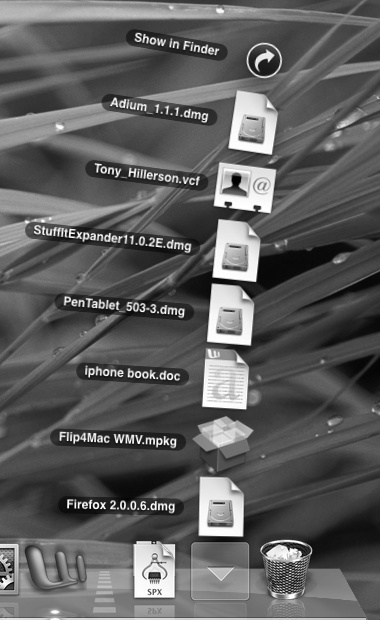
Stacks offers a new way of viewing and accessing files in folders you store in the Dock. Whenever you download a file from the Internet (such as a PDF file or a disk image), the file is automatically saved to your Downloads folder in your Home directory. What you may not know, however, is that your Downloads folder is also aliased in the Dock, next to the Trash. If you click on the Downloads folder in the Dock, you’ll see a list of the files within spring outward (as shown in Figure 1-12) so you can see what’s in there.
To open a file in a Stack, simply click its icon and the file opens in the appropriate application. If the item you click on is another folder, that folder opens in a new Finder window. If you don’t see what you’re looking for, click on the down arrow in the Dock to close the Stack, or click the “Show in Finder” button in the Stack; that closes the Stack and opens a Finder window to that folder.
You’re not limited to using just the Downloads folder in the Dock, either. For example, you can open a Finder window and drag your Documents folder to the right side of the Dock as well. This creates an alias of your Documents folder in the Dock, so you can quickly see what’s in there.
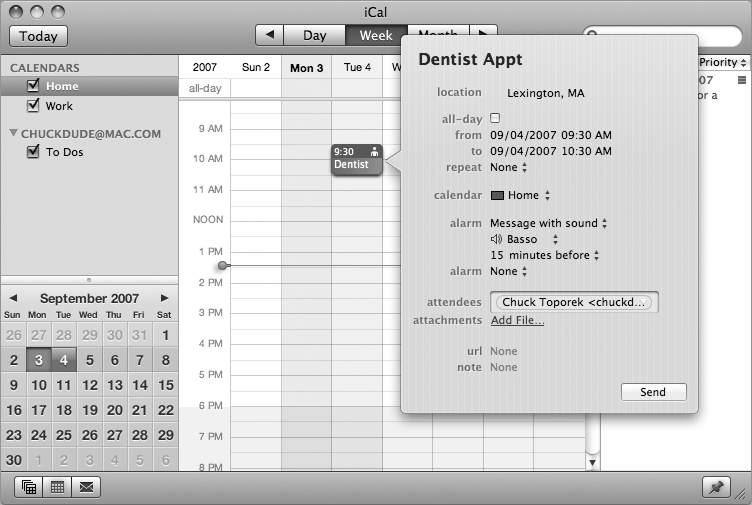
Improvements to iCal
For the past few versions of Mac OS X, iCal is the one application I’ve hoped would see improvements, but I have always been left wanting more. Not this time! iCal now has a new interface, as shown in Figure 1-13, and it works more closely with Mail than ever before.
In the new version of iCal, you can:
Exchange To Do items with Mail
Add invites to your calendar that you receive in email
Share your calendar with other Mac users on your local network so they can see when you’re available
Sync your calendar with other devices or computers
Add a Birthday calendar that pulls birthdates stored in your Address Book
And much, much more!
The new iCal is a great improvement over its predecessor, so give it a try.
Personalize Messages with Stationery in Mail
Why send an email as plain text when you can spiff it up? When using Mac OS X’s Mail application (Applications → Mail), you can opt to send your emails the regular way, or you can click on the Stationery button to add a page design to your email message, as shown in Figure 1-14.
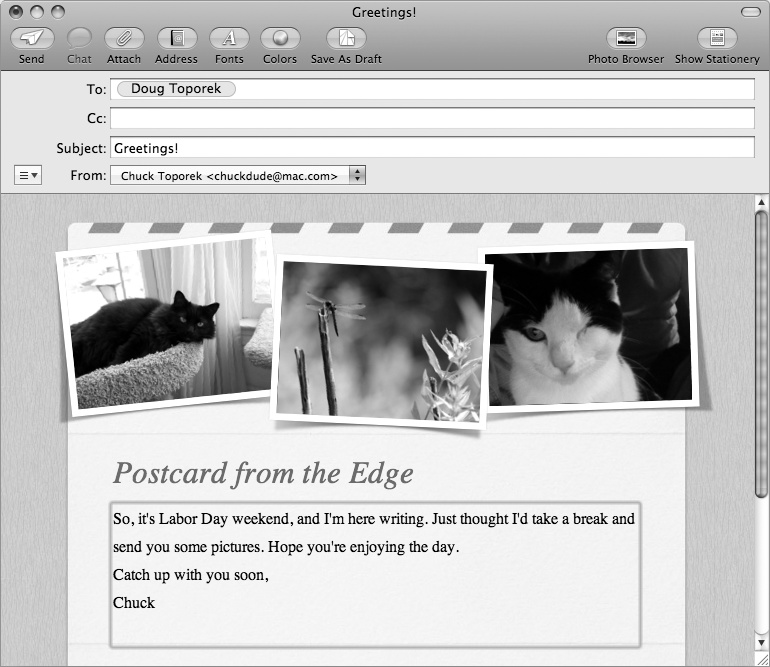
There are more than 20 different Stationery templates you can choose from, just by clicking on the Show Stationery button in a new email message. Want to add your own pictures to the template? Click the Photo Browser button or drag images into the email message from the Finder—it’s that simple!
Other Improvements to Mail
In Leopard, Mail is more than just a program for reading and sending emails. Some new features added to Mail in Mac OS X Leopard include:
Parental Controls
It’s hard to catch the evening news without hearing another story about some teenager who’s been stalked online by a predator. Parents have very few resources at their disposal to help protect their kids from bad things on the Internet . . . that is, until now.
Mac OS X Leopard sports some powerful Parental Controls, which you can configure using its preference panel in System Preferences (see Figure 1-15).
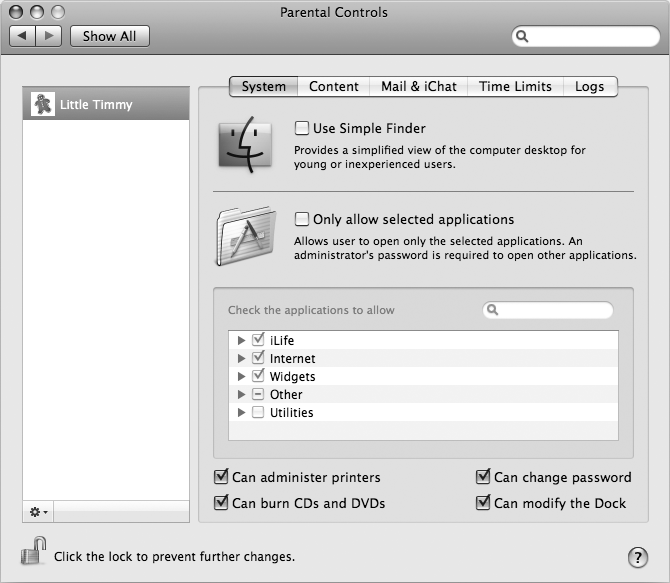
As you can see from Figure 1-15, the Parental Controls panel has five tabs that allow you to tweak and set controls for your child (or employee). See the section "Parental Controls" in Chapter 2 for more details.
Boot Camp
Boot Camp lets users install and run Windows XP or Windows Vista on their Intel Mac. To use Boot Camp, you’ll need an Intel Mac (such as a MacBook, MacBook Pro, Mac Pro, or one of the newer Intel-based iMac or Mac minis). Boot Camp partitions your Mac’s hard drive to create a space for you to install Windows on your Mac. Once installed, you can opt to boot into Mac OS X or Windows by setting the default OS in System Preferences → Startup Disk.
Tip
For more details about how to use Boot Camp to install a version of Windows on your Intel Mac, see my digital Short Cut, “Running Boot Camp,” available from O’Reilly.
These are just some of the many new features that have been added to Mac OS X Leopard. As you work your way through this book, you’ll become aware of even more, but these should give you a taste of what’s to come.
Get Mac OS X Leopard Pocket Guide now with the O’Reilly learning platform.
O’Reilly members experience books, live events, courses curated by job role, and more from O’Reilly and nearly 200 top publishers.

