Chapter 1. Inside the Terminal
The Terminal application (/Applications/Utilities) is Mac OS X’s graphical terminal emulator. Inside the Terminal, Unix users will find a familiar command-line environment. In this chapter we describe Terminal’s capabilities and compare them to the corresponding xterm functionality when appropriate. We also highlight key features of another Aqua-native terminal application, iTerm. The chapter concludes with a synopsis of the open command, which you can use to launch Aqua applications from the Terminal.
Mac OS X Shells
Mac OS X comes with the Bourne-Again shell (bash) as the default user shell and also includes the TENEX C shell (tcsh), the Korn shell (ksh), and the Z shell (zsh). The bash, ksh, and zsh are sh-compatible. When tcsh is invoked through the csh link, it behaves much like csh. Similarly, /bin/sh is a hard link to bash, which also reverts to traditional behavior when invoked through this link (see the bash manpage for more information).
The version of bash that ships with Tiger has improved POSIX support over bash implementations that shipped with earlier releases of Mac OS X. Invoking bash with the -posix command-line option changes the default behavior of bash to comply with the POSIX 1003.2 standard in cases where the default behavior differs from this standard.
If you install additional shells , you should add them to /etc/shells. To change the Terminal’s default shell, see "Customizing the Terminal,” later in this chapter. To change a user’s default shell (used for both the Terminal and remote console logins), see "Modifying a User" in Chapter 5.
The Terminal and xterm Compared
There are several differences between Mac OS X’s Terminal application and the xterm and xterm-like applications common to Unix systems running X Windows:
You cannot customize the characteristics of the Terminal with command-line switches such as -fn, -fg, and -bg. Instead, you must use the Terminal Inspector.
Unlike xterm, in which each window corresponds to a separate process, a single master process controls the Terminal. However, each shell session is run as a separate child process of the Terminal.
The Terminal selection is not automatically put into the clipboard. Use ⌘-C to copy, and ⌘-V to paste. Even before you press ⌘-C, the current text selection is contained in a selection called the pasteboard . One similarity between Terminal and xterm is that selected text can be pasted in the same window with the middle button of a three-button mouse. If you want to paste selected text into another window, you must drag and drop it with the mouse or use copy and paste. The operations described in “The Services Menu” section of this chapter also use the pasteboard.
The value of
$TERMisxterm-colorwhen running under Terminal (it’s set toxtermunder xterm by default).Pressing ⌘-Page Up or ⌘-Page Down scrolls the Terminal window, rather than letting the running program handle it.
On compatible systems (generally, a system with at least an ATI Radeon or NVidia GeForce AGP graphics adapter ), the Terminal (and all of the Aqua user interface) uses Quartz Extreme acceleration to make everything faster and smoother.
If you need an xterm, you can have it; however, you must first install Apple’s X11 package, which is bundled with Mac OS X Tiger as an optional installation. See Chapter 7 for more information about the X Window System.
There are also Aqua-native applications that offer an alternative to Apple’s Terminal, such as the freeware iTerm . We’ll have more to say about iTerm later in this chapter.
Using the Terminal
The first order of business when exploring a new flavor of Unix is to find the command prompt. In Mac OS X, you won’t find the command prompt in the Dock or on a Finder menu. Instead, you’ll need to use the Terminal application, located in /Applications/Utilities. Don’t open it just yet, though. First, drag Terminal’s application icon to the Dock so you’ll have quick access to it when you need to access the command line. To launch the Terminal, click its icon in the Dock once, or double-click on its icon in the Finder.
Tip
The full path to the Terminal is /Applications/Utilities/Terminal.app, although the Finder hides the .app extension. Terminal.app is not a binary file. Instead, it’s a Mac OS X bundle, which contains a collection of files, including the binary and support files for the Terminal’s user interface.
You can Control-click (or right-click) on the Terminal in the Finder and select Show Package Contents to see what’s inside. You can also use the Unix commands ls and cd to explore the directory /Applications/Utilities/Terminal.app.
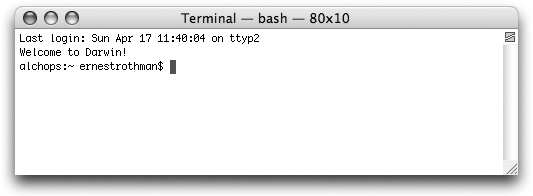
After the Terminal starts, you are greeted by the banner message from /etc/motd and a bash prompt, as shown in Figure 1-1.
Launching Terminals
One difference xterm users will notice is that there is no obvious way to launch a new Terminal window from the command line. For example, the Mac OS X Terminal has no equivalent to the following commands:
    xterm &
    xterm -e -fg green -bg black -e pine -name pine -title pine &
Instead, you create a new Terminal window by pressing ⌘-N or selecting File → New Shell from the menu bar.
Tip
To cycle between open Terminal windows, you can use the same keystroke that most other Mac OS X applications use: ⌘-”. You can also switch between windows by pressing ⌘-Right Arrow or ⌘-Left Arrow, using the Window menu, or by using the Terminal’s Dock menu. You can also jump to a particular Terminal window with ⌘-number (see the Window menu for a list of numbers).
You can customize startup options for new Terminal windows by creating .term and .command files.
.term files
You can launch a customized Terminal window from the command line by saving some prototypical Terminal settings to a .term file and then using the open command to launch the .term file. (For more information on open, see "The open Command" section, later in this chapter.) To create a .term file, open a new Terminal window, and then open the Terminal Inspector (File → Show Info or ⌘-I) and set the desired attributes, such as window size, fonts, and colors. When the Terminal’s attributes have been set, save the Terminal session (File → Save or ⌘-S) to a .term file, such as proto.term . If you save this file to ~/Library/Application Support/Terminal, you’ll be able to launch a new Terminal window with the proto.term file’s special attributes from the File → Library menu.
Alternatively, you can launch such a Terminal window from the command line by issuing the following command (depending on where you saved proto.term):
    open ~/Library/Application\ Support/Terminal/proto.term
open ~/Documents/proto.termThe .term file is an XML property list (plist) that you can edit with a text editor like vim (it can be invoked with vi, which is a symbolic link to vim) or with the Property List Editor application (/Developer/Applications/Utilities).[*] By default, opening the .term file creates a new Terminal window. You can configure the window so it executes a command by adding an execution string to the .term file. When you launch the Terminal, this string is echoed to standard output before it is executed. Example 1-1 shows an execution string that connects to a remote host via ssh and exits when you log out.
.command files
Adding the .command extension to any executable shell script turns it into a double-clickable executable. The effect is similar to that of a .term file, except that you can’t control the Terminal’s characteristics in the same way. (A .command file uses the Terminal’s default settings.) However, you can stuff the shell script full of osascript commands to set the Terminal characteristics after it launches. The osascript utility lets you run AppleScript from the command line.[*] Example 1-2 is a shell script that sets the size and title of the Terminal, and then launches the pico editor.
If you don’t want to give the shell a .command extension, you could also use the Finder’s Get Info option (File → Get Info or ⌘-I) to choose which application opens the executable. To do this, perform the following steps:
Highlight the script’s icon in the Finder.
Choose Get Info from the File menu (⌘-I).
In the Get Info dialog, choose “Open with.”
Click the drop-down menu and choose Other.
In the Choose Other Application dialog, select All Applications rather than Recommended Applications.
Find and choose the Terminal (/Applications/Utilities) application.
Click Add.
Close the Get Info window (⌘-W).
You can assign a custom-made icon to your shell scripts, and place them in the right section of the Dock. You can also drag the executable’s icon to the lower section of the Finder’s Sidebar, although this section of the Finder is intended primarily for quick access to frequently visited folders. To change an icon, use the following procedure:
Copy the desired icon to the clipboard.
Select your script in the Finder and open the Get Info window (⌘-I). The file’s icon appears in the upper-left corner.
Click the current icon, and use the Paste option (Edit → Paste or ⌘-V) to paste the new icon over it.
Close the Get Info window (⌘-W) to save the icon to the application.
To add the shell script application to the Dock, locate the application in the Finder and drag its icon to the Dock. Now you can click on the script’s Dock icon to invoke the script.
Split Screen Terminal Feature
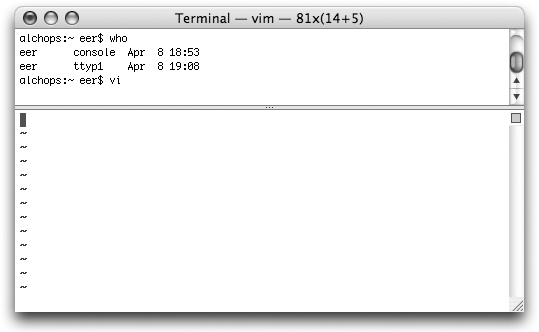
You can split a Terminal window (see Figure 1-2) into upper and lower sessions by clicking on the small broken rectangle located just above the Terminal’s scroll bar. This feature is useful, for example, if you need to edit a file and copy and paste output from earlier in the Terminal session. The upper window contains the buffer (i.e., what you would see if you scrolled up in a non-split window), while the lower window contains your current Terminal section.
Contextual Menu
Users familiar with the X Window System know that right-clicking an xterm window opens a terminal-related contextual menu . Mac OS X’s Terminal also has a contextual menu that can be accessed with Control-clicking (or
right-clicking if you have a two- or three-button mouse). The Terminal contextual menu includes the following choices: Copy, Paste, Paste Selection, Paste Escaped Text, Select All, Clear Scrollback, Send Break (equivalent to Control-C), Send Hard Reset, Send Reset, and Windows Settings. Each of these items also has a keyboard shortcut.
Customizing the Terminal
To customize the shell
used by the Terminal, start by changing the Terminal’s Preferences (Terminal → Preferences). In the Preferences pane, you can tell the Terminal to execute the default shell or a specific command (such as an alternative shell) at startup.[*] You can also declare the terminal type ($TERM), which is set as xterm-color by default. The other choices for the environment variable TERM are ansi, dtterm, rxvt, vt52, vt100, vt102, and xterm. Among other things, the default setting for TERM allows you to take advantage of the support for color output in ls (via the -G option) and color syntax highlighting in the vim
editor. Although color is enabled by the default xterm-color, dtterm provides some additional capabilities. For example, the visual bell in vi works with dtterm, but not with xterm-color.
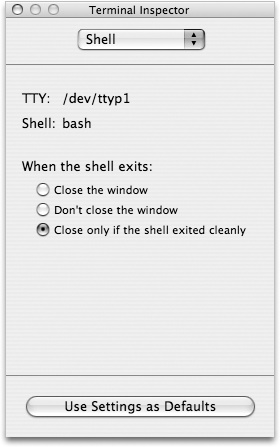
You can also adjust the Terminal’s characteristics using Terminal → Window Settings (or ⌘-I), which brings up the Terminal Inspector, shown in Figure 1-3. Table 1-1 lists the available window settings . Changing these settings affects only the topmost Terminal window. If you want to change the default settings for all future Terminal windows, click the Use Settings As Defaults button at the bottom of the Terminal Inspector window.
|
Pane |
Description |
|
Shell |
Displays the shell used by the Terminal and lets you choose whether to close the Terminal window when the shell exits. |
|
Processes |
Displays the processes running under the frontmost window. You can also control whether Terminal will warn you if you try to close the window while you are running a program. You can disable this by choosing Never under “Prompt before closing window.” You can also supply a list of commands that should be ignored, so if you’re running a program (such as vi or Emacs) that’s not in the list, the Terminal will warn you before closing the window. |
|
Emulation |
Controls the Terminal emulation properties. |
|
Buffer |
Sets the size and properties of the scrollback buffer. |
|
Display |
Changes the character set encoding, cursor style, font, and other attributes. |
|
Color |
Changes colors and transparency of the Terminal window. |
|
Window |
Controls window dimensions, title, and other settings. |
|
Keyboard |
Controls key mappings. |
One useful option available in the Emulation tab is “Option click to position cursor”. If you enable this feature, you will be able to Option-click with the mouse to position the cursor in Terminal applications such as vim or Emacs (this could save you many keystrokes when you need to move the insertion point). This option also works over a remote login session, assuming that this is supported by the remote host’s terminal capabilities.
Customizing the Terminal on the Fly
You can customize the Terminal in shell scripts using escape sequences or AppleScript commands. xterm users may be familiar with the following command to set the xterm window’s title when using the bash shell:
echo -n -e "\033]0;My-Window-Title\007"
or the equivalent when using tcsh:
echo '^[]2;My-Window-Title^G'
Mac OS X’s Terminal accepts these sequences as well.
Tip
^[ is the ASCII ESC character, and ^G is the ASCII BEL character. (The BEL character is used to ring the terminal bell, but in this context, it terminates an escape sequence.) The escape sequences described here are ANSI escape sequences, which differ from the shell escape sequences described later. ANSI escape sequences are used to manipulate a Terminal window (such as by moving the cursor or setting the title). Shell escape sequences are used to tell the shell to treat a metacharacter, such as |, as a literal character rather than an instruction to pipe standard output somewhere else.
To type the ^[ characters in bash, use the key sequence Control-V, Escape (press Control-V and release, then press the Escape key). To type ^G, use Control-V, Control-G. The vim editor supports the same key sequence; Emacs uses Control-Q instead of Control-V.
You can capture the bash escape sequence in a function that you can include in your .bash_profile script:
    function set_title ( )
    {
        case $TERM in
            *term | xterm-color | rxvt | vt100 | gnome* )
                echo -n -e "\033]0;$*\007" ;;
            *)  ;;
        esac
    }
Then you can change the title by issuing the following command:
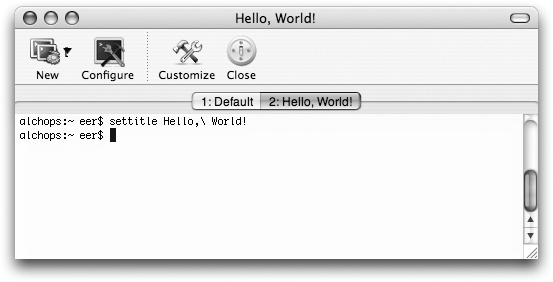
set_title your fancy title hereYou may want to package this as a shell script and make it available to everyone who uses your system, as shown in Example 1-3.
    #!/bin/bash
    #
    # Script settitle
    # Usage:  settitle title
    #
    if [ $# == 0 ]; then
      echo "Usage:  settitle title"
    else
       echo -n -e "\033]0;$*\007"
    fi
You can also use osascript to execute AppleScript commands that accomplish the same thing:
    osascript -e \
      'tell app "Terminal" to set custom title of first window to "Title"'
Working with File and Directory Names
Traditionally, Unix users tend to avoid spaces in file and directory names , sometimes by inserting hyphens and underscores where spaces are implied, as follows:
    textFile.txt
    text-file.txt
    text_file.txt
However, most Mac users tend to insert spaces into file and directory names and, in a lot of cases, these names tend to be long and descriptive. While this practice is okay if you’re going to work in the GUI all the time, it creates a small hurdle to jump over when you’re working on the command line. To get around these spaces, you have two choices: escape them, or quote the file or directory name.
To escape a space on the command line, simply insert a backslash (\) before the space. This also works with other special characters, such as a parenthesis. Because they have meaning to the shell, special characters that must be escaped are: * # " " ' \ $ | & ? ; ~ ( ) < > ! ^. Here is an example of how to use a backslash to escape a space character in a file or directory name:
cd ~/Documents/My\ Shell\ Scripts
Or you can use quotation marks around the file or directory name that contains the space, as follows:
cd ~/Documents/"My Shell Scripts"
There is one other way to get around this problem, but it involves using the Finder in combination with the Terminal application. To launch a Classic (Mac OS 9 and earlier) application such as Word 2001, which probably lives on the Mac OS 9 partition of your hard drive, you could enter the path as follows, using escape characters:
    open -a /Volumes/Mac\ OS\ 9/Applications\ \(Mac\ OS\ 9\)/Microsoft\ Office\ ↲
    2001/Microsoft\ Word
Or you can enter the path using quotes:
open -a /Volumes/"Mac OS 9"/"Applications (Mac OS 9)"/"Microsoft Office ↲ 2001"/"Microsoft Word"
As you can see, neither way is very pretty, and both require you to know a lot of detail about the path. Now for the easy way:
Type open -a, followed by a space on the command line (don’t press Return yet).
Locate Microsoft Word in the Finder and then drag its icon to the Terminal window to insert the path after the space. When you do this, the spaces and any other special characters will be escaped with backslashes automatically:
    open -a /Volumes/Mac\ OS\ 9/Applications\ \(Mac\ OS\ 9\)/Microsoft\ ↲
    Office\ 2001/Microsoft\ Word
Press Return to invoke the command and launch Word 2001. (If Classic isn’t already running, Classic starts, too.)
You can also drag and drop URLs from a web browser. For example, to use curl to download files from the command line:
Open a new Terminal window and type curl -O, with a space after the switch.
Bring up your web browser and navigate to http://www.oreilly.com.
Drag the image at the top of the page to the Terminal window. You should now see the following in the Terminal window:
curl -O http://www.oreilly.com/graphics_new/header_main.gif
Press Enter in the Terminal window to download header_main.gif to your computer.
Tab completion
If you want to type a long pathname, you can cut down on the number of keystrokes needed to type it by using tab completion . For example, to type /Library/StartupItems, you could type /Li<Tab>, which gives you /Library/. Next, type S<Tab>. This time, instead of completing the path, you’re given a choice of completions: Screen Savers, Scripts, and StartupItems. Type a little bit more of the desired item, followed by a tab, as in t<Tab>. The full key sequence for /Library/StartupItems is /Li<Tab>St<Tab>.
If you have multiple completions where a space is involved, you can type a literal space with \<Space>. So, to get a completion for /System Folder (the Mac OS 9 system folder), you should use /Sy<Tab>\ <Space><Tab>. It stops just before the space because /System (Mac OS X’s System folder) is a valid completion for the first three characters.
Changing Your Shell
Although other shells are available in Mac OS X, as we noted earlier, the default shell in Mac OS X Tiger is bash. Earlier versions of Mac OS X shipped with tcsh as the default shell. Although you can change the default shell in the Terminal preferences, this does not affect the login shell used for remote or console logins. To change your default shell in a more pervasive manner, see "Modifying a User" in Chapter 5. If you install additional shells on the system, you’ll need to add them to the /etc/shells file to make Mac OS X aware that they are legitimate shells.
The Services Menu
Mac OS X’s Services menu (Terminal → Services) exposes a collection of services that can work with the currently running application. In the case of the Terminal, the services operate on text that you have selected (the pasteboard). To use a service, select a region of text in the Terminal and choose one of the following items from the Services menu:
- ChineseTextConverter
This service can be used to convert selected text either to simplified Chinese or Traditional Chinese.
- Disk Utility
This service invokes Disk Utility to calculate either a CRC-32 or an MD-5 image checksum of a selected disk.
- Finder
The Finder Services menu allows you to open a file (Finder → Open), show its enclosing directory (Finder → Reveal), or show its information (Finder → Show Info).
- Font Book
This can be used either to create a font collection or a font library from text.
- Grab
Not supported by the Terminal.
- Import Image
Not supported by the Terminal.
The Mail → Send To service allows you to compose a new message to an email address, once you have selected that address in the Terminal. You can also select a region of text and choose Mail → Send Selection to send a message containing the selected text.
- Make New Sticky Note (Shift-⌘-Y)
This service creates a new Sticky (/Applications/Stickies) containing the selected text.
- Open URL
This service opens the URL specified by the selected text in your default web browser.
- Script Editor
This service gets the result of an AppleScript, makes a new AppleScript (in the Script Editor), or runs the selected text as an AppleScript.
- Search with Google (Shift-⌘-L)
This service searches for the selected text using google.com in your default web browser.
- Send File To Bluetooth Device (Shift-⌘-B)
This service sends the file specified by the selected text to a Bluetooth device.
- Speech
The Speech service is used to start speaking the selected text. (Use Speech → Stop Speaking to interrupt.)
- Spotlight (Shift-⌘-F)
This service invokes Tiger’s system-wide search technology Spotlight to search for selected text. (Tiger provides command-line utilities for working with Spotlight. See Chapter 2.)
- Summarize
This service condenses the selected text into a summary document. The summary service analyzes English text and makes it as small as possible while retaining the original meaning.
- TextEdit
The TextEdit service can open a filename or open a new file containing the selected text.
- View in JavaBrowser (Shift-⌘-J)
This service browses Java documentation for the selected class name. This is available whether the selected text is a real Java class name or not. (Garbage In, Garbage Out applies here.)
Third-party applications may install additional services of their own. When you use a service that requires a filename, you should select a fully qualified pathname, not just the filename, because the service does not know the shell’s current working directory. (As far as the service is concerned, you are invoking it upon a string of text.)
Bonjour
Bonjour (http://developer.apple.com/networking/bonjour), formerly known as Rendezvous, is a networking technology that allows Bonjour-enabled devices on a local network to automatically discover each other. As are many Mac OS X applications, Terminal is Bonjour-enabled. For example, you can select File → Connect to Server to make an SSH connection to any other Mac OS X system on the LAN, provided it allows such connections. The other Macs on the LAN are identified by their computer names, as specified in their Sharing System Preferences.
Announced in 2002 as Rendezvous, Bonjour is Apple’s implementation of the Zero Configuration Networking open source project , also known as Zeroconf (http://www.zeroconf.org), which was initiated by the Internet Engineering Task Force (http://www.ietf.org) in 1999.
Tip
You can learn more about Bonjour by reading Apple’s Bonjour Technology Brief at http://images.apple.com/macosx/pdf/MacOSX_Bonjour_TB.pdf.
Alternative Terminal Applications
As noted earlier, other Aqua-native terminal applications are available, and the freeware iTerm (http://iterm.sourceforge.net), developed by Fabian and Ujwal S. Sathyam, is a particularly attractive one. Although Mac OS X’s Terminal is rich with useful features, iTerm offers some interesting extras that make it worthy of consideration. We won’t cover iTerm in great detail, but will touch on a few of its more attractive aspects.
Before getting into what makes iTerm distinct, here are some similarities between iTerm and Terminal:
One feature that each of these terminal applications share is that they use the same Services menu.
Both iTerm and Terminal support transparency, language encodings, and AppleScript, and have contextual menus that can be accessed by Control-clicking or right-clicking (if you have a two- or three-button mouse) in a window.
iTerm supports several language encodings, vt100/ANSI/xterm/xterm-color/rxvt emulations, and many GUI features. Particularly interesting features
of iTerm include support for multiple tabbed terminal sessions
within each window, bookmarks
that allow you to open new iTerm sessions with preset terminal settings, and bookmarks for launching non-shell commands. The default value for TERM is vt100, but this can be changed either on the fly with a bash shell command, such as TERM=xterm-color, in the Configure menu, or, if you want a global change, in iTerm’s Preferences dialog. Like the Terminal application, iTerm is also Bonjour-enabled.
iTerm’s tabbed view should be familiar to GNOME users, since the gnome-terminal also supports this feature. Tabs in iTerm are designed to make efficient use of desktop space, much as they do in Safari and other popular web browsers. Figure 1-4 shows an iTerm window with two tabs.
The same bash (or tcsh) shell commands that can be used to customize the Terminal’s titlebar work just as well with iTerm’s titlebar. When used in iTerm, these commands also set the tab labels as shown in Figure 1-5.
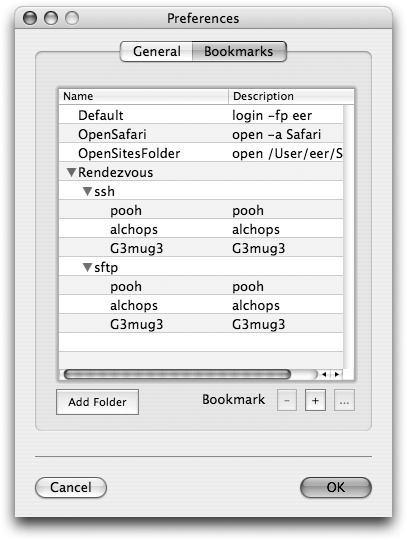
iTerm’s support for bookmarks should be familiar to KDE users, as the KDE Konsole terminal emulator offers a similar feature. Bookmarks are used to define iTerm sessions with preset terminal settings. For example, you can define the color or typeface to use for text.
The default bookmarks are Default, which specifies the default login shell, and Bonjour, which includes ssh and sftp connections to SSH- and Bonjour-enabled computers on the LAN. To define a new bookmark, select iTerm → Preferences and click the Bookmarks tab in the Preferences window. Then,
click the plus sign to add a bookmark and specify its name, which is used when you open a session from the New icon in iTerm’s toolbar. Figure 1-6 shows the Bookmark preferences window in which we have defined several bookmarks after the Default Session, but before the automatically and dynamically generated Bonjour bookmarks.
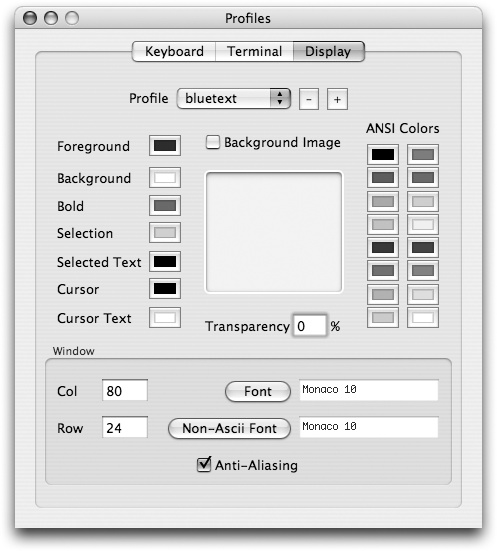
The bookmark OpenSafari opens Safari, while the OpenSitesFolder bookmark opens the ~/Sites folder in the Finder. To add a bookmark that opens another login session with various characteristics that differ from the Default, you must first create a new Profile. For example, suppose your Default login session has black text and you want to create a bookmark
named bluetext for a login session with blue text. First, select iTerm → Preferences. Then, click the General tab, followed by the Profiles button. To add a profile with the display characteristic of blue text, click the Display tab, set the colors you want, and click the plus sign to name the new profile as shown in Figure 1-7.
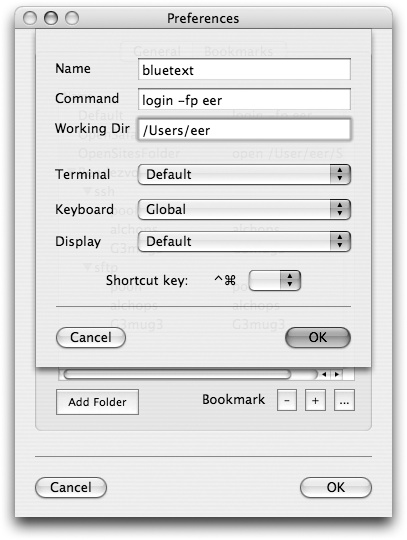
To add the new profile as a bookmark, select iTerm → Preferences and click the Bookmarks tab in Preferences window. In the Bookmarks Preferences window, click the plus sign to add the new bookmark as shown in Figure 1-8.
iTerm’s contextual menu consists of the following items: New Tab (which allows you to choose a session from the bookmarks), Browser (which opens the selected URL in your default web browser), Mail (which opens a compose mail window with the selected email address as the recipient), Copy, Paste, Save, Select All, Clear Buffer, Close, and Configure.
The open Command
The open shell command lets you open Finder windows and launch Aqua applications. To open a directory in the Finder, use open, followed by the name of the directory. For example, to open a Finder window containing the current directory, enter the following command:
open .
To open your Public folder (~ /Public) in a Finder window, use the following:
open ~/Public
To open the /Applications folder in a Finder window, use the following:
open /Applications
To open an application, you need only its name. To open Xcode (/Developer/Applications), you would use the following:
open -a Xcode
Tip
You are not required to enter the path for the application, only its name, even if it is a Classic application. The only time you are required to enter the path is if you have two different versions of an application with similar names on your system.
You can use the -a option to open a file with something other than the application with which it’s associated. For example, to open an XML file in Xcode instead of the default XML editor, the Property List Editor, enter this command:
open -a Xcode data.xml
To open multiple files, you can use wildcards:
open *.c
To force a file to be opened with TextEdit, use -e:
open -e *.c
The -e option directs the file to be opened in TextEdit; it cannot be used to open a file in another text editor, such as BBEdit (though BBEdit includes its own command-line application for this purpose). However, if you want to open a file using BBEdit, use the following:
open -a BBEdit filenameIf you want to use TextEdit on a file that is owned by an administrator (or root), sudo open -e won’t work. You’ll need to specify the full path to the TextEdit executable, as in:
$ sudo /Applications/TextEdit.app/Contents/MacOS/TextEdit filenameIf you find yourself doing this often, you might want to create an alias for the path to TextEdit’s executable file. For example, you could enter the following into your .bash_profile file:
alias sudotext="sudo /Applications/TextEdit.app/Contents/MacOS/TextEdit "
Then the next time you want to open a text file that would otherwise require use of the sudo command, you could just use the following:
$ sudotext filenameWhen you enter that command, you’ll be prompted for the admin password; once authenticated, the file you’ve specified is opened in TextEdit, just as you hoped it would.
Tip
Similar to the open command, the open-x11 command is used to open applications. However, it is for opening X11-based apps in Apple’s X11 environment. You can learn more about X11 and the open-x11 command in Chapter 7.
[*] For more information on XML, see Learning XML (O’Reilly) or XML in a Nutshell (O’Reilly).
[*] More details on Scripting are covered in this book in Chapter 19. To learn more about AppleScript, see AppleScript: The Definitive Guide (O’Reilly).
[*] You can change the default shell in the Terminal preferences, but it will not affect the login shell used for remote or console logins. Changing a user’s default shell is covered later in this chapter.
Get Mac OS X Tiger for Unix Geeks, 3rd Edition now with the O’Reilly learning platform.
O’Reilly members experience books, live events, courses curated by job role, and more from O’Reilly and nearly 200 top publishers.

