Throughout the book, a handful of ideas and processes come up again and again. They’re explained here so you don’t have to read them 500 more times.
You may have noticed that most Mac OS X programs aren’t marred by 50,000 support files strewn across your hard drive. To open Internet Explorer, you merely have to double-click a single Internet Explorer icon. There’s no need to initially open an Internet Explorer folder. This, inarguably, is a far superior arrangement than the ones found in Mac OS 9 or Windows, where many programs must remain in special folders, surrounded by libraries, dictionaries, foreign language components, and other support files and folders.
So where did all those support files go?
Most Mac OS X programs come in the form of packages or bundles, which are actually folders that behave like single files. A Mac OS X program may look like a single, double-clickable application icon, yet to the Mac, it’s actually a folder that contains both the application and all of its support files, which are hidden for your convenience. (In fact, even documents can be packages, including iDVD project files and certain TextEdit documents.)
This book will repeatedly direct you to peek inside these cleverly disguised folders. And no, you can’t do that by double-clicking them. Instead, follow the routine shown in Figure P-2.
Once you’re inside, look around as much as you like, but don’t move or remove any of the files you find there—unless a hint tells you to. Doing so may cause the program to quit working more suddenly than a McDonald’s cashier at the end of a shift.
TextEdit is a basic text processor included in Mac OS X. Among other things, it’s the perfect freebie tool to help you create or modify Mac OS X’s system and program preference files. Many of the hints in this book refer to TextEdit.
To open a file with TextEdit, drag its icon (the document) from the Finder or desktop onto the TextEdit icon on the Dock or in your Applications folder.
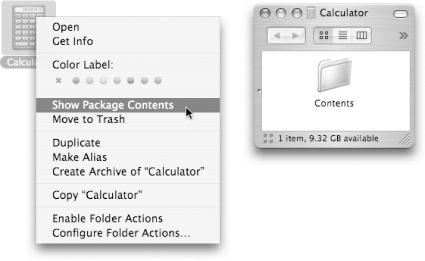
Figure 2. Left: In the Finder, highlight a program, Control-click it, and then choose Show Package Contents from the contextual menu.
Tip
Because so many of the hints in this book direct you to use TextEdit, you’ll find it worthwhile to put its icon on your Dock right now. Simply drag it there from your Applications folder.
One more thing: TextEdit can typically create two kinds of files: unformatted plain text files, and Rich Text documents that contain formatting like bold and italics. Rich Text documents offer more artistic freedom, but they’re baffling to many Mac OS X programs. It’s very important that when you edit Mac OS X system files, you save the result exclusively as plain text files.
Figure P-3 shows you how to verify exactly what you’re getting.
Finally, it’s worth noting that TextEdit isn’t the only program you can use to edit Mac OS X system files. If you’re an old hand at Mac OS X, you may have run across programs like BBEdit, TextWrangler, PropertyList Editor (which comes with the Developer Tools, described below), or any of the Unix editors (like vi or emacs), which you reach through Terminal. In any of the hints in this book that direct you to open a file with TextEdit, feel free to substitute any of these other programs.
This book refers often to Terminal. Terminal is a program in your Applications → Utilities folder that serves as the door to Mac OS X’s Unix underbelly. Unfortunately, that underbelly has no graphics, icons, or menus. Terminal is all text, all the time.
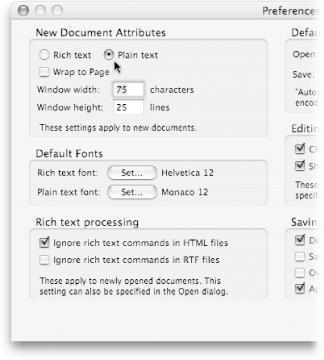
Figure 3. To make TextEdit use plain text, choose TextEdit → Preferences. In the New Document Attributes section, turn on “Plain text,” shown here next to the cursor. From now on, when you create or edit a file, TextEdit will save it in plain text format, just the way Mac OS X system software likes it.
Still, the command line (this type-a-command-to-control-the-Mac mode) opens up a world of possibilities. It lets you reach corners of Mac OS X that you can’t access from the regular desktop. It lets you perform certain tasks with much greater speed and efficiency than you’d get by dragging around icons. And it gives you a glimpse into the minds and moods of people who live and breathe computers.
When you double-click Terminal’s icon, you’re greeted with something like this:
Last login: Fri Mar 26 05:40:57 on ttyp1
Welcome to Darwin!
MyPowerBook:~ chris$
The $ sign is the command prompt—the Mac’s way of saying, “I’m all yours. What’s your pleasure?” The insertion point blinks just to its right, waiting for you to type a Unix command like the ones suggested in this book. After you type each specified command, press Return or Enter to seal the deal.
Note
If you upgraded from a previous version of Mac OS X, your command prompt may look slightly different; it might have a % sign instead of a $ one, for example. This is a result of your shell settings.
When you’re done using Terminal, type logout or exit, press Enter, and then choose File → Quit.
Many of the hints in this book direct you to change a program’s settings by issuing a command, in Terminal, known as the defaults command. It’s nothing more than the Unix way of changing a setting that doesn’t have a corresponding button in the program’s Preferences dialog box.
For example, hint 2-17 details how to turn off the Finder’s zooming effect, that animated growing puff you see briefly when you double-click an icon. You’re directed to open Terminal and type the following command after the command prompt:
defaults write com.apple.finder ZoomRects -bool no
Note
Whenever you read instructions to type something into Terminal, capitalization counts. If you type a single letter as lowercase when in actuality it should be capped (or vice versa), the command might not work.
The full command breaks down like this:
defaults write tells Terminal that you’d like to modify (write) a new value for a preference setting.
com.apple.finder refers to the Finder’s preference file. That’s the file you’re going to change.
ZoomRects refers to “zooming rectangles,” the name of the actual setting you’re going to change.
-bool refers to the type of value you’re going to write. In this case, -bool is short for Boolean. A Boolean variable has only two possible values: yes and no.
no means no, just like your parents always told you. But in this case, it’s also the value for the ZoomRects Boolean preference that you’re changing.
Put it all together, and you’ve got a command telling your system to modify the Finder’s zooming preference setting by turning it off. (You can reverse this command by repeating the command but changing no to yes.)
If you bought the retail, boxed version of Mac OS X, it came with a special CD called Xcode Tools. If Mac OS X came with your Mac, the Xcode Tools CD may be a disk image on one of your Software Restore discs. (Use Disk Copy to burn this image onto a real CD, as described on Section 11.5.1.)
The Xcode Tools are essential for anyone who writes software for Mac OS X; the programs that come with them help you create, debug, and compile programs. But the Xcode Tools can be useful even if you’re not a programmer. They include some useful utilities, including PropertyList Editor (which makes it easy to edit a program’s preference files), and they give you a bunch of extra Unix commands. In fact, some of the hints in this book require that you have Developer Tools installed (you’ll see which ones).
If the Xcode Tools CD or disk image didn’t come with your Mac or your copy of Mac OS X, you can download it from the Web for free, although you first must sign up for Apple’s developer program (also free). A high-speed Internet connection is recommended, since the files are more than 300 MB.
In your Web browser, visit http://connect.apple.com, and then click the Join ADC button at the lower right of the screen. Follow the instructions to create your free account. Next, log in at http://connect.apple.com, and then click Download Software to reveal a submenu. When you choose Mac OS X, you jump to a screen containing recent Xcode Tools releases.
Find the latest version, click Download, and then wait. The download is long, even over a fast connection.
Once downloaded, Xcode Tools can be installed the same way as many other Mac OS X programs: Just expand the archive, double-click the package installer, and then provide your administrative password when requested. If the installation is successful, you end up with a Developer folder on your hard drive containing all the Xcode Tool goodies.
Get Mac OS X Power Hound, Second Edition now with the O’Reilly learning platform.
O’Reilly members experience books, live events, courses curated by job role, and more from O’Reilly and nearly 200 top publishers.

