Exposé is a window-management tool built-in to Mac OS X 10.3. With the press of a key (or the click of a mouse), your open windows magically arrange themselves onscreen, making it easy to find just the one you want. Or they fly off to the edges of the screen, making it easy to work with files on your desktop. Exposé is one of those technologies that, after you use it a few times, make you wonder how you got along without it. Here are some hints to help you maximize this powerful feature.
The standard method of activating Exposé is to use the keyboard: F9 to shrink all onscreen windows; F10 to show the current application’s windows; and F11 to show the desktop. However, there’s an alternative, hidden method of using at least two of Exposé’s modes: the “Floating Exposé Blob.” As shown in Figure 4-5, the floating blob is a translucent gelatinous globule that hovers over all your open windows.
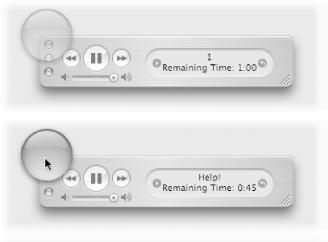
Figure 4-5. Top: Most of the time, the Floating Exposé Blob is partially transparent, so you can see what’s underneath it.
To activate the blob, you first must make a quick visit to Terminal, found in Applications → Utilities. Type the following line, then hit Enter:
defaults write com.apple.dock wvous-floater -bool true
For this change to take effect, you’ll need to quit and restart the Dock. You can do so in the Terminal by typing killall dock. As soon as the Dock restarts, you should see The Blob. As explained in Figure 4-5, you can activate a couple of Exposé modes via the blob (and for real fun, add the Shift key to either sequence to watch the fun in slow motion).
You can drag the blob around onscreen, too. To make it vanish entirely, just repeat the above command in Terminal replacing “true” with “false.”
When you use Exposé’s Show Desktop key (F11), all open windows fly off to the edges of the screen, leaving only a thin border to let you know they’re out there. But there’s a hidden Show Desktop mode that shrinks your open windows in plain sight, as seen in Figure 4-6.
Warning
This hint has been reported, in a few cases, to cause a system crash. Additionally, the area used by the small window is unusable by any other application, even when you can’t see the small window!
To turn on this hide-in-plain-sight mode, open Terminal (in Applications → Utilities) and type:
defaults write com.apple.dock wvous-olddesktop -bool false
Hit Enter when you’re done typing, then type killall dock (and hit Enter again), to make the change take effect by restarting the Dock.
If you hit F11 now, all your windows minimize into the small window, as seen in Figure 4-6. You can drag and drop this window anywhere you like; click it to exit Exposé’s Show Desktop mode.
Figure 4-6. When you put Exposé in its alternate Show Desktop mode, all of your windows are “hidden” in one small window on your desktop. You can freely move this window around anywhere you like. However, the space taken up by the small window is unusable by any application; mouse clicks won’t register in this region, for instance.
To view any Exposé effect in slow motion, just press and hold the Shift key while pressing F9, F10, or F11. If you have a ton of open windows, a slow motion activation of All Windows mode (Shift-F9) is most impressive. For an even better demo, hold down Shift when you hit F9 again to watch the windows grow back to full size in slow motion.
If you have a multi-button mouse, you can make Exposé even easier to use by assigning its various modes to the extra buttons on your mouse. Start by visiting the Mouse section of the Exposé System Preferences panel. You’ll only see this section if you have a multi-button mouse plugged into your Mac. As illustrated in Figure 4-7, you can use the pop-up menus to assign each Exposé action to a mouse button.
You may find, however, that setting these values has no effect on Exposé—it just ignores your button clicks. If that’s the case, your mouse’s driver software is probably overriding the settings in the Exposé preferences panel. To work around this dilemma, you’ll need to use the program that came with your mouse to set the mouse buttons to imitate F9, F10, and F11.
Note
You may have to set the Exposé keyboard shortcuts to something different (like Option-Shift-F9) before attempting to customize your mouse buttons. Then, once you’ve successfully customized your mouse buttons to imitate the original keyboard shortcuts (F9, F10, and F11), return to System Preferences and set the Exposé keyboard shortcuts back to their original values. This procedure prevents you from accidentally activating Exposé while trying to customize your mouse.

Did you know Exposé actually has two completely different modes of operation? The most-used mode is the “sticky mode,” which is what you get when you press and release the Exposé activation keys (F9, F10, F11). In this mode, you press a key once to activate Exposé, and press it again to deactivate it.
On the other hand, if you press and hold a shortcut key, Exposé enters “temporary mode.” In this mode, the Exposé effect goes away as soon as you release the key.
With this ploy, you can just press and hold F11 to get a glimpse at what’s on your desktop, and then release F11 and return to what you were doing. In either of the window-shrinking modes, though, this trick demonstrates its real power: press and hold F9 or F10, then move your mouse to your desired window, and then release the key. Presto! Mac OS X immediately brings that window forward, switching programs if necessary.
Tip
This hint becomes even more useful if you use the Exposé mouse-button trick (see Section 4.2.4). That way, you can switch applications with just the mouse: press and hold the button you’ve assigned to F9, mouse over a window to make it active, then release the button to switch right to it. It’s an amazingly efficient way to switch programs, with the added bonus of letting you choose any open window in the destination application.
So you’ve been working very hard on a complex project all day, and you’ve got about 15 different Finder windows open, along with 20 other applications, each with two or three of its own windows. Then you realize that you need to move the Project Summary document you saved on your desktop into your Project Daedalus folder, which is somewhere among your open Finder windows. Before Exposé, this simple task would require quite a bit of clicking, dragging, and window positioning to make the icon and folder visible at the same time.
With Exposé, though, it’s a much simpler process. Hit F11 to shove all the open windows off the edge of the screen and reveal the desktop. Click and hold the icon you want to move (Project Summary, in this example), and hit F9 to activate Exposé’s “Show All Windows” mode—just don’t let go of the mouse button yet!
Now drag your icon into the Finder window where you’d like to file the document, and (still holding the mouse button down) hit F9 again. This activates the chosen Finder window, zooming it back to full size. Release the file when it’s in the right folder (or subfolder), and you’re done—no window resizing or moving required. Here lies the real power of Exposé: the ability to manage open windows and documents without having to move or resize them.
Want an easy way to save a headline or text snippet from a Web browser or other program? Highlight the text and begin to drag it. As you do, hit F9 to reveal all windows, and then move the mouse over a Finder window. After a second or two, the window will flash and jump forward, just like a spring-loaded folder (Section 2.5.7). Drop the selection in the Finder window, and you have yourself a new text clipping.
Of course, you don’t have to create text clippings; you can use this same technique to drag snippets of text into Word, Stickies, or any other program that accepts them.
Have you ever wanted to have just one window onscreen, with all the others hidden? Using Exposé’s Show Desktop key (F11), this dream can become a reality. First, switch to the application with the window you’d like to isolate—Safari, for instance. In Safari, minimize the window to the Dock (hit
-M). Then hit F11 to send every onscreen window sliding off the edges of the screen. Finally, click the minimized window to bring it back to the foreground; the hidden windows remain hidden, lurking just off the edges of your desktop.
To get them back, either click another application in the Dock or just press F11 again. All other windows slide in neatly behind the current one.
You might think that once you’ve activated Exposé, there wouldn’t be much use for
-Tab, the application-switching keystroke. Mixing these two techniques, however, is a powerful tool for window navigation.
In both All Windows (F9) and Application Windows (F10) Exposé modes, you can hit
-Tab to bring up the application switcher ( Section 4.1.5). When you
-Tab to an application, it becomes active—but Exposé stays in Application Windows mode. In other words, you see all of that program’s windows highlighted, yours for the clicking.
When you click a window, it becomes the active window, and all of that program’s other windows slide into place behind it.
Here are some other tricks that combine Exposé and the application switcher:
If you press Tab instead of
-Tab after activating Exposé, you’ll cycle through the applications but keep the typical onscreen switcher hidden. Shift-Tab cycles backwards in this mode.
If you’d rather keep your hands on the keyboard while using Exposé, you can select a window by using the arrow keys instead of the mouse.
Get Mac OS X Power Hound, Second Edition now with the O’Reilly learning platform.
O’Reilly members experience books, live events, courses curated by job role, and more from O’Reilly and nearly 200 top publishers.

