Hacking is fun and productive, but it can also introduce an element of danger (perhaps thatâs part of the fun). You want to minimize that danger, and the best way to minimize the bad stuff that can happen is to back up your data and know what to do when something goes wrong. This is why this chapter is here. Youâll discover some basic hacking techniques but, before you try them, youâll learn how to protect your precious data. If something does go wrong, youâll have the tools to fix the problem very quickly. The interesting world of hacking awaits!
Even if you never plan to perform a single hack in this book, youâll still want a reliable backup. This hack explains different methods you can use to back up your Mac so you can be confident that youâll be able to recover quickly when things go wrong.
If youâre ever asked what the most important part of a computer is (and thatâs a question companies sometimes ask employment seekers), you could do much worse than saying, âA good backup.â Why not, say, the CPU or graphics card instead? Because a good backup is where all your work, toil, pictures, movies, and other accumulated data is preserved for that inevitable moment when everything stops working. With a good backup, you donât start over, you simply restore. Without a good backup, well, good luck getting that loved one to put on a prom outfit 5 years later.
The point is that some things canât be re-created (and even the ones that can be re-created might take an obscene amount of time and effort and, likely, still not be as good as the original). So your goal should be to both minimize downtime and minimize lost dataâand a good backup helps you achieve both these goals.
The phrase âa good backupâ gets tossed around a lot, but itâs rarely ever defined. What is a good backup? That depends on what data you donât care about and what data you couldnât stand to lose. For our purposes, âa good backupâ is one that saves your precious data and gives you peace of mind. To find the backup method thatâs right for you, weâll look at several different options for backing up your computer.
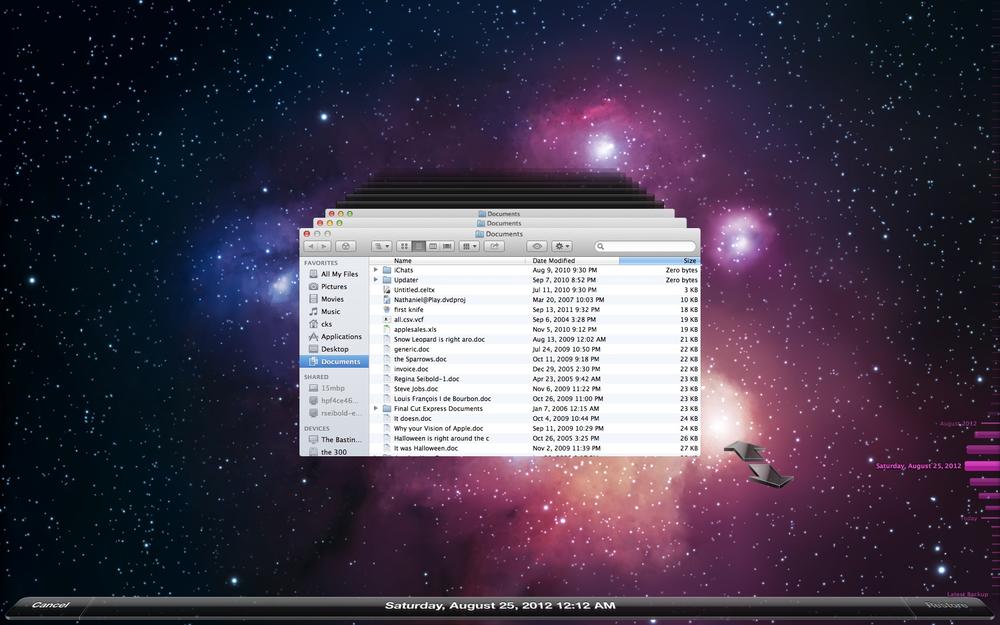
The most user-friendly way to back up your Mac is Time Machine (Figure 1-1), which is built into OS X and is incredibly easy to use. The idea behind Time Machine is simple: you hook a drive up to your Mac and Time Machine copies the drive. Once the drive is copied, Time Machine incrementally copies any changes you make (file by file). If you lose a file or something goes wrong, you can step backwards in time to the good old days when everything was how you wanted it or just retrieve the file thatâs missing.
Time Machine backups are good enough for most people, but if youâre going to be hacking around on your Mac and trying stuff you wouldnât normally try, youâll likely want something a little beefier. Creating a backup you can boot from (which you canât do with Time Machine) is a nice place to start. The next section explains how to create one.
Your Mac comes with a nice utility for duplicating drives. Itâs called Disk Utility and youâll find it, as youâd expect, in the Utilities folder (Applications/Utilities/Disk Utility). That takes care of the software youâll need, but youâll also need some media to store your backup on. In a perfect world, youâd have a massive amount of super speedy storage. But since this media is for backup purposes, cost considerations can be more critical than high speed, so whatever youâre comfortable with will do. Just make sure the drive/flash stick/ssd/partition you use is the same size or larger than the disk you want to backup.
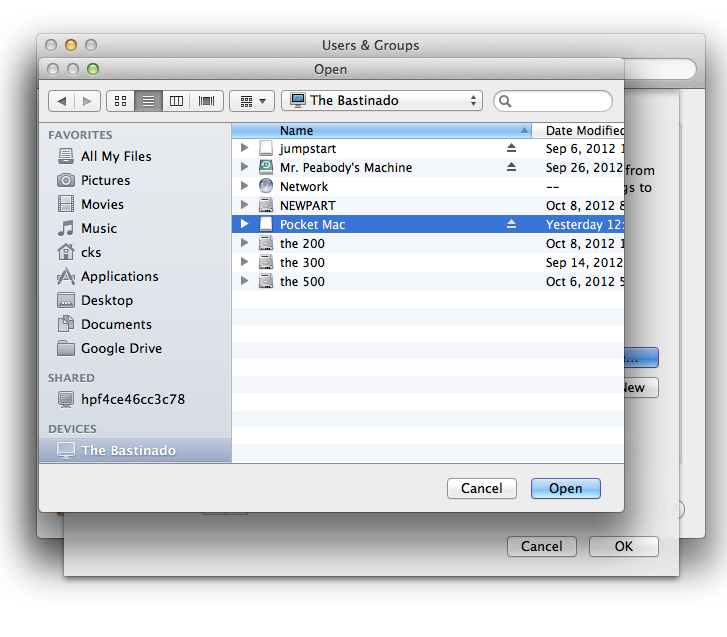
Attach your backup media to your Mac in the manner required by the media. (I usually just jam the connector blindly into the back of my machine until it fits, but you might want to use more care.) Next launch Disk Utility. Once Disk Utility is up and running, you can get to the business of duplicating your drive. Click the Restore tab and then drag the disk you want to copy from the sidebar into the Source field. You can guess whatâs next: drag the disk that you want the back up to into the Destination field (Figure 1-2).
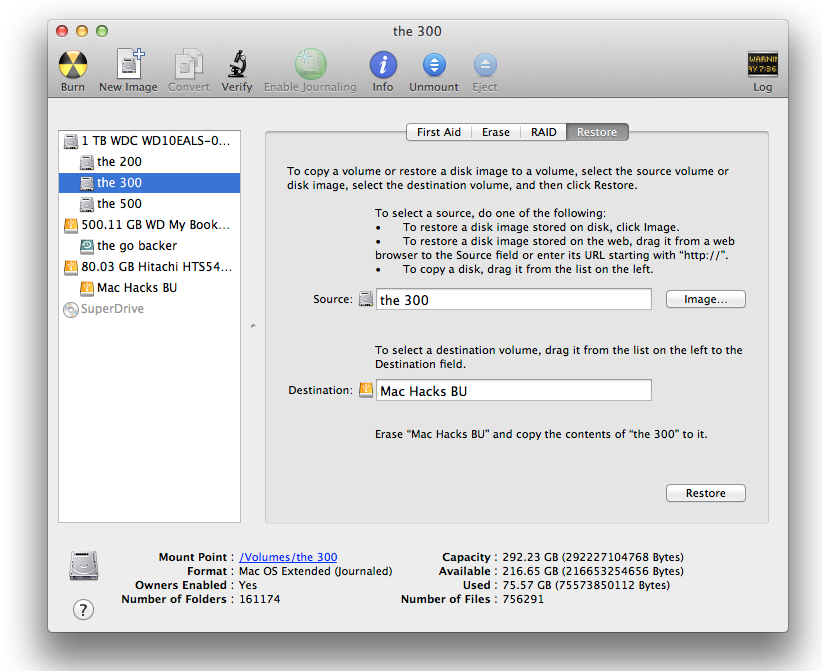
Figure 1-2. In this case, the partition named âthe 300â is being duplicated to the partition Mac Hacks BU. OS X treats separate partitions as different disks even though they can be on the same physical drive. This illustration shows three physical drives and five partitions.
Click Restore and OS X displays a message asking if youâre sure you want to replace the contents of the targeted drive. Youâre careful and youâve thought this out, so click Erase. Once you do that, youâll be asked for your password.
Type in your password and Disk Utility will go about the business of copying the data to the destination drive. Unlike Time Machine, which copies drives file by file, Disk Utility works by copying drives block by block, which yields an exact copy of the drive and keeps it bootable. (If you use a copy method that copies file by file, the result wonât be bootable unless you take some extra steps.) When the process is finished youâll have a new drive with all your old data that you can use to boot your Mac if things go horribly awry. But before you start sloshing cola on your old drive, take a quick trip to System Preferences and choose Startup Disk. If the backup process went smoothly, youâll see an option to use the drive you just cloned as a startup disk. As shown in Figure 1-3, the name of your newest drive has been changed to match the name of the drive you just cloned.
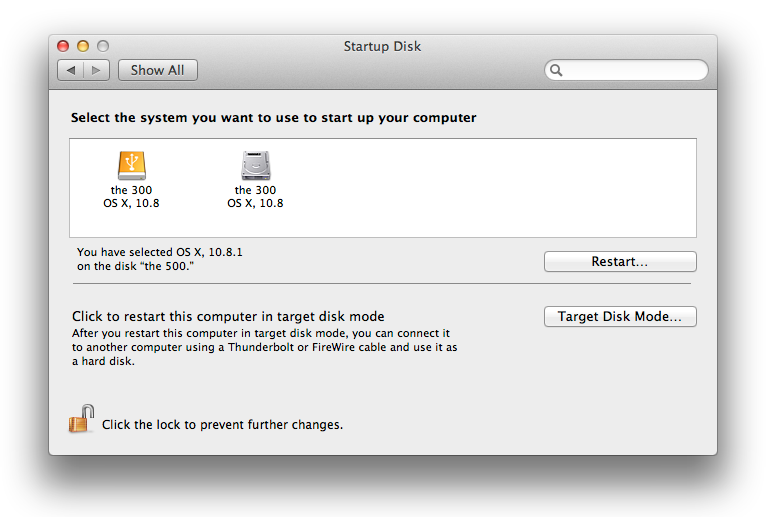
Figure 1-3. Use the Startup Disk preference pane to make certain that the backup disk is bootable. Note that there are now two drives named âthe 300.â You can tell them apart by their different icons: the one on the left (the backup) is a USB drive, and the one on the right (the original) is a hard drive.
Your installation of OS X has recovery tools built into it. But because those tools are stored on your hard drive, they wonât do you any good if the thing wreaking havoc with your Mac is the drive. This hack explains how to make a cheap startup disk using a USB stick and a free Apple-supplied program.
In the olden times, back when you had to install new versions of OS X from a DVD, you always had an emergency startup disk. Snow Leopard acting wonky? Cram that DVD into your iMacâs superdrive, press Option-O when it starts, and boot from the install disk. It was a slow process but at least it got your Mac going again.
OS X Lion and Mountain Lion are different. Since they donât have physical install disks, the emergency boot option is installed on your drive when you install Lion or Mountain Lion. This is called the recovery partition and itâs a tiny slice of the media you use to boot from. This slice holds a bunch of nifty tools for you to use in an emergency (for a more thorough discussion of the emergency boot partition, see [Hack #7]). The unfortunate thing is that none of those will do you any good if something is wrong with the drive.
What you really need is a way to create a bootable disk. Happily, Apple offers a program to do exactly that, it just isnât all that well known andâtruth be toldâonce youâre interested enough to learn about it on your own, it might be too late to solve your problem.
How do you get your own slice of USB-startup-disk heaven?
Point your Mac to the support page for OS X
Recovery and click the download link on the upper right side of
the page. Itâs a small file (1.1 MB) so the download will be quick. (If
the link listed here doesnât work for you, a web search for OS X Recovery Disk Assistant will find the program).
Recovery Disk Assistant arrives as a .dmg file. As youâd expect, double-clicking this file will expand and give you access to the program. You can move it to your Applications folder, but youâll likely want different versions of a recovery disk for all your different Macs, so save the app to each of your Macs.
Grab a blank USB drive thatâs at least 650 MB in size that has no important data on it (Recovery Disk Assistant erases all the data as it creates the disk). Now is a great time to rename the USB disk to something easily recognizable. (To rename the disk, plug it into your Mac and, when the diskâs icon appears onscreen, click the icon and then click its name; then type the new name. This isnât a long-term commitment: once the process is done, you wonât see the disk at all, so donât fret over the name.)
So your drive is plugged in, devoid of necessary data, and named something you can spot easily. Greatâthe hard work is done. Launch Recovery Disk Assistant (Figure 1-4) and let your Mac do the hard work! Youâll be asked for your password and then Recovery Disk Assistant will take a few minutes to actually write the disk.
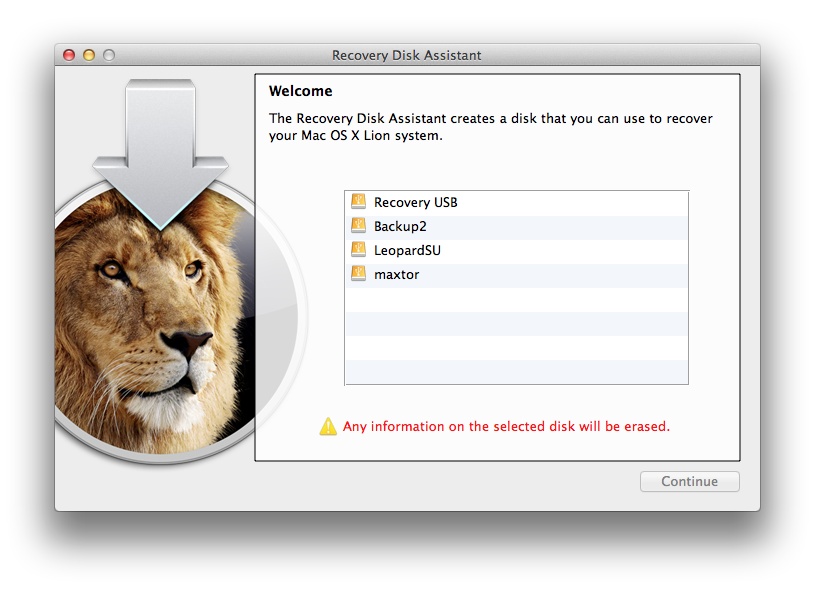
Figure 1-4. The drive selection screen of Recovery Disk Assistant. Make your choice carefully as the selected disk will be erased.
Once everything is in place, Recovery Disk Assistant will tell you that the process is finished and youâll have a disk you can use to start your Mac when things go wrong. Since the disk is a copy (more or less) of the recovery partition built into your hard drive, itâll give you access to all the same tools youâd have if you booted from the recovery disk (Disk Utility, Terminal, etc.).
Thereâs a downside to this method, however: from now on, when you insert the disk into your Macâs USB slot, nothing shows up onscreen. Thatâs because that disk is dedicated only to booting your Mac and helping you recoverâyou canât use it for anything else. (There is a workaround that will make your Mac display the disk: shut down, plug in the disk, and then hold down the Option key while you start up.) For that reason, you probably want to boldly label the disk with the name of the machine you created it on.
Honestly, the whole process is kind of cumbersomeâcreating specific disks for specific Macs (but only sometimes)âbut in an emergency the disks can be real lifesavers.
At some point youâll want partitions on your hard drive, but partitioning a drive usually means erasing the data on it first. This hack reveals how to partition your drives without losing any data.
When you get a new Mac, youâre understandably excited and you want to start using that thing right away. You create some data, transfer some pics onto it, and now the Mac is yours. A few weeks later you realize youâd really like to have some partitions on your Mac. The problem is thereâs no obvious way to partition the hard drive without losing the data youâve created.
The most obvious workaround is to back up your disk with Time Machine or clone it, and then boot from some other disk and partition your disk. But that involves a lot of time and hassle. What you want is a method to partition your existing disk without a lot of work.
The coolest hacks use tools in unintended ways. This one uses Boot Camp Assistant and a Windows install disk to create a new partition without having to erase your data. Boot Camp Assistant is an application published by Apple that helps you install Windows on your Mac. If youâre wondering how installing Windows on a Mac relates to partitioning your drive without losing data, the answer is simple: one of the steps Boot Camp performs is partitioning your drive.
Note: This hack requires a Windows install disk. But it doesnât require a never-used install disk. I used an old Vista install disk, but you can get away with using any disk someone has laying around. You wonât be running Windows anyway!
The good news is that Boot Camp Assistant is already on your Mac (youâll find it the Utilities folder), so the only thing you need to hunt down is that Windows install disk. Once you find one, launch Boot Camp and get ready for some ominous warnings. The first screen of Boot Camp Assistant warns you to back up your computer. Heed this advice! Your drive is about to be messed with and, without a good backup, you could suffer major data loss. (See [Hack #1] for advice on backing up.)
Click Continue and youâll see a few checkboxes offering to get some Windows support files from Appleâs servers and install Windows (Figure 1-5). Youâre not here to install Windows, you just want Boot Camp Assistant to take care of a little drudgery. But if you uncheck all the boxes, then Boot Camp Assistant wonât run. If you read the fine print, youâll note that the Install Windows option states that it will add a partition for Windows, which is exactly what you want, so turn off all the checkboxes except that one.
Once you click Continue, youâll find the path to happy partitioning. Youâll have an option to set partition sizes (Figure 1-6). What partition scheme you use is up to you, but the larger the partition you select the more flexibility youâll have in the future.
Once youâve made your decision, insert your Windows install disk and then click Install. Your Mac will restart and attempt to install Windows. But you arenât after Windows, so donât waste time installing Windows; stop the install process by pressing the Eject key while the Mac is rebooting to force it to use its internal drive. Your Mac will go through the normal startup process and when itâs done, the new partition will just be sitting there! Back to Disk Utility to format your brand-new partition in any manner you wish (Figure 1-7).
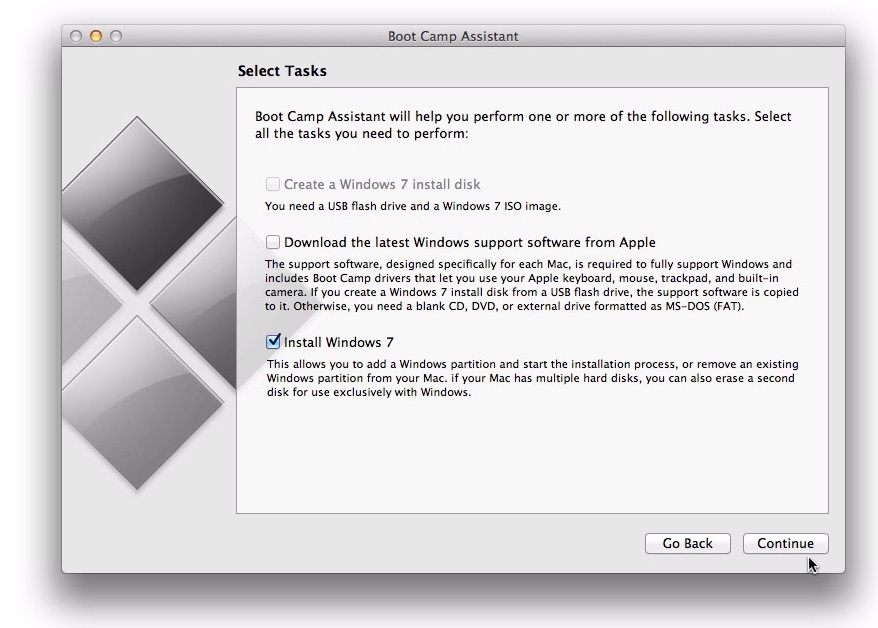
Figure 1-5. If you ever truly want to install Windows, the process will be different. But for the purposes of partitioning, only check the Install Windows box.
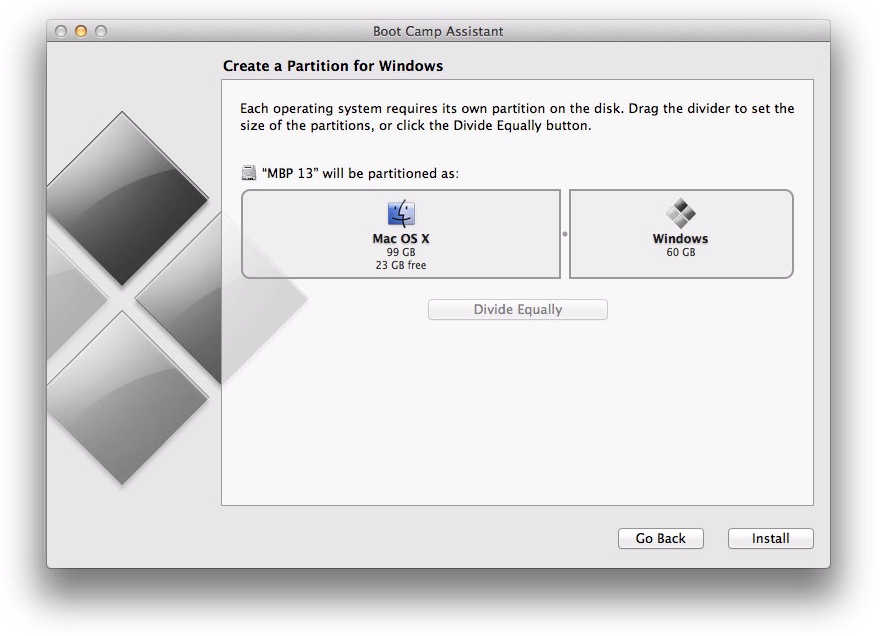
Figure 1-6. To set partition sizes, either drag the divider between the two partitions or you could opt to use the Divide Equally button. Itâs your partitionâdo what you want!
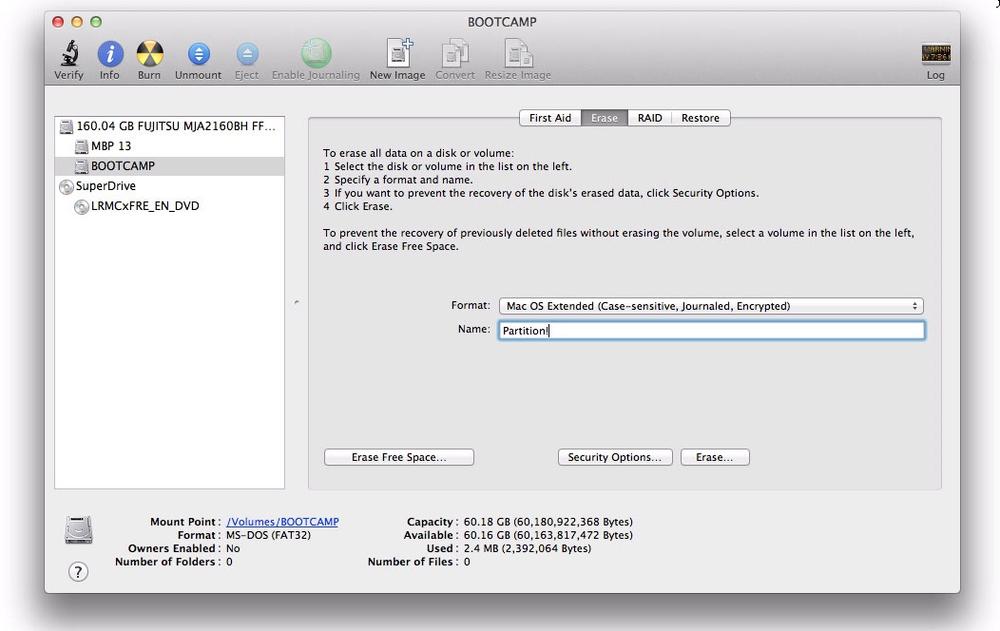
Figure 1-7. Here Disk Utility is being used to change the partition from MS-DOS FAT to a more Mac-friendly partition. Sure, your Mac can use disks formatted in MS-DOS FAT, but it prefers HJFS+ made specifically with Macs in mind.
It will likely occur to you that tricking Boot Camp Assistant is one way to partition your hard drive, but probably an unnecessary way. After all, if Boot Camp Assistant can nondestructively partition your disk, you can probably do it yourself. Youâre rightâyou can do it without Boot Camp Assistant, though youâll need to spend some time with Terminal.
Note: From the department of âIt canât be said enough,â you really should back up your drive before you try this. Is your data backed up? Good, letâs get going!
Fire up Terminal (itâs in your Utilities folder) and youâll see a window that looks remarkably like an old-style computer terminal. If you feel a little intimidated by Terminal, check out Chapter 6 before you start; if not, itâs time to start typing. Take a deep breath and type:
diskutil list
Not too hard, right? What that command does is tell your Mac to reveal all the
partitions on the drives mounted on your Mac (âmountedâ doesnât
necessarily mean physically mountedâit just means currently available to
your machine; you can have disks plugged in that arenât mounted). The
output will vary from machine to machine, but itâs generally almost
humanly understandable. When I ran diskutil list on
my iMac in Knoxville, Tennessee, I got an output that looked like
this:
| Â | Â | Â |
|
|
|
|
|
|
|
|
|
|
|
|
|
|
|
|
|
|
|
|
|
|
|
|
|
|
|
|
|
|
|
|
|
|
|
|
What can we learn from this output? SIZE, as youâve guessed is the size of the disk. IDENTIFIER is how the computer tells one disk from another, and TYPE NAME is how you can tell what each disk is. In this particular case, we have a 1.0 TB disk (disk0) that has been divided into seven partitions. The first partition is EFI (disk0s1), which contains some device drivers and other necessary things for your Mac to boot; you wonât need to mess with that partition for the purposes of this hack. I created the second partition (disk0s2) for storing movies, so weâll leave that one alone, too. The next one (disk0s3) is a recovery disk generated during the install of Lion or Mountain Lion. We wonât be altering that partition in this hack either, so we can skip Apple_Boot Recovery HD.
This brings us to the disk we want to repartition: Apple_HFS the 300 (a.k.a. disk0s4). Before we partition the disk, we should decide what size partitions we want. To figure that out, we need to know how much of the diskâs space is already in use (we donât want to lose any data, now do we?). To find that out, at the Terminal prompt, type:
df -h
The df command tells your
Mac to list information based on file systems, and the âh flag tells Terminal to list the data in
human-readable form. The output will tell you more than you really want
to know so, in this case, weâll just pay attention to the disk weâre
going to partition. Hereâs the relevant information:
|
|
|
|
|
|
|
|
|
|
|
|
|
|
|
|
|
|
Well that is almost humanly understandable! If you look closely, you can tell that the disk known as âthe 300â is 272 GB in size and that 68 GB have been used, leaving us with 204 GB available. Thatâs certainly enough space to make it worth our while to create a new partition.
Letâs see what the limits of our partitions will be using the
diskutil command:
diskutil resizeVolume disk0s4 limits
Which tells us:
For device disk0s4 the 300:
Current size: 292.2 GB (292227104768 Bytes)
Minimum size: 78.3 GB (78349324288 Bytes)
Maximum size: 292.2 GB (292227104768 Bytes)
Those are the limits of what we can do; weâre free to choose any
value within those limits. In this case weâll use 100 GB for the old
disk (âthe 300â) and 190 for the new disk (which will be named,
unimaginatively, âNEWPARTâ). To get the new partition made, we need to
use diskutil to tell the program exactly what we want
to do. To do all that, type:
diskutil resizevolume /dev/disk0s4 100G JHFS+ "NEWPART" 190G
That doesnât make a much sense if you just look at it. Hereâs what each part of that command represents:
diskutilis the program that will be doing the work; itâs built into OS X.resizevolumeexplains what you want diskutil to do./dev/disk0s4tells diskutil which disk you want it to resize.100Gtells diskutil that you want the old partition reduced to 100 GBs.JHFS+tells diskutil that you want the new partition to be a Journaled Hierarchical File System Plus, which is the type of partition your Mac prefers (though you can choose other systems if you like)."NEWPART"tells diskutil what to name the new partition.190Gtells diskutil you want the disk partition to be 190 GBs.
Youâll need to adjust the command to your specific desires. Once
you get all that typed into Terminal (carefulâspelling and spacing
matters), hit Return and diskutil will start the
process. You wonât see the nifty OS X progress bar that youâre familiar
with; instead youâll see the Terminal version of a progress bar. (What
does a progress bar look like in the Terminal? It looks like [***----], with * representing the completed parts.) The
process can take some time (donât close that Terminal window!), but once
itâs done youâll have all your data and a new
partition! When itâs finished, diskutil will print
out a list of the disks on your Mac, which includes the new
partition:
|
|
|
|
|
|
|
|
|
|
|
|
|
|
|
|
|
|
|
|
|
|
|
|
|
|
|
|
|
|
|
|
|
|
|
|
|
|
|
|
Youâre probably wondering why the partition came out as 192.1 GB
instead of 190 GB. The reason is actually kind of interesting: the
maximum partition is 292.2 GB but the partitions requested by the
Terminal command add up to 290 GB. So instead of wasting that space,
diskutil adds it on to the larger partition. (What
happened to the missing .1 GB? The world may never know.)
Permissions are crucial to the functioning of OS X, and a basic understanding of them will make your hacking forays not only more fruitful but also less fearful.
You likely know that OS X is based on Unix, an operating system invented in Bell Labs that has been around since 1969. In 1969 the idea of a personal computer was pretty far fetchedâcomputers were hugely expensive and computer time was very valuable. Because of that, Unix was designed to be a multiuser system. As such, it needed a method for deciding just what each user can do with the machine. (It would be bad if one student could erase another studentâs work or, the other extreme, a setup where only one superuser could make any changes at all.) Permissions allow users to change what they need to change while protecting others who use the same machine from accidental data deletion.
When you first set up OS X, you provided a name, OS X suggested a short name which you may or may not have chosen to use, and you were off to the races. âNo big deal,â you might think, âthis is just routine housekeeping when setting up a new machine.â Actually, this step is kind of a big dealâthe first account you set up in OS X is, by default, an administrator account.
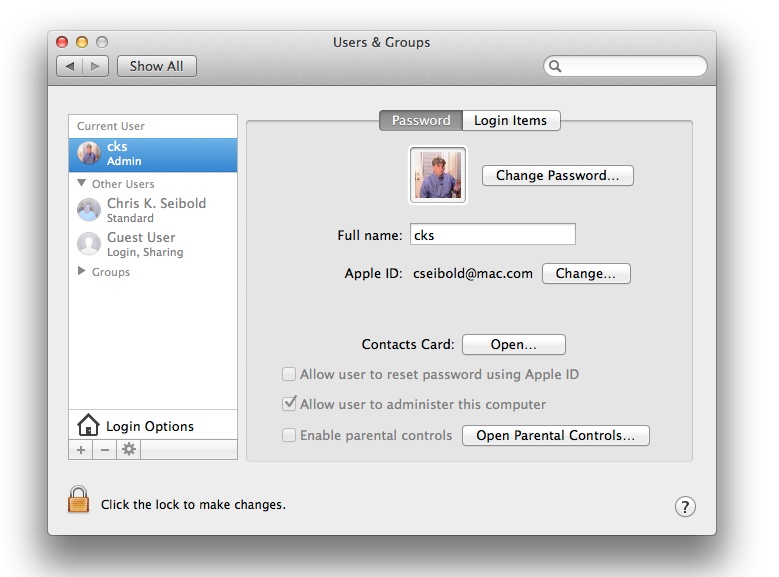
OS offers three main types of accounts: Administrator, Standard, and Managed with Parental Controls. (There are other types listed in the Users & Groups preference pane, but the ones listed above are your best bets for everyday use.) Administrators have a lot of power in OS Xâthey can make global changes that impact everyone who uses that computerâso logging in as an administrator for day-to-day use isnât the best idea; with that much power over the entire system, you can cause serious harm to your account and othersâ. Itâs much better to log in as a standard user for day-to-day tasks while reserving the administrator account for those times you need to, well, administrate. Standard users can make changes that impact their own accounts, and Managed users can only do what the administrator specifically allows. The Standard account is the sweet spot because you get to control the stuff you need to control, but you canât mess up anyone elseâs work or the machine.
The most obvious objection to switching to a standard user account is that youâre already using one account and you donât want to re-create everything for your new account. Thatâs a valid objectionâbut one we can work around.
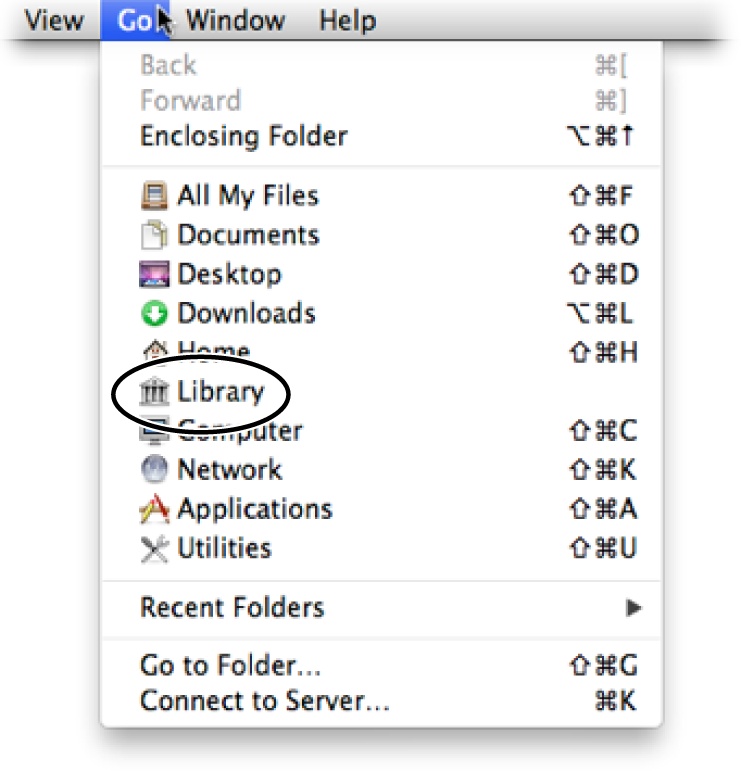
Figure 1-8. Pressing the Option key when viewing the Go menu isnât the only way to find your Library folder, but itâs probably the easiest.
Fire up System Preferences and head to Users & Groups. Youâll see a list of users on the left side of the pane with the current user at the very top. Immediately under each userâs name is a label that indicates what kind of user they are (Figure 1-9).
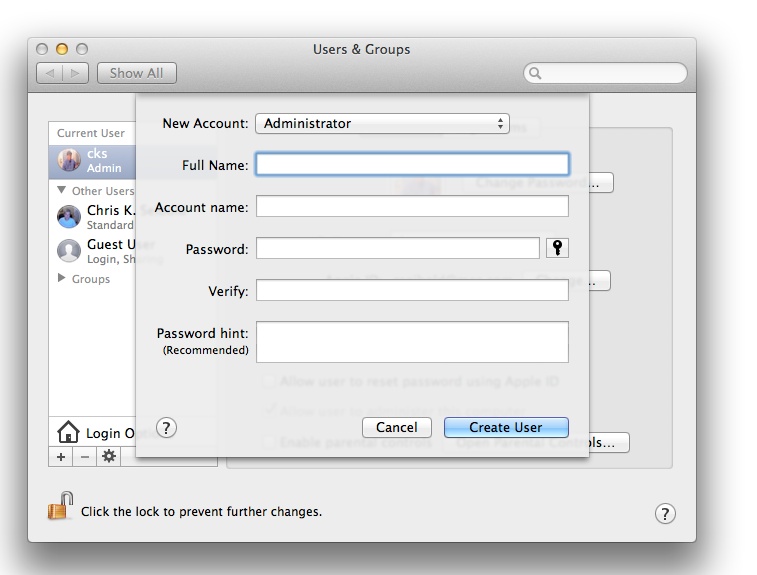
If you only have one administrator account, you canât really change your account status because your Mac has to have at least one admin-level user. In that case, the first step is to add another administrator user. Click the lock icon in the paneâs lower-left corner and then type in your administrator password in the window that appears. Once the pane is unlocked, you can add a new account. Click the + button above the lock icon and a new window will appear (Figure 1-10).
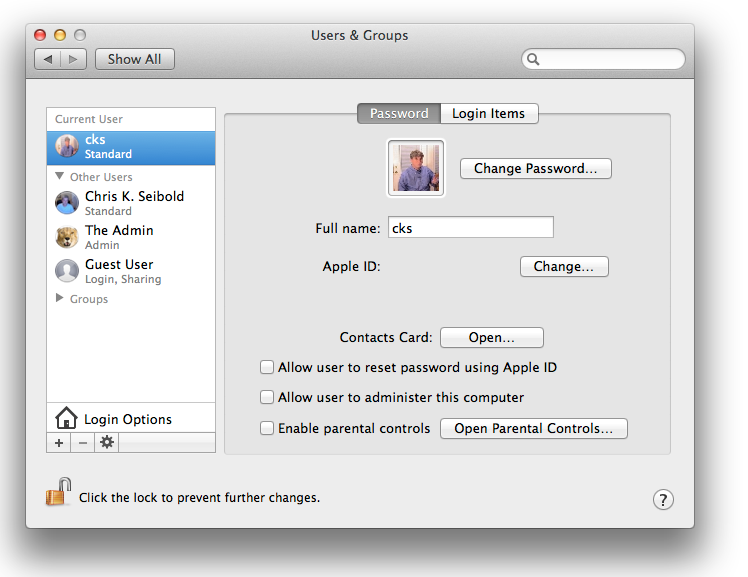
Fill out the fields and pick a good password (click the key icon if you want Password Assistant to help you pick a secure one); write yourself a meaningful hint and click Create User. You now have two administrator accounts. Now youâre ready to make your original admin account into a standard account: click your original account in the list on the right side of the preference pane, and then uncheck the box that says âAllow user to administer this computerâ (Figure 1-11). Thatâs itâyouâve turned your overly powerful administrator account into a safe-to-use-daily standard account! (Well, after you restart your machine, anyway.) In Figure 1-11, a former administrator account has become a standard account.
You might be experiencing some regret at this point. What about all the power you gave up? How will you get things done when you need to be an administrator to accomplish something? Will you have to log out and log back in? Donât fret: everything will be almost exactly the same. Youâll still have all the same powers, youâll just have to occasionally enter the admin username and password you just created instead of the password associated with your now-standard accountâa small price to pay for increased security.
Now you know the safe way to do things when it comes to user accounts, but that method might not be to your liking. You might be one of those folks who wants to control everythingâyouâre so certain of your abilities that you donât want to stumble along using a standard account to safeguard other usersâ data or the integrity of your machine. If youâre one of those people, the root account may be for you.
Warning: Enabling a root account is a bad ideaâa really bad idea. Donât do it. You can accomplish anything you want to by just being an administrator user or authenticating when youâre trying to do something potentially damaging. But if you still insist on being lord of the realm, this section explains what to do.
Youâve been warned, but if you want to go ahead and enable the root account anyway, the process is simple. Open the Users & Groups preference pane, click the lock icon and enter your admin credentials, and then click Login Options. In the paneâs list of settings, click the Join button. Doing so will display a pane where you can enter a server for your Mac to look at. You donât need to worry about which server to choose. Just click the Open Directory Utility button and marvel at the Directory Utility window (Figure 1-12).
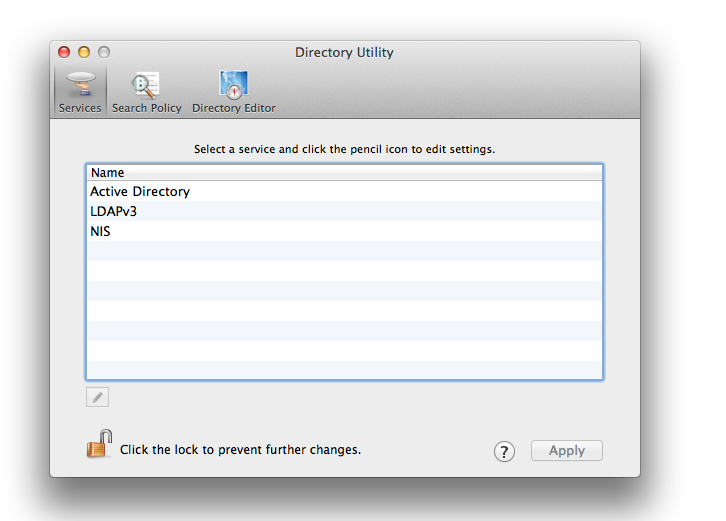
Figure 1-12. Active Directory, LDAPv3, NISâis this some sort of repository for bad acronyms? Nope. Even though this window might not make any sense at all in light of what youâre trying to do, this is exactly where you want to be.
You are about to become the supreme overlord of your Mac. First, unlock the pane by clicking the lock icon and authenticating. Next, head to the top of your screen, click Edit, and then select Enable Root User, Youâll see some fields you can use to create a password for the newly enabled root user. Enter the password and bangâyouâve got a root user for your Mac!
To log in as the root user, log out or switch users. Youâll see an
option on the Login screen named Others. Choose this option and then
type in root for the login name
and the password you created for that account.
Once youâre logged in as the root user, you can do anything you want. You can look at any file on your machine (even other peopleâs) delete any directory, delete any file, or completely ruin the system on a whim. Logging in as root isnât necessarily dangerous if youâre very careful with what you do while youâre logged in, but a momentâs lapse of attention and you can do serious damage.
Note: If you donât administer the Mac you use, you might be worried that the administrator could log in as root and see all your personal files. Thatâs certainly possible. The way to prevent that is to move your home directory to a portable media you can physically control (see [Hack #35]) or encrypt the data using FileVault 2 ([Hack #34]).
Most (but not all) of the information that makes your Mac seem uniquely yours resides in your Home folder. Discover how to take this folder with you everywhere you go so that any Mac feels (almost) like home.
Take the case of the mysterious Mac Guy A. He had a problem: he was constantly using different Macs. He might use one of 20 different Macs in his schoolâs computer lab, give a lecture using yet another Mac or, even worse, he might find himself in front of his girlfriendâs laptop for an extended period of time.
âNo big deal,â you argue, âhe can use iCloud. Store his documents there and he can access them everywhere.â A seemingly sure solutionâuntil the network gets iffy (like it is at more than one place he visits) or he runs up against his data limit (iCloud storage isnât unlimited).
So the problem remains. He doesnât want to haul his Mac Pro around in a heavy-duty backpack (plus think how long the extension cord would have to be!), he canât use his iPad for all his computing needs, and carrying both the iPad and a laptop seems overly burdensome. He does have one thing going for him: heâs around a lot Macs, a lot of the time. If he could just make all those Macs his, he would be in computing nirvana!
The good news is that you can make any Mac you meet yours. The bad news? Youâll need some portable storageâsomething with more space than your current Home folder but thatâs easy to carry around. This could be an SSD drive, a high-speed flash drive connected to your keychain, etc. Whatever youâre comfortable carrying that is of sufficient size will fit the bill.
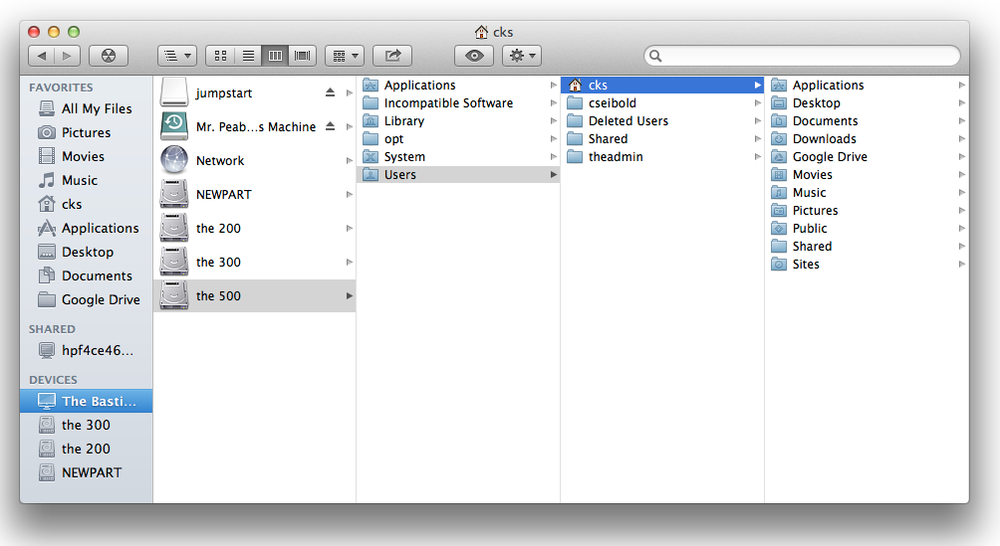
Your Home folder houses everything that you like and have customized about your Mac: your music, your photos, and the veritable morass of preferences that tell your applications just how you like them to behave.
Warning: Your Home folder is crucially importantâitâs one collection of files you really, really donât want to lose. So before you try this hack (or any potentially dangerous hack) make sure your Home folder is safely backed up. (See [Hack #1] for tips on backing up.)
Of course, not everything travels with your Home folder. Your Application folder houses the applications you use and they wonât go for the ride unless you manually copy them to a folder on the memory stick youâre using. Youâve got two choices: either make sure the applications you want to use are on the Macs youâll be using, or take your unusual applications with you.
Turns out thereâs an Application folder right in your Home folder. Usually this is reserved for apps that are installed for a single user, but thereâs no reason you canât copy the apps you want to travel with to this folder. It wonât work for every app, but most apps donât mind travelling like this.
The first obstacle to deal with is the fact that your drive/chip/whatever youâre using probably didnât come formatted with Macs in mind. Your Mac prefers a Mac OS Extended Journaled format. So fire up Disk Utility (ApplicationsâUtilitiesâDisk Utility), select the device in the lefthand column (Figure 1-14), and then click Erase and let Disk Utility do the hard work. When itâs done, youâll have a blank drive ready to hold your Home folder.
Using Macs is easy, right? So slapping your Home folder on another drive is as simple as a dragging and dropping it, right? Well it isâwith one caveat: turns out that a Mac needs to know where to look for your Home folder in order to use it, and telling a Mac where to look for your Home folder isnât a trivial task. First, you have a decision to make: do you want the portable media to house your current Home folder and rely solely on said media for all your Home-folder storage needs, or do you want your media to contain a copy of your Home folder? Thereâs no right answer here: if youâre going to spend a lot more time at your home computer consider using a copy; if your time is equally spent between machines, consider using the portable media as your standalone Home folder. The difference isnât huge, but it also isnât negligible. Depending on the steps you take, you can create a Home folder you use all the time (on your main machine and all the other Macs you use) or one that youâll use only when youâre on a Mac thatâs not yours.
Whether youâve decided to go with a new Home folder or just go portable media all the time, the process is the same. First, locate the Home folder you want to use on the go and copy it to the media you are going to use. This will duplicate the data from the chosen folder to your destination (youâll be asked to authenticate during the process). Donât worry, copying data is nondestructive, so you wonât lose any data doing this.
Note: If you decide to copy the contents of your Home folder one folder at a time, youâll miss the Library folder because itâs invisible. To temporarily make invisibles visible, open Terminal and type:
defaults write com.apple.finder AppleShowAllFiles TRUE
And then press Return. This command tells the Finder to show the hidden files. Next, type:
killall Finder
This command restarts the Finder. Now you can see the Library folder and copy it over to your portable media. Once youâre done, head back to Terminal and type:
defaults write com.apple.finder AppleShowAllFiles FALSE
This re-hides the Library folder and other invisibles. Finally, type:
killall Finder
This restarts the Finder and makes everything normal again.
Once you have the Home folder copied to your chosen destination, youâve got to tell the Mac youâre using as your main machine where to look for the Home folder. Yeah, your computer is smart, but it isnât psychic (though Google might be).
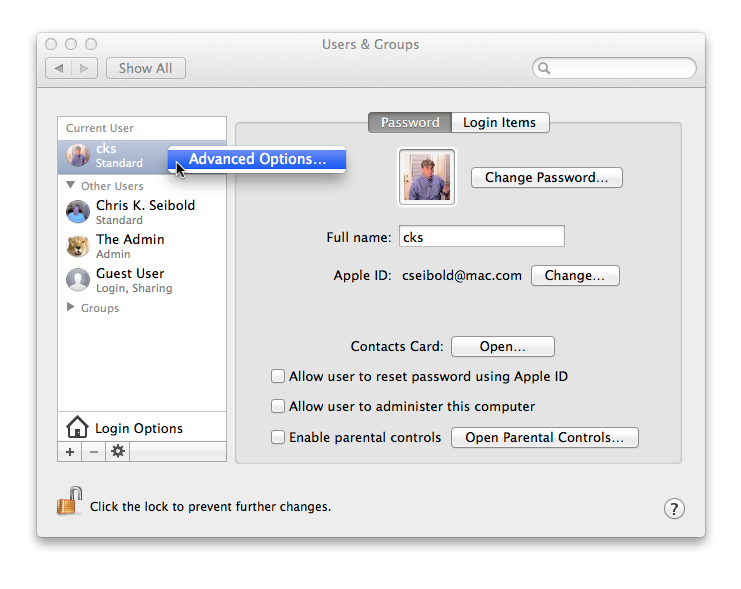
The deliciously easy procedure to tell your Mac where your new Home folder resides? Head over to the Accounts preference pane (System PreferencesâUsers & Groups), click on the lock to make changes and then authenticate. Once authenticated youâll need to explore the Advanced options, which Apple has cleverly hidden from view. To get to them, in the lefthand column, right-click the account you want to change, and an Advanced Options item will magically appear (Figure 1-16).
Once youâve accessed the Advanced Options pane, youâll see a scary warning message. Donât worry, what weâre doing wonât hurt anything. Look for the Choose button next to the âHome directoryâ field. Simply click that button and navigate to where your new Home folder resides (Figure 1-17).
As mentioned earlier, Macs arenât psychic. So youâll have to run through this process on each Mac youâre planning to use.
So you want your Home folder to go but you donât always want to rely on your portable drive for your Home folder. In other words, you want your Home folder on your keychain when youâre away but when youâre in your dorm or apartment you want your Mac to rely on the internal hard drive. That configuration makes a lot of senseâwhy not use the built-in hard drive when youâre using your home computer?
Of course, if the latest files arenât at your fingertips, that defeats the purpose of having a portable Home folder (convenience). For example, if you modified a Final Cut Pro movie while you were working on a Mac using your portable drive as the Home folder, when you want to work on the same presentation at home, you wonât want to manually dig through your USB drive to find the latest version.
What you need is a way to keep the Home folder on your portable media synced up with the Home folder on your main Mac. There are many ways to get this done, either using a command line and something like rsync or a third-party application. Thereâs no single ârightâ method for keeping the folders synced, but one of the easiest is using Automator.
You could start from scratch and create your very own Automator workflow (see [Hack #23] for instructions), but why reinvent the wheel when someone else has done most of the legwork? On your home Mac, point your browser to the Sync Folders download page to grab a copy of it. Sync Folders is a very handy Automator action written by Ben Long that can take the contents of two folders and make sure the folders exactly mirror each other while ensuring the newest version of each file overwrites the older files. Once youâve downloaded the Sync Folders action, double-click the file and a window will pop up asking if you want to install the âSync Foldersâ action. Of course you do, so click Install.
Sync Folders then needs to know what you want synced (in this case, the two versions of your Home folder), and that we want the folder synced both ways with the newest version of each file in both folders. The first thing to do is drag your Macâs Home folder from a Finder window (just grab it in the sidebar) into Automatorâs workflow pane (the upper-right pane). Then do the same with the Home folder youâve created on your portable storage. Make sure the pop-up menu next to Pass On is set to Both Folders, and youâre ready to try it out. Click the Play button and witness the results of the workflow.
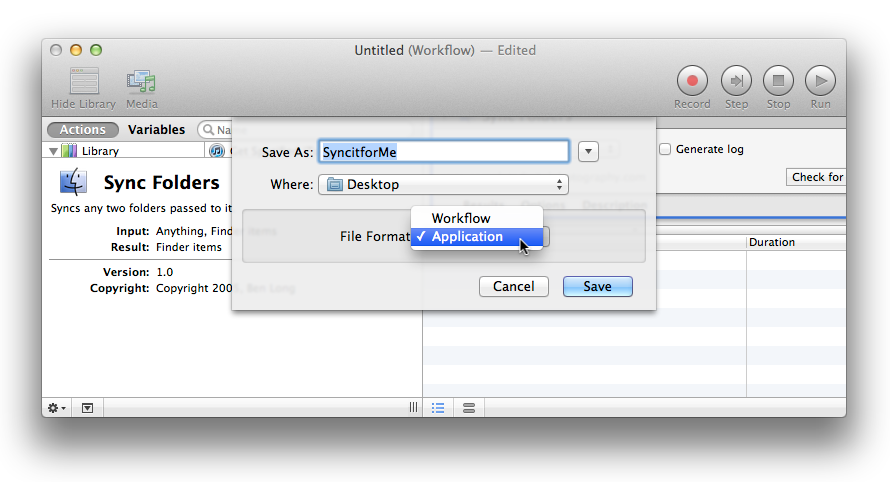
You probably donât want to fire up Automator every time you want to sync your portable Home folder and the Home folder on your main machine. No problem: one of the great things about Automator is that it lets you save a workflow as an application so you can just launch the application instead of mucking about with Automator. To save Sync Folders as an application, choose FileâSave As (you may have to press the Option key to make this menu item appear), name the workflow something meaningful, and choose Application in the File Format menu (Figure 1-18); then click Save. Once the file is saved you can sync the two folders anytime simply by launching your new application.
Using your newly portable Home folder is simply a matter of reversing the steps for creating your new Home folder. Simply create a new account on the target machine with the same name as the account on your portable media and youâre ready to go. Once youâve created that account, head to the Users & Groups preference paneâs Advanced Options and point OS X to the portable mediaâbased Home folder.
PLIST files are strewn all over your Mac, but chances are you never see them. Thatâs too bad, because PLIST files offer one of the most direct ways to hack your machine. Spend a few moments with this hack to discover techniques for mastering PLIST files.
PLIST is short for âproperty list,â and these files are the main
method OS X (and some other operating systems) use to organize data so
that itâs accessible by programs; theyâre also structured enough that you
can generate your own PLIST files if need be. That very brief explanation
doesnât really tell you much, but the full
explanation of what PLIST files actually do is a little dense. (If youâre
really interested in the functionality of PLIST files, check out its
manual entry or type man
plist into Terminal.)
When you are bending your machine to your will, the most frequent PLIST files youâll be mucking with are the ones that store the default values of parameters for various programs. These can range from default colors to default behaviors. These files are typically found in the LibraryâPreferences folder of your Home directory (to view them, in the Finder, use the Go menu, press and hold the Option key, and choose the Library folder that appears; then open the Preferences folder). Tweaking these files can yield unexpected behaviors that are mostly harmless. If you screw one up, you can always just drag the PLIST file to the trash, and your Mac will generate a new one. The downside of doing so is that youâll lose your preferences for that program, so the better way (as with all hacks) is to back up the file so youâll have a ready-made replacement.
Thereâs more than one way to access PLIST files. The quickest is
Terminal, via the default command. An
example will help.
Some programs can be made to display a Debug menu (most canât), and Disk Utility is one of these. Turns out that the Debug menu in Disk Utility is actually very useful in Mountain Lion because it includes an option to show all the partitions on your Macâs drives. Why is this useful? Lion and Mountain Lion rely on a hidden partition not normally shown in Disk Utility, and itâs a partition you could accidentally delete. Knowing whether the partition is there offers some peace of mind. Time to add the Debug menu so you can check for the partition:
Like magic, Disk Utility has a brand new Debug menu (see Figure 1-19). To see all your partitions, choose âShow every partition.â If you see Recovery Disk in the list on the left side of the Disk Utility window, you know youâve still got the extra partition used by Lion and Mountain Lion.
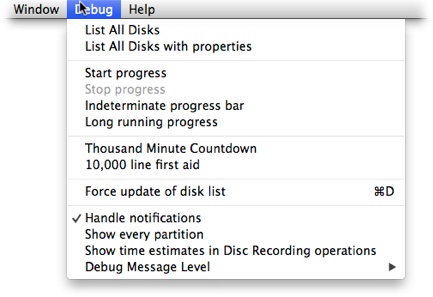
Figure 1-19. Disk Utilityâs Debug menu. You might not have seen it before, but it can be very useful.
Using Terminal is great when you know specifically what you want to change, but not so useful if you just want to know what you can change. To find that out, you need the property list file itself. As mentioned earlier in this section, youâll usually find the PLIST files you want to hack in the Library folder of your Home directory.
To open PLIST files, you need a property list editor. If you donât have a property list editor lying about (and you probably donât), youâll want to get one. In older versions of OS X (Snow Leopard and earlier), a property list editor was bundled with Developer Tools as a standalone application. In later versions of OS X (Lion and newer) you can use Xcode, which is free to download from the Mac App Store. (You donât have to use Xcodeâthere are a lot of other programs you can use to edit PLIST filesâbut itâs hard to beat Xcodeâs price.) Once youâve got a PLIST editor you can live with, find the Disk Utility PLIST file we played with earlier (~/Library/Preferences/com.apple.DiskUtility.plist) and open it up (Figure 1-20).
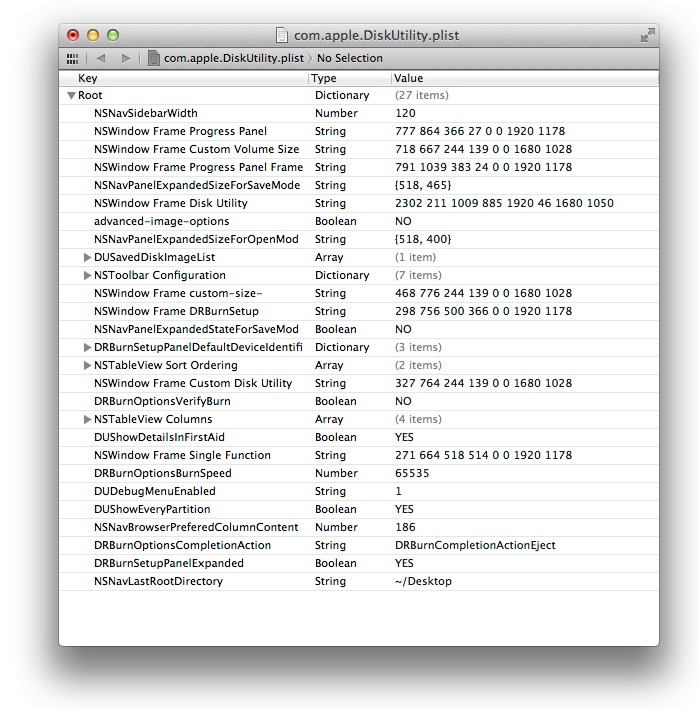
Figure 1-20. Using Xcode to poke around Disk Utilityâs PLIST file. You can make a ton of reversible choices here, so donât be afraid to play! Your options might look different than the ones pictured here; thatâs to be expected, because the PLIST options change as you deviate from the standard configuration.
Note: If youâre wondering what ~ (tilde) is doing in the commands for Terminal, youâre not alone. Itâs a shortcut that means Home. So instead of typing Hard Drive/Library/Users/cks (for example), you can simply type ~ and the Terminal will know what you mean.
You can change any of the lines you see when the file is opened. Most of the them wonât mean much to you, but some have obvious functionality. For example, by fiddling with DRBurnOptionsVerifyBurn (toggling YES and NO) you can stop OS X from verifying a disk after you burn it. (This is also a great example of why the PLISTs are different from Mac to Mac: if youâve never burned a disk, this option wonât be on in your PLIST because your Mac has never been faced with that decision.)
So now you know how to tweak PLIST files with the command-line and a program. Most people would say thatâs enough, but if youâre messing with these files a lot, you might want to use something more familiar. It turns out you can also touch up PLIST files with a text editor, but it will take just a wee bit of work.
PLIST files are stored in binary format, so youâll have to convert them to something a text editor can read. The easiest way to do so? Terminal. Since weâve abused Disk Utilityâs PLIST file enough for now, try poking around with Safariâs PLIST file instead (~/Library/Preferences/com.apple.Safari.plist). Since itâs smart to work with a copy, right-click the file and choose Duplicate from the contextual menu. Then launch Terminal and convert the file with the command line by typing:
plutil -convert xml1 ~/Library/Preferences/com.apple.Safari\ copy.plist
Here, the plutil command
invokes the property list utility, -convert
xml1 (thatâs the letters X, M, and L followed by the number 1)
tells plutil to convert the property
list to XML, and the rest is just the path to the file. Once the command
has run, navigate to the converted file with Finder, right-click it and
choose Open WithâOther, and then pick TextEdit. The formerly unreadable
PLIST is now easily understandable (see Figure 1-21).
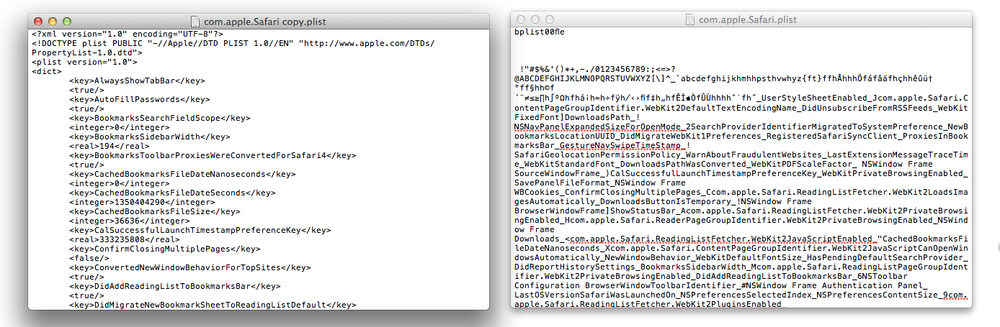
Figure 1-21. The same PLIST file side by side. The one on the left is the converted version (so itâs comprehensible). The one on the right is the unconverted version, which looks like it was created by an explosion at a keyboard factory.
You can now edit the PLIST file however you like with TextEdit. When youâre done, youâll have to convert the file back to binary format:
plutil -convert binary ~/Library/Preferences/com.apple.Safari\ copy.plist
Then simply rename the file to remove the word âcopyâ from its name, and Safari will happily use your handcrafted PLIST until you tire of it.
Thereâs much more to learn about PLIST files, but these tidbits should get you comfortable enough to start PLIST-hacking adventures and let you know whatâs going on when these types of files get abused throughout the rest of this book.
When youâve been tweaking your Mac and something goes wrong, the natural thing is to imagine your actions just destroyed OS X. Thatâs probably not the caseâyour Mac was probably going to let you down no matter what you did (hardware failures usually arenât the userâs fault), so donât feel guilty. No matter the cause, the important thing to know is what to do nextâand thatâs when this hack comes in handy.
OS X is a robust operating system, but while problems are rare, they do show up from time to time. Since these issues always seem to present themselves at the worst possible moment, it helps if you know the best ways to troubleshoot them, and thatâs a great reason to keep this book around!
There are a lot of things that can go wrong with your Mac: hardware problems, software glitches, and configuration issues can happen at any moment. Most of the problems youâll encounter can be easily addressed or diagnosed by following the steps in this hack. If the information here doesnât resolve things, it could be a unique issue, in which case a trip to the Apple Store or a call to Apple is in order.
Tip: A complete list of Appleâs technical support numbers is available. In the U.S., dial 1-800-275-2273.
One of the most common problems on a Mac is an application that isnât behaving as expected. This problem comes in many forms: an application that unexpectedly quits repeatedly, simply stops responding, or just doesnât perform the way it normally does. This section suggests ways to resolve all these issues and more.
Occasionally, an application will simply stop reacting to anything. Your mouse or trackpad will still work, other programs will be fine, but if you try to use the troublesome program, all youâll get is a spinning beach ball cursor (instead of the mouse pointer) and youâll have no way to input anything.
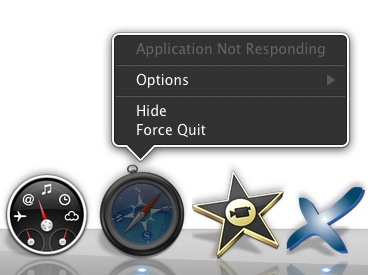
Donât panicâthereâs an easy fix. Simply right-click or Control-click the stalled applicationâs icon in the Dock to bring up its Dock menu (Figure 1-22). If you see âApplication Not Respondingâ in faint text at the top of the menu, youâll also see a Force Quit option. Select Force Quit and OS X will kill the program.
You may also need another one way to kill applications,
because occasionally a program can become unresponsive without OS X
realizing it. For these times, launch the Force Quit Applications
dialog box either by heading to the Apple menu and selecting Force
Quit or using the key combo Option-Command-Esc. You can also try
holding down Shift as you click the Apple menu, and then select Force
Quit application name to kill the
front-most application.
Thereâs some good news when it comes to force quitting applications in Lion and Mountain Lion. In previous versions of OS X, any changes you made between the last time you saved a document and the moment the application started misbehaving were gone forever. But these newer versions of OS X include Auto Save, which automatically saves your work as you go. So if youâre forced to quit an application, OS X preserves the work youâve done since the last time you saved.
Warning: For the time being âSave early, save oftenâ is still good advice, since OS Xâs Auto Save feature only works with applications specifically built with Auto Save in mind. That means that work you do in apps designed for Lion and Mountain Lion will be saved, but applications that havenât been updated for those versions of OS X wonât automatically save your work.
The Finder is just another program, so it can get hung up, too. If that happens, either head to the Apple menu and choose Force Quit or use the key combination Option-Command-Esc. If nothing happens, try clicking the Dock or some other application first, and then use the Apple menu or Option-Command-Esc to invoke the Force Quit dialog box.
Note: When you select an application in the Force Quit dialog box, the dialog boxâs button reads âForce Quit.â However, if you select the Finder, the button reads âRelaunchâ instead. Why the change in nomenclature? Unlike every other application, the Finder will be restarted immediately after itâs forced to quit.
If you suspect something is eating up too much processor time or too many system resources (because your Mac is running really slowly, say, or the fans are running at full speed for no obvious reason), Force Quit wonât help you figure out which application is hogging all the resources. Instead, open Activity Monitor (ApplicationsâUtilitiesâActivity Monitor), click its CPU tab, and then check the % CPU column for any processes that are using a lot of CPU resources for more than a few seconds. (Safari and its helper applications occasionally do this, particularly with runaway Flash or JavaScript code.) When you identify a suspect, single-click the renegade processâs name and then click Activity Monitorâs big red Quit Process button (you canât miss itâitâs shaped like a stop sign).
Warning: Be careful which applications you quit in this way. There are some programs that your Mac runs in the background, and many of these are important in helping your computer operate normally. Hereâs a rule of thumb: if you donât recognize the name of the program as an application that you launched, donât kill it. Instead, do a Google search on its name (for good measure, include the terms âMac OS Xâ and âcpu,â too). Chances are good youâll find a solution for whatever is causing that process to use up so much CPU time.
A misbehaving application is bad enough, but a Mac that wonât start properly is truly disconcerting. The good news is that most such problems are usually repairable. The general method of attack in this case is to get your Mac to a state where you can run Disk Utility and repair the drive. However, there are some situations where you canât even get to that point. This section discusses your options.
If your Mac just beeps when you try to start it up, itâs trying to tell you something: one beep means thereâs no memory (RAM) installed, and three beeps means your RAM doesnât pass integrity check. (This goes for Intel Macs only; Power PC Macs have slightly different beeps, but they canât run Lion or Mountain Lion.) The problem could be a bad RAM module, so youâll need to open up your Mac and replace the module.
Try installing some memory that youâre certain is fully functional to see if that resolves the problem. If you donât have any spare memory lying around, try removing each RAM module and replacing them one by one until youâve isolated the bad module.
Tip: If you donât know how to replace memory in your Mac, check the user guide that came with it. Or if your Mac is still under warranty, just bring it into an Apple Store for service.
If you suspect youâve got a physical hard drive problem, you need to check things out quickly before they get much, much worse. If you hear a strange noise coming from your machine, thatâs an obvious sign of a hard drive problem; but they can also be indicated by the computer stalling for several seconds at a time (or making a clicking sound when stalling).
Just as with a car, when a bad sound is emanating from your hard drive, itâs usually a bad thing. If youâve ever listened to the National Public Radio show Car Talk, you know that one of the highlights is when callers try to imitate the sounds their cars are making. If youâre inclined to try identifying the sound by ear, head over to http://datacent.com/hard_drive_sounds.php and take a listen to the sounds of dying drives, sorted by manufacturer.
Warning: If your hard drive is failing, youâre likely to lose more data every moment itâs running. If you donât have current backups, your best bet is to replace the drive immediately, and either seek a data-recovery professional or, if you donât have the money for that, install the damaged drive in an external drive enclosure and use the GNU ddrescue utility (www.gnu.org/software/ddrescue) to recover the data on the damaged drive.
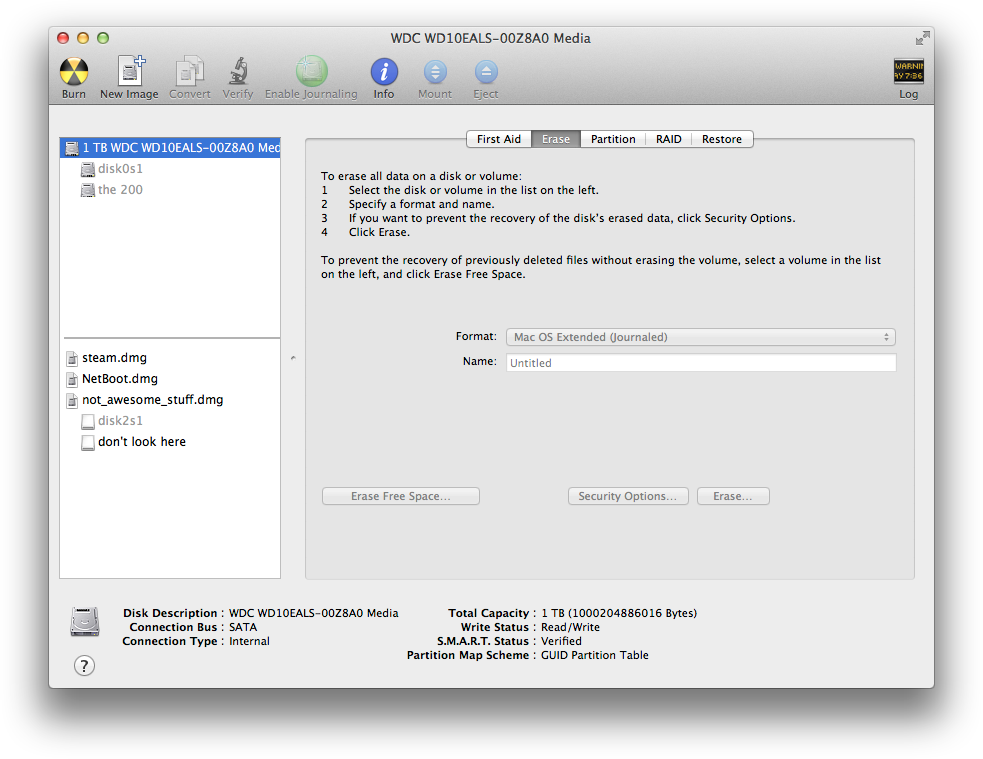
If you arenât hearing any unusual sounds but still suspect your hard drive is causing your problems, head to Disk Utility (ApplicationsâUtilitiesâDisk Utility) and check the S.M.A.R.T. status of the drive.
Using a computer means loving acronyms, and this time the acronym is clever, if a little forced: S.M.A.R.T. stands for Self-Monitoring Analysis and Reporting Technology. The idea behind S.M.A.R.T. is that many hard disk failures are predictable, and computer users, if given a heads-up that their hard drive is on the verge of failing, will be able to recover data before the failure actually happens. You can discover your driveâs S.M.A.R.T status by opening Disk Utility and selecting the disk youâre worried about in the list on the left. In the lower-right part of the Disk Utility window, youâll see the S.M.A.R.T Status (Figure 1-23): either Verified (everything is fine) or âAbout to Fail.â If you get the âAbout to Failâ notice, donât waste any time: if your Mac is under warranty, take it into an Apple Store; otherwise, back up your data as soon as possible (see [Hack #1]) and start pricing out the cost of a new drive.
Note: S.M.A.R.T. status isnât available for every drive. External drives that support S.M.A.R.T. donât have a way to report that over USB or FireWire, so if you donât see the status of a particular drive, donât panic.
Warning: S.M.A.R.T. isnât perfect (thatâs no surpriseânothing is). You can have a problematic drive that S.M.A.R.T. wonât recognize. So if youâre having consistent problems and S.M.A.R.T. keeps telling you everything is fine, donât discount the drive as the source of the problems after youâve exhausted other fixes.
Thankfully, the hardware failures just described are relatively rare. Much more common are software failures. Corrupt files, wonky login items, and even font problems can cause a startup failure. These issues are generally repairable, hopefully without data loss. Unfortunately, when you have one of these problems, the cause isnât immediately obvious. When faced with a Mac that wonât boot, there are a few things you can try to get your computer back to a usable state:
- Restart your Mac
A lot happens when OS X starts up: it checks your Macâs hardware, prepares the system software, and more. During the startup process, there are ample opportunities for something to go wrong, especially right after you install an update to OS X or even an application. If your Mac wonât complete the startup sequence, donât panic; simply restart the machine by holding down the power button until you hear a chime; chances are everything will be fine.
Warning: If you see a flashing question mark when you try to start your Mac, it means that your machine canât find its startup disk. In that case, skip down this list to âRestart in Recovery Mode.â
- Safe Boot
If a simple restart doesnât do the trick, it means you have problems that persist across restarts, so the next step is a Safe Boot. In Safe Mode, all your Macâs startup items are disabled, font caches are cleared, and some other possibly problematic items are avoided. More important, Safe Boot gives you a chance to run Disk Utility, uninstall any software that may be misbehaving, or back up your data before whatever is causing the problem gets worse. To get your Mac to boot into Safe Mode, hold down the Shift key after you hear the startup chime and release the key when you see the spinning wheel appear. Once your Mac has booted, run Disk Utility (ApplicationsâUtilitiesâDisk Utility).
Note: When youâre booting in Safe Mode, the Login window automatically appears even if you usually use Automatic Login on your Mac. Donât be alarmed by the changeâitâs a sign that Safe Mode is working as expected.
- Restart in Recovery Mode
Before Lion and Mountain Lion, one remedy to try when your Mac went bad was to boot from the DVD you either got with your Mac or purchased when you upgraded to Snow Leopard. But since you donât use any physical mediaâDVD or otherwiseâwhen you install Lion or Mountain Lion, this trick wonât work anymore. Fortunately, Apple realizes that, when problems occur, you might need to boot your Mac from a different source than usual, so OS X now includes Recovery Mode.
Note: You need to be connected to the Internet to use Recovery Mode to reinstall Lion or Mountain Lion. The reinstall option will download every byte of the OS X installer, so you might want to try other fixes before going through with the entire process.
Recovery Mode allows you to boot from a virtual partition called Recovery HD. When you boot into Recovery Mode, youâll find yourself running a special system that lets you restore your Mac from a Time Machine backup, reinstall OS X, use Safari to look for solutions to your problem online, or run Disk Utility. (Donât be afraid to launch Safari even if youâre not connected to the Internet; thereâs a static web page with basic instructions that automatically opens when you launch Safari.)
Note: You can only run one application at a time in Recovery Mode, so if youâre running Disk Utility, say, you canât also launch Safari. Being aware of this limitation can save you some frustration and endless restarts.
In addition to Recovery Modeâs obvious choices, you can also run Firmware Password Utility, Network Utility, and Terminal by visiting the Utilities drop-down menu at the top of the screen. With all of these options, most users will find the choices presented in the OS X Utilities window sufficient to fix their Mac woes.
Hereâs how to boot your Mac in Recovery Mode (the process should be familiar if youâve booted Macs from alternative disks before): hold down the Option key while starting your Mac. Youâll be presented with a screen that shows all the viable startup partitions available. Choose Recovery HD and youâll be well on your way to diagnosing (and hopefully fixing) whatever problem is currently plaguing your Mac.
This section emphasized tools that come with Lion and Mountain Lion because, well, if youâve installed either version of OS X, you have access to these tools. But you should be aware that these tools arenât the only ones available when things go wrong. There are several disk-repair programs available (many of which are more powerful than Disk Utility) from third parties, such as DiskWarrior and TechTool Pro.
This maneuver gets its own section only because itâs one of the oldest troubleshooting techniques in Mac history.
PRAM (parameter random access memory) is where your Mac stores many of its hardware settings. Resetting the PRAM almost never resolves a startup issue, but itâs something Apple support usually asks you to do when troubleshooting a problem (and it does, in some rare cases, help). To reset the PRAM, turn on your Mac, immediately press and hold Option-Command-P-R, and continue to hold those keys until your Mac restarts and your hear the startup chime a total of three times. After you do this, you may have to reconfigure some of the system settings (like date, time, and possibly keyboard/mouse settings if youâve customized them).
Get Mac Hacks now with the O’Reilly learning platform.
O’Reilly members experience books, live events, courses curated by job role, and more from O’Reilly and nearly 200 top publishers.

