Windows services are the most useful of the self-hosting environments for WCF services. In fact, for services deployed in a production server system, the Windows service is the only practical self-hosting choice for a few reasons:
Windows services can be configured to start when the system starts without requiring a user to log in to the machine.
The Service Control Manager can be used to manage service startup, restarts, and other run behaviorsâno custom user interface required.
The service can be configured to restart when it encounters a failure, increasing overall availability.
Windows services are a self-hosting environment for WCF services, thus you write the
same code as with console and Windows hosts to initialize the ServiceHost. The main difference for Windows services is in the location where
initialization and cleanup take place. In this section Iâll walk you through creating and
deploying a Windows service and using it to host a WCF service.
Iâll provide you with a brief review of Windows services, followed by an explanation for how this relates to WCF. Then you will complete a lab that walks you through creating and testing a Windows service host. After that, Iâll discuss some scenarios for applying Windows services.
Windows services are applications whose lifetime is controlled through the Service Control Manager (SCM). The SCM is automatically started when a Windows machine boots, allowing local or remote control over the machineâs Windows services. You can access the SCM through the Control Panel under Administrative Tools â Services. Through the SCM you can: start, stop, pause, and continue services, and edit configuration settings for a service.
Windows services are normally installed as part of an automated deployment script, rather than directly through the SCM interface. Configuration settings for the service can also be scripted, but are also editable through property dialogs provided by the SCM. Figure 4-7 shows general properties for a Windows service. Aside from descriptive information, such as the service name, display name, and description, you can also control the service startup type and explicitly start, stop, pause, or resume the service from here.
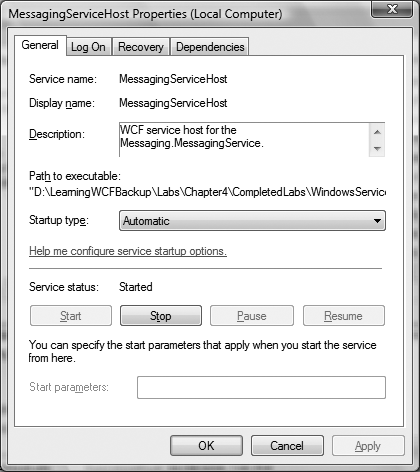
Startup type is an important setting since this determines whether the service is enabled or not, and whether the service should be automatically started when the machine boots. The options are:
- Disabled
The service is disabled.
- Manual
The service must be manually started using the SCM.
- Automatic
The service should start when the machine is booted.
- Automatic (delayed start)
The service should start after other nondelayed (higher-priority) services have started.
You can control the identity under which the service runs from the Log On tab of the service properties dialog (see Figure 4-8). This account identity is important because it governs the Windows resources that the service will have access to at runtime, along with the credentials that will be passed if the service calls out to another process.
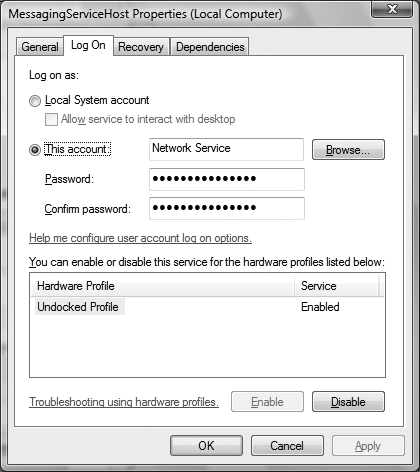
Options for identity are as follows:
- Local Service
This is a special identity that presents anonymous credentials for outgoing calls.
- Local System
This represents a risky, very high-privileged account.
- Network Service
This represents a safer, lower-privileged account, which also means that the service will have reduced access to Windows resources.
- Specific User
This represents a particular user and requires a password be provided, preferably one that wonât expire.
Services can have a user interface only if they run as the local system account.
Another feature of Windows services is their recovery options. For example, in the event of failure, the service can be configured to restart. As Figure 4-9 illustrates, you can set the recovery action for the first and second failures, and all subsequent failures. In addition, you can control the delay before restarting the service and reset the failure count after some duration.
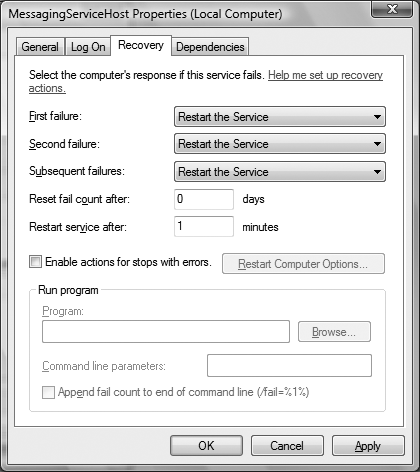
Options for recovery are as follows:
Take no action.
Run a program.
Restart the service.
Restart the computer.
You can use the Windows Service template provided with Visual Studio to generate a
Windows application that contains a Windows serviceâa type that extends ServiceBase from the System.ServiceProcess namespace. In fact, you can create more than one
Windows service type in a single executable process. To implement a Windows service, your
job is to set properties and override the appropriate methods on ServiceBase and optionally provide an installer to streamline the
installation process.
You will typically override the OnStart( ) and
OnStop( ) methods in a Windows service to provide
functionality appropriate for service startup and shutdown. When a service is started,
through the SCM or when the machine boots if configured to do so, the OnStart( ) override is called, giving you a chance to
initialize. Likewise, when the service is stopped, through the SCM or when the machine
is shut down, the OnStop( ) override is called so
that you can respond and clean up any allocated resources.
Optionally, services can also support pause and continue behavior, suspend behavior
when the machine is operating on low battery power, and respond specifically to machine
shutdown. Your service must explicitly subscribe to these lifecycle events by enabling
the appropriate property, as shown in bold in Example 4-16. By enabling
CanHandlePowerEvent, CanPauseAndContinue, and CanShutdown
properties, your respective overrides for OnPowerEvent(
), OnPause( ), OnContinue( ), and OnShutdown( ) will be
invoked at the appropriate times.
Example 4-16. Responding to pause, continue, shutdown, and power events
public partial class TraceWindowsService : ServiceBase
{
  public TraceWindowsService( )
  {
    InitializeComponent( );
    this.ServiceName = "TraceWindowsService";this.CanHandlePowerEvent = true;
    this.CanPauseAndContinue = true;
    this.CanShutdown = true;
  }

  protected override bool OnPowerEvent(PowerBroadcastStatus powerStatus)
  {...}

  protected override void OnPause( )
  {...}

  protected override void OnContinue( )
  {...}

  protected override void OnShutdown( )
  {...}

  // other code
}
Tip
The following code sample illustrates a Windows service that traces each of these events: <YourLearningWCFPath>\Samples\Hosting\TraceWindowsService.
The AutoLog property of ServiceBase is enabled by default. That means all start, stop, pause, and
continue events will be recorded in the application event log. ServiceBase also provides a direct reference to the event log through its
EventLog property. Using this reference, you can
write application-specific details directly to the event log, as shown here:
this.EventLog.WriteEntry("This is an information log entry.",
EventLogEntryType.Information);

this.EventLog.WriteEntry("This is an error log entry.", EventLogEntryType.Error);

this.EventLog.WriteEntry("This is a warning log entry.",
EventLogEntryType.Warning);
The EventLogEntryType enumeration has the
following options:
InformationTo trace non-critical information useful to administrators
WarningTo indicate a problem that does not necessarily prevent the service from functioning yet
ErrorTo log exceptions or internal errors
SuccessAuditTo audit successful attempts to access a resource
FailureAuditTo audit failed attempts to access a resource
When you generate a new Windows service application using the Windows Service
template, the following code is added to the Main( )
entry point of the application:
ServiceBase[] ServicesToRun;
ServicesToRun = new ServiceBase[] { new MessagingServiceHost( ) };
ServiceBase.Run(ServicesToRun);
ServiceBase.Run( ) asks the SCM to add one or
more Windows services to the database of installed services located in the Windows
registry. You can add additional service types to this list if you have more than one
Windows service in the application.
When the service is registered, the location of the executable process containing the service is recorded. Thus, the application configuration fileâwhere service model configuration is placed for the executableâshould be located in the same directory as the service, like you would expect with any self-hosting environment.
The Installer Tool (installutil.exe) is a command-line utility used to execute the installer
components in a specified assembly. This tool is commonly used to install database
scripts and Windows services, but can be used to run any installer component that
implements the RunInstallerAttribute and inherits the
Installer base type.
In the lab, you will create an installer component, similar to the implementation
shown in Example 4-17, with
the exception of the user account settings. When the installer tool is run with the
Windows service assembly, the installer type (MessagingServiceHostInstaller) is constructed which initializes the
settings for MessagingServiceHost with the SCM. These
settings can be altered during installation with a proper setup program or directly
through the SCM interface discussed earlier.
Example 4-17. Providing a specific user account for a Windows service
[RunInstaller(true)]
public class MessagingServiceHostInstaller : Installer
{
  public MessagingServiceHostInstaller( )
  {
    ServiceProcessInstaller processInstaller = new ServiceProcessInstaller( );
    ServiceInstaller serviceInstaller = new ServiceInstaller( );processInstaller.Account = ServiceAccount.User;
    processInstaller.Username = "WindowsServiceUser";
    processInstaller.Password = "p@ssw0rd";

    serviceInstaller.DisplayName = "MessagingServiceHost_EventLog";
    serviceInstaller.Description = "WCF service host for the
Messaging.MessagingService.";
    serviceInstaller.ServiceName = "MessagingServiceHost_EventLog";
    serviceInstaller.StartType = ServiceStartMode.Automatic;

    Installers.Add(processInstaller);
    Installers.Add(serviceInstaller);
  }
}In this lab, you will create and install a new Windows service and use it to host an existing WCF service. During the lab youâll use the Windows Service project template to create the host, create an installer class to help with installation settings, and install and run the Windows service. Once the service is running, youâll complete the client application to consume the service.
The first step is to create the service from the Windows Service project template.
First, open the startup solution for this lab at <YourLearningWCFPath>\Labs\Chapter4\WindowsServiceHost\WindowsServiceHost.sln. So far, this solution contains a completed service and a shell client application.
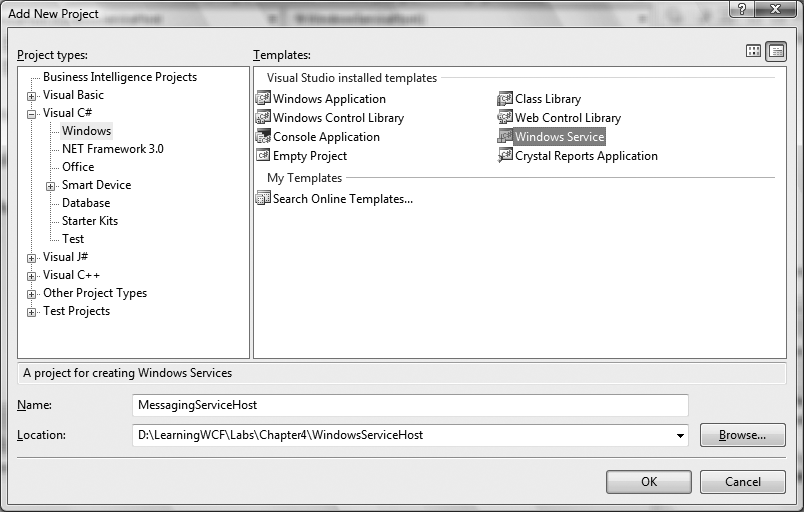
Letâs start by adding a new Windows Service project to the solution. From the Add New Project dialog, select the Windows Service template from the list of Windows templates (see Figure 4-10). Name the project
MessagingServiceHost.The newly generated project files include a service file, Service1.cs. From Solution Explorer, rename this file to MessagingServiceHost.cs; this will also rename the underlying Windows service class. Open the file in the code window to verify that the class and constructor were renamed to
MessagingServiceHost, as shown in Example 4-18.MessagingServiceHostinheritsServiceBase. Recall that this is the base type for all Windows service components, supplying some basic properties including aServiceNameproperty that identifies the service in the SCM. In the constructor of the Windows service, set theServiceNametoMessagingServiceHost, as shown here:public MessagingServiceHost( ) { InitializeComponent( );this.ServiceName = "MessagingServiceHost";}
In this part of the lab, youâll introduce code related to hosting the WCF service in a Windows service application.
Youâll need a configuration file to provide service model settings. Add a new application configuration file to the project (app.config) and create a
<system.serviceModel>section inside the<configuration>section. Configure the service to be accessed over TCP protocol, and provide a metadata exchange endpoint over TCP as well. The completed configuration is shown in Example 4-19.Example 4-19. Host configuration settings for MessagingService
<system.serviceModel>
  <services>
    <service name="Messaging.MessagingService"
behaviorConfiguration="serviceBehavior" >
      <endpoint address="MessagingService" contract="Messaging.IMessagingService"
binding="netTcpBinding" />
      <endpoint address="mex" contract="IMetadataExchange" binding="mexTcpBinding" />
      <host>
        <baseAddresses>
          <add baseAddress="net.tcp://localhost:9100"/>
        </baseAddresses>
      </host>
    </service>
  </services>
  <behaviors>
    <serviceBehaviors>
      <behavior name="serviceBehavior" >
        <serviceMetadata />
      </behavior>
    </serviceBehaviors>
  </behaviors>
</system.serviceModel>
Now add the code to initialize the
MessagingServicewhen the Windows service is started. Go to theMessagingServiceHostproject and add an assembly reference toSystem.ServiceModeland a project reference to theMessagingproject that holds the WCF service.Open MessagingServiceHost.cs and add a
usingstatement forSystem.ServiceModel, as shown here:using System.ServiceModel;
Inside the
MessagingServiceHosttype, create aServiceHostmember namedm_serviceHost. In addition, add code to theOnStart( )method override to construct theServiceHostinstance, as shown here:ServiceHost m_serviceHost; protected override void OnStart(string[] args) { m_serviceHost = new ServiceHost(typeof(Messaging.MessagingService)); m_serviceHost.Open( ); }Tip
ServiceBaseprovides a number of virtual methods where you can interact with Windows service events such as start, stop, pause, continue, and shutdown. Typically, youâll at least handle start and stop events.When the Windows service is stopped, you should clean up the
ServiceHostinstance and free the TCP port. Do this by adding code to theOnStop( )method override, as shown here:protected override void OnStop( ) { if (m_serviceHost != null) m_serviceHost.Close( ); m_serviceHost = null; }At this point the implementation of your Windows service host is complete. Now, you will create an installer for it.
Windows services typically provide an installer component to support the installation process, so in this part of the lab, Iâll walk you through creating one for this Windows service. This is not necessary to hosting services in the Windows serviceâit is merely a convenience for installation that you may find useful.
Go to the
WindowsServiceHostproject and add a reference to theSystem.Configuration.Installassembly so that the installer component will have access to it. Then add a new class to the project, naming the file MessagingServiceHostInstaller.cs.Edit the
MessagingServiceHostInstallerclass so that it inherits theInstallertype from theSystem.Configuration.Installnamespace, and make the typepublic. Also add ausingstatement for the namespace. Apply theRunInstallerAttributeto theMessagingServiceHostInstallerclass and add ausingstatement for theSystem.ComponentModelnamespace. The changes are shown here in bold:using System.Configuration.Install;using System.ComponentModel;namespace MessagingServiceHost {[RunInstaller(true)]publicclass MessagingServiceHostInstaller: Installer{ } }Now itâs time to write the code that will execute when the installer runs. Youâll use the
ServiceProcessInstallerand theServiceInstaller, both from theSystem.ServiceProcessnamespace, to initialize settings for the Windows service during installation.The constructor of the installer component,
MessagingServiceHostInstaller, will be executed when the Windows service is installed. In this constructor, create an instance of theServiceProcessInstallerto set the Windows account under which the Windows service will run. Add this installer to theInstallerscollection. Create an instance of theServiceInstalleras well. Initialize the descriptive properties for the Windows service and set its startup type to automatic.Example 4-20 shows the complete implementation for this constructor with the appropriate settings, in addition to the required
usingstatement.Example 4-20. Constructor code for MessagingServiceHostInstaller
using System.ServiceProcess;

// added to the MessagingServiceHostInstaller class
public MessagingServiceHostInstaller( )
{
  ServiceProcessInstaller processInstaller = new ServiceProcessInstaller( );
  ServiceInstaller serviceInstaller = new ServiceInstaller( );

  processInstaller.Account = ServiceAccount.NetworkService;
  serviceInstaller.DisplayName = "MessagingServiceHost";
  serviceInstaller.Description = "WCF service host for the
Messaging.MessagingService.";
  serviceInstaller.ServiceName = "MessagingServiceHost";
  serviceInstaller.StartType = ServiceStartMode.Automatic;

  Installers.Add(processInstaller);
  Installers.Add(serviceInstaller);
}
Compile
MessagingServiceHostin preparation for installation.Now that the Windows service host is complete, you can install and run the service. Open the Visual Studio command prompt and type the following instruction to install
MessagingServiceHost:installutil.exe <YourLearningWCFPath>\Labs\Chapter4\WindowsServiceHost\MessagingServiceHost\bin\ Debug\MessagingServiceHost.exe
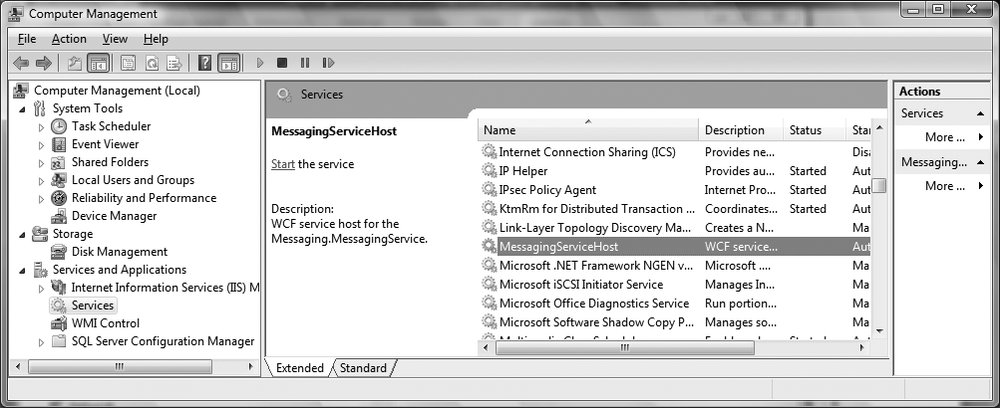
To verify that the Windows service was properly installed, and to start the service, open the Service Control Manager. From the Control Panel, navigate to Administrative Tools and open the Computer Management console (see Figure 4-11). Select âServices and Applicationsâ â Services, scroll down the list of services, and find the
MessagingServiceHostentry. Right-click the entry and select Start. In the Status column, you should see the service is started.
Warning
If an exception occurs during process of initializing the ServiceHost, such as a configuration error, the Windows service will not
start. To find out the cause of the problem, use the Event Viewer to review the
application logs.
Now that the Windows service is running, which means the ServiceHost has been initialized, you can generate a proxy for the client
application.
The Add Service Reference dialog supports only HTTP endpoints for metadata exchange, which is what you have used from Chapter 1 until now for proxy generation. Metadata exchange endpoints can also be exposed over TCP and named pipes using
MexTcpBindingandMexNamedPipeBinding. Since the Windows service is exposing a TCP endpoint only for metadata exchange, use the Visual Studio command prompt to generate the client proxy. Type this command into the command prompt:svcutil.exe /d:<YourLearningWCFPath>\Labs\Chapter4\WindowsServiceHost\Client / config:app.config /o:serviceproxy.cs net.tcp://localhost:9100/
Return to Visual Studio and add the newly generated app.config and serviceproxy.cs files to the
Clientproject. You must also add a reference to theSystem.ServiceModelassembly.Add code to the client to invoke
MessagingService. Open Form1.cs in design view and double-click the button to generate a Click event handler. Add the following bold code to the event handler:private void button1_Click(object sender, EventArgs e) {MessagingServiceClient proxy = new MessagingServiceClient( );MessageBox.Show(proxy.SendMessage(string.Format("Hello from {0}", this.Text)));}Run the client application to test the service. Click the Call Service button to verify that no exceptions occur.
When hosting WCF services in a Windows service application, at a minimum, you will
initialize the ServiceHost in the OnStart( ) override and close the ServiceHost in the OnStop( ) override, as
illustrated in the lab.
Warning
Failure to properly close the ServiceHost
instance can result in problematic delays freeing ports used by the service.
Example 4-21 shows the same
MessagingServiceHost as you completed in the lab with
the following added functionality:
A handler is provided for the
Faultedevent of theServiceHostto add an error entry to the event log for administrators.An information entry is written to the event log entry to inform administrators of the base addresses and ports that the
ServiceHostis listening on once opened.Another information entry is written when the
ServiceHostis closed.
Example 4-21. MessagingServiceHost with additional functionality
public partial class MessagingServiceHost : ServiceBase
{
  ServiceHost m_serviceHost;
  public MessagingServiceHost( )
  {
    InitializeComponent( );
    this.ServiceName = "MessagingServiceHost";
  }

  protected override void OnStart(string[] args)
  {
    m_serviceHost = new ServiceHost(typeof(Messaging.MessagingService));
    m_serviceHost.Open( );
    m_serviceHost.Faulted += new EventHandler(m_serviceHost_Faulted);

    string baseAddresses = "";

    foreach (Uri address in m_serviceHost.BaseAddresses)
    {
      baseAddresses += " " + address.AbsoluteUri;
    }
    string s = String.Format("{0} listening at {1}", this.ServiceName,
baseAddresses);
    this.EventLog.WriteEntry(s, EventLogEntryType.Information);
  }

  void m_serviceHost_Faulted(object sender, EventArgs e)
  {
    string s = String.Format("{0} has faulted, notify administrators of this
problem", this.ServiceName);
    this.EventLog.WriteEntry(s, EventLogEntryType.Error);
  }

  protected override void OnStop( )
  {
    if (m_serviceHost != null)
    {
      m_serviceHost.Close( );
      string s = String.Format("{0} stopped", this.ServiceName);
      this.EventLog.WriteEntry(s, EventLogEntryType.Information);
    }

    m_serviceHost = null;
  }
}
In theory, the service shouldnât stop unless something goes wrong, or an administrator explicitly stops it through the SCM. Fortunately, in the former case, the service can also be configured in the SCM to restart on failure as discussed earlierâa necessary feature for an unattended server machine.
Though the hosting code is much the same as in other self-host environments Iâve discussed, there are some special considerations for hosting WCF services in a Windows service:
For a Windows service,
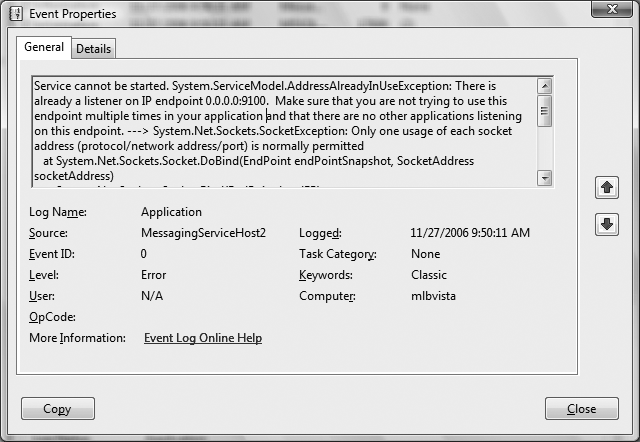
OnStart( )must execute within 30 seconds by default, or it will fail to start the service. If the startup code will take longer to execute, you can implement a timer to delegate longer-running initialization after startup is complete. Initializing yourServiceHostinstances should fall within the 30-second timeframe.OnStart( )will record exceptions in the event log. In the event a service will not start, you should look to the event log for information indicating the cause. Figure 4-12 shows the properties of an event log entry when a port conflict caused a problem opening theServiceHostduring theOnStart( )method.Uncaught exceptions after
OnStart( )may not be recorded unless you explicitly catch the exception and record it. For example, if you delegateServiceHostinitialization using a timer, be sure to catch exceptions thrown by theOpen( )function and log them for administrators to see.As with any hosting environment, the identity under which the Windows service runs will govern the Windows resources it has access to at runtime. You might not want to run your WCF services under the NETWORKSERVICE account, which means your deployment scripts will have to customize the account under which the service is configured to avoid hardcoding account information into the Windows service installer.
You can use Windows services to host WCF services on client and server machines. It is more common to host on server machines, simply because the extra deployment effort of installing a Windows service at the client may be undesirable. For server deployments, Windows services provide the most reliable way to host services over non-HTTP protocols when IIS 7.0 and the WAS are unavailable. Specifically, since Windows Server 2003 machines do not support WAS, the Windows service is the best choice for hosting services over named pipes, TCP, or MSMQ protocols. In particular, this would apply to scenarios such as intranet applications, or distributed services behind the firewall. Here are some scenarios that might warrant employing Windows services:
In a classic client-server deployment in which clients are part of a Windows domain and communicate with services on remote servers using TCP.
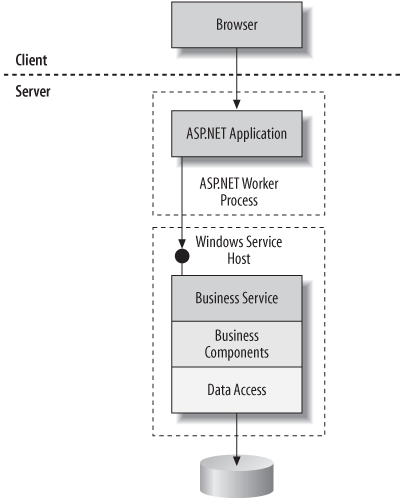
ASP.NET web applications typically do not store business functionality in page code. Business tier assemblies provide functionality that is consumed by each page according to functionality. In a service-oriented system, the page consumes business services, not business assemblies, which would mean calling across process and possibly machine boundaries for distribution or security reasons (more on security boundaries in Chapter 7). Figure 4-13 illustrates this scenario.
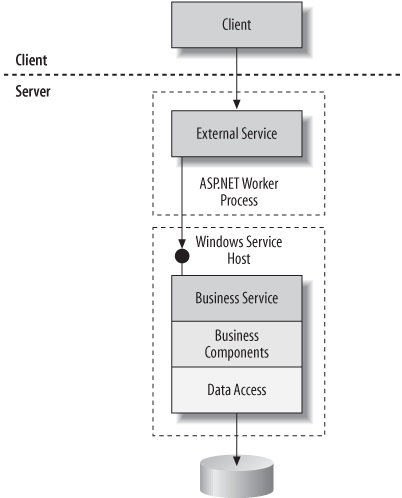
WCF services exposed over HTTP protocol are usually hosted in the ASP.NET worker process through IIS on Windows Server 2003 machines. The ASP.NET worker process usually doesnât have rights to talk to protected Windows resources such as databases, thus another tier of services may be necessary to create a trusted subsystem model. Figure 4-14 illustrates this scenario.
In general, any Windows 2003 server exposing WCF services over non-HTTP protocols will find Windows services the only viable option to ensure automatic startup and restarts on failure.
Server machines for these deployments are typically unattended, and Windows services would be configured to start on machine boot and restart on the first two failures (after the third failure you might notify administrators). In addition, Windows services will run with an identity that is granted access to the server resources it uses. For communication to services on the same machine, named pipes protocol would be used, while TCP protocol is used for cross-machine calls. MSMQ may also be employed for one-way reliable messaging.
Get Learning WCF now with the O’Reilly learning platform.
O’Reilly members experience books, live events, courses curated by job role, and more from O’Reilly and nearly 200 top publishers.

