Chapter 4. Modeling a System’s Logical Structure: Introducing Classes and Class Diagrams
Classes are at the heart of any object-oriented system; therefore, it follows that the most popular UML diagram is the class diagram. A system’s structure is made up of a collection of pieces often referred to as objects. Classes describe the different types of objects that your system can have, and class diagrams show these classes and their relationships. Class relationships are covered in Chapter 5.
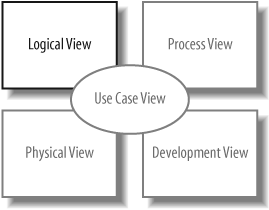
Use cases describe the behavior of your system as a set of concerns. Classes describe the different types of objects that are needed within your system to meet those concerns. Classes form part of your model’s logical view, as shown in Figure 4-1.
What Is a Class?
Like any new concept, when first coming to grips with what classes are, it’s usually helpful to start with an analogy. The analogy we’ll use here is that of guitars, and my favorite guitar is the Burns Brian May Signature (BMS) guitar, shown in Figure 4-2.
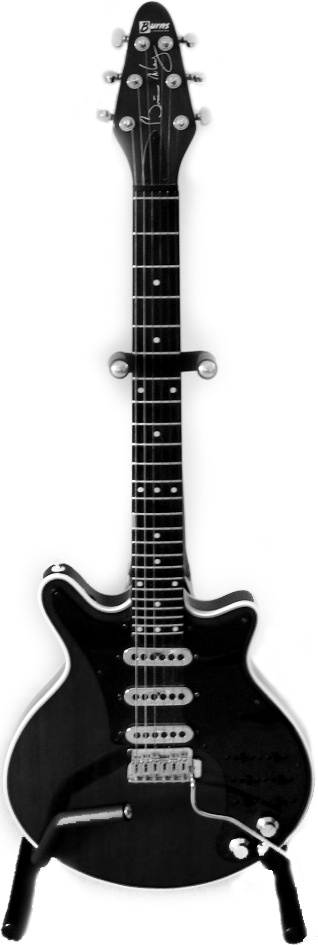
The guitar in Figure 4-2 is an example of an object. It has an identity: it’s the one I own. However, I’m not going to pretend that Burns made only one of this type of guitar and that it was just for me—I’m not that good a guitarist! Burns as a company will make hundreds of this type of guitar or, to put it another way, this class of guitar.
A class is a type of something. You can think of a class as being the blueprint out of which objects can be constructed, as shown in Figure 4-3.
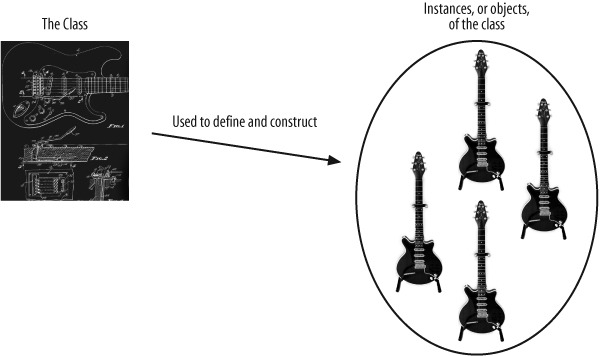
In this analogy, the BMS guitar that Burns manufactures is an example of a class of guitar. Burns know how to build this type of guitar from scratch based on its blueprints. Each guitar constructed from the class can be referred to as an instance or object of the class, and so my guitar in Figure 4-2 is an instance of the Burns BMS Guitar class.
At its simplest, a class’s description will include two pieces of information: the state information that objects of the class will contain and the behavior that they will support. This is what differentiates OO from other forms of system development. In OO, closely related state and behavior are combined into class definitions, which are then used as the blueprints from which objects can be created.
In the case of the Burns BMS Guitar class, the class’s state could include information about how many strings the guitar has and what condition the guitar is in. Those pieces of information are the class’s attributes
.
To complete the description, we need to know what the guitar can do. This includes behavior such as tuning and playing the guitar. A class’s behavior is described as the different operations that it supports.
Attributes and operations are the mainstays of a class’s description (see "Class State: Attributes“). Together, they enable a class to describe a group of parts within your system that share common characteristics such as state—represented by the class’s attributes—and behavior—represented by the class’s operations (see "Class Behavior: Operations" later in this chapter).
Abstraction
A class’s definition contains the details about that class that are important to you and the system you are modeling. For example, my BMS guitar might have a scratch on the back—or several—but if I am creating a class that will represent BMS guitars, do I need to add attributes that contain details about scratches? I might if the class were to be used in a repair shop; however, if the class were to be used only in the factory system, then scratches are one detail that I can hopefully ignore. Discarding irrelevant details within a given context is called abstraction.
Let’s have a look at an example of how a class’s abstraction changes depending on its context. If Burns were creating a model of its guitar production system, then it would probably be interested in creating a Burns BMS Guitar class that models how one is constructed, what materials are to be used, and how the guitar is to be tested. In contrast, if a Guitar World store were creating a model of its sales system, then the Burns BMS Guitar class might contain only relevant information, such as a serial number, price, and possibly any special handling instructions.
Getting the right level of abstraction for your model, or even just for a class, is often a real challenge. Focus on the information that your system needs to know rather than becoming bogged down with details that may be irrelevant to your system. You will then have a good starting point when designing your system’s classes.
Tip
Abstraction is key not only to class diagrams but to modeling in general. A model, by definition, is an abstraction of the system that it represents. The actual system is the real thing; the model contains only enough information to be an accurate representation of the actual system. In most cases, the model abstracts away details that are not important to the accuracy of the representation.
Encapsulation
Before we take a more detailed look at attributes, operations, and how classes can work together, it’s worth focusing on what is the most important characteristic of classes and object orientation: encapsulation .
According to the object-oriented approach to system development, for an object to be an object, it needs to contain both data—attributes—and the instructions that affect the data—operations. This is the big difference between object orientation and other approaches to system development: in OO, there is the concept of an object that contains, or encapsulates, both the data and the operations that work on that data.
Referring back to the guitar analogy, the Burns BMS Guitar class could encapsulate its strings, its body, its neck, and probably some neat electrics that no one should mess around with. These parts of the guitar are effectively its attributes, and some of the attributes, such as the strings, are accessible to the outside world and others, such as electrics, are hidden away. In addition to these attributes, the Burns BMS Guitar class will contain some operations that will allow the outside world to work with the guitar’s attributes. At a minimum, the guitar class should at least have an operation called play so that the guitar objects can be played, but other operations such as clean and possibly even serviceElectrics may also be encapsulated and offered by the class.
Encapsulation of operations and data within an object is probably the single most powerful and useful part of the object-oriented approach to system design. Encapsulation enables a class to hide the inner details of how it works from the outside world—like the electrics from the example guitar class—and only expose the operations and data that it chooses to make accessible.
Encapsulation is very important because with it, a class can change the way it works internally and as long as those internals are not visible to the rest of the system, those changes will have no effect on how the class is interacted with. This is a useful feature of the object-oriented approach because with the right classes, small changes to how those classes work internally shouldn’t cause your system to break.
Getting Started with Classes in UML
So far we’ve been looking at what a class is and how it enables the key benefits of the object-oriented approach of system development: abstraction and encapsulation. Now it’s time to take a look at how classes are represented in UML.
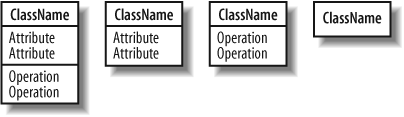
At its simplest, a class in UML is drawn as a rectangle split into up to three sections. The top section contains the name of the class, the middle section contains the attributes or information that the class contains, and the final section contains the operations that represent the behavior that the class exhibits. The attributes and operations sections are optional, as shown in Figure 4-4. If the attributes and operations sections are not shown, it does not necessarily imply that they are empty, just that the diagram is perhaps easier to understand with that information hidden.
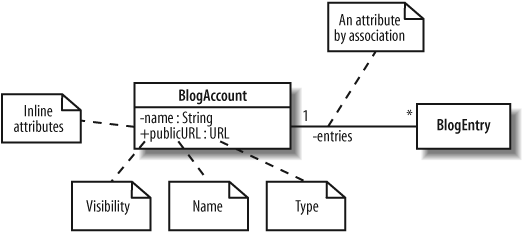
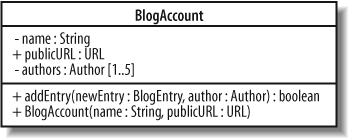
A class’s name establishes a type for the objects that will be instantiated based on it. Figure 4-5 shows a couple of classes from the CMS in Chapter 2: the BlogAccount class defines the information that the system will hold relating to each of the user’s accounts, and the BlogEntry class defines the information contained within an entry made by a user into her blog.

The interaction diagrams covered in Chapters 7 through 10 are used to show how class instances, or objects, work together when a system is running.
Visibility
How does a class selectively reveal its operations and data to other classes? By using visibility. Once visibility characteristics are applied, you can control access to attributes, operations, and even entire classes to effectively enforce encapsulation. See "Encapsulation" earlier in this chapter for more information on why encapsulation is such a useful aspect of object-oriented system design.
There are four different types of visibility that can be applied to the elements of a UML model, as shown in Figure 4-6. Typically these visibility characteristics will be used to control access to both attributes, operations, and sometimes even classes (see the "Packages" section in Chapter 13 for more information on class visibility).

Public Visibility
Starting with the most accessible of visibility characteristics, public visibility
is specified using the plus (+) symbol before the associated attribute or operation (see Figure 4-7). Declare an attribute or operation public if you want it to be accessible directly by any other class.
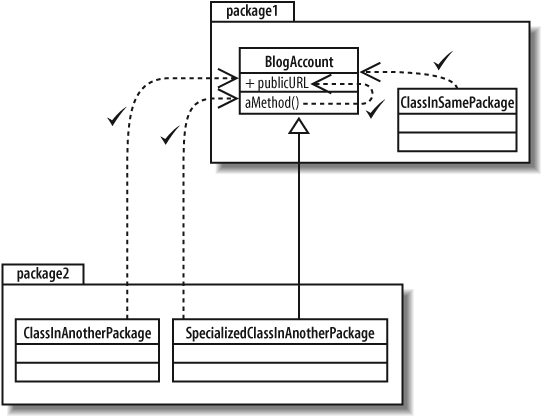
The collection of attributes and operations that are declared public on a class create that class’s public interface. The public interface of a class consists of the attributes and operations that can be accessed and used by other classes. This means the public interface is the part of your class that other classes will depend on the most. It is important that the public interface to your classes changes as little as possible to prevent unnecessary changes wherever your class is used.
Protected Visibility
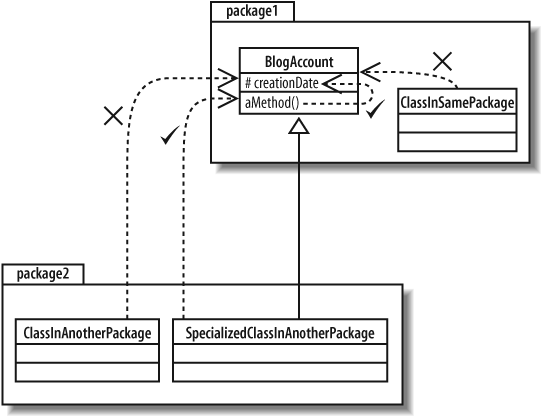
Protected attributes and operations are specified using the hash (#) symbol and are more visible to the rest of your system than private attributes and operations, but are less visible than public. Declared protected elements on classes can be accessed by methods that are part of your class and also by methods that are declared on any class that inherits from your class. Protected elements cannot be accessed by a class that does not inherit from your class whether it’s in the same package or not, as shown in Figure 4-8. See Chapter 5 for more information on inheritance relationships between classes.
Protected visibility is crucial if you want allow specialized classes to access an attribute or operation in the base class without opening that attribute or operation to the entire system. Using protected visibility is like saying, “This attribute or operation is useful inside my class and classes extending my class, but no one else should be using it.”
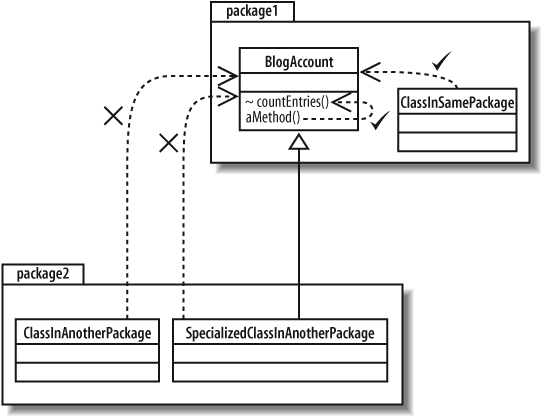
Package Visibility
Package visibility, specified with a tilde (~), when applied to attributes and operations, sits in between protected and private. As you’d expect, packages are the key factor in determining which classes can see an attribute or operation that is declared with package visibility
.
The rule is fairly simple: if you add an attribute or operation that is declared with package visibility to your class, then any class in the same package can directly access that attribute or operation, as shown in Figure 4-9. Classes outside the package cannot access protected attributes or operations even if it’s an inheriting class.In practice, package visibility is most useful when you want to declare a collection of methods and attributes across your classes that can only be used within your package.
For example, if you were designing a package of utility classes and wanted to reuse behavior between those classes, but not expose the rest of the system to that behavior, then you would declare package visibility to those particular operations internally to the package. Any functionality of utility classes that you wanted to expose to the rest of the application could then be declared with public visibility.
See “Package Diagrams” in Chapter 13 for more on how packages control visibility of elements such as classes.
Private Visibility
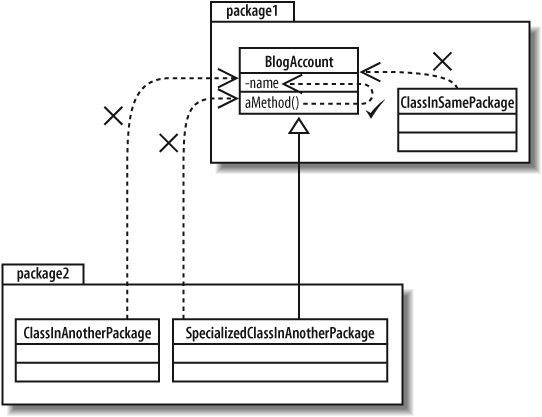
Last in line in the UML visibility scale is private visibility
. Private visibility is the most tightly constrained type of visibility classification, and it is shown by adding a minus (-) symbol before the attribute or operation. Only the class that contains the private element can see or work with the data stored in a private attribute or make a call to a private operation, as shown in Figure 4-10.
Private visibility is most useful if you have an attribute or operation that you want no other part of the system to depend on. This might be the case if you intend to change an attribute or operation at a later time but don’t want other classes with access to that element to be changed.
Tip
It’s a commonly accepted rule of thumb that attributes should always be private and only in extreme cases opened to direct access by using something more visible. The exception to this rule is when you need to share your class’s attribute with classes that inherit from your class. In this case, it is common to use protected. In well-designed OO systems, attributes are usually private or protected, but very rarely public.
Class State: Attributes
A class’s attributes are the pieces of information that represent the state of an object. These attributes can be represented on a class diagram either by placing them inside their section of the class box—known as inline attributes —or by association with another class, as shown in Figure 4-11. Associations are covered in more detail in Chapter 5.
It doesn’t matter if you are declaring an inline or associated attribute. At a minimum, your attribute will usually have a signature that contains a visibility property, a name, and a type, although the attribute’s name is the only part of its signature that absolutely must be present for the class to be valid.
Name and Type
An attribute’s name can be any set of characters, but no two attributes in the same class can have the same name. The type of
attribute can vary depending on how the class will be implemented in your system but it is usually either a class, such as String, or a primitive type, such as an int in Java.
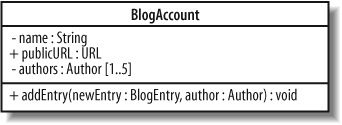
In Figure 4-11, the name attribute is declared as private (indicated by the minus (-) sign at the beginning of the signature) and after the colon, the type is specified as being of the class String. The associated entries attribute is also private, and because of that association, it represents a number of instances of the BlogEntry class.
If the BlogAccount class in Figure 4-11 was going to be implemented as a Java class in software, then the source code would look something like that shown in Example 4-1.
public class BlogAccount
{
   // The two inline attributes from Figure 4-11.
   private String name;
   private URL publicURL;

   // The single attribute by association, given the name 'entries'
   BlogEntries[] entries;

   // ...

}
It’s pretty clear how the two inline attributes are implemented in the BlogAccount Java class; the name attribute is just a Java String and the publicURL attribute is a Java URL object. The entries attribute is a bit more interesting since it is introduced by association. Associations and relationships between classes are covered in Chapter 5.
Multiplicity
Sometimes an attribute will represent more than one object. In fact, an attribute could represent any number of objects of its type; in software, this is like declaring that an attribute is an array. Multiplicity allows you to specify that an attribute actually represents a collection of objects, and it can be applied to both inline and attributes by association, as shown in Figure 4-12.

In Figure 4-12, the trackbacks, comments, and authors attributes all represent collections of objects. The * at the end of the trackbacks and comments attributes specifies that they could contain any number of objects of the Trackback and Comment class, respectively. The authors attribute is a little more constrained since it specifies that it contains between one and five authors.
The entries attribute that is introduced using an association between the BlogAccount class and the BlogEntry class has two multiplicity properties specified at either end of the association. A * at the BlogEntry class end of the association indicates that any number of BlogEntry objects will be stored in the entries attribute within the BlogAccount class. The 1 specified at the other end of the association indicates that each BlogEntry object in the entries attribute is associated with one and only one BlogAccount object.
Those with a keen eye will have also noticed that the trackbacks, comments, and entries attributes also have extra properties to describe in even more detail what the multiplicity on the attributes means. The trackbacks attribute represents any number of objects of the Trackback class, but it also has the unique multiplicity property applied to it. The unique property dictates that no two Trackback objects within the array should be the same. This is a reasonable constraint since we don’t want an entry in another blog cross-referencing one of our entries more than once; otherwise the list of trackbacks will get messy.
By default, all attributes with multiplicity are unique. This means that, as well as the trackbacks attribute in the BlogEntry class, no two objects in the authors attributes collection in the BlogAccount class should be the same because they are also declared unique. This makes sense since it specifies that a BlogAccount can have up to five different authors; however, it wouldn’t make sense to specify that the same author represents two of the possible five authors that work on a blog! If you want to specify that duplicates are allowed, then you need to use the not unique property, as used on the comments attribute in the BlogEntry class.
The final property that an attribute can have that is related to multiplicity is the ordered property. As well as not having to be unique, the objects represented by the comments attribute on the BlogEntry class need to be ordered. The ordered property is used in this case to indicate that each of the Comment objects is stored in a set order, most likely in order of addition to the BlogEntry. If you don’t care about the order in which objects are stored within an attribute that has multiplicity, then simply leave out the ordered property.
Attribute Properties
As well as visibility, a unique name, and a type, there is also a set of properties that can be applied to attributes to completely describe an attribute’s characteristics.
Although a complete description of the different types attribute properties is probably a bit beyond this book—also, some of the properties are rarely used in practice—it is worth looking at what is probably the most popular attribute property: the readOnly property.
Tip
Other properties supported by attributes in UML include union, subsets, redefines, and composite. For a neat description of all of the different properties that can be applied to attributes, check out UML 2.0 in a Nutshell (O’Reilly).
If an attribute has the readOnly property applied, as shown in Figure 4-13, then the value of the attribute cannot be changed once its initial value has been set.
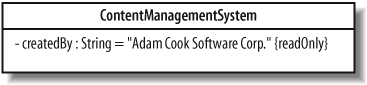
If the ContentManagementSystem class were to be implemented in Java source code, then the createdBy attribute would be translated into a final attribute, as shown in Example 4-2.
Inline Attributes Versus Attributes by Association
So, why confuse things with two ways of showing a class’s attributes? Consider the classes and associations shown in Figure 4-14.
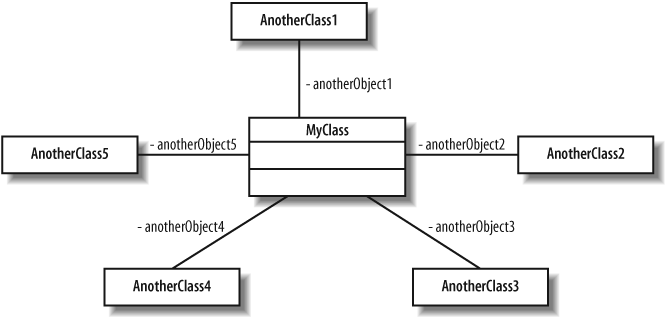
When attributes are shown as associations, as is the case in Figure 4-14, the diagram quickly becomes busy—and that’s just to show the associations, nevermind all of the other relationships that classes can have (see Chapter 5). The diagram is neater and easier to manage with more room for other information when the attributes are specified inline with the class box, as shown in Figure 4-15.
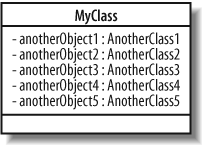
Choosing whether an attribute should be shown inline or as an association is really a question of what the focus of the diagram should be. Using inline attributes takes the spotlight away from the associations between MyClass and the other classes, but is a much more efficient use of space. Associations show relationships between classes very clearly on a diagram but they can get in the way of other relationships, such as inheritance, that are more important for the purpose of a specific diagram.
Class Behavior: Operations
A class’s operations describe what a class can do but not necessarily how it is going to do it. An operation is more like a promise or a minimal contract that declares that a class will contain some behavior that does what the operation says it will do. The collection of all the operations that a class contains should totally encompass all of the behavior that the class contains, including all the work that maintains the class’s attributes and possibly some additional behavior that is closely associated with the class.
Operations in UML are specified on a class diagram with a signature that is at minimum made up of a visibility property, a name, a pair of parentheses in which any parameters that are needed for the operation to do its job can be supplied, and a return type, as shown in Figure 4-16.
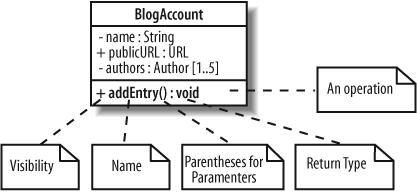
In Figure 4-16, the addEntry operation is declared as public; it does not require any parameters to be passed to it (yet), and it does not return any values. Although this is a perfectly valid operation in UML, it is not even close to being finished yet. The operation is supposed to add a new BlogEntry to a BlogAccount, but at the moment, there is no way of knowing what entry to actually add.
Parameters
Parameters are used to specify the information provided to an operation to allow it to complete its job. For example, the addEntry(..) operation needs to be supplied with the BlogEntry that is to be added to the account, as shown in Figure 4-17.
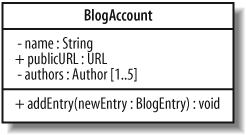
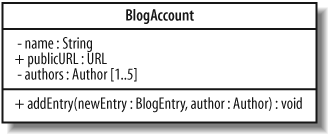
The newEntry parameter that is passed to the addEntry operation in Figure 4-17 shows a simple example of a parameter being passed to an operation. At a minimum, a parameter needs to have its type specified—in this case, BlogEntry class. More than one parameter can be passed to an operation by splitting the parameters with a comma, as shown in Figure 4-18. For more information on all the nuances of parameter notation, see UML 2.0 in a Nutshell (O’Reilly).
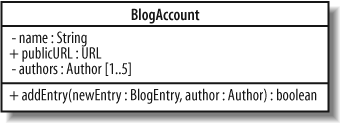
Return Types
As well as a name and parameters, an operation’s signature also contains a return type. A return type is specified after a colon at the end of an operation’s signature and specifies the type of object that will be returned by the operation, as shown in Figure 4-19.
There is one exception where you don’t need to specify a return type: when you are declaring a class’s constructor. A constructor creates and returns a new instance of the class that it is specified in, therefore, it does not need to explicitly declare any return type, as shown in Figure 4-20.
Static Parts of Your Classes
To finish off this introduction to the fundamentals of class diagrams, let’s take a look at one of the most confusing characteristics of classes: when a class operation or attribute is static .
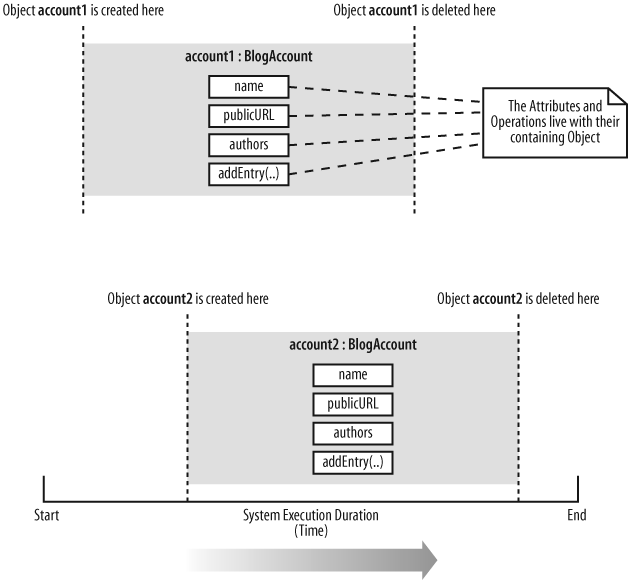
In UML, operations, attributes, and even classes themselves can be declared static. To help us understand what static means, we need to look at the lifetime of regular non-static class members. First, lets take another look at the BlogAccount class from earlier on in this chapter, shown in Figure 4-21.
Because each of the attributes and operations on the BlogAccount class are non-static, they are associated with instances, or objects, of the class. This means that each object of the BlogAccount class will get their own copy of the attributes and operations, as shown in Figure 4-22.
Sometimes you want all of the objects in a particular class to share the same copy of an attribute or operation. When this happens, a class’s attributes and operations are associated with the class itself and have a lifetime beyond that of the any objects that are instantiated from the class. This is where static attributes and operations become useful.
For example (and let’s ignore the possibility of multiple classloaders for now), if we wanted to keep a count of all the BlogAccount objects currently alive in the system, then this counter would be a good candidate for being a static class attribute. Rather than the counter attribute being associated with any one object, it is associated with the BlogAccount class and is therefore a static attribute, as shown in Figure 4-23.
The accountCounter attribute needs to be incremented every time a new BlogAccount is created. The accountCounter attribute is declared static because the same copy needs to be shared between all of the instances of the BlogAccount class. The instances can increment it when they are created and decrement it when they are destroyed, as shown in Figure 4-24.
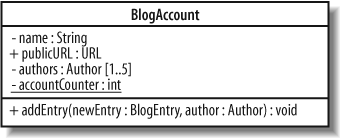
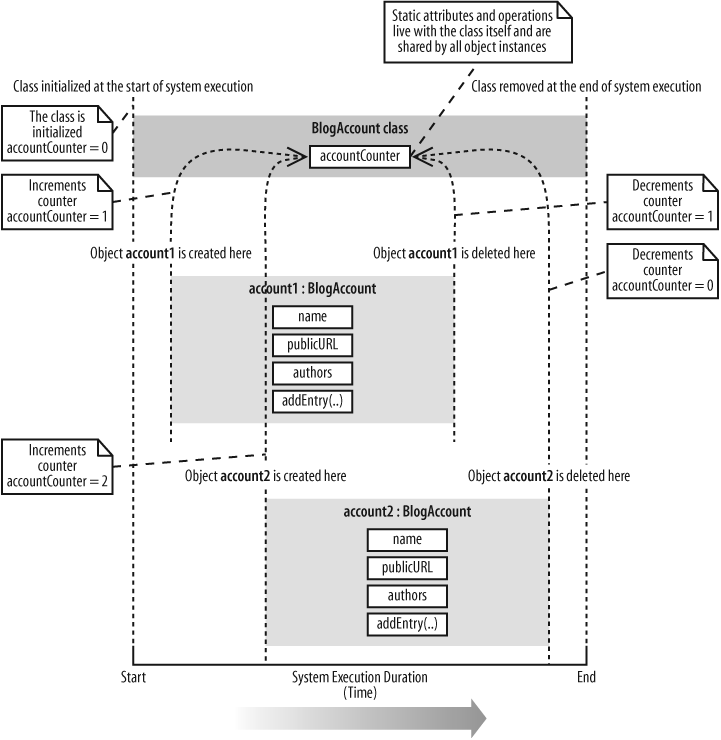
If the accountCounter attribute were not static, then every BlogAccount instance would get its own copy of the accountCounter attribute. This would not be very useful at all since each BlogAccount object would update only its own copy of accountCounter rather than contributing to a master object instance counter—in fact, if accountCounter were not static, then every object would simply increment its own copy to 1 and then decrement it to 0 when it is destroyed, which is not very useful at all!
What’s Next
This chapter has given you only a first glimpse of all that is possible with class diagrams. Classes can be related to one another, and there are even advanced forms of classes, such as templates, that can make your system’s design even more effective. Class relationships, abstract classes, and class templates are all covered in Chapter 5.
Class diagrams show the types of objects in your system; a useful next step is to look at object diagrams because they show how classes come alive at runtime as object instances, which is useful if you want to show runtime configurations. Object diagrams are covered in Chapter 6.
Composite structures are a diagram type that loosely shows context-sensitive class diagrams and patterns in your software. Composite structures are described in Chapter 11.
After you’ve decided the responsibilities of the classes in your system, it’s common to then create sequence and communication diagrams to show interactions between the parts. Sequence diagrams can be found in Chapter 7. Communication diagrams are covered in Chapter 8.
It’s also common to step back and organize your classes into packages. Package diagrams allow you to view dependencies at a higher level, helping you understand the stability of your software. Package diagrams are described in Chapter 13.
Get Learning UML 2.0 now with the O’Reilly learning platform.
O’Reilly members experience books, live events, courses curated by job role, and more from O’Reilly and nearly 200 top publishers.

