Retrieving Submitted Data
Example 11-1 is only one part of the multipart form handling process. If you enter a name and click on the Submit Query button, absolutely nothing will happen other than the form being redisplayed. So now it’s time to add some PHP code to process the data submitted by the form.
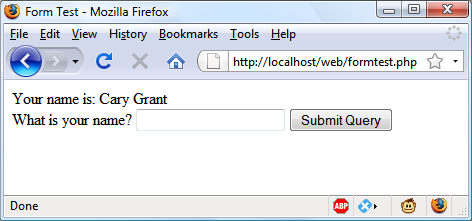
Example 11-2 expands on the previous program to include data processing. Type it in, or modify formtest.php by adding in the new lines, save it as formtest2.php, and try the program for yourself. The result of running this program and entering a name can be seen in Figure 11-2.
<?php // formtest2.php
if (isset($_POST['name'])) $name = $_POST['name'];
else $name = "(Not entered)";

echo <<<_END
<html>
    <head>
        <title>Form Test</title>
    </head>
    <body>
    Your name is: $name<br />
    <form method="post" action="formtest2.php">
        What is your name?
        <input type="text" name="name" />
        <input type="submit" />
    </form>
    </body>
</html>
_END;
?>
The only changes are a couple of lines at the start that check the
$_POST associative array for the
field name having been submitted. The previous
chapter introduced the $_POST
associative array, which contains an element for each field in an HTML
form. In Example 11-2, the input
name used was name and the form method was post, so element name of the $_POST array contains the value ...
Get Learning PHP, MySQL, and JavaScript now with the O’Reilly learning platform.
O’Reilly members experience books, live events, courses curated by job role, and more from O’Reilly and nearly 200 top publishers.

