Well, now that
we have those concepts under
control, we can move on to some fun stuff.
HelloJava3 brings us a new graphical interface
component: the JButton.[9] We add a JButton component to our
application that changes the color of our text each time the button
is pressed. The draggable-message capability is still there, too. Our
new example is:
//file: HelloJava3.java
import java.awt.*;
import java.awt.event.*;
import javax.swing.*;
public class HelloJava3
extends JComponent
implements MouseMotionListener, ActionListener {
// Coordinates for the message
int messageX = 125, messageY = 95;
String theMessage;
JButton theButton;
// Current index into someColors
int colorIndex;
static Color[] someColors = { Color.black, Color.red,
Color.green, Color.blue, Color.magenta };
public HelloJava3(String message) {
theMessage = message;
theButton = new JButton("Change Color");
setLayout(new FlowLayout( ));
add(theButton);
theButton.addActionListener(this);
addMouseMotionListener(this);
}
public void paintComponent(Graphics g) {
g.drawString(theMessage, messageX, messageY);
}
public void mouseDragged(MouseEvent e) {
// Save the mouse coordinates and paint the message.
messageX = e.getX( );
messageY = e.getY( );
repaint( );
}
public void mouseMoved(MouseEvent e) {}
public void actionPerformed(ActionEvent e) {
// Did somebody push our button?
if (e.getSource( ) == theButton)
changeColor( );
}
synchronized private void changeColor( ) {
// Change the index to the next color.
if (++colorIndex == someColors.length)
colorIndex = 0;
setForeground(currentColor( )); // Use the new color.
repaint( ); // Paint again so we can see the change.
}
synchronized private Color currentColor( ) {
return someColors[colorIndex];
}
public static void main(String[] args) {
JFrame f = new JFrame("HelloJava3");
// Make the application exit when the window is closed.
f.addWindowListener(new WindowAdapter( ) {
public void windowClosing(WindowEvent we) { System.exit(0); }
});
f.setSize(300, 300);
f.getContentPane( ).add(new HelloJava3("Hello, Java!"));
f.setVisible(true);
}
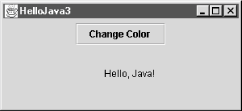
}Create HelloJava3 in the same way as the other
applications. Run the example, and you should see the display shown
in Figure 2.5. Drag the text. Each time you
press the button the color should change. Call your friends! They
should be duly impressed.
So what have we added this time? Well, for starters we have a new variable:
JButton theButton;
The theButton variable is of type
JButton and is going to hold an instance of the
javax.swing.JButton class. The
JButton class, as you might expect, represents a
graphical button, like other buttons in
your windowing system.
Three additional lines in the constructor create the button and display it:
theButton = new JButton("Change Color");
setLayout(new FlowLayout( ));
add(theButton);
In the first line, the new
keyword creates an instance of the JButton class.
Recall that the variable we have declared is just an empty reference
and doesn’t yet point to a real object—in this case, an
instance of the JButton class. This is a
fundamental and important concept. The new
operator provides the general mechanism for
instantiating objects.
It’s the feature of the Java language that creates a new
instance of a specified class. It arranges for Java to allocate
storage for the object and then calls the constructor method of the
object’s class to initialize it.
JButton
has more than one constructor. A class can have multiple
constructors, each taking different parameters and presumably using
them to do different kinds of setup. When there are multiple
constructors for a class, Java chooses the correct one based on the
types of arguments that are passed to it. We call the
JButton constructor and pass it a
String argument, so Java locates the constructor
method of the JButton class that takes a single
String argument and uses it to set up the object.
This is called method overloading. All methods
in Java, not just constructors, can be overloaded; this is one aspect
of the object-oriented programming principle of
polymorphism
.
Overloaded constructors generally provide a convenient way to
initialize a new object. The JButton constructor
we’ve used sets the text of the button as it is created:
theButton = new JButton("Change Color");This is shorthand for creating the button and setting its label, like this:
theButton = new JButton( );
theButton.setText("Change Color");
We’ve told you how to
create a new object with the
new operator, but we haven’t said anything
about how to get rid of an object when you are done with it. If you
are a C programmer, you’re probably wondering why not. The
reason is that you don’t have to do anything to get rid of
objects when you are done with them.
The Java runtime system uses a garbage collection mechanism to deal with objects no longer in use. The garbage collector sweeps up objects not referenced by any variables and removes them from memory. Garbage collection is one of the most important features of Java. It frees you from the error-prone task of having to worry about details of memory allocation and deallocation.
We have
used the terms "component” and
"container” somewhat loosely to
describe graphical elements of Java applications. But these terms are
the names of actual classes in the java.awt
package.
Component is a base class from which all of
Java’s GUI components are derived. It contains variables that
represent the location, shape, general appearance, and status of the
object, as well as methods for basic painting and event handling.
javax.swing.JComponent extends the fundamental
Component
class for the Swing toolkit. The
paintComponent( ) method we have been using in our
example is inherited from the JComponent class.
HelloJava3 is a kind of
JComponent and inherits all of its public members,
just as other (perhaps simpler) types of GUI components do.
The JButton class is also derived from
JComponent
and therefore shares this functionality.
This means that the developer of the JButton class
had methods like paintComponent( ) available with
which to implement the behavior of the JButton
object, just as we did when creating our example. What’s
exciting is that we are perfectly free to further subclass components
like JButton and override their behavior to create
our own special types of user-interface components.
JButton and HelloJava3 are, in
this respect, equivalent types of things.
The Container class
is an extended type of Component that maintains a
list of child components and helps to group them. The
Container causes its children to be displayed and
arranges them on the screen according to a particular layout
strategy. A Container also commonly arranges to
receive events related
to its child components. This strategy gives us a great deal of
flexibility in managing interface components. We implement the
strategy here by having JButton’s container,
HelloJava3, deal with the button’s events.
(Alternatively, we could create a smart button that handles its own
clicks, by subclassing the JButton class and
overriding certain methods to deal with the action of being pressed.)
Remember that a Container is a
Component, too. It can be placed alongside other
Component objects in other
Containers, in a hierarchical fashion, as shown in
Figure 2.6. Our HelloJava3
class is a kind of Container and can therefore
hold and manage other Java components and containers like buttons,
sliders, text fields, and panels.

In Figure 2.6, the italicized items are
Components, and the bold items are
Containers. The keypad is implemented as a
container object that manages a number of keys. The keypad itself is
contained in the GizmoTool container object.
Since JComponent descends from
Container, it can be both a component and a
container. In fact, we’ve already used it in this capacity in
the HelloJava3 example. It does its own drawing
and handles events, just like any component. But it also contains a
button, just like any container.
Having created a JButton object, we need to place
it in the container
(HelloJava3
), but
where? An object called a
LayoutManager
determines the location within the
HelloJava3 container at which to display the
JButton. A LayoutManager object
embodies a particular scheme for arranging components on the screen
and adjusting their sizes. You’ll learn more about layout
managers in Chapter 16. There are several standard
layout managers to choose from, and we can, of course, create new
ones. In our case, we specify one of the standard managers, a
FlowLayout
. The
net result is that the button is centered at the top of the
HelloJava3 container:
setLayout(new FlowLayout( ));
To add the button to the layout, we invoke the add( )
method that
HelloJava3 inherits from
Container, passing the JButton
object as a parameter:
add(theButton);
add( ) is a method inherited by our class from the
Container class. It appends our
JButton to the list of components that the
HelloJava3 container manages. Thereafter,
HelloJava3 is responsible for the
JButton: it causes the button to be displayed and
it determines where in its window the button should be placed.
If you look up the add( ) method of the Container class,
you’ll see that it takes a Component object
as an argument. But in our example we’ve given it a
JButton object. What’s going on?
JButton is a subclass, indirectly, of the
Component class (eventually). Because a subclass
is a kind of its superclass and has, at minimum, the same public
methods and variables, we can use an instance of a subclass anywhere
we use an instance of its superclass. This is a very important
concept, and it’s a second aspect of the
object-oriented principle of polymorphism.
JButton is a kind of Component,
so any method that expects a Component as an
argument will accept a JButton.
Now that we have a
JButton, we need some way to communicate with it:
that is, to get the events it generates. We could just listen for
mouse clicks within the button and act accordingly. But that would
require customization, via subclassing of the
JButton; we would be giving up the advantages of
using a prebuilt component. Instead, we have the
HelloJava3 container object listen for button
clicks. A JButton generates a special kind of
event called an ActionEvent when someone clicks on
it with the mouse. To receive these events, we have added another
method to the HelloJava3 class:
public void actionPerformed(ActionEvent e) {
  if (e.getSource( ) == theButton)
    changeColor( );
}
If you understood the previous example, you shouldn’t be
surprised to see that HelloJava3 now declares that
it implements the
ActionListener
interface, in addition to
MouseMotionListener
. ActionListener
requires us to implement an actionPerformed( )
method, which is called whenever an ActionEvent
occurs. You also shouldn’t be surprised to see that we added a
line to the HelloJava3 constructor, registering
itself (this) as a listener for the button’s
action events:
theButton.addActionListener(this);
The actionPerformed( ) method takes care of any action events that arise. First,
it checks to make sure that the event’s source (the component
generating the event) is what we think it should be:
theButton, the only button we’ve put in the
application. This may seem superfluous; after all, what else could
possibly generate an action event? In this application, nothing. But
it’s a good idea to check, because another application may have
several buttons, and you may need to figure out which one has been
clicked. Or you may add a second button to this application later,
and you don’t want it to break something. To check this, we
call the
getSource( ) method of the
ActionEvent object,
e. Then we use
the
== operator to make sure that the
event source matches theButton.
Note
In Java, == is a test for identity, not equality; it is true if the event source and theButton are the same object. The distinction between equality and identity is important. We would consider two String objects to be equal if they have the same characters in the same sequence. However, they might not be the same object. In Chapter 7, we’ll look at the equals( ) method, which tests for equality. Once we establish that the event e comes from the right button, we call our changeColor( ) method, and we’re finished.
You may be wondering why we don’t have to change
mouseDragged( ) now that we have a
JButton in our application. The rationale is that
the coordinates of the event are all that matter for this method. We
are not particularly concerned if the event happens to fall within an
area of the screen occupied by another component. This means that you
can drag the text right through the JButton and
even lose it behind the JButton if you
aren’t careful: try it and see!
To support
HelloJava3’s colorful side, we have added a
couple of new variables and two helpful methods. We create and
initialize an array of Color objects representing
the colors through which we cycle when the button is pressed. We also
declare an integer variable that serves as an index for this array,
specifying the current color:
int colorIndex;
static Color[] someColors = { Color.black, Color.red,
    Color.green, Color.blue, Color.magenta };
A number of things are going on here. First let’s look at the
Color objects we are putting into the array.
Instances of the java.awt.Color class represent
colors; they are used by all classes in the
java.awt package that deal with color graphics.
Notice that we are referencing variables such as
Color.black and Color.red .
These look like normal examples of an object’s instance
variables; however, Color is not an object,
it’s a class. What is the meaning of this?
A class can contain variables and methods that are shared among all instances of the class. These shared members are called static variables and static methods. The most common use of static variables in a class is to hold predefined constants or unchanging objects, which all of the instances can use.
There are two advantages to this approach. The more obvious advantage
is that static members take up space only in the class;
the members are not replicated in each instance. The second advantage
is that static members can be accessed even if no instances of the
class exist. In this example, we use the static variable
Color.red , without having to create an instance
of the Color class.
An
instance of the Color class represents a visible
color. For convenience, the Color class contains
some static, predefined objects with friendly names like
green, red , and (our favorite)
magenta. The variable green,
for example, is a static member in the Color
class. The data type of the variable green is
Color; it is initialized like this:
public final static Color green = new Color(0, 255, 0);
The green variable and the other static members of
Color are not changeable (after they’ve been
initialized), so they are effectively constants and can be optimized
as such by the compiler. Constant (or final)
static members are the closest thing to a #define
construct that you’ll find in Java. The alternative to using
these predefined colors is to create a color manually by specifying
its red, green, and blue (RGB) components
using a Color class constructor.
Next, we turn our
attention to the array. We have declared a variable called
someColors, which is an array of
Color objects. In Java, arrays are first-class
objects. This means that an array is, itself, a type of object that
knows how to hold an indexed list of some other type of object.
An array is
indexed by integers; when you index an array, the resulting value is
an object reference—that is, a reference to the object that is
located in the array’s specified slot. Our code uses the
colorIndex variable to index
someColors. It’s also possible to have an
array of simple primitive types, such as floats,
rather than objects.
When
we declare an array, we can initialize it by using the familiar
C-like curly brace construct. Specifying a comma-separated list of
elements inside of curly braces is a convenience that instructs the
compiler to create an instance of the array with those elements and
assign it to our variable. Alternatively, we could have just declared
our someColors variable and, later, allocated an
array object for it and assigned individual elements to that
array’s slots. See Chapter 5 for a complete
discussion of arrays.
So, we
now have an array of Color objects and a variable
with which to index the array. Two private
methods do the actual work for us. The
private modifier on these methods specifies that
they can be called only by other methods in the same instance of the
class. They cannot be accessed outside of the object that contains
them. We declare members to be private to hide the
detailed inner workings of a class from the outside world. This is
called
encapsulation
and is another tenet of object-oriented
design, as well as good programming practice. Private methods are
also often created as helper functions for use solely in the class
implementation.
The first method, currentColor( )
, is simply a convenience routine that
returns the Color object representing the current
text color. It returns the Color object in the
someColors array at the index specified by our
colorIndex variable:
synchronized private Color currentColor( ) {
  return someColors[colorIndex];
}
We could just as readily have used the expression
someColors[colorIndex] everywhere we use
currentColor( ); however, creating methods to wrap
common tasks is another way of shielding ourselves from the details
of our class. In an alternative implementation, we might have
shuffled off details of all color-related code into a separate class.
We could have created a class that takes an array of colors in its
constructor and then provided two methods: one to ask for the current
color and one to cycle to the next color ( just some food for
thought).
The second method, changeColor( )
, is responsible for incrementing the
colorIndex variable to point to the next
Color in the array. changeColor( ) is called from our actionPerformed( )
method whenever the button is pressed:
synchronized private void changeColor( ) {
  if (++colorIndex == someColors.length)
    colorIndex = 0;
  setForeground(currentColor( ));
  repaint( );
}
We increment colorIndex and compare it to the
length of the someColors array. All array objects
have a variable called length that specifies the
number of elements in the array. If we have reached the end of the
array, we “wrap around to the beginning” by resetting the
index to zero. After changing the currently selected color, we do two
things. First, we call the component’s setForeground( ) method, which changes the color used to draw text in the
application. Then we call repaint( ) to cause the
component to be redrawn with the new color for the draggable message.
What is the
synchronized keyword that appears in front of our
currentColor( ) and changeColor( ) methods? Synchronization has to do with threads, which
we’ll examine in the next section. For now, all you need know
is that the synchronized keyword indicates these
two methods can never be running at the same time. They must always
run one after the other.
The reason is that in changeColor( ) we increment
colorIndex before testing its value. That means
that for some brief period of time while Java is running through our
code, colorIndex can have a value that is past the
end of our array. If our currentColor( ) method
happened to run at that same moment, we would see a runtime
“array out of bounds” error. There are, of course, ways
in which we could fudge around the problem in this case, but this
simple example is representative of more general synchronization
issues we need to address. In the next section, you’ll see that
Java makes dealing with these problems easy through language-level
synchronization
support.
[9] Why
isn’t it just called a Button?
Button is the name that was used in Java’s
original GUI toolkit, the Abstract Windowing Toolkit (AWT). AWT
had some significant shortcomings, so it was extended and essentially
replaced by Swing in Java 2. Since AWT
already took the reasonable names such as Button
and MenuBar, Swing user interface components have
names that are prefixed with “J”, like
JButton and JMenuBar.
Get Learning Java now with the O’Reilly learning platform.
O’Reilly members experience books, live events, courses curated by job role, and more from O’Reilly and nearly 200 top publishers.

