We’ll start with the simplest components: buttons and
labels. Frankly, there isn’t much to say about them. If you’ve seen one
button, you’ve seen them all, and you’ve already seen buttons in the
applications in Chapter 2 (HelloJava3 and HelloJava4). A button generates an ActionEvent when the user presses it. To receive
these events, your program registers an ActionListener, which must implement the
actionPerformed() method. The argument
passed to actionPerformed() is the
event itself.
There’s one more thing worth saying about buttons, which applies to
any component that generates an action event. Java lets us specify an
“action command” string for buttons (and other components, like menu
items, that can generate action events). The action command is less
interesting than it sounds. It is just a String that serves to identify the component
that sent the event. By default, the action command of a JButton is the same as
its label; it is included in action events so that you could use it to
figure out which button an event came from. However, you’ll often know
this from the context of your event listener.
To get the action command from an action event, call the event’s
getActionCommand()
method. The following code checks whether the user pressed the button
labeled Yes:
publicvoidactionPerformed(ActionEvente){if(e.getActionCommand().equals("Yes"){//the user pressed "Yes"; do something...}}
Yes is a string, not a command per se. You can
change the action command by calling the button’s setActionCommand()
method. The following code changes button myButton’s action command to “confirm:”
myButton.setActionCommand("confirm");
It’s a good idea to get used to setting action commands explicitly;
this helps to prevent your code from breaking when you or some other
developer internationalizes it or otherwise changes the button’s label. If
you rely on the button’s label, your code stops working as soon as that
label changes; a French user might see the label Oui rather than Yes.
Swing buttons can have an image in addition to a label. The JButton class includes constructors that accept
an Icon object, which knows how to draw
itself. You can create buttons with captions, images, or both. A handy
class called ImageIcon takes care of
loading an image for you and can be used to add an image to a button. The
following example shows how this works:
//file: PictureButton.javaimportjava.awt.*;importjava.awt.event.*;importjavax.swing.*;publicclassPictureButton{publicstaticvoidmain(String[]args){JFrameframe=newJFrame();Iconicon=newImageIcon("rhino.gif");JButtonbutton=newJButton(icon);button.addActionListener(newActionListener(){publicvoidactionPerformed(ActionEventae){System.out.println("Urp!");}});frame.getContentPane().add(button);frame.pack();frame.setDefaultCloseOperation(JFrame.EXIT_ON_CLOSE);frame.setVisible(true);}}
The example creates an ImageIcon
from the rhino.gif file. Then, a JButton is created from the ImageIcon. The whole thing is displayed in a
JFrame. This example also shows the
idiom of using an anonymous inner class as an ActionListener.
There’s even less to be said about JLabel components.
They’re just text strings or images housed in a component. There aren’t
any special events associated with labels; about all you can do is specify
the text’s alignment, which controls the position of the text within the
label’s display area. As with buttons, JLabels can be created with Icons if you want to create a picture label. The
following code creates some labels with different options:
// default alignment (CENTER)JLabellabel1=newJLabel("Lions");// left alignedJLabellabel2=newJLabel("Tigers",SwingConstants.LEFT);//label with no text, default alignmentJLabellabel3=newJLabel();// create image iconIconicon=newImageIcon("rhino.gif");// create image labelJLabellabel4=newJLabel(icon);// assigning text to label3label3.setText("and Bears");// set alignmentlabel3.setHorizontalAlignment(SwingConstants.RIGHT);
The alignment constants are defined in the SwingConstants interface.
We’ve built several labels using a variety of constructors and
several of the class’s methods. To display the labels, just add them to a
container by calling the container’s add() method.
You can set other label characteristics, such as changing their font
or color, using the methods of the Component class, JLabel’s distant ancestor. For example, you can
call setFont() and setBackground() on a label, as with any other
component.
Given that labels are so simple, why do we need them at all? Why not
find a way to draw a text string directly on the container object?
Remember that a JLabel is a JComponent. That means that labels have the
normal complement of methods for setting fonts and colors that we
mentioned earlier as well as the ability to be persistently and sensibly
managed by a layout manager. Therefore, they’re much more flexible than a
text string drawn procedurally at an arbitrary location within a
container. Speaking of layouts—if you use the setText() method to
change the text of your label, the label’s preferred size may change. But
the label’s container automatically lays out its components when this
happens so you don’t have to worry about it.
A neat feature of Swing is that it can interpret
HTML-formatted text in JLabel and
JButton labels. The following example
shows how to create a button with some HTML-formatted text:
JButtonbutton=newJButton("<html>"+"S<font size=-1>MALL<font size=+0> "+"C<font size=-1>APITALS");
Older versions of Java may not render complex HTML very well. But as of JDK 1.4, most basic HTML features are supported, including crazy things such as images and tables.
Figure 17-1 uses an HTML table to arrange its text.

Figure 17-2 uses an HTML image tag to display an image.
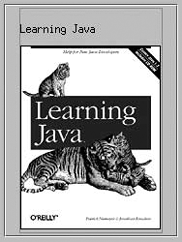
The code for the two figures looks like this:
Stringhtml="<html><table border=1>"+"<tr><td>One</td><td>Two</td></tr>"+"<tr><td>Three</td><td>Four</td></tr>"+"</table>";JButtonbutton=newJButton(html);Stringhtml2="<html><h3>Learning Java</h3>"+"<img src=\"http://www.oreilly.com/catalog/covers/learnjava3.s.gif\">";Jbuttonbutton2=newJButton(html2);
Get Learning Java, 4th Edition now with the O’Reilly learning platform.
O’Reilly members experience books, live events, courses curated by job role, and more from O’Reilly and nearly 200 top publishers.

