One of the truly novel things about Java is that security is built into the language. As described in Chapter 1, the Java VM can verify class files and Java’s security manager can impose limits on what classes do. In early versions of Java, it was necessary to implement security policies programmatically by writing a Java security manager class and using it in your application. Later, a declarative security system was added. This system allows you to write policy files—text-based descriptions of permissions—which are much simpler and don’t require code changes. These policy files tell the security manager what to allow and disallow and for whom.
In early versions of Java, much of the buzz had to do with the security of applets. Applets that were downloaded from untrusted locations could be run with security restrictions that prevented them from doing questionable things such as reading from or writing to the disk or contacting arbitrary computers on the network. With security policy files, it’s easy to apply applet-style security to any application without modifying it. Furthermore, it’s easy to fine-tune the access you grant. For example, you can allow an application to access only a specific directory on the disk, or you can allow network access to certain addresses.
Understanding security and security policies can be important, so we’ll cover it here. However, in practice, you probably won’t use this facility yourself, unless you are writing a framework for running applications from many unknown sources or need to restrict an application for some other reason.
By default, no security manager is installed when you launch a Java application locally. You can turn on security using an option of the java interpreter to install a default security manager. The default security policy enforces many of the same rules as for applets. To see how this works, let’s write a little program that does something questionable: it makes a network connection to some computer on the Internet. (We cover the specifics of network programming in Chapters 13 and 14.)
importjava.net.*;publicclassEvilEmpire{publicstaticvoidmain(String[]args)throwsException{try{Sockets=newSocket("207.46.131.13",80);System.out.println("Connected!");}catch(SecurityExceptione){System.out.println("SecurityException: could not connect.");}}}
If you run this program with the Java interpreter, it makes the network connection:
C:\>javaEvilEmpireConnected!
But because this program is “evil,” let’s install the default security manager, like this:
C:\>java-Djava.security.managerEvilEmpireSecurityException:couldnotconnect.
That’s better, but suppose that the application actually has a legitimate reason to make its network connection. We’d like to leave the default security manager in place, just to be safe, but we’d like to grant this application permission to make a network connection.
To permit our EvilEmpire example to make a network
connection, we need to create a policy file that
contains the appropriate permission. A handy utility called
policytool, included with the JDK, helps make
policy files. Fire it up from a command line like this:
C:\>policytool
You may get an error message when policytool starts up about not finding a default policy file. Don’t worry about this; just click OK to make the message go away.
We now add a network permission for the EvilEmpire application. The application is
identified by its origin, also called a codebase, described by a URL. In this
case, it is a file: URL that points
to the location of the EvilEmpire
application on your disk.
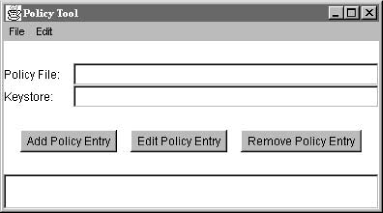
If you started up policytool, you should see its main window, shown in Figure 3-2. Click on Add Policy Entry. Another window pops up, like the one shown in Figure 3-3 (but with the fields empty).
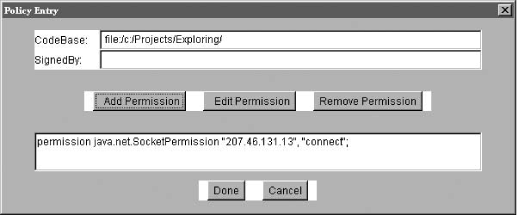
First, fill in the codebase with the URL of the directory
containing EvilEmpire. Then click on
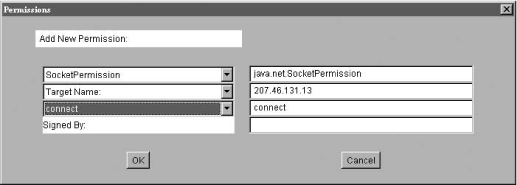
Add Permission. Yet another window pops up as shown
in Figure 3-4.
Choose SocketPermission from the first combo box. Then fill out
the second text field on the right side with the network address that
EvilEmpire will connect to. Finally,
choose Connect from the third combo box. Click on
OK; you should see the new permission in the policy
entry window, as shown in Figure 3-3.
Click on Done to finish creating the policy. Then choose Save As from the File menu and save the policy file as something memorable, such as EvilEmpire.policy. You can quit policytool now; we’re all done with it.
The policy file you just created is not complicated. Take a look at it with a text editor, which shows the simple syntax of the policy we created:
grantcodeBase"file:/c:/Projects/Exploring/"{permissionjava.net.SocketPermission"207.46.131.13","connect";};
You can eschew policytool entirely and just create policy files with a text editor if you’re more comfortable that way.
Now that we’ve gone to the trouble of creating a policy
file, let’s use it. You can tell the default security manager to use the
policy file with another command-line option to the java interpreter:
C:\>java-Djava.security.manager-Djava.security.policy=EvilEmpire.policyEvilEmpireConnected!
EvilEmpire can now make its
socket connection because we have explicitly granted it permission with
a policy file. The default security manager still protects us in other
ways, however. EvilEmpire cannot
write or read files on the disk except in the directory it came from,
and it cannot make connections to any other network addresses except the
one we specified. Take a moment and bask in this warm fuzzy
feeling.
Get Learning Java, 4th Edition now with the O’Reilly learning platform.
O’Reilly members experience books, live events, courses curated by job role, and more from O’Reilly and nearly 200 top publishers.

