The first time you run Eclipse, you’ll be prompted to select a workspace. This is a root directory to hold new projects that you create within Eclipse. The default location is inside the application’s folder itself, which is probably not what you want. Choose a location and click OK.
Eclipse greets you with the Welcome screen. Close this window by closing the Welcome tab within the application. If you want to come back later and go through the Eclipse tutorials and related help topics, you can return to this window by choosing Help → Welcome.
One last thing before we move on: Eclipse stores all of its configuration information in the configuration folder inside the Eclipse installation directory. If, at any point in this introduction, you feel that things are not right and you want to start from scratch, you can quit the application and remove this folder. You may also wish to remove your workspace items as they hold per-project state. Less drastically, if you wish to reset all of the application windows to their default locations, you can choose Window → Reset Perspective. We’ll talk more about perspectives later.
We are going to create a project to hold all our examples. Select
File → New → Java Project from the application menu and type
Learning Java in the “Project name”
field at the top of the dialog, as seen in Figure 2-1. Make sure the JRE version is set to
JavaSE-1.7 as seen in the figure and click Next at
the bottom.
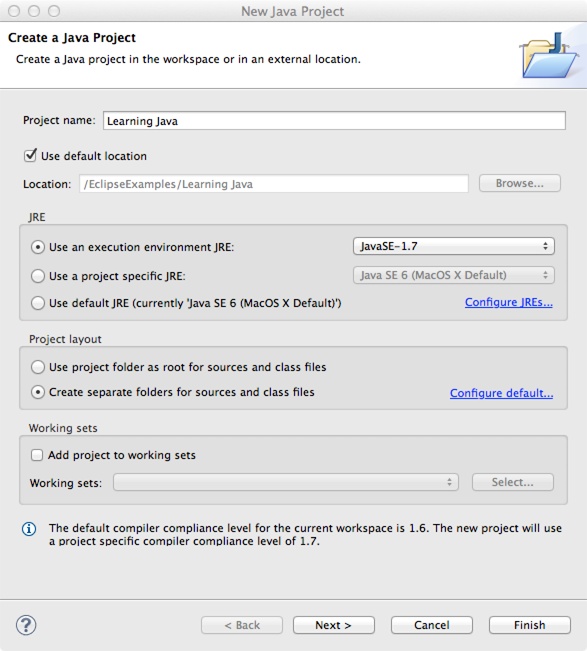
Next, you will need to set your build path to the Java 7 system library. Select the Libraries tab and remove the Java 1.6 library. Click Add Library and select JavaSE-1.7. Eclipse is now configured to use Java 7. Click Finish.
Let’s load the examples from this book. You can find a ZIP file containing all of the examples from this book nicely packaged as an Eclipse project at http://oreil.ly/Java_4E. The Eclipse version of the examples is called examples-eclipse.zip. (The file examples.zip holds the same examples but packaged slightly differently and without the Eclipse project files.)
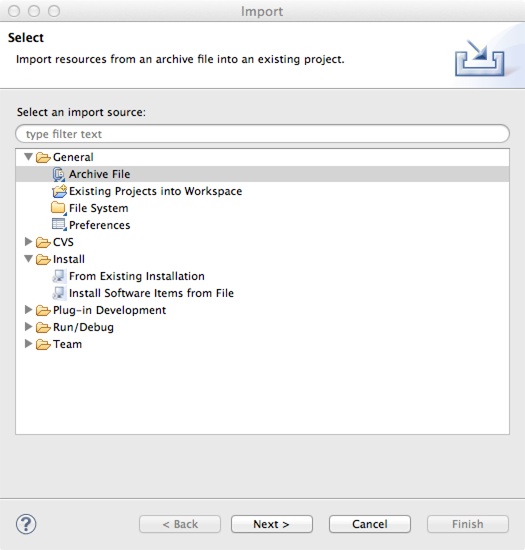
Next, we’ll import the examples ZIP file. Choose File → Import to open the Import wizard. Select Archive File as the source and click Next. See Figure 2-2.
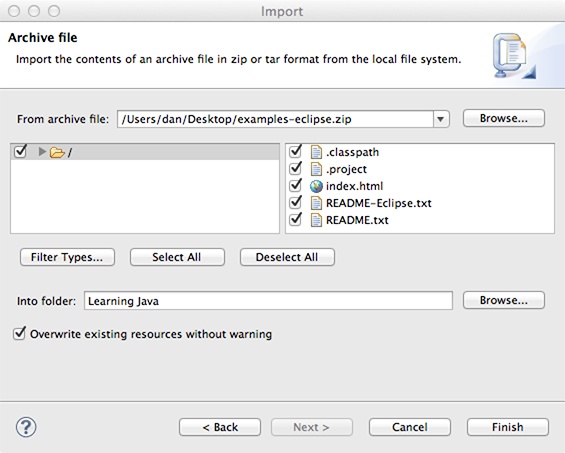
Click the Browse button and choose the examples-eclipse.zip file as seen in Figure 2-3. Check the “Overwrite existing resources without warning” button so that our Eclipse-specific project file will overwrite the empty one in your new project. Click Finish.
Eclipse will now import all of the files from the archive and immediately begin building the source in the background (a small progress bar at the bottom of the screen will show this). On the left is the Package Explorer. It shows a tree view of the Java packages, libraries, and resources of our project. Click the folder handles to expand the tree and see source folders for each chapter in the book. Now we are ready to start coding!
Get Learning Java, 4th Edition now with the O’Reilly learning platform.
O’Reilly members experience books, live events, courses curated by job role, and more from O’Reilly and nearly 200 top publishers.

